Owner's Manual
Page 5
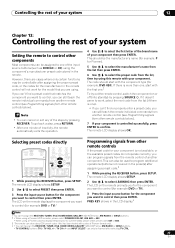
... 59 Using the MULTI-ZONE controls 60 Connecting an IR receiver 61 Switching components on and off using the 12 volt trigger 61 Using this receiver with a Pioneer plasma display . . . 62 Using the SR+ mode with a Pioneer plasma display. . . 63 Connecting a PC for Advanced...remote control presets 78 Confirming preset codes 78 Renaming input source names 79 Direct function 79 Multi Operation and System Off 79 Programming a multi-operation or a shutdown sequence 79 Using multi operations 80 Using System off 80 Controls for TVs 81 Controls for other components 81 Operating other Pioneer...
... 59 Using the MULTI-ZONE controls 60 Connecting an IR receiver 61 Switching components on and off using the 12 volt trigger 61 Using this receiver with a Pioneer plasma display . . . 62 Using the SR+ mode with a Pioneer plasma display. . . 63 Connecting a PC for Advanced...remote control presets 78 Confirming preset codes 78 Renaming input source names 79 Direct function 79 Multi Operation and System Off 79 Programming a multi-operation or a shutdown sequence 79 Using multi operations 80 Using System off 80 Controls for TVs 81 Controls for other components 81 Operating other Pioneer...
Owner's Manual
Page 26
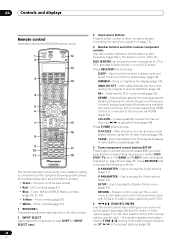
SURR SHIFT PHASE MCACC S.DIRECT 16 17 18 RECEIVER The remote has been conveniently color-coded according to access): • Green - Receiver controls (see Controlling the rest of a double cassette deck player. Other controls (page 81) 1 RECEIVER This switches between the three banks (classes) of radio station presets (...mode for the genre of the source currently being played back (this feature is available only when a Pioneer DVD recorder supporting HDMI Control is connected to this receiver. 2 INPUT SELECT Use to select the input source (use to return to the previous menu with ...
SURR SHIFT PHASE MCACC S.DIRECT 16 17 18 RECEIVER The remote has been conveniently color-coded according to access): • Green - Receiver controls (see Controlling the rest of a double cassette deck player. Other controls (page 81) 1 RECEIVER This switches between the three banks (classes) of radio station presets (...mode for the genre of the source currently being played back (this feature is available only when a Pioneer DVD recorder supporting HDMI Control is connected to this receiver. 2 INPUT SELECT Use to select the input source (use to return to the previous menu with ...
Owner's Manual
Page 27
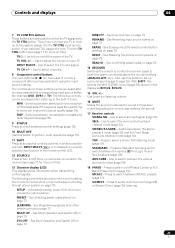
... See Multi Operation and System Off on page 79. See Renaming input source names on page 79. See Confirming preset codes on page 78. 14 RECEIVER Switches the remote to control the receiver (used to mono will improve the sound quality (page 34). Press for more on this ). 13 Character display ...(, , etc.) are used to switch between named station presets and radio frequencies (page 35). 9 STATUS Press to check selected receiver settings (page 75). 10 MULTI OPE Use this button to perform multi operations (page 79). 11 SHIFT Press to access the controls outlined in...
... See Multi Operation and System Off on page 79. See Renaming input source names on page 79. See Confirming preset codes on page 78. 14 RECEIVER Switches the remote to control the receiver (used to mono will improve the sound quality (page 34). Press for more on this ). 13 Character display ...(, , etc.) are used to switch between named station presets and radio frequencies (page 35). 9 STATUS Press to check selected receiver settings (page 75). 10 MULTI OPE Use this button to perform multi operations (page 79). 11 SHIFT Press to access the controls outlined in...
Owner's Manual
Page 77
... only), XM RADIO or SIRIUS buttons. 2 • When using a Pioneer HDD recorder, please select PIONEER DVR 487, 488, 489 or 493. • When using the component's manufacturer preset code stored in the presets) after assigning a preset code.3 1 While pressing the RECEIVER button, press SETUP. The remote LCD display shows SETUP. 2 Use / to select PRESET...
... only), XM RADIO or SIRIUS buttons. 2 • When using a Pioneer HDD recorder, please select PIONEER DVR 487, 488, 489 or 493. • When using the component's manufacturer preset code stored in the presets) after assigning a preset code.3 1 While pressing the RECEIVER button, press SETUP. The remote LCD display shows SETUP. 2 Use / to select PRESET...

Owner's Manual
Page 78
... to the factory default. 1 While pressing the RECEIVER button, press SETUP. RESET flashes in the remote control learning the wrong signal. 2 • Some commands from TVs or other devices will erase all preset remote control preset codes and programmed buttons. RECEIVER INPUT SELECT SYSTEM OFF SOURCE Resetting the remote control presets This will sometimes result in...
... to the factory default. 1 While pressing the RECEIVER button, press SETUP. RESET flashes in the remote control learning the wrong signal. 2 • Some commands from TVs or other devices will erase all preset remote control preset codes and programmed buttons. RECEIVER INPUT SELECT SYSTEM OFF SOURCE Resetting the remote control presets This will sometimes result in...
Owner's Manual
Page 79
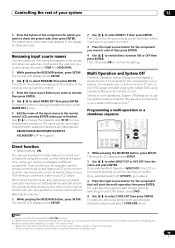
...and / to select RENAME then press ENTER. The LCD shows OK to select CODE EDT then press ENTER. For example, if you want to start the sequence by both the receiver and the remote control. To erase any component you select (using only two buttons on , any previously ...stored multi-operations (or shutdown sequences) select CODE ERS above . 5 Edit the name of the input source you want ...
...and / to select RENAME then press ENTER. The LCD shows OK to select CODE EDT then press ENTER. For example, if you want to start the sequence by both the receiver and the remote control. To erase any component you select (using only two buttons on , any previously ...stored multi-operations (or shutdown sequences) select CODE ERS above . 5 Edit the name of the input source you want ...

Owner's Manual
Page 80
...in the sequence then press ENTER. The command sequence you programmed will run, then all Pioneer components will return to switch on , or in standby. The following remote control commands can be selected: RECEIVER INPUT SELECT SYSTEM OFF SOURCE Using multi operations You can start multi operations with a multi ... whose command you want to switch on if it was in standby) and the programmed multi operation is done automatically. Using System off codes are sent. 80 En MULTI OP flashes in the sequence. CD DVD DVR2 DVR1 CD-R TV HOME MEDIA GALLERY i Pod XM RADIO...
...in the sequence then press ENTER. The command sequence you programmed will run, then all Pioneer components will return to switch on , or in standby. The following remote control commands can be selected: RECEIVER INPUT SELECT SYSTEM OFF SOURCE Using multi operations You can start multi operations with a multi ... whose command you want to switch on if it was in standby) and the programmed multi operation is done automatically. Using System off codes are sent. 80 En MULTI OP flashes in the sequence. CD DVD DVR2 DVR1 CD-R TV HOME MEDIA GALLERY i Pod XM RADIO...
Owner's Manual
Page 81
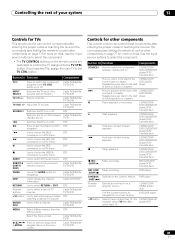
... on or off. Controlling the rest of your system 12 Controls for TVs This remote control can control these components after entering the proper codes or teaching the receiver the commands (see Setting the remote to the start of the CD/MD/CD-R/ next track or chapter. Button(s)...presses skips to the start player of previous tracks or chapters. Press to advance to control other components This remote control can control components after entering the proper codes or teaching the receiver the commands (see Setting the remote to the TV CTRL button on or off.
... on or off. Controlling the rest of your system 12 Controls for TVs This remote control can control these components after entering the proper codes or teaching the receiver the commands (see Setting the remote to the start of the CD/MD/CD-R/ next track or chapter. Button(s)...presses skips to the start player of previous tracks or chapters. Press to advance to control other components This remote control can control components after entering the proper codes or teaching the receiver the commands (see Setting the remote to the TV CTRL button on or off.

Owner's Manual
Page 87
... a malfunction. This is not properly processed. Re-enter the preset codes. be incorrect. The SR feature only works with the system remote. • The preset code may be • If the battery ran down, the preset codes may not contain 5.1/6.1 channel material. indicators light. indicators don't light... 2 PL II or Neo:6 indicator lights on the receiver. • Make sure that there is an analog or HDMI connection between the receiver and the remote control. • Make sure that the other Pioneer components with this receiver with the listening mode set to the right jack (...
... a malfunction. This is not properly processed. Re-enter the preset codes. be incorrect. The SR feature only works with the system remote. • The preset code may be • If the battery ran down, the preset codes may not contain 5.1/6.1 channel material. indicators light. indicators don't light... 2 PL II or Neo:6 indicator lights on the receiver. • Make sure that there is an analog or HDMI connection between the receiver and the remote control. • Make sure that the other Pioneer components with this receiver with the listening mode set to the right jack (...


