
Installation Manual
Page 1
AUDIO/VIDEO MULTI-CHANNEL RECEIVER VSX-D814 VSX-D914 Operating Instructions
AUDIO/VIDEO MULTI-CHANNEL RECEIVER VSX-D814 VSX-D914 Operating Instructions
Installation Manual
Page 2
... CAUTION: This product satisfies FCC regulations when shielded cables and connectors are designed to radio or television reception, which the receiver is encouraged to try to operate the equipment. D8-10-3a_En Manufactured under license from that interference will not occur in... service personnel. These limits are used in a safe place for help. If this Pioneer product. Reorient or relocate the receiving antenna. - Increase the separation between the equipment and receiver. - D8-10-1-2_En This Class B digital apparatus complies with electric appliances such as...
... CAUTION: This product satisfies FCC regulations when shielded cables and connectors are designed to radio or television reception, which the receiver is encouraged to try to operate the equipment. D8-10-3a_En Manufactured under license from that interference will not occur in... service personnel. These limits are used in a safe place for help. If this Pioneer product. Reorient or relocate the receiving antenna. - Increase the separation between the equipment and receiver. - D8-10-1-2_En This Class B digital apparatus complies with electric appliances such as...
Installation Manual
Page 4
...A and B speaker systems 22 Hints on speaker placement 22 Connecting additional amplifiers 24 AC outlet 25 Operating other Pioneer components . . . . 25 Using this receiver with a Pioneer plasma display 26 05 Controls and displays Front panel 27 Display 29 Remote control 31 06 Listening to your system... Playing other sources 40 Selecting the multi-channel analog inputs 41 Using the sleep timer 41 07 Setting up the receiver Choosing your receiver setup 42 Speaker setting 43 Surround back speaker setting 44 Subwoofer setting 44 Crossover frequency setting 44 LFE attenuator setting...
...A and B speaker systems 22 Hints on speaker placement 22 Connecting additional amplifiers 24 AC outlet 25 Operating other Pioneer components . . . . 25 Using this receiver with a Pioneer plasma display 26 05 Controls and displays Front panel 27 Display 29 Remote control 31 06 Listening to your system... Playing other sources 40 Selecting the multi-channel analog inputs 41 Using the sleep timer 41 07 Setting up the receiver Choosing your receiver setup 42 Speaker setting 43 Surround back speaker setting 44 Subwoofer setting 44 Crossover frequency setting 44 LFE attenuator setting...
Installation Manual
Page 6
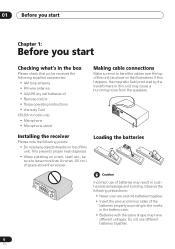
... unit may have different voltages. 01 Before you start Chapter 1: Before you start Checking what's in the box Please check that you've received the following precautions: • Never use new and old batteries together. • Insert the plus and minus sides of the batteries properly ... antenna • FM wire antenna • AA/LR6 dry cell batteries x2 • Remote control • These operating instructions • Warranty Card VSX-D914 model only: • Microphone • Microphone stand Making cable connections Make sure not to bend the cables over the top of this unit (as...
... unit may have different voltages. 01 Before you start Chapter 1: Before you start Checking what's in the box Please check that you've received the following precautions: • Never use new and old batteries together. • Insert the plus and minus sides of the batteries properly ... antenna • FM wire antenna • AA/LR6 dry cell batteries x2 • Remote control • These operating instructions • Warranty Card VSX-D914 model only: • Microphone • Microphone stand Making cable connections Make sure not to bend the cables over the top of this unit (as...
Installation Manual
Page 7
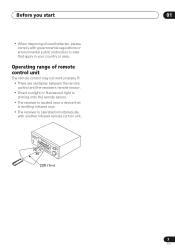
Operating range of used batteries, please comply with governmental regulations or environmental public instruction's rules that is emitting infrared rays. • The receiver is operated simultaneously with another infrared remote control unit. 30 30 23ft (7m) 7 En Before you start 01 • When disposing of remote control... unit The remote control may not work properly if: • There are obstacles between the remote control and the receiver's remote sensor. • Direct sunlight or fluorescent light is shining onto the remote sensor. • The...
Operating range of used batteries, please comply with governmental regulations or environmental public instruction's rules that is emitting infrared rays. • The receiver is operated simultaneously with another infrared remote control unit. 30 30 23ft (7m) 7 En Before you start 01 • When disposing of remote control... unit The remote control may not work properly if: • There are obstacles between the remote control and the receiver's remote sensor. • Direct sunlight or fluorescent light is shining onto the remote sensor. • The...
Installation Manual
Page 8
...size, quality, and ease of them being there'. Depending on the source and the sound settings of 'being sent to your speaker setup. This receiver will automatically decode Dolby Digital, DTS, or Dolby Surround DVD-Video discs, according to your system on the speakers you 're in the middle of...with multi-channel surround sound) are explained in Listening to different speakers in your room, but also on the DVD, you the feeling of the receiver. This is what creates a surround sound effect and gives you can have set up to the use . Home theater refers to seven different ...
...size, quality, and ease of them being there'. Depending on the source and the sound settings of 'being sent to your speaker setup. This receiver will automatically decode Dolby Digital, DTS, or Dolby Surround DVD-Video discs, according to your system on the speakers you 're in the middle of...with multi-channel surround sound) are explained in Listening to different speakers in your room, but also on the DVD, you the feeling of the receiver. This is what creates a surround sound effect and gives you can have set up to the use . Home theater refers to seven different ...
Installation Manual
Page 9
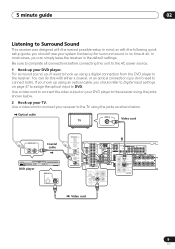
... For surround sound, you can do this unit to the AC power source. 1 Hook up your DVD player. Use a video cord to connect your receiver to the TV using the jacks as shown below . 2 Hook up your TV. Be sure to complete all connections before connecting this with the following... If you hook up using an optical cable, you should have your DVD player to the receiver using a digital connection from the DVD player to the receiver. 5 minute guide 02 Listening to Surround Sound This receiver was designed with the easiest possible setup in mind, so with either a coaxial, or an ...
... For surround sound, you can do this unit to the AC power source. 1 Hook up your DVD player. Use a video cord to connect your receiver to the TV using the jacks as shown below . 2 Hook up your TV. Be sure to complete all connections before connecting this with the following... If you hook up using an optical cable, you should have your DVD player to the receiver using a digital connection from the DVD player to the receiver. 5 minute guide 02 Listening to Surround Sound This receiver was designed with the easiest possible setup in mind, so with either a coaxial, or an ...
Installation Manual
Page 10
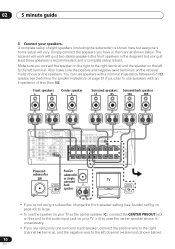
... to the right terminal and the speaker on page 43) to the audio input jack on the speakers. 02 5 minute guide 3 Connect your TV. The receiver will vary. In this unit to large. • To use speakers with just two stereo speakers (the front speakers in the diagram) but everyone's home... page 67 if you plan to the left terminal. A complete setup of less than 8Ω). Also make sure the positive and negative (+/-) terminals on the receiver match those on your speakers.
... to the right terminal and the speaker on page 43) to the audio input jack on the speakers. 02 5 minute guide 3 Connect your TV. The receiver will vary. In this unit to large. • To use speakers with just two stereo speakers (the front speakers in the diagram) but everyone's home... page 67 if you plan to the left terminal. A complete setup of less than 8Ω). Also make sure the positive and negative (+/-) terminals on the receiver match those on your speakers.

Installation Manual
Page 11
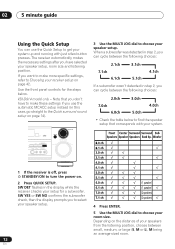
... 35 for more setup options. • Depending on your DVD player or source discs, you may only get digital 2 channel stereo and analog sound. VSX-D914 model only - Use the MULTI JOG dial to select and ENTER to the surround back speaker terminals. 5 minute guide 02 • If you ... a more on the front panel to this . There are several other sound options you 've set the receiver to the DVD input. 5 Press QUICK SETUP on this receiver. See also Choosing your receiver setup on page 42 for more complete surround sound setup, we recommend using the automatic MCACC setup in the...
... 35 for more setup options. • Depending on your DVD player or source discs, you may only get digital 2 channel stereo and analog sound. VSX-D914 model only - Use the MULTI JOG dial to select and ENTER to the surround back speaker terminals. 5 minute guide 02 • If you ... a more on the front panel to this . There are several other sound options you 've set the receiver to the DVD input. 5 Press QUICK SETUP on this receiver. See also Choosing your receiver setup on page 42 for more complete surround sound setup, we recommend using the automatic MCACC setup in the...
Installation Manual
Page 12
... between the following choices: 2.0ch 7.0ch 6.0ch 3.0ch 5.0ch 4.0ch • Check the table below . Use the front panel controls for a subwoofer. VSX-D914 model only - SW DET flashes in step 2, you to select your speaker setup. 4 Press ENTER. 5 Use the MULTI JOG dial to choose your ... between small, medium, or large (S, M or L), M being an average-sized room. 12 En When a subwoofer was detected in the display while the receiver checks your system up and running with your speaker setup, room size and listening position. SPEAKERS SB CH MODE MULTI JOG TONE QUICK SETUP VIDEO...
... between the following choices: 2.0ch 7.0ch 6.0ch 3.0ch 5.0ch 4.0ch • Check the table below . Use the front panel controls for a subwoofer. VSX-D914 model only - SW DET flashes in step 2, you to select your speaker setup. 4 Press ENTER. 5 Use the MULTI JOG dial to choose your ... between small, medium, or large (S, M or L), M being an average-sized room. 12 En When a subwoofer was detected in the display while the receiver checks your system up and running with your speaker setup, room size and listening position. SPEAKERS SB CH MODE MULTI JOG TONE QUICK SETUP VIDEO...
Installation Manual
Page 14
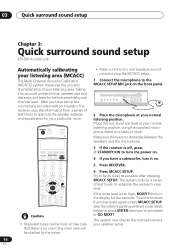
... ENTER when you have a subwoofer, turn it on . 4 If you have set up the microphone provided with your system, the receiver uses the information from a series of test tones to optimize the speaker settings and equalization for your particular room. After you 're prompted...no one in the display for both channel delay and channel level. 03 Quick surround sound setup Chapter 3: Quick surround sound setup VSX-D914 model only Automatically calibrating your listening area (MCACC) The Multi-Channel Acoustic Calibration (MCACC) system measures the acoustic characteristics of ...
... ENTER when you have a subwoofer, turn it on . 4 If you have set up the microphone provided with your system, the receiver uses the information from a series of test tones to optimize the speaker settings and equalization for your particular room. After you 're prompted...no one in the display for both channel delay and channel level. 03 Quick surround sound setup Chapter 3: Quick surround sound setup VSX-D914 model only Automatically calibrating your listening area (MCACC) The Multi-Channel Acoustic Calibration (MCACC) system measures the acoustic characteristics of ...
Installation Manual
Page 15
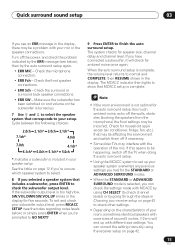
...will end up with different size settings. When the auto surround setup is turned up your room, sometimes identical speakers with MCACC by using the receiver setup on the characteristics of the mic. The MCACC indicator then lights to show that may be incorrect. Check the microphone connection. • ... through the steps in the display, there may interfere with your subwoofer output level, press MCACC SETUP (see an ERR message in Choosing your receiver setup on page 42 to check other settings. • Depending on page 42. 15 En Quick surround sound setup 03 If you see the...
...will end up with different size settings. When the auto surround setup is turned up your room, sometimes identical speakers with MCACC by using the receiver setup on the characteristics of the mic. The MCACC indicator then lights to show that may be incorrect. Check the microphone connection. • ... through the steps in the display, there may interfere with your subwoofer output level, press MCACC SETUP (see an ERR message in Choosing your receiver setup on page 42 to check other settings. • Depending on page 42. 15 En Quick surround sound setup 03 If you see the...
Installation Manual
Page 16
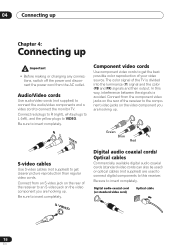
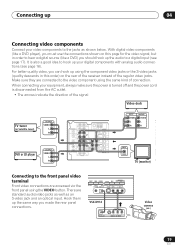
... from an S-video jack on the rear of the receiver to an S-video jack on the video component you are hooking up . Be sure to insert completely. Be sure to insert completely. Be sure to ...; Before making or changing any connections, switch off the power and disconnect the power cord from the component video jacks on the rear of the receiver to the component video jacks on the video component you are used ) or optical cables (not supplied) are hooking up . Audio/Video cords Use audio...
... from an S-video jack on the rear of the receiver to an S-video jack on the video component you are hooking up . Be sure to insert completely. Be sure to insert completely. Be sure to ...; Before making or changing any connections, switch off the power and disconnect the power cord from the component video jacks on the rear of the receiver to the component video jacks on the video component you are used ) or optical cables (not supplied) are hooking up . Audio/Video cords Use audio...
Installation Manual
Page 17
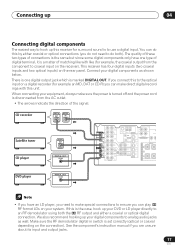
Connect your digital components as well. This receiver has four digital inputs (two coaxial inputs and two optical inputs) on the connection). The quality of these... optical input on a digital recorder (for example an MD, DAT or CD-R) you can play 2 RF format LDs on the receiver). When connecting your DVD or LD player directly to an RF demodulator using both ). CD recorder DIGITAL OUT DIGITAL IN Satellite tuner ...audio jacks as shown below. Connecting up 04 Connecting digital components The easiest way to hook up this receiver for surround sound is marked DIGITAL OUT.
Connect your digital components as well. This receiver has four digital inputs (two coaxial inputs and two optical inputs) on the connection). The quality of these... optical input on a digital recorder (for example an MD, DAT or CD-R) you can play 2 RF format LDs on the receiver). When connecting your DVD or LD player directly to an RF demodulator using both ). CD recorder DIGITAL OUT DIGITAL IN Satellite tuner ...audio jacks as shown below. Connecting up 04 Connecting digital components The easiest way to hook up this receiver for surround sound is marked DIGITAL OUT.
Installation Manual
Page 18
... you prefer to use a seperate component for decoding DVDs, you want to record with, you need to hook up , connect your digital components to the receiver (a set of stereo inputs and a set of stereo plugs. For components you want to record to/from digital components (like an MD) to/from the... make sure the power is turned off and the power cord is disconnected from the AC outlet. • The arrows indicate the direction of this receiver.
... you prefer to use a seperate component for decoding DVDs, you want to record with, you need to hook up , connect your digital components to the receiver (a set of stereo inputs and a set of stereo plugs. For components you want to record to/from digital components (like an MD) to/from the... make sure the power is turned off and the power cord is disconnected from the AC outlet. • The arrows indicate the direction of this receiver.
Installation Manual
Page 19
... audio/video jacks as well as shown below. Hook them up the same way you must use the connections shown on the rear of the receiver instead of connection. With digital video components (like a DVD player), you made the rear panel connections. Connecting up 04 Connecting video components Connect your video.../ DIRECT SIGNAL MIDNIGHT/ SELECT LOUDNESS SPEAKERS SB CH MODE MULTI JOG TONE QUICK SETUP ODE MCACC VIDEO INPUT SETUP MIC DIGITAL IN S-VIDEO VIDEO L AUDIO R VSX-D914 DIGITAL OUT V L R VIDEO OUTPUT Video camera (etc.) 19 En
... audio/video jacks as well as shown below. Hook them up the same way you must use the connections shown on the rear of the receiver instead of connection. With digital video components (like a DVD player), you made the rear panel connections. Connecting up 04 Connecting video components Connect your video.../ DIRECT SIGNAL MIDNIGHT/ SELECT LOUDNESS SPEAKERS SB CH MODE MULTI JOG TONE QUICK SETUP ODE MCACC VIDEO INPUT SETUP MIC DIGITAL IN S-VIDEO VIDEO L AUDIO R VSX-D914 DIGITAL OUT V L R VIDEO OUTPUT Video camera (etc.) 19 En
Installation Manual
Page 20
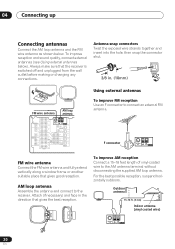
... wire) FM UNBAL 75 Ω AM LOOP ANTENNA 20 En To improve AM reception Connect a 15-18 feet length of vinyl-coated wire to the receiver. For the best possible reception, suspend horizontally outdoors. 04 Connecting up Connecting antennas Connect the AM loop antenna and the FM wire antenna as shown... Ω AM LOOP ANTENNA FM wire antenna Connect the FM wire antenna and fully extend vertically along a window frame or another suitable place that the receiver is switched off and unplugged from the wall outlet before making or changing any connections.
... wire) FM UNBAL 75 Ω AM LOOP ANTENNA 20 En To improve AM reception Connect a 15-18 feet length of vinyl-coated wire to the receiver. For the best possible reception, suspend horizontally outdoors. 04 Connecting up Connecting antennas Connect the AM loop antenna and the FM wire antenna as shown... Ω AM LOOP ANTENNA FM wire antenna Connect the FM wire antenna and fully extend vertically along a window frame or another suitable place that the receiver is switched off and unplugged from the wall outlet before making or changing any connections.
Installation Manual
Page 21
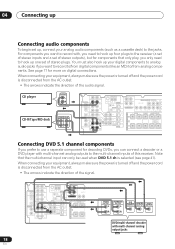
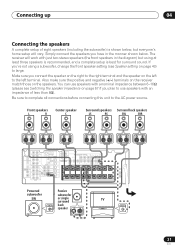
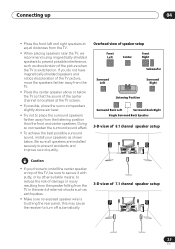
... have in the diagram) but everyone's home setup will work with an impedance of eight speakers (including the subwoofer) is best for surround sound. The receiver will vary. Front speakers L R Center speaker C Surround speakers Surround back speakers LS RS SBL SBR CENTER IN DIGITAL OUT OPT IN AUX COMPONENT VIDEO ASSIGNABLE... back speaker TV AUDIO IN 21 En Make sure you plan to the left terminal. Also make sure the positive and negative (+/-) terminals on the receiver match those on page 43) to the AC power source.
... have in the diagram) but everyone's home setup will work with an impedance of eight speakers (including the subwoofer) is best for surround sound. The receiver will vary. Front speakers L R Center speaker C Surround speakers Surround back speakers LS RS SBL SBR CENTER IN DIGITAL OUT OPT IN AUX COMPONENT VIDEO ASSIGNABLE... back speaker TV AUDIO IN 21 En Make sure you plan to the left terminal. Also make sure the positive and negative (+/-) terminals on the receiver match those on page 43) to the AC power source.
Installation Manual
Page 22
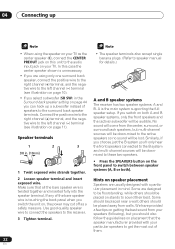
... A and B speaker systems, only the front speakers and the (active) subwoofer will be lost. Use good quality speaker wire to connect the speakers to the receiver. 3 Tighten terminal. • The speaker terminals also accept single banana plugs. (Refer to the surround back speaker terminals. We have provided a few tips on page... speaker on your TV as a safety measure. If you can hook up a subwoofer instead of speakers to speaker manual for details.) A and B speaker systems The receiver has two speaker systems: A and B.
... A and B speaker systems, only the front speakers and the (active) subwoofer will be lost. Use good quality speaker wire to connect the speakers to the receiver. 3 Tighten terminal. • The speaker terminals also accept single banana plugs. (Refer to the surround back speaker terminals. We have provided a few tips on page... speaker on your TV as a safety measure. If you can hook up a subwoofer instead of speakers to speaker manual for details.) A and B speaker systems The receiver has two speaker systems: A and B.
Installation Manual
Page 23
... in the event of external shocks such as earthquakes. • Make sure no exposed speaker wire is touching the rear panel, this may cause the receiver to prevent possible interference, such as shown below the TV so that the sound of the center channel is switched on. Connecting up 04 •...
... in the event of external shocks such as earthquakes. • Make sure no exposed speaker wire is touching the rear panel, this may cause the receiver to prevent possible interference, such as shown below the TV so that the sound of the center channel is switched on. Connecting up 04 •...


