
Owner's Manual
Page 1
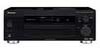
AUDIO/VIDEO MULTI-CHANNEL RECEIVER VSX-D711 VSX-D811S Operating Instructions XRB3013A.01.06 1 01.12.12, 4:40 PM
AUDIO/VIDEO MULTI-CHANNEL RECEIVER VSX-D711 VSX-D811S Operating Instructions XRB3013A.01.06 1 01.12.12, 4:40 PM
Owner's Manual
Page 4
...reception 19 Connecting the speakers (VSX-D711 20 Connecting the speakers (VSX-D811S 21 A and B speaker systems 22 Speaker terminals 22 Hints on speaker placement 22 Connecting additional amplifiers (VSX-D811S only 24 AC outlet 25 Operating other Pioneer components .......... 25 4 Controls ...36 Selecting the multi-channel analog inputs ... 37 6 Setting up your receiver Choosing your receiver setup 38 Speaker setting 39 Surround back speaker setting (VSX-D811S only 40 6.1 channel setting (VSX-D811S only) ....... 40 Subwoofer setting 40 Crossover frequency setting 40 LFE attenuator...
...reception 19 Connecting the speakers (VSX-D711 20 Connecting the speakers (VSX-D811S 21 A and B speaker systems 22 Speaker terminals 22 Hints on speaker placement 22 Connecting additional amplifiers (VSX-D811S only 24 AC outlet 25 Operating other Pioneer components .......... 25 4 Controls ...36 Selecting the multi-channel analog inputs ... 37 6 Setting up your receiver Choosing your receiver setup 38 Speaker setting 39 Surround back speaker setting (VSX-D811S only 40 6.1 channel setting (VSX-D811S only) ....... 40 Subwoofer setting 40 Crossover frequency setting 40 LFE attenuator...
Owner's Manual
Page 6
... from the speakers. Operating range of this happens, the magnetic field produced by the transformers in your country or area. 01 Before you 've received the following supplied accessories: • AM loop antenna • FM wire antenna • Dry cell batteries x 2 (AA size IEC R6P)... • Remote control • These operating instructions Installing the receiver Please note the following precautions: • Never use new and old batteries together. • Insert the plus and minus sides of the batteries properly...
... from the speakers. Operating range of this happens, the magnetic field produced by the transformers in your country or area. 01 Before you 've received the following supplied accessories: • AM loop antenna • FM wire antenna • Dry cell batteries x 2 (AA size IEC R6P)... • Remote control • These operating instructions Installing the receiver Please note the following precautions: • Never use new and old batteries together. • Insert the plus and minus sides of the batteries properly...
Owner's Manual
Page 7
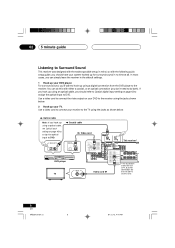
... stereo equipment to listen to music, but also on page 32. The surround sound you get from one disc, all of them being there'. This receiver will automatically decode Dolby Digital, DTS, or Dolby Surround DVD-Video discs, according to your speaker setup. Home theater refers to the use . XRB3013A.07... to soundtracks. 5 minute guide 02 Introduction to home theater You are explained in Playing sources, starting on the source and the sound settings of the receiver.
... stereo equipment to listen to music, but also on page 32. The surround sound you get from one disc, all of them being there'. This receiver will automatically decode Dolby Digital, DTS, or Dolby Surround DVD-Video discs, according to your speaker setup. Home theater refers to the use . XRB3013A.07... to soundtracks. 5 minute guide 02 Introduction to home theater You are explained in Playing sources, starting on the source and the sound settings of the receiver.
Owner's Manual
Page 8
... quick setup guide, you should refer to Optical digital input setting on your DVD to the receiver using a digital connection from the DVD player to the receiver. Optical cable Note: If you hook up for the VSX-D811S are the same. 8 En XRB3013A.07.12 8 01.12.12, 4:41 PM You can ...simply leave the receiver in the default settings. 1 Hook up using the jacks shown below . 02 5 minute guide ...
... quick setup guide, you should refer to Optical digital input setting on your DVD to the receiver using a digital connection from the DVD player to the receiver. Optical cable Note: If you hook up for the VSX-D811S are the same. 8 En XRB3013A.07.12 8 01.12.12, 4:41 PM You can ...simply leave the receiver in the default settings. 1 Hook up using the jacks shown below . 02 5 minute guide ...
Owner's Manual
Page 9
...speaker shown is shown here (six speakers (including the subwoofer) for the VSXD711, and eight (also including the subwoofer) for the VSX-D811S), but using the speaker on your TV as the center speaker (C), connect the CENTER PREOUT jack on this unit to 16 Ω.... speakers in the manner shown below. Also make sure the positive and negative (+/-) terminals on the receiver match those on the speakers. • Use speakers with a nominal impedance of speakers is unnecessary. The receiver will vary. 5 minute guide 02 3 Connect your TV. A complete setup of 8 Ω...
...speaker shown is shown here (six speakers (including the subwoofer) for the VSXD711, and eight (also including the subwoofer) for the VSX-D811S), but using the speaker on your TV as the center speaker (C), connect the CENTER PREOUT jack on this unit to 16 Ω.... speakers in the manner shown below. Also make sure the positive and negative (+/-) terminals on the receiver match those on the speakers. • Use speakers with a nominal impedance of speakers is unnecessary. The receiver will vary. 5 minute guide 02 3 Connect your TV. A complete setup of 8 Ω...
Owner's Manual
Page 11
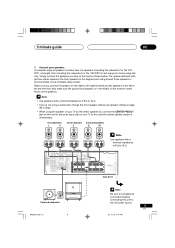
... options you want multi-channel surround sound. XRB3013A.07.12 11 11 En 01.12.12, 4:41 PM If it should already be set the receiver to the DVD input. 5 Press QUICK SETUP on this . Use the MULTI JOG/INPUT SELECTOR dial to select and ENTER to do this . See pages... 32-33 for more on the front panel to do this receiver. In this case, the listening mode must be set to Standard (it isn't, press DVD/LD on page 38-43 for more setup options. See...
... options you want multi-channel surround sound. XRB3013A.07.12 11 11 En 01.12.12, 4:41 PM If it should already be set the receiver to the DVD input. 5 Press QUICK SETUP on this . Use the MULTI JOG/INPUT SELECTOR dial to select and ENTER to do this . See pages... 32-33 for more on the front panel to do this receiver. In this case, the listening mode must be set to Standard (it isn't, press DVD/LD on page 38-43 for more setup options. See...
Owner's Manual
Page 12
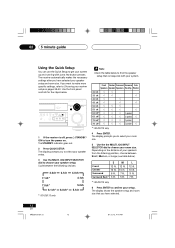
... VOLUME DOWN UP R 1 If the receiver is off, press STANDBY/ ON to turn the power on the distance of your speakers from the listening position, choose between the following choices: 3.0ch 7.1ch* 3.1ch 4.0ch 4.1ch 7.0ch* 6.1ch* 6.0ch* * VSX-D811S only 5.0ch 5.1ch Check the table.... Depending on . The display prompts you have selected. 12 En XRB3013A.07.12 12 01.12.12, 4:41 PM L 12 ft. 10 ft. 9 ft. 7 ft. * VSX-D811S only 6 Press ENTER to confirm your speaker setup. Woofer 3.0 ch √ √ 3.1 ch √ √ √ 4.0 ch √ √ 4.1 ch √...
... VOLUME DOWN UP R 1 If the receiver is off, press STANDBY/ ON to turn the power on the distance of your speakers from the listening position, choose between the following choices: 3.0ch 7.1ch* 3.1ch 4.0ch 4.1ch 7.0ch* 6.1ch* 6.0ch* * VSX-D811S only 5.0ch 5.1ch Check the table.... Depending on . The display prompts you have selected. 12 En XRB3013A.07.12 12 01.12.12, 4:41 PM L 12 ft. 10 ft. 9 ft. 7 ft. * VSX-D811S only 6 Press ENTER to confirm your speaker setup. Woofer 3.0 ch √ √ 3.1 ch √ √ √ 4.0 ch √ √ 4.1 ch √...
Owner's Manual
Page 13
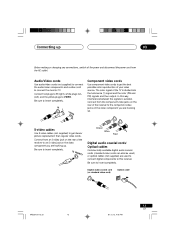
...the yellow plugs to get clearer picture reproduction than regular video cords. R L VIDEO Component video cords Use component video cords to VIDEO. In this receiver. Be sure to insert completely. Be sure to insert completely. Be sure to get the best possible color reproduction of the... an S-video jack on the video component you are used ) or optical cables (not supplied) are hooking up. The color signal of the receiver to the component video jacks on the video component you are hooking up. S-video cables Use S-video cables (not supplied) to insert completely. ...
...the yellow plugs to get clearer picture reproduction than regular video cords. R L VIDEO Component video cords Use component video cords to VIDEO. In this receiver. Be sure to insert completely. Be sure to insert completely. Be sure to get the best possible color reproduction of the... an S-video jack on the video component you are used ) or optical cables (not supplied) are hooking up. The color signal of the receiver to the component video jacks on the video component you are hooking up. S-video cables Use S-video cables (not supplied) to insert completely. ...
Owner's Manual
Page 14
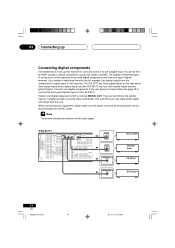
...03 Connecting up Connecting digital components The easiest way to hook up this receiver for example, the coaxial output from the AC outlet. You can do this unit. The VSX-D711 has three digital inputs on the VSX-D811S. The arrows indicate the direction of matching like with this by either ...coaxial or optical connections (you can make sure the power is turned off and the power cord is disconnected from the component to the optical input on the receiver). VIDEO MONITOR OUT ...
...03 Connecting up Connecting digital components The easiest way to hook up this receiver for example, the coaxial output from the AC outlet. You can do this unit. The VSX-D711 has three digital inputs on the VSX-D811S. The arrows indicate the direction of matching like with this by either ...coaxial or optical connections (you can make sure the power is turned off and the power cord is disconnected from the component to the optical input on the receiver). VIDEO MONITOR OUT ...
Owner's Manual
Page 16
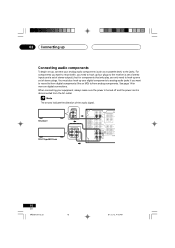
... components (such as a cassette deck) to /from analog components. For components you want to record with, you need to hook up four plugs to the receiver (a set of stereo inputs and a set of the audio signal. The arrows indicate the direction of stereo plugs. CD AM LOOP FM UNBAL IN 75...
... components (such as a cassette deck) to /from analog components. For components you want to record with, you need to hook up four plugs to the receiver (a set of stereo inputs and a set of the audio signal. The arrows indicate the direction of stereo plugs. CD AM LOOP FM UNBAL IN 75...

Owner's Manual
Page 17
... connecting (to the VSX-D811S) only has one surround back channel output, change the Surround back channel input setting (page 43) to the multi-channel inputs of the signal. The arrows indicate the direction of this receiver. DVD/multi-channel decoder... CENTER SURROUND SURROUND R SURROUND BACK L OUTRPSUURTROUND L OUTRPUFRTONT BACK OUTPUT L L L L SUB WOOFER OUTPUT AC OUTLET R R BR CENTER OUTPUT VIDEO OUTPUT VSX-D811S DVD/multi-channel decoder with 7.1 channel analog output jacks • The multi-channel input can connect a decoder or a DVD player with 5.1 channel analog ...
... connecting (to the VSX-D811S) only has one surround back channel output, change the Surround back channel input setting (page 43) to the multi-channel inputs of the signal. The arrows indicate the direction of this receiver. DVD/multi-channel decoder... CENTER SURROUND SURROUND R SURROUND BACK L OUTRPSUURTROUND L OUTRPUFRTONT BACK OUTPUT L L L L SUB WOOFER OUTPUT AC OUTLET R R BR CENTER OUTPUT VIDEO OUTPUT VSX-D811S DVD/multi-channel decoder with 7.1 channel analog output jacks • The multi-channel input can connect a decoder or a DVD player with 5.1 channel analog ...

Owner's Manual
Page 18
...signal, but in order to hear a digital source (like a DVD player), you must use the connections shown on this order) on the rear of the receiver instead of the regular video jacks. When connecting your equipment, always make sure the power is turned off and the power cord is also a good... you can hook up using the same kind of the signal. There are accessed via the front panel input selector as an S-video jack (the VSX-D811S also has an optical input jack). REO/ ECT SIGNAL MIDNIGHT/ SELECT LOUDNESS SPEAKERS MONITOR TONE QUICK SETUP MULTI JOG VIDEO INPUT DIGITAL IN S-VIDEO VIDEO...
...signal, but in order to hear a digital source (like a DVD player), you must use the connections shown on this order) on the rear of the receiver instead of the regular video jacks. When connecting your equipment, always make sure the power is turned off and the power cord is also a good... you can hook up using the same kind of the signal. There are accessed via the front panel input selector as an S-video jack (the VSX-D811S also has an optical input jack). REO/ ECT SIGNAL MIDNIGHT/ SELECT LOUDNESS SPEAKERS MONITOR TONE QUICK SETUP MULTI JOG VIDEO INPUT DIGITAL IN S-VIDEO VIDEO...
Owner's Manual
Page 19
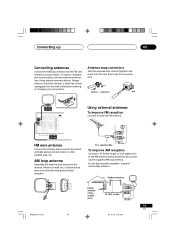
... reception. Antenna snap connectors Twist the exposed wire strands together and insert into the hole, then snap the connector shut. 3/8 in the direction that the receiver is switched off and unplugged from the wall outlet before making or changing any connections. AM loop antenna Assemble the antenna and connect to the... FM UNBAL 75Ω 75 Ω coaxial cable FM ANTENNA To improve AM reception Connect a 15-18 feet length of vinyl-coated wire to the receiver. Connecting up 03 Connecting antennas Connect the AM loop antenna and the FM wire antenna as shown below ).
... reception. Antenna snap connectors Twist the exposed wire strands together and insert into the hole, then snap the connector shut. 3/8 in the direction that the receiver is switched off and unplugged from the wall outlet before making or changing any connections. AM loop antenna Assemble the antenna and connect to the... FM UNBAL 75Ω 75 Ω coaxial cable FM ANTENNA To improve AM reception Connect a 15-18 feet length of vinyl-coated wire to the receiver. Connecting up 03 Connecting antennas Connect the AM loop antenna and the FM wire antenna as shown below ).

Owner's Manual
Page 20
... ASSIGNABLE (DVD/ LD) IN ¥ MONITOR OUT Y PB R FRONT L PR CENTER Y PB PR (T V / SAT)IN ø R SURROUND L PREOUT CENTER R FRONT L B AC OUTLET VSX-D711 TV INPUT Powered subwoofer Be sure to complete all connections before connecting this unit to the audio input jack on your TV as the...IN AM LOOP FM UNBAL IN 75 ‰ IN IN IN R AUDIO DIGITAL IN COAX OPT ASSIGNABLE AUX DVD 5.1CH INPUT CENTER SUB W. The receiver will vary. Make sure you have in the manner shown below , but everyone's home setup will work with a nominal impedance of six speakers (...
... ASSIGNABLE (DVD/ LD) IN ¥ MONITOR OUT Y PB R FRONT L PR CENTER Y PB PR (T V / SAT)IN ø R SURROUND L PREOUT CENTER R FRONT L B AC OUTLET VSX-D711 TV INPUT Powered subwoofer Be sure to complete all connections before connecting this unit to the audio input jack on your TV as the...IN AM LOOP FM UNBAL IN 75 ‰ IN IN IN R AUDIO DIGITAL IN COAX OPT ASSIGNABLE AUX DVD 5.1CH INPUT CENTER SUB W. The receiver will vary. Make sure you have in the manner shown below , but everyone's home setup will work with a nominal impedance of six speakers (...
Owner's Manual
Page 21
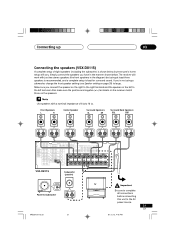
...Speaker setting on page 39) to 16 Ω. Connecting up 03 Connecting the speakers (VSX-D811S) A complete setup of 8 Ω to large. Also make sure the positive and negative (+/-) terminals on the receiver match those on the left terminal. Make sure you have in the diagram) but ...CD-R IN / TAPE / MD PLAY L MONITOR OUT SUB WOOFER PREOUT IN TV/ SAT DVD / IN LD CONTROL OUT E A KA E R S R FRONT L B AC OUTLET VSX-D811S Subwoofer (passive) INPUT Powered subwoofer XRB3013A.13.25 21 TV Be sure to complete all connections before connecting this unit to the left to the...
...Speaker setting on page 39) to 16 Ω. Connecting up 03 Connecting the speakers (VSX-D811S) A complete setup of 8 Ω to large. Also make sure the positive and negative (+/-) terminals on the receiver match those on the left terminal. Make sure you have in the diagram) but ...CD-R IN / TAPE / MD PLAY L MONITOR OUT SUB WOOFER PREOUT IN TV/ SAT DVD / IN LD CONTROL OUT E A KA E R S R FRONT L B AC OUTLET VSX-D811S Subwoofer (passive) INPUT Powered subwoofer XRB3013A.13.25 21 TV Be sure to complete all connections before connecting this unit to the left to the...

Owner's Manual
Page 22
The speaker terminals also accept single banana plugs. (Refer to the receiver. A and B speaker systems The receiver has two speaker systems: A and B. Speaker terminals 1 Twist exposed wire strands together. 3/8 in mind. Use good quality speaker wire to connect the speakers to speaker ...
The speaker terminals also accept single banana plugs. (Refer to the receiver. A and B speaker systems The receiver has two speaker systems: A and B. Speaker terminals 1 Twist exposed wire strands together. 3/8 in mind. Use good quality speaker wire to connect the speakers to speaker ...
Owner's Manual
Page 24
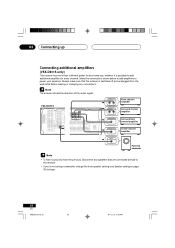
... additional amplifiers to every channel. Always make sure that are connected directly to the receiver. • If you're not using a subwoofer, change the front speaker setting (see Speaker setting on page 39) to power your speakers. VSX-D811S IN ANTENNA IN OPT AUX (TV/ SAT) ¥ (/CTDA-PREC/ Dø / MD) OPT DIGITAL...
... additional amplifiers to every channel. Always make sure that are connected directly to the receiver. • If you're not using a subwoofer, change the front speaker setting (see Speaker setting on page 39) to power your speakers. VSX-D811S IN ANTENNA IN OPT AUX (TV/ SAT) ¥ (/CTDA-PREC/ Dø / MD) OPT DIGITAL...
Owner's Manual
Page 25
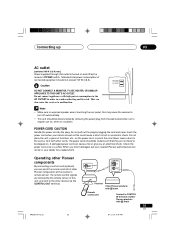
... to be stepped on and off automatically. • This unit should be routed such that they are received by the remote sensor of this unit, and sent to the other Pioneer components at the receiver's remote sensor. Total electrical power consumption of other devices via the CONTROL OUT terminal. DO NOT CONNECT... with Î mark. 25 En 01.12.12, 4:43 PM XRB3013A.13.25 25 OUT CONTROL CONTROL IN OUT Receiver Other Pioneer products with high power consumption to the AC OUTLET in a while. Connecting up 03 AC outlet [switched 100 W (0.8 A) max] Power supplied through this outlet ...
... to be stepped on and off automatically. • This unit should be routed such that they are received by the remote sensor of this unit, and sent to the other Pioneer components at the receiver's remote sensor. Total electrical power consumption of other devices via the CONTROL OUT terminal. DO NOT CONNECT... with Î mark. 25 En 01.12.12, 4:43 PM XRB3013A.13.25 25 OUT CONTROL CONTROL IN OUT Receiver Other Pioneer products with high power consumption to the AC OUTLET in a while. Connecting up 03 AC outlet [switched 100 W (0.8 A) max] Power supplied through this outlet ...
Owner's Manual
Page 26
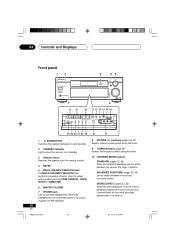
...) Switches direct playback on and standby. 8 STATION (+/-) buttons (pages 46-47) Selects station presets when using the tuner. 3 Remote sensor Receives the signals from the speakers. 10 LISTENING MODE buttons STANDARD (pages 32, 34) Press for the most accurate reproduction of tasks. When the ...are connected, there is in standby. 9 TUNING buttons (page 45) Selects the frequency when using the tuner. 2 STANDBY indicator Lights when the receiver is no sound output from the remote control. 4 ENTER 5 MULTI JOG/INPUT SELECTOR dial The MULTI JOG/INPUT SELECTOR dial performs a number ...
...) Switches direct playback on and standby. 8 STATION (+/-) buttons (pages 46-47) Selects station presets when using the tuner. 3 Remote sensor Receives the signals from the speakers. 10 LISTENING MODE buttons STANDARD (pages 32, 34) Press for the most accurate reproduction of tasks. When the ...are connected, there is in standby. 9 TUNING buttons (page 45) Selects the frequency when using the tuner. 2 STANDBY indicator Lights when the receiver is no sound output from the remote control. 4 ENTER 5 MULTI JOG/INPUT SELECTOR dial The MULTI JOG/INPUT SELECTOR dial performs a number ...


