
Instruction Manual English
Page 2
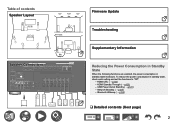
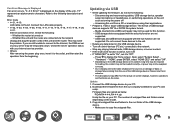
Table of contents Speaker Layout Main Room Zone 2 Speaker Connections Firmware Update Troubleshooting Supplementary Information Reducing the Power Consumption in Standby State When the following functions are enabled, the power consumption in standby state, check each setting and set the functions to "Off". - HDMI CEC ( →p123) - HDMI Standby Through ( →p123) - Network Standby ( →p125) - USB Power Out at Standby ( →p125) - To reduce the power consumption in standby state increases. Bluetooth Wakeup ( →p125) ‰ Detailed contents (Next page) 2
Table of contents Speaker Layout Main Room Zone 2 Speaker Connections Firmware Update Troubleshooting Supplementary Information Reducing the Power Consumption in Standby State When the following functions are enabled, the power consumption in standby state, check each setting and set the functions to "Off". - HDMI CEC ( →p123) - HDMI Standby Through ( →p123) - Network Standby ( →p125) - USB Power Out at Standby ( →p125) - To reduce the power consumption in standby state increases. Bluetooth Wakeup ( →p125) ‰ Detailed contents (Next page) 2
Instruction Manual English
Page 3
... with HDMI 20 jacks Connecting an Audio Component 56 57 Connecting a TV or Integrated Amplifier in a separate 22 room (Multi-zone) 58 23 Connecting a TV (ZONE 2) 58 24 Connecting an Integrated Amplifier (ZONE 2) 59 25 Connecting Antennas 60 26 Network Connection 61 27 Connecting the Power Cord 62 Playback Playing audio from an...
... with HDMI 20 jacks Connecting an Audio Component 56 57 Connecting a TV or Integrated Amplifier in a separate 22 room (Multi-zone) 58 23 Connecting a TV (ZONE 2) 58 24 Connecting an Integrated Amplifier (ZONE 2) 59 25 Connecting Antennas 60 26 Network Connection 61 27 Connecting the Power Cord 62 Playback Playing audio from an...

Instruction Manual English
Page 4
...with an Amazon account 83 Operating this unit 84 Amazon Music 85 Registering This Unit with Amazon Music 85 Playing Amazon Music using the Pioneer Remote App 86 Playing Amazon Music using the remote controller 86 TIDAL 87 Registering this unit with TIDAL 87 Playing TIDAL 87 Connecting ...to Connect This Unit and Sonos Connect 88 Setting Up 88 Playing Sonos on This Unit 89 Internet Radio 90 Playing Back 90 Multi-zone 92 Playing Back 93 Using PERSONAL PRESET 95 USB Storage Device 97 Supported Audio Formats 97 USB Storage Device Requirements 97 Playing music ...
...with an Amazon account 83 Operating this unit 84 Amazon Music 85 Registering This Unit with Amazon Music 85 Playing Amazon Music using the Pioneer Remote App 86 Playing Amazon Music using the remote controller 86 TIDAL 87 Registering this unit with TIDAL 87 Playing TIDAL 87 Connecting ...to Connect This Unit and Sonos Connect 88 Setting Up 88 Playing Sonos on This Unit 89 Internet Radio 90 Playing Back 90 Multi-zone 92 Playing Back 93 Using PERSONAL PRESET 95 USB Storage Device 97 Supported Audio Formats 97 USB Storage Device Requirements 97 Playing music ...
Instruction Manual English
Page 5
...123 127 Pioneer Remote App Main features Initial Setup Troubleshooting 128 Before starting the procedure 130 When the unit is operating erratically 130 Troubleshooting 131 132 133 134 134 135 138 141 141 142 142 143 144 144 144 145 145 145 147 148 149 5 Multi Zone Sound ... a transmitter for playback Connections Setting Up Playing Back Setup System Setup Menu list Input/Output Assign Speaker Audio Adjust Source Hardware Multi Zone Miscellaneous MCACC Menu operations Full Auto MCACC 101 Manual MCACC 103 MCACC Data Check 103 Network/Bluetooth 103 Menu operations 104 Network 105 ...
...123 127 Pioneer Remote App Main features Initial Setup Troubleshooting 128 Before starting the procedure 130 When the unit is operating erratically 130 Troubleshooting 131 132 133 134 134 135 138 141 141 142 142 143 144 144 144 145 145 145 147 148 149 5 Multi Zone Sound ... a transmitter for playback Connections Setting Up Playing Back Setup System Setup Menu list Input/Output Assign Speaker Audio Adjust Source Hardware Multi Zone Miscellaneous MCACC Menu operations Full Auto MCACC 101 Manual MCACC 103 MCACC Data Check 103 Network/Bluetooth 103 Menu operations 104 Network 105 ...
Instruction Manual English
Page 8
... display the Home screen, and refer to the network. • Stop any playing Internet radio, USB storage device, or server content. • If the multi-zone function is turned on account of the loss of present or prospective profits, loss of data, or for any special, indirect, incidental, or consequential damages...
... display the Home screen, and refer to the network. • Stop any playing Internet radio, USB storage device, or server content. • If the multi-zone function is turned on account of the loss of present or prospective profits, loss of data, or for any special, indirect, incidental, or consequential damages...
Instruction Manual English
Page 9
... PC. Do not connect these devices to the unit. • Delete any playing Internet radio, USB storage device, or server content. • If the multi-zone function is active, turn it to your PC and unzip. Connect the LAN cable properly. • -02, -03, -04, -05, ...
... PC. Do not connect these devices to the unit. • Delete any playing Internet radio, USB storage device, or server content. • If the multi-zone function is active, turn it to your PC and unzip. Connect the LAN cable properly. • -02, -03, -04, -05, ...

Instruction Manual English
Page 11
... enabled in standby state of the remote controller is on the perpendicular axis and 30° to either side. 12. It does not light when ZONE 2 is within about 16´/5 m, at Standby ( →p125) - HDMI CEC ( →p123) - Network Standby ( →p125) - RETURN ...made with the input selector and the unit is selected with MCACC. ( →p131, p144) 11. ZONE 2-ON/OFF button: Switches the multizone function on/off or adjust the brightness of 20° on , however. - ZONE 2-CONTROL button: Controls the multizone function. ( →p92) 6. Cursor buttons ( / / / ...
... enabled in standby state of the remote controller is on the perpendicular axis and 30° to either side. 12. It does not light when ZONE 2 is within about 16´/5 m, at Standby ( →p125) - HDMI CEC ( →p123) - Network Standby ( →p125) - RETURN ...made with the input selector and the unit is selected with MCACC. ( →p131, p144) 11. ZONE 2-ON/OFF button: Switches the multizone function on/off or adjust the brightness of 20° on , however. - ZONE 2-CONTROL button: Controls the multizone function. ( →p92) 6. Cursor buttons ( / / / ...

Instruction Manual English
Page 13
...American,Australian and Asian models)/ FM radio STEREO: Receiving FM stereo. Displays the audio output destination. Lights in the following conditions. Z2: ZONE 2 is selected. B: Outputs audio only to the network. Displays various information of input digital audio signal and the listening mode. 4.... →p124) AUTO STBY: Auto Standby is selected with the "NET" input selector. A: Outputs audio only to both ZONE A and ZONE B. 6. AB: Outputs audio to ZONE A. Lights when headphones are available to the type of the input signals. 9. NET: Lights when connected to the network ...
...American,Australian and Asian models)/ FM radio STEREO: Receiving FM stereo. Displays the audio output destination. Lights in the following conditions. Z2: ZONE 2 is selected. B: Outputs audio only to the network. Displays various information of input digital audio signal and the listening mode. 4.... →p124) AUTO STBY: Auto Standby is selected with the "NET" input selector. A: Outputs audio only to both ZONE A and ZONE B. 6. AB: Outputs audio to ZONE A. Lights when headphones are available to the type of the input signals. 9. NET: Lights when connected to the network ...
Instruction Manual English
Page 15
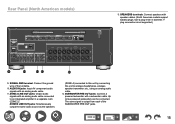
... banana plugs. The same signal is not supported.) 9. Use a plug 4 mm in a separate room (ZONE 2). ZONE B LINE OUT jacks: Simultaneously output the same audio source as the speakers (ZONE A) connected to this unit by connecting this unit to two powered subwoofers can be connected. Up to wireless ...headphones, wireless speaker transmitter, etc., using an analog audio cable. 12. Y plug connection is output from each of the turntable. 10. ZONE 2 LINE OUT jacks: Output audio signals with an analog audio cable. 11. SIGNAL GND terminal: Connect the ground wire of the SUBWOOFER PRE...
... banana plugs. The same signal is not supported.) 9. Use a plug 4 mm in a separate room (ZONE 2). ZONE B LINE OUT jacks: Simultaneously output the same audio source as the speakers (ZONE A) connected to this unit by connecting this unit to two powered subwoofers can be connected. Up to wireless ...headphones, wireless speaker transmitter, etc., using an analog audio cable. 12. Y plug connection is output from each of the turntable. 10. ZONE 2 LINE OUT jacks: Output audio signals with an analog audio cable. 11. SIGNAL GND terminal: Connect the ground wire of the SUBWOOFER PRE...
Instruction Manual English
Page 17
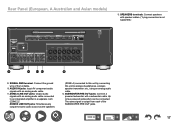
ZONE 2 LINE OUT jacks: Output audio signals with a subwoofer cable. Rear Panel (European, A Australian and Asian models) 13. The same signal is not supported.) 9. SIGNAL GND ... PRE OUT jacks: Connect a powered subwoofer with an analog audio cable connected to an integrated amplifier in a separate room (ZONE 2). ZONE B LINE OUT jacks: Simultaneously output the same audio source as the speakers (ZONE A) connected to this unit by connecting this unit to two powered subwoofers can be connected. Up to wireless headphones...
ZONE 2 LINE OUT jacks: Output audio signals with a subwoofer cable. Rear Panel (European, A Australian and Asian models) 13. The same signal is not supported.) 9. SIGNAL GND ... PRE OUT jacks: Connect a powered subwoofer with an analog audio cable connected to an integrated amplifier in a separate room (ZONE 2). ZONE B LINE OUT jacks: Simultaneously output the same audio source as the speakers (ZONE A) connected to this unit by connecting this unit to two powered subwoofers can be connected. Up to wireless headphones...

Instruction Manual English
Page 19
... volume level of the speakers. It is not used with this unit, you made will be used . Press + or - ZONE 2 SHIFT button: Used to control the multi-zone function ( →p92). (The ZONE 3 SHIFT button cannot be restored to the standby mode, the adjustments you can adjust the sound quality of the subwoofer...
... volume level of the speakers. It is not used with this unit, you made will be used . Press + or - ZONE 2 SHIFT button: Used to control the multi-zone function ( →p92). (The ZONE 3 SHIFT button cannot be restored to the standby mode, the adjustments you can adjust the sound quality of the subwoofer...

Instruction Manual English
Page 20
...;p121). 1. Inputting Characters You can input characters or symbols on the keyboard displayed on the remote control. • On the ZONE 2 playback screen, operate the remote controller while pressing and holding the ZONE 2 SHIFT button. Select a character or symbol with the MODE button on the remote controller.) • To enter a space, select...; To delete a character on the left of the cursor, select " ". • To delete all the input characters, only press the CLEAR button without pressing the ZONE 2 SHIFT button. , . / ; : ] / // ENTER CLEAR ZONE 2 SHIFT MODE 20
...;p121). 1. Inputting Characters You can input characters or symbols on the keyboard displayed on the remote control. • On the ZONE 2 playback screen, operate the remote controller while pressing and holding the ZONE 2 SHIFT button. Select a character or symbol with the MODE button on the remote controller.) • To enter a space, select...; To delete a character on the left of the cursor, select " ". • To delete all the input characters, only press the CLEAR button without pressing the ZONE 2 SHIFT button. , . / ; : ] / // ENTER CLEAR ZONE 2 SHIFT MODE 20
Instruction Manual English
Page 22
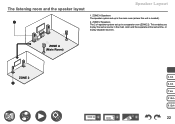
This enables you to play the same source in a separate room (ZONE 2). ZONE A (Main Room) ZONE 2 3.1ch 5.1ch 7.1ch 3.1.2ch 5.1.2ch 22 The listening room and the speaker layout Speaker Layout 1. ZONE A Speakers The speaker system set up in the main room (where this unit is located). 2. ZONE 2 Speakers The 2 ch speaker system set up in the main room and the separate at the same time, or to play separate sources.
This enables you to play the same source in a separate room (ZONE 2). ZONE A (Main Room) ZONE 2 3.1ch 5.1ch 7.1ch 3.1.2ch 5.1.2ch 22 The listening room and the speaker layout Speaker Layout 1. ZONE A Speakers The speaker system set up in the main room (where this unit is located). 2. ZONE 2 Speakers The 2 ch speaker system set up in the main room and the separate at the same time, or to play separate sources.
Instruction Manual English
Page 23
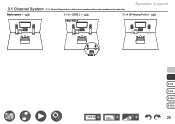
Speaker Layout Basic system ( →p29) 3.1 ch + ZONE 2 ( →p29) 3.1 ch (Bi-Amping (Front)) ( →p29) Main Room Zone 2 3.1ch 5.1ch 7.1ch 3.1.2ch 5.1.2ch 23 3.1 Channel System A 3.1 Channel System that combines front speakers with a center speaker and a subwoofer.
Speaker Layout Basic system ( →p29) 3.1 ch + ZONE 2 ( →p29) 3.1 ch (Bi-Amping (Front)) ( →p29) Main Room Zone 2 3.1ch 5.1ch 7.1ch 3.1.2ch 5.1.2ch 23 3.1 Channel System A 3.1 Channel System that combines front speakers with a center speaker and a subwoofer.
Instruction Manual English
Page 24
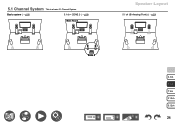
Basic system ( →p29) 5.1 ch + ZONE 2 ( →p29) Main Room Speaker Layout 5.1 ch (Bi-Amping (Front)) ( →p29) Zone 2 3.1ch 5.1ch 7.1ch 3.1.2ch 5.1.2ch 24 5.1 Channel System This is a basic 5.1 Channel System.
Basic system ( →p29) 5.1 ch + ZONE 2 ( →p29) Main Room Speaker Layout 5.1 ch (Bi-Amping (Front)) ( →p29) Zone 2 3.1ch 5.1ch 7.1ch 3.1.2ch 5.1.2ch 24 5.1 Channel System This is a basic 5.1 Channel System.
Instruction Manual English
Page 25
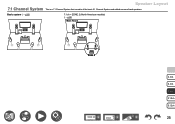
Speaker Layout 7.1 Channel System This is a 7.1 Channel System that consists of the basic 5.1 Channel System and added surround back speakers. Basic system ( →p30) 7.1 ch + ZONE 2 (North American models) ( →p30) Main Room Zone 2 3.1ch 5.1ch 7.1ch 3.1.2ch 5.1.2ch 25
Speaker Layout 7.1 Channel System This is a 7.1 Channel System that consists of the basic 5.1 Channel System and added surround back speakers. Basic system ( →p30) 7.1 ch + ZONE 2 (North American models) ( →p30) Main Room Zone 2 3.1ch 5.1ch 7.1ch 3.1.2ch 5.1.2ch 25

Instruction Manual English
Page 26
Speaker Layout 3.1.2 ch (Front High or Rear High) ( →p31) 3.1.2 ch (Top Front or Top Middle or Top Rear) ( →p31) 3.1.2 ch (Dolby Enabled Speakers (Front)) ( →p31) 3.1.2 ch + ZONE 2 ( →p31) Main Room 3.1.2 ch (Bi-Amping (Front)) ( →p31) Zone 2 3.1ch 5.1ch 7.1ch 3.1.2ch 5.1.2ch 26 3.1.2 Channel System A Speaker System that is a 3.1 Channel System with one set of height speakers added.
Speaker Layout 3.1.2 ch (Front High or Rear High) ( →p31) 3.1.2 ch (Top Front or Top Middle or Top Rear) ( →p31) 3.1.2 ch (Dolby Enabled Speakers (Front)) ( →p31) 3.1.2 ch + ZONE 2 ( →p31) Main Room 3.1.2 ch (Bi-Amping (Front)) ( →p31) Zone 2 3.1ch 5.1ch 7.1ch 3.1.2ch 5.1.2ch 26 3.1.2 Channel System A Speaker System that is a 3.1 Channel System with one set of height speakers added.

Instruction Manual English
Page 27
Speaker Layout 5.1.2 ch (Front High or Rear High) ( →p32) 5.1.2 ch (Top Front or Top Middle or Top Rear) ( →p32) 5.1.2 ch (Dolby Enabled Speakers (Front or Surround)) ( →p32) 5.1.2 ch + ZONE 2 (North American models) ( →p32) Main Room Zone 2 3.1ch 5.1ch 7.1ch 3.1.2ch 5.1.2ch 27 5.1.2 Channel System A Speaker System that is a 5.1 Channel System with one set of height speakers added.
Speaker Layout 5.1.2 ch (Front High or Rear High) ( →p32) 5.1.2 ch (Top Front or Top Middle or Top Rear) ( →p32) 5.1.2 ch (Dolby Enabled Speakers (Front or Surround)) ( →p32) 5.1.2 ch + ZONE 2 (North American models) ( →p32) Main Room Zone 2 3.1ch 5.1ch 7.1ch 3.1.2ch 5.1.2ch 27 5.1.2 Channel System A Speaker System that is a 5.1 Channel System with one set of height speakers added.

Instruction Manual English
Page 29
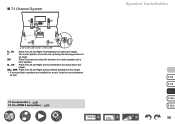
The center speaker should be just above ear height. 3.1 ch connection ( →p36) 3.1 ch + ZONE 2 connection ( ˠp37, p38) 3.1 ch (Bi-Amping (Front)) connection ( →p39) 5.1 ch connection ( →p40) 5.1 ch + ZONE 2 connection ( ˠp41, p42) 5.1 ch (Bi-Amping (Front)) connection ( →p43) 3.1ch 5.1ch 7.1ch 3.1.2ch 5.1.2ch 29 Place the powered subwoofer...
The center speaker should be just above ear height. 3.1 ch connection ( →p36) 3.1 ch + ZONE 2 connection ( ˠp37, p38) 3.1 ch (Bi-Amping (Front)) connection ( →p39) 5.1 ch connection ( →p40) 5.1 ch + ZONE 2 connection ( ˠp41, p42) 5.1 ch (Bi-Amping (Front)) connection ( →p43) 3.1ch 5.1ch 7.1ch 3.1.2ch 5.1.2ch 29 Place the powered subwoofer...
Instruction Manual English
Page 30
... 150° FL, FR Place the Left and Right Front Speakers to be sure to install surround speakers as well. 7.1 ch connection ( →p44) 7.1 ch + ZONE 2 connection ( →p45) Speaker Installation 3.1ch 5.1ch 7.1ch 3.1.2ch 5.1.2ch 30
... 150° FL, FR Place the Left and Right Front Speakers to be sure to install surround speakers as well. 7.1 ch connection ( →p44) 7.1 ch + ZONE 2 connection ( →p45) Speaker Installation 3.1ch 5.1ch 7.1ch 3.1.2ch 5.1.2ch 30
