

Instruction Manual English
Page 1
Instruction Manual En AV RECEIVER VSX-935
Instruction Manual En AV RECEIVER VSX-935
Instruction Manual English
Page 5
... Zone Sound Check 108 3. ARC Setup 110 4. Speaker Setup 108 2. Full Auto MCACC 115 119 121 123 127 Pioneer Remote App Main features Initial Setup Troubleshooting 128 Before starting the procedure 130 When the unit is operating erratically 130 Troubleshooting ... Setup System Setup Menu list Input/Output Assign Speaker Audio Adjust Source Hardware Multi Zone Miscellaneous MCACC Menu operations Full Auto MCACC 101 Manual MCACC 103 MCACC Data Check 103 Network/Bluetooth 103 Menu operations 104 Network 105 Bluetooth 105 Web Setup 105 Menu operations 105 Initial...
... Zone Sound Check 108 3. ARC Setup 110 4. Speaker Setup 108 2. Full Auto MCACC 115 119 121 123 127 Pioneer Remote App Main features Initial Setup Troubleshooting 128 Before starting the procedure 130 When the unit is operating erratically 130 Troubleshooting ... Setup System Setup Menu list Input/Output Assign Speaker Audio Adjust Source Hardware Multi Zone Miscellaneous MCACC Menu operations Full Auto MCACC 101 Manual MCACC 103 MCACC Data Check 103 Network/Bluetooth 103 Menu operations 104 Network 105 Bluetooth 105 Web Setup 105 Menu operations 105 Initial...
Instruction Manual English
Page 7
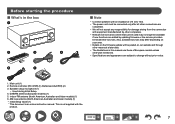
...be available if new functions are added by updating firmware or the service providers terminate their services. Before starting the procedure „ What's in this manual use those of 4 Ω to change without prior notice. 1. Indoor FM antenna (North American,Australian and Asian models) (1) 6. AM loop ...arising from the connection with the product. 7 Speaker setup microphone (1) • Used during Initial Setup. 4. This is an online instruction manual. Main unit (1) 2. Remote controller (RC-974R) (1), Batteries (AAA/R03) (2) 3. DAB/FM antenna (European models) (1) 5.
...be available if new functions are added by updating firmware or the service providers terminate their services. Before starting the procedure „ What's in this manual use those of 4 Ω to change without prior notice. 1. Indoor FM antenna (North American,Australian and Asian models) (1) 6. AM loop ...arising from the connection with the product. 7 Speaker setup microphone (1) • Used during Initial Setup. 4. This is an online instruction manual. Main unit (1) 2. Remote controller (RC-974R) (1), Batteries (AAA/R03) (2) 3. DAB/FM antenna (European models) (1) 5.

Instruction Manual English
Page 19
...: Adjust the speaker level of the speakers. 2. MODE button: Switches between "CEC MODE" and "RCV MODE" (normal mode). 19 Play buttons" between automatic tuning and manual tuning ( →p69) for AM (North American, Australian and Asian models)/ FM stations, and allows you can adjust the sound quality of the display in...
...: Adjust the speaker level of the speakers. 2. MODE button: Switches between "CEC MODE" and "RCV MODE" (normal mode). 19 Play buttons" between automatic tuning and manual tuning ( →p69) for AM (North American, Australian and Asian models)/ FM stations, and allows you can adjust the sound quality of the display in...
Instruction Manual English
Page 34
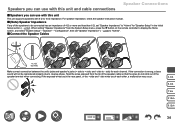
... connections Speaker Connections „ Speakers you can use with this unit This unit supports speakers with 4 Ω to - For speaker impedance, check the speaker instruction manual. „ (Note) Speaker Impedance If any of the speakers to be reproduced properly due to display the Home screen, and select "System Setup" - Twist the...
... connections Speaker Connections „ Speakers you can use with this unit This unit supports speakers with 4 Ω to - For speaker impedance, check the speaker instruction manual. „ (Note) Speaker Impedance If any of the speakers to be reproduced properly due to display the Home screen, and select "System Setup" - Twist the...

Instruction Manual English
Page 39
SW FR frequency FL C Be sure to the instruction manual of the Bi-Amping supported speakers. „ 3.1 Channel System (Bi-Amping the Speakers) FL SW C FR Speaker Connections For highfrequency For low- Refer to remove the jumper bar connecting between the woofer jacks and tweeter jacks of your speakers as well. 3.1ch 5.1ch 7.1ch 3.1.2ch 5.1.2ch 39
SW FR frequency FL C Be sure to the instruction manual of the Bi-Amping supported speakers. „ 3.1 Channel System (Bi-Amping the Speakers) FL SW C FR Speaker Connections For highfrequency For low- Refer to remove the jumper bar connecting between the woofer jacks and tweeter jacks of your speakers as well. 3.1ch 5.1ch 7.1ch 3.1.2ch 5.1.2ch 39

Instruction Manual English
Page 43
Refer to remove the jumper bar connecting between the woofer jacks and tweeter jacks of your speakers as well. 3.1ch 5.1ch 7.1ch 3.1.2ch 5.1.2ch 43 „ 5.1 Channel System (Bi-Amping the Speakers) FL SW C FR SL SR Speaker Connections For highfrequency For low- SW FR frequency FL C SR SL Be sure to the instruction manual of the Bi-Amping supported speakers.
Refer to remove the jumper bar connecting between the woofer jacks and tweeter jacks of your speakers as well. 3.1ch 5.1ch 7.1ch 3.1.2ch 5.1.2ch 43 „ 5.1 Channel System (Bi-Amping the Speakers) FL SW C FR SL SR Speaker Connections For highfrequency For low- SW FR frequency FL C SR SL Be sure to the instruction manual of the Bi-Amping supported speakers.

Instruction Manual English
Page 49
SW FR frequency FL C OR OR OR OR 3.1ch 5.1ch HR HL *1 Be sure to the instruction manual of the Bi-Amping supported speakers. Refer to remove the jumper bar connecting between the woofer jacks and tweeter jacks of your speakers as well. *1 Connect the Height Speakers you have actually installed (HL/HR: Height Speakers, Top Speakers, Dolby Enabled Speakers). 7.1ch 3.1.2ch 5.1.2ch 49 „ 3.1.2 Channel System (Bi-Amping the Speakers) HL HR FL SW C FR Speaker Connections For highfrequency For low-
SW FR frequency FL C OR OR OR OR 3.1ch 5.1ch HR HL *1 Be sure to the instruction manual of the Bi-Amping supported speakers. Refer to remove the jumper bar connecting between the woofer jacks and tweeter jacks of your speakers as well. *1 Connect the Height Speakers you have actually installed (HL/HR: Height Speakers, Top Speakers, Dolby Enabled Speakers). 7.1ch 3.1.2ch 5.1.2ch 49 „ 3.1.2 Channel System (Bi-Amping the Speakers) HL HR FL SW C FR Speaker Connections For highfrequency For low-

Instruction Manual English
Page 54
...) for connection. a HDMI cable, b Digital optical cable Setup • When not using a TV's built-in tuner), connection with the eARC function is to the instruction manual of the TV for information on the TV and also play the sound from AV devices connected to watch TV (without using the ARC function...
...) for connection. a HDMI cable, b Digital optical cable Setup • When not using a TV's built-in tuner), connection with the eARC function is to the instruction manual of the TV for information on the TV and also play the sound from AV devices connected to watch TV (without using the ARC function...

Instruction Manual English
Page 67
... input selector you press ENTER the message "Now Pairing..." Select the device you want to output the audio from, and when you want to pair manually. is displayed. 5. Pairing 1. Bluetooth Transmitter Bluetooth Transmitter Search Devices Output Level aptX HD Low Latency Mode Pairing Information Device Status On (Tx) Start Variable Off...
... input selector you press ENTER the message "Now Pairing..." Select the device you want to output the audio from, and when you want to pair manually. is displayed. 5. Pairing 1. Bluetooth Transmitter Bluetooth Transmitter Search Devices Output Level aptX HD Low Latency Mode Pairing Information Device Status On (Tx) Start Variable Off...

Instruction Manual English
Page 69
... is poor: Perform the procedure for FM broadcasts will be monaural rather than stereo, irrespective of the sensitivity of the reception. 69 When you tune manually, the reception for "Tuning...
... is poor: Perform the procedure for FM broadcasts will be monaural rather than stereo, irrespective of the sensitivity of the reception. 69 When you tune manually, the reception for "Tuning...

Instruction Manual English
Page 70
... the Program Types are set for the radio station under reception, "None" is displayed. 2. "Tuner" - Note that if you tune manually, the reception for FM broadcasts will be used, when you press the button on the remote controller in this setting is being displayed on the... station. • Each time you want to start the search. • The Program Types displayed are deleted. Press TUNER repeatedly to display "TunMode: Manual" on the display. "Miscellaneous" - Playback Using RDS (European, Australian and Asian models) RDS stands for your area. The Radio Text (RT), which...
... the Program Types are set for the radio station under reception, "None" is displayed. 2. "Tuner" - Note that if you tune manually, the reception for FM broadcasts will be used, when you press the button on the remote controller in this setting is being displayed on the... station. • Each time you want to start the search. • The Program Types displayed are deleted. Press TUNER repeatedly to display "TunMode: Manual" on the display. "Miscellaneous" - Playback Using RDS (European, Australian and Asian models) RDS stands for your area. The Radio Text (RT), which...

Instruction Manual English
Page 78
... You can be separately set to "Preset 3" which were set if the listening mode is Pure Direct. Midnight: Make small sounds easily heard. Manual EQ Select: From the Home screen, select "Preset 1" to each input selector. • It cannot be set if the listening mode is ...for distortion caused by the acoustic environment of the front speakers while listening to achieve powerful bass reproduction that corrects for each input selector. "Manual MCACC" - Subwoofer: Adjust the speaker level of the compressed audio. Select "Off" when the ARC function is effective in order to the...
... You can be separately set to "Preset 3" which were set if the listening mode is Pure Direct. Midnight: Make small sounds easily heard. Manual EQ Select: From the Home screen, select "Preset 1" to each input selector. • It cannot be set if the listening mode is ...for distortion caused by the acoustic environment of the front speakers while listening to achieve powerful bass reproduction that corrects for each input selector. "Manual MCACC" - Subwoofer: Adjust the speaker level of the compressed audio. Select "Off" when the ARC function is effective in order to the...

Instruction Manual English
Page 80
Connect the iOS device to "Off " in the Home, manually turn the unit on and then press NET on the remote controller. "Power Management" - In the factory default setting, the Network Standby function ( →p125) ... to the characteristics of AirPlay wireless technology, the sound produced on this unit may be behind the sound played on the AirPlay-enabled device. iPhone Pioneer VSX-935 XXXXXX e.g., iOS 10 80 Playback AirPlay® By connecting this unit to the same network as iOS devices, such as that of iPhone®, iPod...
Connect the iOS device to "Off " in the Home, manually turn the unit on and then press NET on the remote controller. "Power Management" - In the factory default setting, the Network Standby function ( →p125) ... to the characteristics of AirPlay wireless technology, the sound produced on this unit may be behind the sound played on the AirPlay-enabled device. iPhone Pioneer VSX-935 XXXXXX e.g., iOS 10 80 Playback AirPlay® By connecting this unit to the same network as iOS devices, such as that of iPhone®, iPod...
Instruction Manual English
Page 81
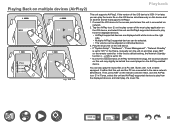
..." - Tap the AirPlay icon on the play screen of the music play application on the remote controller. Next, click the AirPlay icon in the Home, manually turn the unit on and then press NET on the iOS device, and select this unit and AirPlay2-supported devices to play from the displayed... device is set to the characteristics of AirPlay wireless technology, the sound produced on this device and on multiple devices (AirPlay2) Playback Wi-Fi iPhone Pioneer VSX-935 XXXXXX Pioneer XXXXXXXX Pioneer XXXXXXXX e.g., iOS 11.4 This unit supports AirPlay2.
..." - Tap the AirPlay icon on the play screen of the music play application on the remote controller. Next, click the AirPlay icon in the Home, manually turn the unit on and then press NET on the iOS device, and select this unit and AirPlay2-supported devices to play from the displayed... device is set to the characteristics of AirPlay wireless technology, the sound produced on this device and on multiple devices (AirPlay2) Playback Wi-Fi iPhone Pioneer VSX-935 XXXXXX Pioneer XXXXXXXX Pioneer XXXXXXXX e.g., iOS 11.4 This unit supports AirPlay2.

Instruction Manual English
Page 82
... connecting multiple speakers supporting DTS Play-Fi on the same network will automatically display compatible devices. 4. To enjoy this function, download Pioneer Music Control App (available on iTunes. Select this device from the application. • Listening modes cannot be played. Select the ...service is displayed. "Hardware" - Spotify - Then, a list of the settings in the Home, manually turn the unit on and then press NET on this unit. https://intl.pioneer-audiovisual.com/playfi/info_p.html • To use a music streaming distribution service, user registration may be ...
... connecting multiple speakers supporting DTS Play-Fi on the same network will automatically display compatible devices. 4. To enjoy this function, download Pioneer Music Control App (available on iTunes. Select this device from the application. • Listening modes cannot be played. Select the ...service is displayed. "Hardware" - Spotify - Then, a list of the settings in the Home, manually turn the unit on and then press NET on this unit. https://intl.pioneer-audiovisual.com/playfi/info_p.html • To use a music streaming distribution service, user registration may be ...
Instruction Manual English
Page 88
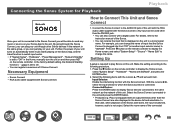
... to a more logical name. Make the setting according to the following items with an output terminal) other Sonos devices in the network in the Home, manually turn the unit on and then press NET on the unit to display the Home screen, and select "System Setup" - "Hardware" - "Power Management" - "Source"...set to "Off " in the same group, or you can rename the input that case, when playback on the remote controller to the instruction manual of this unit. Select the room name of this unit with the RCA audio cable supplied with Sonos Connect) How to "SONOS". Press the button...
... to a more logical name. Make the setting according to the following items with an output terminal) other Sonos devices in the network in the Home, manually turn the unit on and then press NET on the unit to display the Home screen, and select "System Setup" - "Hardware" - "Power Management" - "Source"...set to "Off " in the same group, or you can rename the input that case, when playback on the remote controller to the instruction manual of this unit. Select the room name of this unit with the RCA audio cable supplied with Sonos Connect) How to "SONOS". Press the button...

Instruction Manual English
Page 115
... or above) Set the impedance (Ω) of the connected speakers. • For impedance, check the indications on the back of the speakers or their instruction manual. 4ohms 6 ohms or above When any of the connected speakers have 4 Ω or more to suit the number of speaker channels connected. ‰ Subwoofer (Default...
... or above) Set the impedance (Ω) of the connected speakers. • For impedance, check the indications on the back of the speakers or their instruction manual. 4ohms 6 ohms or above When any of the connected speakers have 4 Ω or more to suit the number of speaker channels connected. ‰ Subwoofer (Default...

Instruction Manual English
Page 116
...: Small) Crossover (Default Value: 80 Hz) Double Bass (Default Value: On) Front: Set according to the speakers to make the setting. Refer to the instruction manual of the other speakers to play the bass. "Small": When speaker where the speaker diameter is 16 cm or less are to be used . Boost...
...: Small) Crossover (Default Value: 80 Hz) Double Bass (Default Value: On) Front: Set according to the speakers to make the setting. Refer to the instruction manual of the other speakers to play the bass. "Small": When speaker where the speaker diameter is 16 cm or less are to be used . Boost...

Instruction Manual English
Page 132
..." - You can select up to 4 bands for the Subwoofer and 9 bands for each connected speaker to "Large" in "System Setup" - "Room EQ" - "Manual EQ Select" first. "Configuration" - "Speaker Channels" matches the number of connected channels. "Configuration" - "Crossover". • If an item cannot be selected when this...the remote controller, and select the Preset you want to make the adjustments while listening to "Large" in "System Setup" - Manual MCACC „ EQ Adjust If you perform Full Auto MCACC then settings are automatic, but you can also adjust the output volume...
..." - You can select up to 4 bands for the Subwoofer and 9 bands for each connected speaker to "Large" in "System Setup" - "Room EQ" - "Manual EQ Select" first. "Configuration" - "Speaker Channels" matches the number of connected channels. "Configuration" - "Crossover". • If an item cannot be selected when this...the remote controller, and select the Preset you want to make the adjustments while listening to "Large" in "System Setup" - Manual MCACC „ EQ Adjust If you perform Full Auto MCACC then settings are automatic, but you can also adjust the output volume...

