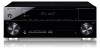

Owner's Manual
Page 4
...function 40 Setting the Audio options 40 Choosing the input signal 43 Using the headphone 43 06 The System Setup menu Using the System Setup menu 44 Manual speaker setup 45 Speaker Setting 45 Crossover Network 47 Channel Level 47 Speaker Distance 48 The Input Assign menu 48 ...Auto playback 35 Listening in surround sound 35 Using the Advanced surround effects . . . . . 36 Listening in a safe place for buying this Pioneer product. Please read through these operating instructions so you will know how to station presets 53 Naming preset stations 53 4 En Thank you for future...
...function 40 Setting the Audio options 40 Choosing the input signal 43 Using the headphone 43 06 The System Setup menu Using the System Setup menu 44 Manual speaker setup 45 Speaker Setting 45 Crossover Network 47 Channel Level 47 Speaker Distance 48 The Input Assign menu 48 ...Auto playback 35 Listening in surround sound 35 Using the Advanced surround effects . . . . . 36 Listening in a safe place for buying this Pioneer product. Please read through these operating instructions so you will know how to station presets 53 Naming preset stations 53 4 En Thank you for future...
Owner's Manual
Page 6
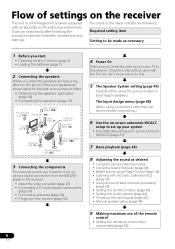
...; Setting the Up Mix function (page 40) • Setting the Audio options (page 40) • Choosing the input signal (page 43) • Manual speaker setup (page 45) 9 Making maximum use of functions and terminals. It can be used easily after following : Required setting item Setting to be made as...abundance of the remote control • Setting the remote to control other than the recommended connections.) 6 Use the on-screen automatic MCACC setup to set the video input on the sound. Check the manual that came with the TV if you place the speakers will have a big effect...
...; Setting the Up Mix function (page 40) • Setting the Audio options (page 40) • Choosing the input signal (page 43) • Manual speaker setup (page 45) 9 Making maximum use of functions and terminals. It can be used easily after following : Required setting item Setting to be made as...abundance of the remote control • Setting the remote to control other than the recommended connections.) 6 Use the on-screen automatic MCACC setup to set the video input on the sound. Check the manual that came with the TV if you place the speakers will have a big effect...
Owner's Manual
Page 7
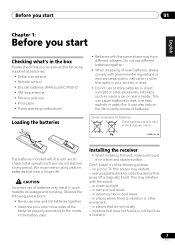
... Please check that have a longer life. We recommend using alkaline batteries that you start 01 Chapter 1: Before you 've received the following supplied accessories: • Setup microphone • Remote control • Dry cell batteries (AAA size IEC R03) x2 • AM loop antenna • FM wire antenna • iPod cable •...
... Please check that have a longer life. We recommend using alkaline batteries that you start 01 Chapter 1: Before you 've received the following supplied accessories: • Setup microphone • Remote control • Dry cell batteries (AAA size IEC R03) x2 • AM loop antenna • FM wire antenna • iPod cable •...
Owner's Manual
Page 9
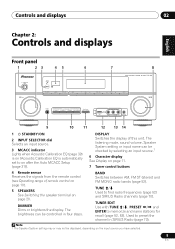
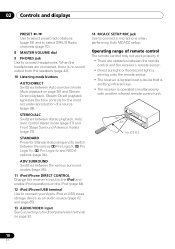
... TUNER EDIT Use with TUNE /, PRESET / and ENTER to on after the Auto MCACC Setup (page 31)). CHANNEL RECEIVER VSX-920 TUNE TUNER EDIT PRESET ENTER MASTER VOLUME PHONES AUTO/DIRECT LISTENING MODE STEREO/ALC STANDARD ADV SURROUND iPod iPhone DIRECT ...CONTROL VIDEO INPUT USB iPod iPhone VIDEO L AUDIO R MCACC SETUP MIC 9 10 11 12 13 14 1 STANDBY/ON 2 INPUT SELECTOR ...
... TUNER EDIT Use with TUNE /, PRESET / and ENTER to on after the Auto MCACC Setup (page 31)). CHANNEL RECEIVER VSX-920 TUNE TUNER EDIT PRESET ENTER MASTER VOLUME PHONES AUTO/DIRECT LISTENING MODE STEREO/ALC STANDARD ADV SURROUND iPod iPhone DIRECT ...CONTROL VIDEO INPUT USB iPod iPhone VIDEO L AUDIO R MCACC SETUP MIC 9 10 11 12 13 14 1 STANDBY/ON 2 INPUT SELECTOR ...
Owner's Manual
Page 10
Stream Direct playback bypasses the tone controls for Standard decoding and to connect a microphone when performing Auto MCACC setup. Operating range of a source (page 38). STEREO/ALC Switches between the various surround modes (page 36). 11 iPod iPhone DIRECT CONTROL Change the receiver's ... sound output from the speakers (page 43). 10 Listening mode buttons AUTO/DIRECT Switches between Auto surround mode (Auto playback on page 30. 14 MCACC SETUP MIC jack Use to switch between the various 2 Pro Logic II, 2 Pro Logic IIx, 2 Pro Logic IIz and NEO:6 options (page 34). ADV SURROUND...
Stream Direct playback bypasses the tone controls for Standard decoding and to connect a microphone when performing Auto MCACC setup. Operating range of a source (page 38). STEREO/ALC Switches between the various surround modes (page 36). 11 iPod iPhone DIRECT CONTROL Change the receiver's ... sound output from the speakers (page 43). 10 Listening mode buttons AUTO/DIRECT Switches between Auto surround mode (Auto playback on page 30. 14 MCACC SETUP MIC jack Use to switch between the various 2 Pro Logic II, 2 Pro Logic IIx, 2 Pro Logic IIz and NEO:6 options (page 34). ADV SURROUND...
Owner's Manual
Page 13
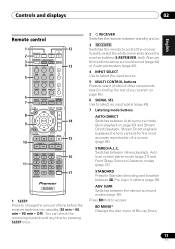
... on page 35) and Stream Direct playback. STANDARD ADV SURR AUDIO PARAMETER TOP 8 MENU TUNE TUNER EDIT MASTER TOOLS VOLUME MENU PRESET ENTER 9 HOME MENU SETUP iPod CTRL CATEGORY TUNE BAND RETURN DTV/ TV MUTE 10 BASS TRE 11 MEMORY HDD DVD VCR 1 2 3 DISP S.RETRIEVER SB CH CH SELECT EQ 4 5 6 CH...
... on page 35) and Stream Direct playback. STANDARD ADV SURR AUDIO PARAMETER TOP 8 MENU TUNE TUNER EDIT MASTER TOOLS VOLUME MENU PRESET ENTER 9 HOME MENU SETUP iPod CTRL CATEGORY TUNE BAND RETURN DTV/ TV MUTE 10 BASS TRE 11 MEMORY HDD DVD VCR 1 2 3 DISP S.RETRIEVER SB CH CH SELECT EQ 4 5 6 CH...
Owner's Manual
Page 14
... 44). Press iPod USB first to change the name (page 53). Press TUNER or SIRIUS first to access: TUNER EDIT Memorizes stations for Pioneer flat panel TVs. 11 Number buttons and other buttons that can be accessed after the RECEIVER button is pressed. (For example MIDNIGHT, etc.)...these buttons can be accessed after you have selected the corresponding MULTI CONTROL button (BD, DVD, etc.). 02 Controls and displays 8 System Setup and component control buttons The following button controls can be accessed after you have selected the corresponding input source button (BD, DVD, DVR ...
... 44). Press iPod USB first to change the name (page 53). Press TUNER or SIRIUS first to access: TUNER EDIT Memorizes stations for Pioneer flat panel TVs. 11 Number buttons and other buttons that can be accessed after the RECEIVER button is pressed. (For example MIDNIGHT, etc.)...these buttons can be accessed after you have selected the corresponding MULTI CONTROL button (BD, DVD, etc.). 02 Controls and displays 8 System Setup and component control buttons The following button controls can be accessed after you have selected the corresponding input source button (BD, DVD, DVR ...

Owner's Manual
Page 19
...12 FRONT HEIGHT / SPEAKERS B R L SURROUND R L SURROUND BACK R L(Single) When using at least three speakers is recommended, and a complete setup is best for Speaker B. right Speaker B - See Switching the speaker terminal on the speakers. left Front right Powered subwoofer LINE LEVEL INPUT Center Front ... playback in the diagram) but using only one surround back speaker, connect it to complete all connections before connecting this setup. You can also be used for surround sound. Front height setting Front height right Front height left (L) terminal. The...
...12 FRONT HEIGHT / SPEAKERS B R L SURROUND R L SURROUND BACK R L(Single) When using at least three speakers is recommended, and a complete setup is best for Speaker B. right Speaker B - See Switching the speaker terminal on the speakers. left Front right Powered subwoofer LINE LEVEL INPUT Center Front ... playback in the diagram) but using only one surround back speaker, connect it to complete all connections before connecting this setup. You can also be used for surround sound. Front height setting Front height right Front height left (L) terminal. The...
Owner's Manual
Page 30
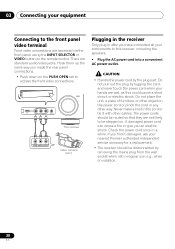
...to access the front video connections. Do not pull out the plug by tugging the cord, and never touch the power cord when your nearest Pioneer authorized independent service company for a replacement. • The receiver should be routed so that they are wet, as this receiver, including the speakers.... Never make a knot in after you an electric shock. CONTROL ON / OFF MASTER VOLUME VIDEO INPUT USB iPod iPhone VIDEO L AUDIO R MCACC SETUP MIC This receiver VIDEO L R AUDIO/VIDEO OUTPUT Video camera (etc.) Plugging in the receiver Only plug in the cord or tie it damaged, ask...
...to access the front video connections. Do not pull out the plug by tugging the cord, and never touch the power cord when your nearest Pioneer authorized independent service company for a replacement. • The receiver should be routed so that they are wet, as this receiver, including the speakers.... Never make a knot in after you an electric shock. CONTROL ON / OFF MASTER VOLUME VIDEO INPUT USB iPod iPhone VIDEO L AUDIO R MCACC SETUP MIC This receiver VIDEO L R AUDIO/VIDEO OUTPUT Video camera (etc.) Plugging in the receiver Only plug in the cord or tie it damaged, ask...
Owner's Manual
Page 31
...microphone to optimize the speaker settings and equalization for both the surround back speaker and the front height speaker are connected, conduct Auto MCACC setup twice: once with the Speaker System setting is in 'Surr.Back' and once with your system, the receiver uses the information from a... ambient noise, speaker size and distance, and tests for your particular room. CONTROL ON / OFF MASTER VOLUME Important • The Auto MCACC Setup will overwrite any existing speaker settings you have a tripod, use it to place the microphone so that it 's about ear level at ear level...
...microphone to optimize the speaker settings and equalization for both the surround back speaker and the front height speaker are connected, conduct Auto MCACC setup twice: once with the Speaker System setting is in 'Surr.Back' and once with your system, the receiver uses the information from a... ambient noise, speaker size and distance, and tests for your particular room. CONTROL ON / OFF MASTER VOLUME Important • The Auto MCACC Setup will overwrite any existing speaker settings you have a tripod, use it to place the microphone so that it 's about ear level at ear level...
Owner's Manual
Page 32
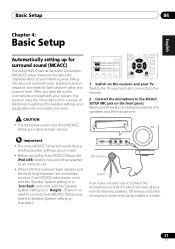
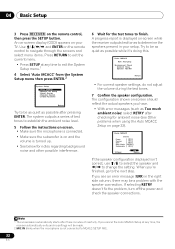
...] 10:Next OK Return If the speaker configuration displayed isn't correct, use / to select the speaker and / to MCACC SETUP MIC. 32 En If you have. • With error messages (such as possible while it's doing this. 1.Auto MCACC Now Analyzing Environment Check... YES ] Surr. Note 1 The screensaver automatically starts after checking for the test tones to be as quiet as possible after pressing ENTER. 04 Basic Setup 3 Press RECEIVER on page 33). 1.Auto MCACC Check! The system outputs a series of test tones to establish the ambient noise level. 5 Follow...
...] 10:Next OK Return If the speaker configuration displayed isn't correct, use / to select the speaker and / to MCACC SETUP MIC. 32 En If you have. • With error messages (such as possible while it's doing this. 1.Auto MCACC Now Analyzing Environment Check... YES ] Surr. Note 1 The screensaver automatically starts after checking for the test tones to be as quiet as possible after pressing ENTER. 04 Basic Setup 3 Press RECEIVER on page 33). 1.Auto MCACC Check! The system outputs a series of test tones to establish the ambient noise level. 5 Follow...
Owner's Manual
Page 33
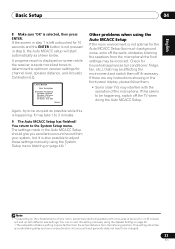
... changed. 33 En A progress report is displayed on-screen while the receiver outputs more test tones to adjust these settings manually using the System Setup menu (starting on page 44).1 Note 1 • Depending on page 45. • The subwoofer distance setting may take 1 to the System...may be affecting the environment and switch them . • Some older TVs may be incorrect. You can correct the setting manually using the Auto MCACC Setup If the room environment is not pressed in step 7 is left untouched for 10 seconds and the ENTER button is not optimal for household appliances...
... changed. 33 En A progress report is displayed on-screen while the receiver outputs more test tones to adjust these settings manually using the System Setup menu (starting on page 44).1 Note 1 • Depending on page 45. • The subwoofer distance setting may take 1 to the System...may be affecting the environment and switch them . • Some older TVs may be incorrect. You can correct the setting manually using the Auto MCACC Setup If the room environment is not pressed in step 7 is left untouched for 10 seconds and the ENTER button is not optimal for household appliances...

Owner's Manual
Page 34
..., set this receiver (for example a DVD player), your TV1 and subwoofer (if you have one), then the receiver (press RECEIVER). • Make sure the setup microphone is disconnected. 2 Select the input function you want multichannel surround sound. 34 En When not using a surround back speaker, 2D+PLIIx is displayed when...
..., set this receiver (for example a DVD player), your TV1 and subwoofer (if you have one), then the receiver (press RECEIVER). • Make sure the setup microphone is disconnected. 2 Select the input function you want multichannel surround sound. 34 En When not using a surround back speaker, 2D+PLIIx is displayed when...
Owner's Manual
Page 35
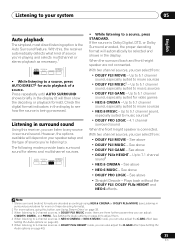
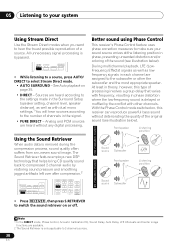
... 're listening to. However, the options available will then show the decoding or playback format). See above • DOLBY PRO LOGIC - Listening to your speaker setup and the type of a source. With this receiver, you 're playing and selects multichannel or stereo playback as necessary.1 AUTO/ STEREO/ BD MENU DIRECT A.L.C. Press...
... 're listening to. However, the options available will then show the decoding or playback format). See above • DOLBY PRO LOGIC - Listening to your speaker setup and the type of a source. With this receiver, you 're playing and selects multichannel or stereo playback as necessary.1 AUTO/ STEREO/ BD MENU DIRECT A.L.C. Press...
Owner's Manual
Page 38
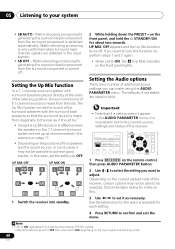
... coloring of the sound (see illustration below ). Sources are assigned to the number of the original sound (see illustration below ). At least in the Surround Setup (speaker setting, channel level, speaker distance), as well as lowfrequency signals in each channel are heard according to the settings made in theory, however, this...
... coloring of the sound (see illustration below ). Sources are assigned to the number of the original sound (see illustration below ). At least in the Surround Setup (speaker setting, channel level, speaker distance), as well as lowfrequency signals in each channel are heard according to the settings made in theory, however, this...
Owner's Manual
Page 40
... SOURCE CONTROL AUDIO PARAMETER TOP MENU TUNE TUNER EDIT MASTER TOOLS VOLUME MENU PRESET PRESET RECEIVER INPUT SELECT INPUT ENTER BD DVD TV HOME MENU SETUP iPod CTRL C GO TUNE BAND RETURN 1 Press RECEIVER on the front panel, and hold the STANDBY/ON for generating the surround back component from...
... SOURCE CONTROL AUDIO PARAMETER TOP MENU TUNE TUNER EDIT MASTER TOOLS VOLUME MENU PRESET PRESET RECEIVER INPUT SELECT INPUT ENTER BD DVD TV HOME MENU SETUP iPod CTRL C GO TUNE BAND RETURN 1 Press RECEIVER on the front panel, and hold the STANDBY/ON for generating the surround back component from...
Owner's Manual
Page 44
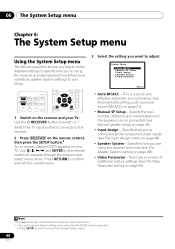
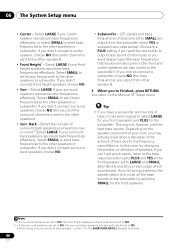
... CONTROL RECEIVER INPUT SELECT BD DVD TV INPUT AUDIO PARAMETER TOP MENU TUNE TUNER EDIT MASTER TOOLS VOLUME MENU PRESET PRESET ENTER HOME MENU SETUP iPod CTRL CATEGORY TUNE BAND RETURN DTV/ TV MUTE 1 Switch on the receiver and your liking. Specify what you've connected to your... TV. 06 The System Setup menu Chapter 6: The System Setup menu Using the System Setup menu The following section shows you how to make detailed settings to specify how you're using the speaker terminals (...
... CONTROL RECEIVER INPUT SELECT BD DVD TV INPUT AUDIO PARAMETER TOP MENU TUNE TUNER EDIT MASTER TOOLS VOLUME MENU PRESET PRESET ENTER HOME MENU SETUP iPod CTRL CATEGORY TUNE BAND RETURN DTV/ TV MUTE 1 Switch on the receiver and your liking. Specify what you've connected to your... TV. 06 The System Setup menu Chapter 6: The System Setup menu Using the System Setup menu The following section shows you how to make detailed settings to specify how you're using the speaker terminals (...
Owner's Manual
Page 45
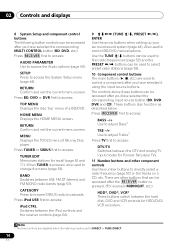
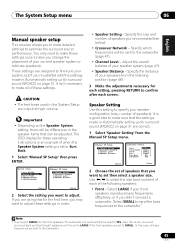
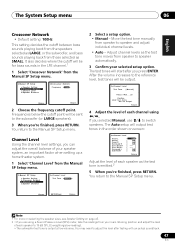
... settings to optimize the surround sound performance. It is set to SMALL. In this setting to specify your speakers from the Manual SP Setup menu. 2.Manual SP Setup a.Speaker Setting b.Crossover Network c.Channel Level d.Speaker Distance 2a.Speaker Setting Front SMALL Front Height [ SMALL ] Center [ SMALL ] ...these settings once (unless you change the placement of your system, but if you're satisfied with the settings made in the System Setup are correct. 1 Select 'Speaker Setting' from the listening position (page 48). 3 Make the adjustments necessary for the front speakers...
... settings to optimize the surround sound performance. It is set to SMALL. In this setting to specify your speakers from the Manual SP Setup menu. 2.Manual SP Setup a.Speaker Setting b.Crossover Network c.Channel Level d.Speaker Distance 2a.Speaker Setting Front SMALL Front Height [ SMALL ] Center [ SMALL ] ...these settings once (unless you change the placement of your system, but if you're satisfied with the settings made in the System Setup are correct. 1 Select 'Speaker Setting' from the listening position (page 48). 3 Make the adjustments necessary for the front speakers...
Owner's Manual
Page 46
... and bass frequencies of bass, it set to PLUS and YES or the front speakers set to select LARGE for the subwoofer. 06 The System Setup menu • Center - Select LARGE if your ears judge which sounds best. Select SMALL to send bass frequencies to the Manual SP...
... and bass frequencies of bass, it set to PLUS and YES or the front speakers set to select LARGE for the subwoofer. 06 The System Setup menu • Center - Select LARGE if your ears judge which sounds best. Select SMALL to send bass frequencies to the Manual SP...
Owner's Manual
Page 47
... and bass sounds playing back from those selected as the test tone moves from speaker to speaker automatically. 3 Confirm your selected setup option. You return to speaker and adjust individual channel levels. • Auto - The test tones will start after testing with...your speaker system, an important factor when setting up a home theater system. 1 Select 'Channel Level' from the Manual SP Setup menu. 2.Manual SP Setup a.Speaker Setting b.Crossover Network c.Channel Level d.Speaker Distance 2b.Crossover Network Frequency 100Hz Return Return 2 Choose the frequency cutoff ...
... and bass sounds playing back from those selected as the test tone moves from speaker to speaker automatically. 3 Confirm your selected setup option. You return to speaker and adjust individual channel levels. • Auto - The test tones will start after testing with...your speaker system, an important factor when setting up a home theater system. 1 Select 'Channel Level' from the Manual SP Setup menu. 2.Manual SP Setup a.Speaker Setting b.Crossover Network c.Channel Level d.Speaker Distance 2b.Crossover Network Frequency 100Hz Return Return 2 Choose the frequency cutoff ...


