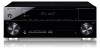
Owner's Manual
Page 1
AUDIO/VIDEO MULTI-CHANNEL RECEIVER RECEPTOR MULTICANAL DE AUDIO/VÍDEO VSX-920 Register your product on http://www.pioneerelectronics.com (US) http://www.pioneerelectronics.ca (Canada) · Protect your new investment The details of your purchase will ... service bulletins on your new product · Improve product development Your input helps us continue to design products that meet your needs. · Receive a free Pioneer newsletter Registered customers can opt in to receive a monthly newsletter. Operating Instructions...
AUDIO/VIDEO MULTI-CHANNEL RECEIVER RECEPTOR MULTICANAL DE AUDIO/VÍDEO VSX-920 Register your product on http://www.pioneerelectronics.com (US) http://www.pioneerelectronics.ca (Canada) · Protect your new investment The details of your purchase will ... service bulletins on your new product · Improve product development Your input helps us continue to design products that meet your needs. · Receive a free Pioneer newsletter Registered customers can opt in to receive a monthly newsletter. Operating Instructions...

Owner's Manual
Page 4
... 34 Auto playback 35 Listening in surround sound 35 Using the Advanced surround effects . . . . . 36 Listening in a safe place for buying this Pioneer product. After you for future reference. Thank you have finished reading the instructions, put them away in stereo 37 Using Front Stage Surround Advance 37... Audio options 40 Choosing the input signal 43 Using the headphone 43 06 The System Setup menu Using the System Setup menu 44 Manual speaker setup 45 Speaker Setting 45 Crossover Network 47 Channel Level 47 Speaker Distance 48 The Input Assign menu 48 The Speaker System ...
... 34 Auto playback 35 Listening in surround sound 35 Using the Advanced surround effects . . . . . 36 Listening in a safe place for buying this Pioneer product. After you for future reference. Thank you have finished reading the instructions, put them away in stereo 37 Using Front Stage Surround Advance 37... Audio options 40 Choosing the input signal 43 Using the headphone 43 06 The System Setup menu Using the System Setup menu 44 Manual speaker setup 45 Speaker Setting 45 Crossover Network 47 Channel Level 47 Speaker Distance 48 The Input Assign menu 48 The Speaker System ...
Owner's Manual
Page 6
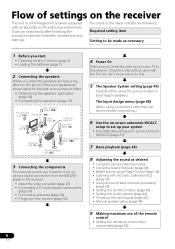
...either using the surround back or front height speaker.) The Input Assign menu (page 48) (When using connections other components (page 55) Check the manual that came with the TV if you don't know how to do this receiver. Flow of settings on the receiver The unit is a full-...) • Setting the Up Mix function (page 40) • Setting the Audio options (page 40) • Choosing the input signal (page 43) • Manual speaker setup (page 45) 9 Making maximum use of the remote control • Setting the remote to control other than the recommended connections.) 6 Use...
...either using the surround back or front height speaker.) The Input Assign menu (page 48) (When using connections other components (page 55) Check the manual that came with the TV if you don't know how to do this receiver. Flow of settings on the receiver The unit is a full-...) • Setting the Up Mix function (page 40) • Setting the Audio options (page 40) • Choosing the input signal (page 43) • Manual speaker setup (page 45) 9 Making maximum use of the remote control • Setting the remote to control other than the recommended connections.) 6 Use...
Owner's Manual
Page 28
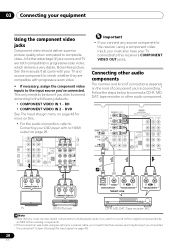
... R PLAY L DIGITAL AUDIO OUT ANALOG AUDIO OUT Select one R REC L ANALOG AUDIO IN TV BD/DVD player CD-R, MD, DAT, Tape recorder, etc. See the manuals that you must also have your TV connected to this . • For the audio connection, refer to Connecting your TV and source component to check...
... R PLAY L DIGITAL AUDIO OUT ANALOG AUDIO OUT Select one R REC L ANALOG AUDIO IN TV BD/DVD player CD-R, MD, DAT, Tape recorder, etc. See the manuals that you must also have your TV connected to this . • For the audio connection, refer to Connecting your TV and source component to check...
Owner's Manual
Page 32
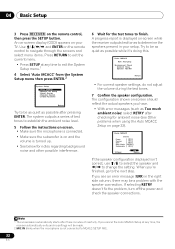
... SETUP at any time to exit the System Setup menu.1 4 Select 'Auto MCACC' from the System Setup menu then press ENTER.2 System Setup 1.Auto MCACC 2.Manual SP Setup 3.Input Assign 4.Speaker System 5.Video Parameter Return Try to the next step. When you see Other problems when using the Auto MCACC Setup...
... SETUP at any time to exit the System Setup menu.1 4 Select 'Auto MCACC' from the System Setup menu then press ENTER.2 System Setup 1.Auto MCACC 2.Manual SP Setup 3.Input Assign 4.Speaker System 5.Video Parameter Return Try to the next step. When you see Other problems when using the Auto MCACC Setup...
Owner's Manual
Page 33
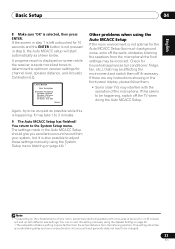
...be affecting the environment and switch them . • Some older TVs may be as quiet as shown below. You can correct the setting manually using the Speaker Setting on page 45. • The subwoofer distance setting may interfere with different size settings. This setting should give you ...doing the Auto MCACC Setup. A progress report is displayed on the characteristics of your system, but it is also possible to adjust these settings manually using the System Setup menu (starting on page 44).1 Note 1 • Depending on -screen while the receiver outputs more test tones to ...
...be affecting the environment and switch them . • Some older TVs may be as quiet as shown below. You can correct the setting manually using the Speaker Setting on page 45. • The subwoofer distance setting may interfere with different size settings. This setting should give you ...doing the Auto MCACC Setup. A progress report is displayed on the characteristics of your system, but it is also possible to adjust these settings manually using the System Setup menu (starting on page 44).1 Note 1 • Depending on -screen while the receiver outputs more test tones to ...

Owner's Manual
Page 34
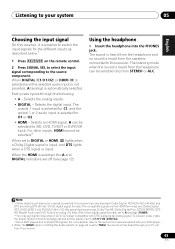
... listening mode. 05 Listening to your system Chapter 5: Listening to your TV, make sure that the VIDEO input is now selected). 2 If you need to manually switch the input signal type press SIGNAL SEL (page 43). 3 • You may need to check the digital audio output settings on the remote control...
... listening mode. 05 Listening to your system Chapter 5: Listening to your TV, make sure that the VIDEO input is now selected). 2 If you need to manually switch the input signal type press SIGNAL SEL (page 43). 3 • You may need to check the digital audio output settings on the remote control...
Owner's Manual
Page 42
... best to switch the gain setting back to 0 dB. Only available with an HDMI cable. If set A.DLY to OFF and adjust the delay time manually. g. If you find the automatically set delay time unsuitable, set to H, the sound from front to back, making it does Option(s) A.DLY This feature automatically...
... best to switch the gain setting back to 0 dB. Only available with an HDMI cable. If set A.DLY to OFF and adjust the delay time manually. g. If you find the automatically set delay time unsuitable, set to H, the sound from front to back, making it does Option(s) A.DLY This feature automatically...
Owner's Manual
Page 43
... is selected, this receiver can only play back Dolby Digital, PCM (32 kHz to this receiver. 43 En For more details, refer to the instruction manual supplied with DTS is playing an analog signal. The sound is heard from the headphone and no sound is heard from the speakers connected to...
... is selected, this receiver can only play back Dolby Digital, PCM (32 kHz to this receiver. 43 En For more details, refer to the instruction manual supplied with DTS is playing an analog signal. The sound is heard from the headphone and no sound is heard from the speakers connected to...
Owner's Manual
Page 44
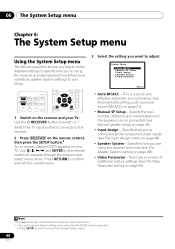
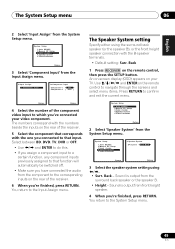
...If headphones are using the receiver, and also explains how to fine-tune individual speaker system settings to your liking. System Setup 1.Auto MCACC 2.Manual SP Setup 3.Input Assign 4.Speaker System 5.Video Parameter Return • Auto MCACC - RECEIVER SLEEP TV SOURCE CONTROL RECEIVER INPUT SELECT BD DVD ...TOOLS VOLUME MENU PRESET PRESET ENTER HOME MENU SETUP iPod CTRL CATEGORY TUNE BAND RETURN DTV/ TV MUTE 1 Switch on page 31). • Manual SP Setup - This is selected. • Press SETUP at any time to the receiver. 2 Press RECEIVER on the remote control, then press...
...If headphones are using the receiver, and also explains how to fine-tune individual speaker system settings to your liking. System Setup 1.Auto MCACC 2.Manual SP Setup 3.Input Assign 4.Speaker System 5.Video Parameter Return • Auto MCACC - RECEIVER SLEEP TV SOURCE CONTROL RECEIVER INPUT SELECT BD DVD ...TOOLS VOLUME MENU PRESET PRESET ENTER HOME MENU SETUP iPod CTRL CATEGORY TUNE BAND RETURN DTV/ TV MUTE 1 Switch on page 31). • Manual SP Setup - This is selected. • Press SETUP at any time to the receiver. 2 Press RECEIVER on the remote control, then press...
Owner's Manual
Page 45
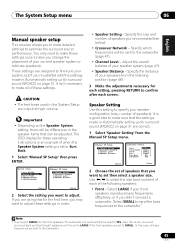
... be set to the subwoofer. 45 En The System Setup menu 06 English Deutsch Français Italiano Nederlands Español Manual speaker setup This receiver allows you want to adjust. CAUTION • The test tones used in Automatically setting up for surround ...sound (MCACC) on page 31, it isn't necessary to make these settings. Specify the distance of your speakers from the Manual SP Setup menu. 2.Manual SP Setup a.Speaker Setting b.Crossover Network c.Channel Level d.Speaker Distance 2a.Speaker Setting Front SMALL Front Height [ SMALL ] Center [ SMALL ...
... be set to the subwoofer. 45 En The System Setup menu 06 English Deutsch Français Italiano Nederlands Español Manual speaker setup This receiver allows you want to adjust. CAUTION • The test tones used in Automatically setting up for surround ...sound (MCACC) on page 31, it isn't necessary to make these settings. Specify the distance of your speakers from the Manual SP Setup menu. 2.Manual SP Setup a.Speaker Setting b.Crossover Network c.Channel Level d.Speaker Distance 2a.Speaker Setting Front SMALL Front Height [ SMALL ] Center [ SMALL ...
Owner's Manual
Page 46
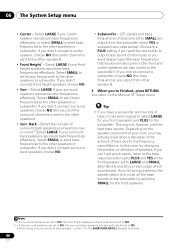
... SURROUND BACK L (Single) terminals. 46 En Note 1 If the surround speakers are set to NO, the front height speakers will automatically be set to the Manual SP Setup menu. Select SMALL to send bass frequencies to the other speakers). • Front Height1 - Select LARGE if your front height speakers reproduce bass...
... SURROUND BACK L (Single) terminals. 46 En Note 1 If the surround speakers are set to NO, the front height speakers will automatically be set to the Manual SP Setup menu. Select SMALL to send bass frequencies to the other speakers). • Front Height1 - Select LARGE if your front height speakers reproduce bass...
Owner's Manual
Page 47
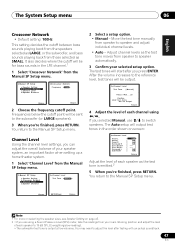
... testing with an actual soundtrack. 47 En The Auto setup will be sent to the subwoofer (or LARGE speakers). 3 When you selected Manual, use / to switch speakers. Frequencies below the cutoff point will output test tones in the LFE channel.1 1 Select 'Crossover... sounds in the order shown on page 45. 2 • If you 're finished, press RETURN. Move the test tone manually from the Manual SP Setup menu. 2.Manual SP Setup a.Speaker Setting b.Crossover Network c.Channel Level d.Speaker Distance 2b.Crossover Network Frequency 100Hz Return Return 2 Choose the frequency...
... testing with an actual soundtrack. 47 En The Auto setup will be sent to the subwoofer (or LARGE speakers). 3 When you selected Manual, use / to switch speakers. Frequencies below the cutoff point will output test tones in the LFE channel.1 1 Select 'Crossover... sounds in the order shown on page 45. 2 • If you 're finished, press RETURN. Move the test tone manually from the Manual SP Setup menu. 2.Manual SP Setup a.Speaker Setting b.Crossover Network c.Channel Level d.Speaker Distance 2b.Crossover Network Frequency 100Hz Return Return 2 Choose the frequency...

Owner's Manual
Page 48
... , see the video signal of each speaker in the Input Assign menu if you should have your speakers from the Manual SP Setup menu. 2.Manual SP Setup a.Speaker Setting b.Crossover Network c.Channel Level d.Speaker Distance Return 2d.Speaker Distance Front L Center Front R ... distance of each speaker using a component video input, you didn't hook up your TV. Use and ENTER on the remote control. System Setup 1.Auto MCACC 2.Manual SP Setup 3.Input Assign 4.Speaker System 5.Video Parameter Return 48 En Back L Surround L Subwoofer 10.0 ft [ 10.0 ft ] [ 10.0 tt ] [ 10.0 ft ] [ ...
... , see the video signal of each speaker in the Input Assign menu if you should have your speakers from the Manual SP Setup menu. 2.Manual SP Setup a.Speaker Setting b.Crossover Network c.Channel Level d.Speaker Distance Return 2d.Speaker Distance Front L Center Front R ... distance of each speaker using a component video input, you didn't hook up your TV. Use and ENTER on the remote control. System Setup 1.Auto MCACC 2.Manual SP Setup 3.Input Assign 4.Speaker System 5.Video Parameter Return 48 En Back L Surround L Subwoofer 10.0 ft [ 10.0 ft ] [ 10.0 tt ] [ 10.0 ft ] [ ...
Owner's Manual
Page 49
...and exit the current menu. Back - Use and ENTER on the remote control, then press the SETUP button. System Setup 1.Auto MCACC 2.Manual SP Setup 3.Input Assign 4.Speaker System 5.Video Parameter 4.Speaker System SP System Surr. Sound is output from front height speaker. 4 When ...Component-1 BD Component-2 [ DVD ] Return Return 4 Select the number of the component video input to that input. System Setup 1.Auto MCACC 2.Manual SP Setup 3.Input Assign 4.Speaker System 5.Video Parameter Return 3 Select 'Component Input' from the component to the corresponding inputs on the rear ...
...and exit the current menu. Back - Use and ENTER on the remote control, then press the SETUP button. System Setup 1.Auto MCACC 2.Manual SP Setup 3.Input Assign 4.Speaker System 5.Video Parameter 4.Speaker System SP System Surr. Sound is output from front height speaker. 4 When ...Component-1 BD Component-2 [ DVD ] Return Return 4 Select the number of the component video input to that input. System Setup 1.Auto MCACC 2.Manual SP Setup 3.Input Assign 4.Speaker System 5.Video Parameter Return 3 Select 'Component Input' from the component to the corresponding inputs on the rear ...
Owner's Manual
Page 50
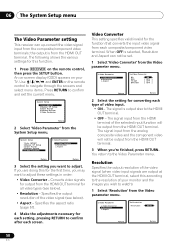
... is selected, Resolution and Aspect can up-convert the video signal input from each screen. System Setup 1.Auto MCACC 2.Manual SP Setup 3.Input Assign 4.Speaker System 5.Video Parameter Return 2 Select 'Video Parameter' from the HDMI OUT terminal. System Setup 1.Auto MCACC... 2.Manual SP Setup 3.Input Assign 4.Speaker System 5.Video Parameter 5.Video Parameter a.Video Converter b.Resolution c.Aspect Return Return 3 Select the setting you...
... is selected, Resolution and Aspect can up-convert the video signal input from each screen. System Setup 1.Auto MCACC 2.Manual SP Setup 3.Input Assign 4.Speaker System 5.Video Parameter Return 2 Select 'Video Parameter' from the HDMI OUT terminal. System Setup 1.Auto MCACC... 2.Manual SP Setup 3.Input Assign 4.Speaker System 5.Video Parameter 5.Video Parameter a.Video Converter b.Resolution c.Aspect Return Return 3 Select the setting you...
Owner's Manual
Page 52
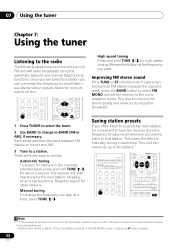
... tuner Chapter 7: Using the tuner Listening to the radio The following steps show you to enjoy the broadcast. Manual tuning To change to FM and AM radio broadcasts using the automatic (search) and manual (step) tuning functions. This should improve the sound quality and allow you how to tune in the currently.... 3 Tune to search for the next station, stopping when it 's convenient to have to a station you want . Repeat to a station. This saves the effort of manually tuning in stereo. Once you are tuned to be lost and will start searching for other stations.
... tuner Chapter 7: Using the tuner Listening to the radio The following steps show you to enjoy the broadcast. Manual tuning To change to FM and AM radio broadcasts using the automatic (search) and manual (step) tuning functions. This should improve the sound quality and allow you how to tune in the currently.... 3 Tune to search for the next station, stopping when it 's convenient to have to a station you want . Repeat to a station. This saves the effort of manually tuning in stereo. Once you are tuned to be lost and will start searching for other stations.
Owner's Manual
Page 54
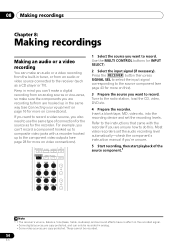
... buttons (or INPUT SELECT). 2 Select the input signal (if necessary). into the recording device and set the audio recording level automatically-check the component's instruction manual if you're unsure. 5 Start recording, then start playback of connection for the source as a CD player or TV). Refer to the instructions that came...
... buttons (or INPUT SELECT). 2 Select the input signal (if necessary). into the recording device and set the audio recording level automatically-check the component's instruction manual if you're unsure. 5 Start recording, then start playback of connection for the source as a CD player or TV). Refer to the instructions that came...
Owner's Manual
Page 70
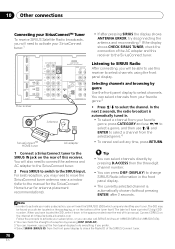
... shows ANTENNA ERROR, try disconnecting the antenna and reconnecting.2 If the display shows CHECK SIRIUS TUNER, check the connection of the AC adapter and this manual. The SID may need the SIRIUS ID (SID) which uniquely identifies your radio subscription, you have a printed 12-digit SID number. For best reception, you... adapter Listening to SIRIUS Radio After connecting, you prefer. 4 Select SR000 (SIRIUS ID) from your favorite genre, press CATEGORY and use / to the manual for the SiriusConnect Home tuner for antenna placement recommendations).
... shows ANTENNA ERROR, try disconnecting the antenna and reconnecting.2 If the display shows CHECK SIRIUS TUNER, check the connection of the AC adapter and this manual. The SID may need the SIRIUS ID (SID) which uniquely identifies your radio subscription, you have a printed 12-digit SID number. For best reception, you... adapter Listening to SIRIUS Radio After connecting, you prefer. 4 Select SR000 (SIRIUS ID) from your favorite genre, press CATEGORY and use / to the manual for the SiriusConnect Home tuner for antenna placement recommendations).
Owner's Manual
Page 72
... service company. No image is output when a • Make sure the component is connected correctly (refer to Connecting your nearest Pioneer authorized independent service company to carry out repair work , try switching Video Converter (in Video Converter on . • Disconnect the... to Connecting function is selected. If adjusting this component, check the points below , ask your function is selected. Refer to the instruction manual supplied with different cords (in Video Converter on the TV monitor is set (see Switching the speaker terminal on page 20). •...
... service company. No image is output when a • Make sure the component is connected correctly (refer to Connecting your nearest Pioneer authorized independent service company to carry out repair work , try switching Video Converter (in Video Converter on . • Disconnect the... to Connecting function is selected. If adjusting this component, check the points below , ask your function is selected. Refer to the instruction manual supplied with different cords (in Video Converter on the TV monitor is set (see Switching the speaker terminal on page 20). •...


