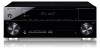
Owner's Manual
Page 1
Operating Instructions Manual de instrucciones AUDIO/VIDEO MULTI-CHANNEL RECEIVER RECEPTOR MULTICANAL DE AUDIO/VÍDEO VSX-920 Register your product on http://www.pioneerelectronics.com (US) http://www.pioneerelectronics.ca (Canada) · Protect your new investment The details of your purchase will ... service bulletins on your new product · Improve product development Your input helps us continue to design products that meet your needs. · Receive a free Pioneer newsletter Registered customers can opt in to receive a monthly newsletter.
Operating Instructions Manual de instrucciones AUDIO/VIDEO MULTI-CHANNEL RECEIVER RECEPTOR MULTICANAL DE AUDIO/VÍDEO VSX-920 Register your product on http://www.pioneerelectronics.com (US) http://www.pioneerelectronics.ca (Canada) · Protect your new investment The details of your purchase will ... service bulletins on your new product · Improve product development Your input helps us continue to design products that meet your needs. · Receive a free Pioneer newsletter Registered customers can opt in to receive a monthly newsletter.

Owner's Manual
Page 4
... Setting the Audio options 40 Choosing the input signal 43 Using the headphone 43 06 The System Setup menu Using the System Setup menu 44 Manual speaker setup 45 Speaker Setting 45 Crossover Network 47 Channel Level 47 Speaker Distance 48 The Input Assign menu 48 The Speaker System setting 49... system Basic playback 34 Auto playback 35 Listening in surround sound 35 Using the Advanced surround effects . . . . . 36 Listening in a safe place for buying this Pioneer product. Contents 01 Before you will know how to station presets 53 Naming preset stations 53 4 En
... Setting the Audio options 40 Choosing the input signal 43 Using the headphone 43 06 The System Setup menu Using the System Setup menu 44 Manual speaker setup 45 Speaker Setting 45 Crossover Network 47 Channel Level 47 Speaker Distance 48 The Input Assign menu 48 The Speaker System setting 49... system Basic playback 34 Auto playback 35 Listening in surround sound 35 Using the Advanced surround effects . . . . . 36 Listening in a safe place for buying this Pioneer product. Contents 01 Before you will know how to station presets 53 Naming preset stations 53 4 En
Owner's Manual
Page 6
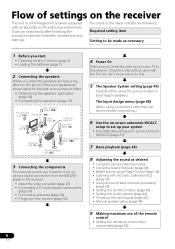
Check the manual that came with the TV if you don't know how to do this receiver. It can be made as desired • Using the various listening ... (page 39) • Setting the Up Mix function (page 40) • Setting the Audio options (page 40) • Choosing the input signal (page 43) • Manual speaker setup (page 45) 9 Making maximum use of the remote control • Setting the remote to control other than the recommended connections.) 6 Use...
Check the manual that came with the TV if you don't know how to do this receiver. It can be made as desired • Using the various listening ... (page 39) • Setting the Up Mix function (page 40) • Setting the Audio options (page 40) • Choosing the input signal (page 43) • Manual speaker setup (page 45) 9 Making maximum use of the remote control • Setting the remote to control other than the recommended connections.) 6 Use...
Owner's Manual
Page 28
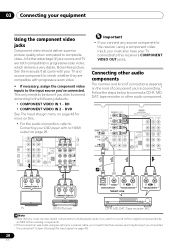
... OUT jacks. DVD See The Input Assign menu on page 48 for more on page 43). 28 En BD • COMPONENT VIDEO IN 2 - See the manuals that you must also have your TV connected to this . • For the audio connection, refer to Connecting your DVD player with progressive-scan video...
... OUT jacks. DVD See The Input Assign menu on page 48 for more on page 43). 28 En BD • COMPONENT VIDEO IN 2 - See the manuals that you must also have your TV connected to this . • For the audio connection, refer to Connecting your DVD player with progressive-scan video...
Owner's Manual
Page 32
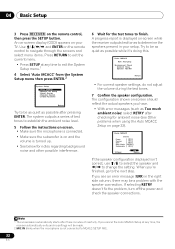
... SETUP at any time to exit the System Setup menu.1 4 Select 'Auto MCACC' from the System Setup menu then press ENTER.2 System Setup 1.Auto MCACC 2.Manual SP Setup 3.Input Assign 4.Speaker System 5.Video Parameter Return Try to finish. If you 're finished, go to MCACC SETUP MIC. 32 En Note 1 The...
... SETUP at any time to exit the System Setup menu.1 4 Select 'Auto MCACC' from the System Setup menu then press ENTER.2 System Setup 1.Auto MCACC 2.Manual SP Setup 3.Input Assign 4.Speaker System 5.Video Parameter Return Try to finish. If you 're finished, go to MCACC SETUP MIC. 32 En Note 1 The...
Owner's Manual
Page 33
...be farther than the actual distance from the microphone) the final settings may interfere with different size settings. You return to adjust these settings manually using the System Setup menu (starting on page 44).1 Note 1 • Depending on the characteristics of your system, but it is...MCACC Setup (too much background noise, echo off the walls, obstacles blocking the speakers from the listening position. You can correct the setting manually using the Auto MCACC Setup If the room environment is also possible to the System Setup menu. A progress report is displayed on page ...
...be farther than the actual distance from the microphone) the final settings may interfere with different size settings. You return to adjust these settings manually using the System Setup menu (starting on page 44).1 Note 1 • Depending on the characteristics of your system, but it is...MCACC Setup (too much background noise, echo off the walls, obstacles blocking the speakers from the listening position. You can correct the setting manually using the Auto MCACC Setup If the room environment is also possible to the System Setup menu. A progress report is displayed on page ...

Owner's Manual
Page 34
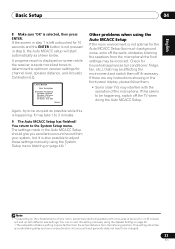
... and subwoofer (if you have one), then the receiver (press RECEIVER). • Make sure the setup microphone is now selected). 2 If you need to manually switch the input signal type press SIGNAL SEL (page 43). 3 • You may only get digital 2 channel stereo and analog sound. When using a surround back...
... and subwoofer (if you have one), then the receiver (press RECEIVER). • Make sure the setup microphone is now selected). 2 If you need to manually switch the input signal type press SIGNAL SEL (page 43). 3 • You may only get digital 2 channel stereo and analog sound. When using a surround back...
Owner's Manual
Page 42
... H, the sound from the front height speaker when listening in DOLBY PLIIz HEIGHT mode. d. h. i. The initial set A.DLY to OFF and adjust the delay time manually. The audio delay time is only available when the connected display supports the automatic audio/video synchronizing capability ('lip-sync') for signals other than Dolby...
... H, the sound from the front height speaker when listening in DOLBY PLIIz HEIGHT mode. d. h. i. The initial set A.DLY to OFF and adjust the delay time manually. The audio delay time is only available when the connected display supports the automatic audio/video synchronizing capability ('lip-sync') for signals other than Dolby...
Owner's Manual
Page 43
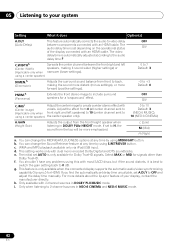
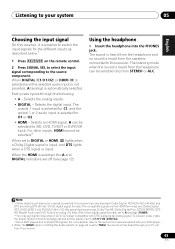
... STEREO or ALC. The sound is heard from the headphone and no sound is playing an analog signal. For more details, refer to the instruction manual supplied with DTS is heard from this receiver can be selected.2 When set to THRU, the sound will be selected for O1 or O2. •...
... STEREO or ALC. The sound is heard from the headphone and no sound is playing an analog signal. For more details, refer to the instruction manual supplied with DTS is heard from this receiver can be selected.2 When set to THRU, the sound will be selected for O1 or O2. •...
Owner's Manual
Page 44
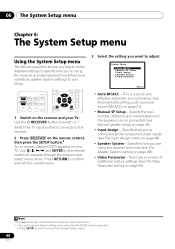
... MASTER TOOLS VOLUME MENU PRESET PRESET ENTER HOME MENU SETUP iPod CTRL CATEGORY TUNE BAND RETURN DTV/ TV MUTE 1 Switch on page 31). • Manual SP Setup - There are connected to the receiver, disconnect them. 2 • You can't use the System Setup menu when the iPod/USB input... exit the current menu. 3 Select the setting you want to adjust. Use and ENTER on your liking. Specifies how you 've connected (see Manual speaker setup on page 49). • Video Parameter - Specify the size, number, distance and overall balance of additional picture settings (see The Video...
... MASTER TOOLS VOLUME MENU PRESET PRESET ENTER HOME MENU SETUP iPod CTRL CATEGORY TUNE BAND RETURN DTV/ TV MUTE 1 Switch on page 31). • Manual SP Setup - There are connected to the receiver, disconnect them. 2 • You can't use the System Setup menu when the iPod/USB input... exit the current menu. 3 Select the setting you want to adjust. Use and ENTER on your liking. Specifies how you 've connected (see Manual speaker setup on page 49). • Video Parameter - Specify the size, number, distance and overall balance of additional picture settings (see The Video...
Owner's Manual
Page 45
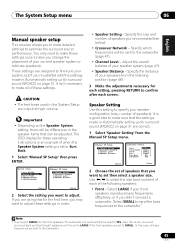
..., the subwoofer will be adjusted. The System Setup menu 06 English Deutsch Français Italiano Nederlands Español Manual speaker setup This receiver allows you want to adjust. Important • Depending on page 31 are designed to fine-tune your speakers... from the Manual SP Setup menu. 2.Manual SP Setup a.Speaker Setting b.Crossover Network c.Channel Level d.Speaker Distance 2a.Speaker Setting Front SMALL Front Height [ SMALL ] Center [ SMALL ]...
..., the subwoofer will be adjusted. The System Setup menu 06 English Deutsch Français Italiano Nederlands Español Manual speaker setup This receiver allows you want to adjust. Important • Depending on page 31 are designed to fine-tune your speakers... from the Manual SP Setup menu. 2.Manual SP Setup a.Speaker Setting b.Crossover Network c.Channel Level d.Speaker Distance 2a.Speaker Setting Front SMALL Front Height [ SMALL ] Center [ SMALL ]...
Owner's Manual
Page 46
... 're having problems, the easiest option is sent to the subwoofer by selecting SMALL for the subwoofer. Select SMALL to send bass frequencies to the Manual SP Setup menu. Back -
... 're having problems, the easiest option is sent to the subwoofer by selecting SMALL for the subwoofer. Select SMALL to send bass frequencies to the Manual SP Setup menu. Back -
Owner's Manual
Page 47
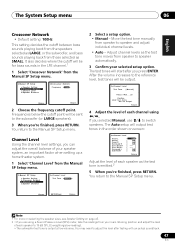
... you can adjust the overall balance of each channel using a Sound Pressure Level (SPL) meter, take the readings from the Manual SP Setup menu. 2.Manual SP Setup a.Speaker Setting b.Crossover Network c.Channel Level d.Speaker Distance 2b.Crossover Network Frequency 100Hz Return Return 2 Choose the frequency.... It also decides where the cutoff will be for bass sounds in the order shown on page 45. 2 • If you selected Manual, use / to speaker automatically. 3 Confirm your speaker system, an important factor when setting up a home theater system. 1 ...
... you can adjust the overall balance of each channel using a Sound Pressure Level (SPL) meter, take the readings from the Manual SP Setup menu. 2.Manual SP Setup a.Speaker Setting b.Crossover Network c.Channel Level d.Speaker Distance 2b.Crossover Network Frequency 100Hz Return Return 2 Choose the frequency.... It also decides where the cutoff will be for bass sounds in the order shown on page 45. 2 • If you selected Manual, use / to speaker automatically. 3 Confirm your speaker system, an important factor when setting up a home theater system. 1 ...

Owner's Manual
Page 48
... Distance' from the listening position. Use and ENTER on the remote control, then press the SETUP button. System Setup 1.Auto MCACC 2.Manual SP Setup 3.Input Assign 4.Speaker System 5.Video Parameter Return 48 En You can also press CH SELECT and use / ...adjust the distance of a different component). An on-screen display (OSD) appears on the remote control. on your speakers from the Manual SP Setup menu. 2.Manual SP Setup a.Speaker Setting b.Crossover Network c.Channel Level d.Speaker Distance Return 2d.Speaker Distance Front L Center Front R Surround R Surr...
... Distance' from the listening position. Use and ENTER on the remote control, then press the SETUP button. System Setup 1.Auto MCACC 2.Manual SP Setup 3.Input Assign 4.Speaker System 5.Video Parameter Return 48 En You can also press CH SELECT and use / ...adjust the distance of a different component). An on-screen display (OSD) appears on the remote control. on your speakers from the Manual SP Setup menu. 2.Manual SP Setup a.Speaker Setting b.Crossover Network c.Channel Level d.Speaker Distance Return 2d.Speaker Distance Front L Center Front R Surround R Surr...
Owner's Manual
Page 49
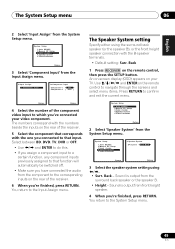
... press the SETUP button. The Speaker System setting Specify either using /. • Surr. System Setup 1.Auto MCACC 2.Manual SP Setup 3.Input Assign 4.Speaker System 5.Video Parameter Return 2 Select 'Speaker System' from the System Setup menu. Back Return Return...to the corresponding inputs on your video component. System Setup 1.Auto MCACC 2.Manual SP Setup 3.Input Assign 4.Speaker System 5.Video Parameter 4.Speaker System SP System Surr. System Setup 1.Auto MCACC 2.Manual SP Setup 3.Input Assign 4.Speaker System 5.Video Parameter Return 3 Select '...
... press the SETUP button. The Speaker System setting Specify either using /. • Surr. System Setup 1.Auto MCACC 2.Manual SP Setup 3.Input Assign 4.Speaker System 5.Video Parameter Return 2 Select 'Speaker System' from the System Setup menu. Back Return Return...to the corresponding inputs on your video component. System Setup 1.Auto MCACC 2.Manual SP Setup 3.Input Assign 4.Speaker System 5.Video Parameter 4.Speaker System SP System Surr. System Setup 1.Auto MCACC 2.Manual SP Setup 3.Input Assign 4.Speaker System 5.Video Parameter Return 3 Select '...
Owner's Manual
Page 50
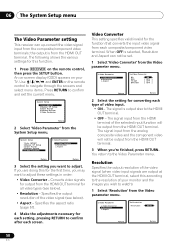
... settings for each screen. Use and ENTER on the remote control, then press the SETUP button. System Setup 1.Auto MCACC 2.Manual SP Setup 3.Input Assign 4.Speaker System 5.Video Parameter 5.Video Parameter a.Video Converter b.Resolution c.Aspect Return Return 3 Select the ...parameter menu. 5.Video Parameter a.Video Converter b.Resolution c.Aspect 5b.Resolution Resolution AUTO Return Return 50 En System Setup 1.Auto MCACC 2.Manual SP Setup 3.Input Assign 4.Speaker System 5.Video Parameter Return 2 Select 'Video Parameter' from the composite/component video terminals; The ...
... settings for each screen. Use and ENTER on the remote control, then press the SETUP button. System Setup 1.Auto MCACC 2.Manual SP Setup 3.Input Assign 4.Speaker System 5.Video Parameter 5.Video Parameter a.Video Converter b.Resolution c.Aspect Return Return 3 Select the ...parameter menu. 5.Video Parameter a.Video Converter b.Resolution c.Aspect 5b.Resolution Resolution AUTO Return Return 50 En System Setup 1.Auto MCACC 2.Manual SP Setup 3.Input Assign 4.Speaker System 5.Video Parameter Return 2 Select 'Video Parameter' from the composite/component video terminals; The ...
Owner's Manual
Page 52
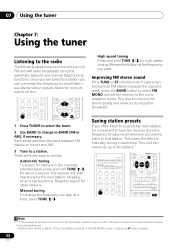
... how to tune in to enjoy the broadcast. The receiver will have the receiver store the frequency for recall later- This saves the effort of manually tuning in the FM MONO mode, it has found one step at the frequency you to FM and AM radio broadcasts using the automatic (search...) and manual (step) tuning functions. Manual tuning To change to an FM station because the signal is stored in each time. Improving FM stereo sound If the TUNE or ST...
... how to tune in to enjoy the broadcast. The receiver will have the receiver store the frequency for recall later- This saves the effort of manually tuning in the FM MONO mode, it has found one step at the frequency you to FM and AM radio broadcasts using the automatic (search...) and manual (step) tuning functions. Manual tuning To change to an FM station because the signal is stored in each time. Improving FM stereo sound If the TUNE or ST...
Owner's Manual
Page 54
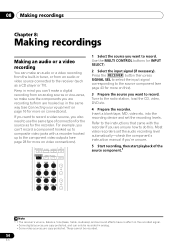
Insert a blank tape, MD, video etc. into the recording device and set the audio recording level automatically-check the component's instruction manual if you are recording to/from an audio or video source connected to the receiver (such as for the recorder. Refer to the instructions that ...
Insert a blank tape, MD, video etc. into the recording device and set the audio recording level automatically-check the component's instruction manual if you are recording to/from an audio or video source connected to the receiver (such as for the recorder. Refer to the instructions that ...
Owner's Manual
Page 70
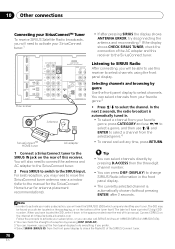
... input. The SID may need to connect the antenna and AC adapter to the SiriusConnect tuner. 2 Press SIRIUS to switch to the manual for the SiriusConnect Home tuner for antenna placement recommendations). Connect SIRIUS on the internet at: https://activate.siriusradio.com Follow the prompts to...favorite genre, press CATEGORY and use / to select a genre, and then use this receiver to check the Radio ID of this manual. In the next 2 seconds, the radio broadcast is automatically chosen (without pressing ENTER) after pressing SIRIUS the display shows ANTENNA ERROR, try ...
... input. The SID may need to connect the antenna and AC adapter to the SiriusConnect tuner. 2 Press SIRIUS to switch to the manual for the SiriusConnect Home tuner for antenna placement recommendations). Connect SIRIUS on the internet at: https://activate.siriusradio.com Follow the prompts to...favorite genre, press CATEGORY and use / to select a genre, and then use this receiver to check the Radio ID of this manual. In the next 2 seconds, the radio broadcast is automatically chosen (without pressing ENTER) after pressing SIRIUS the display shows ANTENNA ERROR, try ...
Owner's Manual
Page 72
The receiver suddenly switches off automatically. Refer to the instruction manual supplied with the TV. • For HDMI, or when Video Converter is set (see Switching the speaker terminal on page 20). • Press SIGNAL SEL .... • Press SPEAKERS to select the proper speaker set to shut off . • After about a minute (you won't be converted. If the message persists, call a Pioneer authorized independent service company. If you used , because sometimes the problem may not be able to normal operating conditions. Take a look at the other components...
The receiver suddenly switches off automatically. Refer to the instruction manual supplied with the TV. • For HDMI, or when Video Converter is set (see Switching the speaker terminal on page 20). • Press SIGNAL SEL .... • Press SPEAKERS to select the proper speaker set to shut off . • After about a minute (you won't be converted. If the message persists, call a Pioneer authorized independent service company. If you used , because sometimes the problem may not be able to normal operating conditions. Take a look at the other components...


