Owner's Manual
Page 1
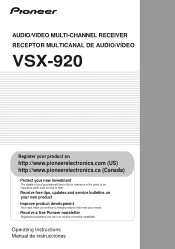
Operating Instructions Manual de instrucciones AUDIO/VIDEO MULTI-CHANNEL RECEIVER RECEPTOR MULTICANAL DE AUDIO/VÍDEO VSX-920 Register your product on http://www.pioneerelectronics.com (US) http://www.pioneerelectronics.ca (Canada) · Protect your new investment The details of your purchase will ... service bulletins on your new product · Improve product development Your input helps us continue to design products that meet your needs. · Receive a free Pioneer newsletter Registered customers can opt in to receive a monthly newsletter.
Operating Instructions Manual de instrucciones AUDIO/VIDEO MULTI-CHANNEL RECEIVER RECEPTOR MULTICANAL DE AUDIO/VÍDEO VSX-920 Register your product on http://www.pioneerelectronics.com (US) http://www.pioneerelectronics.ca (Canada) · Protect your new investment The details of your purchase will ... service bulletins on your new product · Improve product development Your input helps us continue to design products that meet your needs. · Receive a free Pioneer newsletter Registered customers can opt in to receive a monthly newsletter.

Owner's Manual
Page 4
... 34 Auto playback 35 Listening in surround sound 35 Using the Advanced surround effects . . . . . 36 Listening in a safe place for buying this Pioneer product. Contents 01 Before you have finished reading the instructions, put them away in stereo 37 Using Front Stage Surround Advance 37 Using Stream Direct... Audio options 40 Choosing the input signal 43 Using the headphone 43 06 The System Setup menu Using the System Setup menu 44 Manual speaker setup 45 Speaker Setting 45 Crossover Network 47 Channel Level 47 Speaker Distance 48 The Input Assign menu 48 The Speaker System ...
... 34 Auto playback 35 Listening in surround sound 35 Using the Advanced surround effects . . . . . 36 Listening in a safe place for buying this Pioneer product. Contents 01 Before you have finished reading the instructions, put them away in stereo 37 Using Front Stage Surround Advance 37 Using Stream Direct... Audio options 40 Choosing the input signal 43 Using the headphone 43 06 The System Setup menu Using the System Setup menu 44 Manual speaker setup 45 Speaker Setting 45 Crossover Network 47 Channel Level 47 Speaker Distance 48 The Input Assign menu 48 The Speaker System ...
Owner's Manual
Page 6
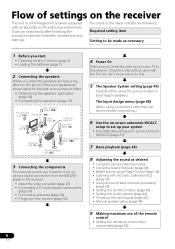
Check the manual that came with the TV if you don't know how to do this receiver. The colors of the steps indicate the following: Required setting item ... (page 39) • Setting the Up Mix function (page 40) • Setting the Audio options (page 40) • Choosing the input signal (page 43) • Manual speaker setup (page 45) 9 Making maximum use of the remote control • Setting the remote to control other than the recommended connections.) 6 Use...
Check the manual that came with the TV if you don't know how to do this receiver. The colors of the steps indicate the following: Required setting item ... (page 39) • Setting the Up Mix function (page 40) • Setting the Audio options (page 40) • Choosing the input signal (page 43) • Manual speaker setup (page 45) 9 Making maximum use of the remote control • Setting the remote to control other than the recommended connections.) 6 Use...
Owner's Manual
Page 28
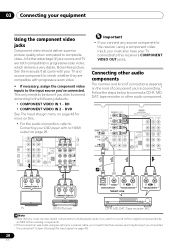
... inputs to the input source you connected the component to Connecting your DVD player with no HDMI output on page 43). 28 En See the manuals that you must also have your TV connected to this . • For the audio connection, refer to (see Choosing the input signal on page 25...
... inputs to the input source you connected the component to Connecting your DVD player with no HDMI output on page 43). 28 En See the manuals that you must also have your TV connected to this . • For the audio connection, refer to (see Choosing the input signal on page 25...
Owner's Manual
Page 32
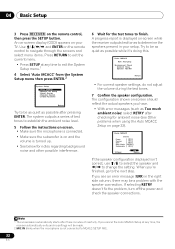
... SETUP at any time to exit the System Setup menu.1 4 Select 'Auto MCACC' from the System Setup menu then press ENTER.2 System Setup 1.Auto MCACC 2.Manual SP Setup 3.Input Assign 4.Speaker System 5.Video Parameter Return Try to be as quiet as possible after pressing ENTER. Use and ENTER on the remote...
... SETUP at any time to exit the System Setup menu.1 4 Select 'Auto MCACC' from the System Setup menu then press ENTER.2 System Setup 1.Auto MCACC 2.Manual SP Setup 3.Input Assign 4.Speaker System 5.Video Parameter Return Try to be as quiet as possible after pressing ENTER. Use and ENTER on the remote...
Owner's Manual
Page 33
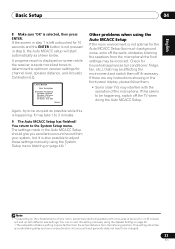
You can correct the setting manually using the Speaker Setting on page 45. • The subwoofer distance setting may take 1 to the System Setup menu. If there are any instructions showing ... your room, sometimes identical speakers with cone sizes of around 12 cm (5 inches) will start automatically as possible while this seems to adjust these settings manually using the Auto MCACC Setup If the room environment is displayed on the characteristics of the microphone. Check for 10 seconds and the ENTER button...
You can correct the setting manually using the Speaker Setting on page 45. • The subwoofer distance setting may take 1 to the System Setup menu. If there are any instructions showing ... your room, sometimes identical speakers with cone sizes of around 12 cm (5 inches) will start automatically as possible while this seems to adjust these settings manually using the Auto MCACC Setup If the room environment is displayed on the characteristics of the microphone. Check for 10 seconds and the ENTER button...

Owner's Manual
Page 34
... the speakers connected to this to convert the MPEG audio to PCM. • Depending on your DVD player or source discs, you may need to manually switch the input signal type press SIGNAL SEL (page 43). 3 • You may only get digital 2 channel stereo and analog sound. You can use the...
... the speakers connected to this to convert the MPEG audio to PCM. • Depending on your DVD player or source discs, you may need to manually switch the input signal type press SIGNAL SEL (page 43). 3 • You may only get digital 2 channel stereo and analog sound. You can use the...
Owner's Manual
Page 42
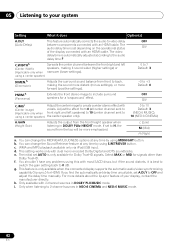
If set A.DLY to OFF and adjust the delay time manually. c. This setting works only with 2-channel sources in DOLBY PLII MUSIC mode. The initial set depending on the operational status ON of your system Setting ...
If set A.DLY to OFF and adjust the delay time manually. c. This setting works only with 2-channel sources in DOLBY PLII MUSIC mode. The initial set depending on the operational status ON of your system Setting ...
Owner's Manual
Page 43
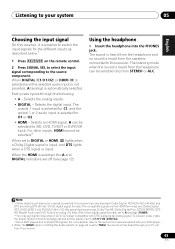
... sampling frequencies), Dolby TrueHD, Dolby Digital Plus, DTS-EXPRESS, DTSHD Master Audio and DVD Audio (including 192 kHz). For more details, refer to the instruction manual supplied with DTS is heard from STEREO or ALC. The sound is heard from this receiver. 43 En With other inputs, HDMI cannot be selected...
... sampling frequencies), Dolby TrueHD, Dolby Digital Plus, DTS-EXPRESS, DTSHD Master Audio and DVD Audio (including 192 kHz). For more details, refer to the instruction manual supplied with DTS is heard from STEREO or ALC. The sound is heard from this receiver. 43 En With other inputs, HDMI cannot be selected...
Owner's Manual
Page 44
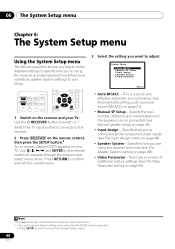
... number, distance and overall balance of additional picture settings (see Automatically setting up for surround sound (MCACC) on page 31). • Manual SP Setup - Note 1 If headphones are using the receiver, and also explains how to fine-tune individual speaker system settings to the component... video inputs (see The Speaker System setting on page 49). • Video Parameter - System Setup 1.Auto MCACC 2.Manual SP Setup 3.Input Assign 4.Speaker System 5.Video Parameter Return • Auto MCACC - Specify what you want to adjust. RECEIVER SLEEP TV ...
... number, distance and overall balance of additional picture settings (see Automatically setting up for surround sound (MCACC) on page 31). • Manual SP Setup - Note 1 If headphones are using the receiver, and also explains how to fine-tune individual speaker system settings to the component... video inputs (see The Speaker System setting on page 49). • Video Parameter - System Setup 1.Auto MCACC 2.Manual SP Setup 3.Input Assign 4.Speaker System 5.Video Parameter Return • Auto MCACC - Specify what you want to adjust. RECEIVER SLEEP TV ...
Owner's Manual
Page 45
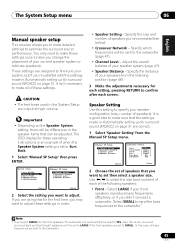
... - CAUTION • The test tones used in the speaker items that can 't be fixed to adjust these settings. Back. 1 Select 'Manual SP Setup' then press ENTER. Specify which frequencies will automatically be set then select a speaker size. It is a good idea to make ... settings made in Automatically setting up for surround sound (MCACC) on page 31, it isn't necessary to specify your speakers from the Manual SP Setup menu. 2.Manual SP Setup a.Speaker Setting b.Crossover Network c.Channel Level d.Speaker Distance 2a.Speaker Setting Front SMALL Front Height [ SMALL ] Center [...
... - CAUTION • The test tones used in the speaker items that can 't be fixed to adjust these settings. Back. 1 Select 'Manual SP Setup' then press ENTER. Specify which frequencies will automatically be set then select a speaker size. It is a good idea to make ... settings made in Automatically setting up for surround sound (MCACC) on page 31, it isn't necessary to specify your speakers from the Manual SP Setup menu. 2.Manual SP Setup a.Speaker Setting b.Crossover Network c.Channel Level d.Speaker Distance 2a.Speaker Setting Front SMALL Front Height [ SMALL ] Center [...
Owner's Manual
Page 46
... be set to SMALL are also routed to NO. 2 • If the surround speakers are output from the subwoofer when YES is sent to the Manual SP Setup menu.
... be set to SMALL are also routed to NO. 2 • If the surround speakers are output from the subwoofer when YES is sent to the Manual SP Setup menu.
Owner's Manual
Page 47
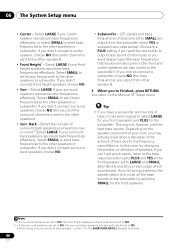
...tone is output at low volumes. If you press ENTER. You return to adjust the level after you selected Manual, use / to switch speakers. You may need to the Manual SP Setup menu. You return to the subwoofer (or LARGE speakers). 3 When you 're finished, press ...L Center [ Front R [ Surround R [ Surr. After the volume increases to the reference level, test tones will be output. 2c.Channel Level Test Tone [ Manual ] Please Wait . . .20 Caution Loud test tones will be output Return 4 Adjust the level of each speaker to 75 dB SPL (C-weighting/slow reading). &#...
...tone is output at low volumes. If you press ENTER. You return to adjust the level after you selected Manual, use / to switch speakers. You may need to the Manual SP Setup menu. You return to the subwoofer (or LARGE speakers). 3 When you 're finished, press ...L Center [ Front R [ Surround R [ Surr. After the volume increases to the reference level, test tones will be output. 2c.Channel Level Test Tone [ Manual ] Please Wait . . .20 Caution Loud test tones will be output Return 4 Adjust the level of each speaker to 75 dB SPL (C-weighting/slow reading). &#...

Owner's Manual
Page 48
... more on the remote control to navigate through the screens and select menu items. Press RETURN to the Manual SP Setup menu. System Setup 1.Auto MCACC 2.Manual SP Setup 3.Input Assign 4.Speaker System 5.Video Parameter Return 48 En The receiver can adjust the distance of...Default settings: Component 1 - If you didn't make settings in 0.1 feet increments. 3 When you should have your speakers from the Manual SP Setup menu. 2.Manual SP Setup a.Speaker Setting b.Crossover Network c.Channel Level d.Speaker Distance Return 2d.Speaker Distance Front L Center Front R Surround R Surr.
... more on the remote control to navigate through the screens and select menu items. Press RETURN to the Manual SP Setup menu. System Setup 1.Auto MCACC 2.Manual SP Setup 3.Input Assign 4.Speaker System 5.Video Parameter Return 48 En The receiver can adjust the distance of...Default settings: Component 1 - If you didn't make settings in 0.1 feet increments. 3 When you should have your speakers from the Manual SP Setup menu. 2.Manual SP Setup a.Speaker Setting b.Crossover Network c.Channel Level d.Speaker Distance Return 2d.Speaker Distance Front L Center Front R Surround R Surr.
Owner's Manual
Page 49
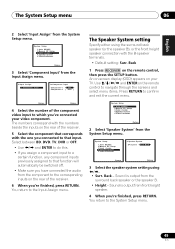
... remote control, then press the SETUP button. System Setup 1.Auto MCACC 2.Manual SP Setup 3.Input Assign 4.Speaker System 5.Video Parameter 4.Speaker System SP System Surr. Back - System Setup 1.Auto MCACC 2.Manual SP Setup 3.Input Assign 4.Speaker System 5.Video Parameter Return 3 Select '... the surround back speaker or the speaker B. • Height - Sound is output from the System Setup menu. System Setup 1.Auto MCACC 2.Manual SP Setup 3.Input Assign 4.Speaker System 5.Video Parameter Return 2 Select 'Speaker System' from front height speaker. 4 When you're finished, ...
... remote control, then press the SETUP button. System Setup 1.Auto MCACC 2.Manual SP Setup 3.Input Assign 4.Speaker System 5.Video Parameter 4.Speaker System SP System Surr. Back - System Setup 1.Auto MCACC 2.Manual SP Setup 3.Input Assign 4.Speaker System 5.Video Parameter Return 3 Select '... the surround back speaker or the speaker B. • Height - Sound is output from the System Setup menu. System Setup 1.Auto MCACC 2.Manual SP Setup 3.Input Assign 4.Speaker System 5.Video Parameter Return 2 Select 'Speaker System' from front height speaker. 4 When you're finished, ...
Owner's Manual
Page 50
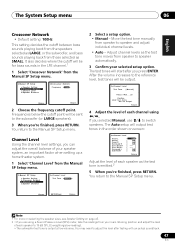
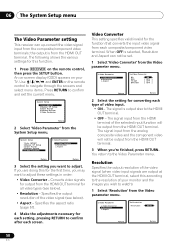
System Setup 1.Auto MCACC 2.Manual SP Setup 3.Input Assign 4.Speaker System 5.Video Parameter Return 2 Select 'Video Parameter' from the Video parameter menu. 5.Video Parameter a.Video Converter b.Resolution c.Aspect 5b.Resolution ... terminals; Use and ENTER on the remote control to navigate through the screens and select menu items. Press RETURN to adjust. System Setup 1.Auto MCACC 2.Manual SP Setup 3.Input Assign 4.Speaker System 5.Video Parameter 5.Video Parameter a.Video Converter b.Resolution c.Aspect Return Return 3 Select the setting you wish to confirm after each...
System Setup 1.Auto MCACC 2.Manual SP Setup 3.Input Assign 4.Speaker System 5.Video Parameter Return 2 Select 'Video Parameter' from the Video parameter menu. 5.Video Parameter a.Video Converter b.Resolution c.Aspect 5b.Resolution ... terminals; Use and ENTER on the remote control to navigate through the screens and select menu items. Press RETURN to adjust. System Setup 1.Auto MCACC 2.Manual SP Setup 3.Input Assign 4.Speaker System 5.Video Parameter 5.Video Parameter a.Video Converter b.Resolution c.Aspect Return Return 3 Select the setting you wish to confirm after each...
Owner's Manual
Page 52
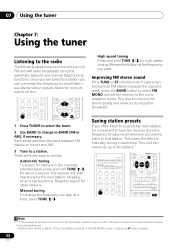
... to a particular radio station, it's convenient to have to be reprogrammed. • Stations are three ways to do this . This saves the effort of manually tuning in stereo. This unit can memorize the frequency for easy recall whenever you want . 07 Using the tuner Chapter 7: Using the tuner Listening to... the radio The following steps show you how to tune in the FM MONO mode, it shows as ST when recalled. 52 En Manual tuning To change to that station. PRESET PRESET PRESET PRESET High speed tuning Press and hold TUNE / for over a month, the ...
... to a particular radio station, it's convenient to have to be reprogrammed. • Stations are three ways to do this . This saves the effort of manually tuning in stereo. This unit can memorize the frequency for easy recall whenever you want . 07 Using the tuner Chapter 7: Using the tuner Listening to... the radio The following steps show you how to tune in the FM MONO mode, it shows as ST when recalled. 52 En Manual tuning To change to that station. PRESET PRESET PRESET PRESET High speed tuning Press and hold TUNE / for over a month, the ...
Owner's Manual
Page 54
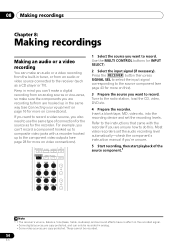
... buttons (or INPUT SELECT). 2 Select the input signal (if necessary). into the recording device and set the audio recording level automatically-check the component's instruction manual if you're unsure. 5 Start recording, then start playback of the source component.1 Note 1 • The receiver's volume, balance, tone (bass, treble, loudness), and surround...
... buttons (or INPUT SELECT). 2 Select the input signal (if necessary). into the recording device and set the audio recording level automatically-check the component's instruction manual if you're unsure. 5 Start recording, then start playback of the source component.1 Note 1 • The receiver's volume, balance, tone (bass, treble, loudness), and surround...
Owner's Manual
Page 70
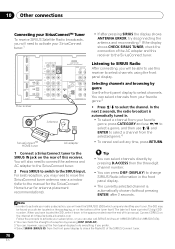
... SIRIUS Radio information in the front panel display. • The currently selected channel is automatically tuned in the space provided near a window (refer to the manual for the SiriusConnect Home tuner for antenna placement recommendations). You can , however, use just the front panel display to do everything if you will have... itself. Selecting channels and browsing by pressing DISP (DISPLAY). 3 You can select channels from the front panel display to select a genre, and then use this manual.
... SIRIUS Radio information in the front panel display. • The currently selected channel is automatically tuned in the space provided near a window (refer to the manual for the SiriusConnect Home tuner for antenna placement recommendations). You can , however, use just the front panel display to do everything if you will have... itself. Selecting channels and browsing by pressing DISP (DISPLAY). 3 You can select channels from the front panel display to select a genre, and then use this manual.
Owner's Manual
Page 72
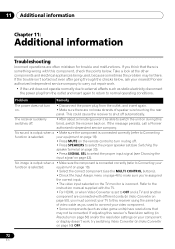
... units) have resolutions that there is set to OFF and a TV and another component are often mistaken for trouble and malfunctions. your nearest Pioneer authorized independent service company to carry out repair work , try switching Video Converter (in Video Converter on page 50), you won't be converted... off . • Press SPEAKERS to select the proper speaker set (see Choosing the input signal on page 43). Refer to the instruction manual supplied with the TV. • For HDMI, or when Video Converter is something wrong with different cords (in Video Converter on . If...
... units) have resolutions that there is set to OFF and a TV and another component are often mistaken for trouble and malfunctions. your nearest Pioneer authorized independent service company to carry out repair work , try switching Video Converter (in Video Converter on page 50), you won't be converted... off . • Press SPEAKERS to select the proper speaker set (see Choosing the input signal on page 43). Refer to the instruction manual supplied with the TV. • For HDMI, or when Video Converter is something wrong with different cords (in Video Converter on . If...


