
User Manual
Page 1
VSX-917V-S/-K AUDIO/VIDEO MULTI-CHANNEL RECEIVER Discover the benefits of registering your product online at http://www.pioneer.co.uk (or http://www.pioneer.eu). Operating Instructions
VSX-917V-S/-K AUDIO/VIDEO MULTI-CHANNEL RECEIVER Discover the benefits of registering your product online at http://www.pioneer.co.uk (or http://www.pioneer.eu). Operating Instructions
User Manual
Page 4
...cables 11 About the video converter 12 Connecting a DVD player and TV 13 Connecting the multichannel analog outputs 14 Connecting a satellite receiver or other digital set-top box 14 Connecting other audio components 15 About the WMA9 Pro decoder 15 Connecting other video components 16... . 29 06 USB playback Using the USB interface 34 Basic playback controls 34 Compressed audio compatibility 35 07 The System Setup menu Making receiver settings from the System Setup menu 36 Surround back speaker setting 36 Manual MCACC speaker setup 37 Fine Channel Level 38 Fine Speaker Distance ...
...cables 11 About the video converter 12 Connecting a DVD player and TV 13 Connecting the multichannel analog outputs 14 Connecting a satellite receiver or other digital set-top box 14 Connecting other audio components 15 About the WMA9 Pro decoder 15 Connecting other video components 16... . 29 06 USB playback Using the USB interface 34 Basic playback controls 34 Compressed audio compatibility 35 07 The System Setup menu Making receiver settings from the System Setup menu 36 Surround back speaker setting 36 Manual MCACC speaker setup 37 Fine Channel Level 38 Fine Speaker Distance ...
User Manual
Page 5
... 57 Switching the speaker system 57 Bi-amping your front speakers 58 Bi-wiring your speakers 58 Using this receiver with a Pioneer plasma display 59 Using the SR+ mode with a Pioneer plasma display 60 12 Other Settings The Input Assign menu 61 The Other Setup menu 62 Dynamic Range Control ...Setup 63 Dual Mono Setup 63 LFE Attenuator Setup 63 SR+ Setup for Pioneer plasma displays . . . . 64 Digital Video Converter Setup 64 13 Additional information Troubleshooting 65 HDMI 67 Resetting the main unit 67 Switching ...
... 57 Switching the speaker system 57 Bi-amping your front speakers 58 Bi-wiring your speakers 58 Using this receiver with a Pioneer plasma display 59 Using the SR+ mode with a Pioneer plasma display 60 12 Other Settings The Input Assign menu 61 The Other Setup menu 62 Dynamic Range Control ...Setup 63 Dual Mono Setup 63 LFE Attenuator Setup 63 SR+ Setup for Pioneer plasma displays . . . . 64 Digital Video Converter Setup 64 13 Additional information Troubleshooting 65 HDMI 67 Resetting the main unit 67 Switching ...

User Manual
Page 6
...on a color TV (the screen may interfere with the sound. - This can also reduce the life or performance of batteries. Installing the receiver When installing this unit, make sure to put it on the following precautions: • Never use new and old batteries together. •...explode or catch fire. This may distort) - 01 Before you start Chapter 1: Before you start Checking what's in the box Please check that you've received the following supplied accessories: • Setup microphone • Remote control unit • Dry cell batteries (AA size IEC R6) x2 • AM ...
...on a color TV (the screen may interfere with the sound. - This can also reduce the life or performance of batteries. Installing the receiver When installing this unit, make sure to put it on the following precautions: • Never use new and old batteries together. •...explode or catch fire. This may distort) - 01 Before you start Chapter 1: Before you start Checking what's in the box Please check that you've received the following supplied accessories: • Setup microphone • Remote control unit • Dry cell batteries (AA size IEC R6) x2 • AM ...

User Manual
Page 7
...In most cases, you won't have a big effect on this. For surround sound, you 've set the receiver to the DVD input.1 There are explained in and switch on the receiver, followed by your system on page 28 for more on the sound. Front speaker (L) Center speaker (C) Front ...Subwoofer (SW) Surround speaker (RS) Listening position Surround back speaker (SBR) Surround speaker (LS) Surround back speaker (SBL) 3 Plug in Listening to the receiver. 2 Connect your system. Make sure you 'll want multichannel surround sound. 7 En If it isn't, press DVD on the remote to set the video ...
...In most cases, you won't have a big effect on this. For surround sound, you 've set the receiver to the DVD input.1 There are explained in and switch on the receiver, followed by your system on page 28 for more on the sound. Front speaker (L) Center speaker (C) Front ...Subwoofer (SW) Surround speaker (RS) Listening position Surround back speaker (SBR) Surround speaker (LS) Surround back speaker (SBL) 3 Plug in Listening to the receiver. 2 Connect your system. Make sure you 'll want multichannel surround sound. 7 En If it isn't, press DVD on the remote to set the video ...
User Manual
Page 8
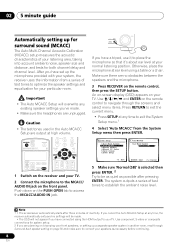
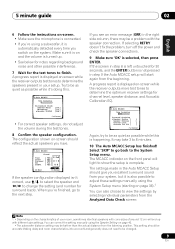
.... After you 've made. • Make sure the headphones are no settings will be as quiet as necessary before continuing. 8 En Push down on the receiver and your particular room. Auto MCACC Surr Back System Normal (SB) ] : Exit ENTER : Start : Cancel 5 Make sure 'Normal (SB)' is selected then...exit the current menu. • Press SETUP at any existing speaker settings you have set up the microphone provided with your system, the receiver uses the information from the System Setup menu then press ENTER. Caution • The test tones used in another room, read through ...
.... After you 've made. • Make sure the headphones are no settings will be as quiet as necessary before continuing. 8 En Push down on the receiver and your particular room. Auto MCACC Surr Back System Normal (SB) ] : Exit ENTER : Start : Cancel 5 Make sure 'Normal (SB)' is selected then...exit the current menu. • Press SETUP at any existing speaker settings you have set up the microphone provided with your system, the receiver uses the information from the System Setup menu then press ENTER. Caution • The test tones used in another room, read through ...
User Manual
Page 9
... the setup is complete. If you see an error message (ERR) in your setup. The MCACC indicator on -screen while the receiver outputs test tones to determine the speakers present in the right side column, there may be a problem with different size settings. Front... • Make sure the microphone is connected. • If you're using the Speaker Setting on -screen while the receiver outputs more test tones to determine the optimum receiver settings for channel level, speaker distance, and Acoustic Calibration EQ. 2.Auto MCACC Now Analyzing Surround Analyzing Speaker System [ ] ...
... the setup is complete. If you see an error message (ERR) in your setup. The MCACC indicator on -screen while the receiver outputs test tones to determine the speakers present in the right side column, there may be a problem with different size settings. Front... • Make sure the microphone is connected. • If you're using the Speaker Setting on -screen while the receiver outputs more test tones to determine the optimum receiver settings for channel level, speaker distance, and Acoustic Calibration EQ. 2.Auto MCACC Now Analyzing Surround Analyzing Speaker System [ ] ...

User Manual
Page 10
... TVs may be affecting the environment and switch them off the TV when doing the Auto MCACC Setup. Other problems when using Phase Control This receiver's Phase Control feature uses phase correction measures to be 'out of phase matching1 for more on phase correction. Note 1 Phase matching is not optimal for...
... TVs may be affecting the environment and switch them off the TV when doing the Auto MCACC Setup. Other problems when using Phase Control This receiver's Phase Control feature uses phase correction measures to be 'out of phase matching1 for more on phase correction. Note 1 Phase matching is not optimal for...
User Manual
Page 11
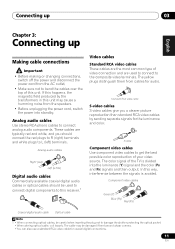
... R (right) terminals and white plugs to damage the shutter protecting the optical socket. • When storing optical cable, coil loosely. The color signal of this receiver.1 Video cables Standard RCA video cables These cables are the most common type of your video source. Connecting up 03 English Deutsch Français...
... R (right) terminals and white plugs to damage the shutter protecting the optical socket. • When storing optical cable, coil loosely. The color signal of this receiver.1 Video cables Standard RCA video cables These cables are the most common type of your video source. Connecting up 03 English Deutsch Français...

User Manual
Page 12
... this copyright protection technology must connect your TV or plasma display, try adjusting the resolution settings on page 61), the converter gives priority to the receiver's HDMI/component video outputs when connecting these video sources. If the video signal does not appear on your monitor/TV to component, S-video, then composite...
... this copyright protection technology must connect your TV or plasma display, try adjusting the resolution settings on page 61), the converter gives priority to the receiver's HDMI/component video outputs when connecting these video sources. If the video signal does not appear on your monitor/TV to component, S-video, then composite...

User Manual
Page 13
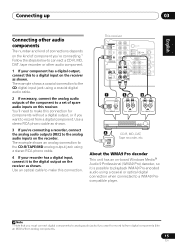
... also connect an optical digital audio output from your DVD player. 3 For better quality, you how to connect your DVD player and TV to the receiver. 1 Connect a coaxial digital audio output on page 61). 2 This connection will allow you to make analog recordings from your TV. 13 En Use ... cable for the connection.1 2 Connect the composite video output and the stereo analog audio outputs2 on your TV to the TV/SAT inputs on this receiver. Use a standard RCA video cable to connect to the composite video jack.4 DIGITAL AUDIO OUT OPTICAL 3 TV ANALOG AUDIO OUT R L VIDEO IN 4 ...
... also connect an optical digital audio output from your DVD player. 3 For better quality, you how to connect your DVD player and TV to the receiver. 1 Connect a coaxial digital audio output on page 61). 2 This connection will allow you to make analog recordings from your TV. 13 En Use ... cable for the connection.1 2 Connect the composite video output and the stereo analog audio outputs2 on your TV to the TV/SAT inputs on this receiver. Use a standard RCA video cable to connect to the composite video jack.4 DIGITAL AUDIO OUT OPTICAL 3 TV ANALOG AUDIO OUT R L VIDEO IN 4 ...

User Manual
Page 14
... RL SURROUND OUTPUT SUB WOOFER OUTPUT VIDEO OUTPUT 1 Connect a set of the coaxial inputs on this receiver using the S-VIDEO TV/SAT jack. However, to receive a signal, you'll need to tell the receiver which input you connected the set-top box to (see page 33). 2 If you've already ...Connecting the multichannel analog outputs For DVD Audio and SACD playback, your set-top box component to the DIGITAL OPT 2 (TV/SAT) input on this receiver. Use an optical cable for the video connection.3 2 Connect an optical digital audio output from your DVD player may have a digital audio output, ...
... RL SURROUND OUTPUT SUB WOOFER OUTPUT VIDEO OUTPUT 1 Connect a set of the coaxial inputs on this receiver using the S-VIDEO TV/SAT jack. However, to receive a signal, you'll need to tell the receiver which input you connected the set-top box to (see page 33). 2 If you've already ...Connecting the multichannel analog outputs For DVD Audio and SACD playback, your set-top box component to the DIGITAL OPT 2 (TV/SAT) input on this receiver. Use an optical cable for the video connection.3 2 Connect an optical digital audio output from your DVD player may have a digital audio output, ...
User Manual
Page 15
... this connection for components without a digital output, or if you want to record from analog components. 15 En Use an optical cable to make this receiver. Use a stereo RCA phono cable as shown. 3 If you 're connecting.1 Follow the steps below to connect a CD-R, MD, DAT, tape ...recorder or other audio components The number and kind of connections depends on the kind of spare audio inputs on the receiver as shown. English Deutsch Français Italiano Nederlands Español Connecting up 03 Connecting other audio component. 1 If your recorder has a ...
... this connection for components without a digital output, or if you want to record from analog components. 15 En Use an optical cable to make this receiver. Use a stereo RCA phono cable as shown. 3 If you 're connecting.1 Follow the steps below to connect a CD-R, MD, DAT, tape ...recorder or other audio components The number and kind of connections depends on the kind of spare audio inputs on the receiver as shown. English Deutsch Français Italiano Nederlands Español Connecting up 03 Connecting other audio component. 1 If your recorder has a ...

User Manual
Page 16
... S-VIDEO DVR/VCR IN jack. When you set of audio/video inputs on the recorder to the DVR/VCR AUDIO and VIDEO outputs on this receiver. Use a stereo RCA phono cable for the audio connection and a standard RCA video cable for the video connection.1 2 Connect a set up However,... the connected DVD player, set of Microsoft Corporation in the United States and/or other video components This receiver has audio/video inputs and outputs suitable for the connection.3 DIGITAL OUT IN OPT IN OPT 2 (TV/ SAT) IN OPT 1 (CD) OUT ASSIGNABLE...
... S-VIDEO DVR/VCR IN jack. When you set of audio/video inputs on the recorder to the DVR/VCR AUDIO and VIDEO outputs on this receiver. Use a stereo RCA phono cable for the audio connection and a standard RCA video cable for the video connection.1 2 Connect a set up However,... the connected DVD player, set of Microsoft Corporation in the United States and/or other video components This receiver has audio/video inputs and outputs suitable for the connection.3 DIGITAL OUT IN OPT IN OPT 2 (TV/ SAT) IN OPT 1 (CD) OUT ASSIGNABLE...

User Manual
Page 17
...way component video cable. Press VIDEO/FRONT AUDIO and select VIDEO input. VIDEO VIDEO INPUT L AUDIO R DIGITAL IN USB MCACC/ AUDIO IN PUSH OPEN This receiver CD CD-R / TAPE / MD USB FM AM AUX VIDEO VIDEO INPUT L AUDIO R DIGITAL IN USB MCACC/ AUDIO IN V L R VIDEO OUTPUT DIGITAL... VIDEO/FRONT AUDIO botton. Press VIDEO/FRONT AUDIO and select F.AUDIO input. Important • If you connect any source component to the receiver using a component video input, you use for which component video inputs you must also have your TV connected to access audio/video connection....
...way component video cable. Press VIDEO/FRONT AUDIO and select VIDEO input. VIDEO VIDEO INPUT L AUDIO R DIGITAL IN USB MCACC/ AUDIO IN PUSH OPEN This receiver CD CD-R / TAPE / MD USB FM AM AUX VIDEO VIDEO INPUT L AUDIO R DIGITAL IN USB MCACC/ AUDIO IN V L R VIDEO OUTPUT DIGITAL... VIDEO/FRONT AUDIO botton. Press VIDEO/FRONT AUDIO and select F.AUDIO input. Important • If you connect any source component to the receiver using a component video input, you use for which component video inputs you must also have your TV connected to access audio/video connection....
User Manual
Page 19
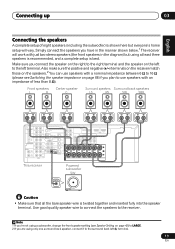
.../SAT) IN 2 OUT HDMI IN 3 IN 1 Y PB PR ASSIGNABLE Y PB PR MONITOR OUT COMPONENT VIDEO IN 2 LR SURROUND L CENTER R SURROUND BACK L B This receiver Powered subwoofer SW INPUT Caution • Make sure that all the bare speaker wire is shown here but using only one surround back speaker, connect... the speaker impedance on page 42) to the surround back left terminal. Simply connect the speakers you have in the manner shown below.1 The receiver will work with a nominal impedance between 6 Ω to 16 Ω (please see Speaker Setting on page 68 if you connect the...
.../SAT) IN 2 OUT HDMI IN 3 IN 1 Y PB PR ASSIGNABLE Y PB PR MONITOR OUT COMPONENT VIDEO IN 2 LR SURROUND L CENTER R SURROUND BACK L B This receiver Powered subwoofer SW INPUT Caution • Make sure that all the bare speaker wire is shown here but using only one surround back speaker, connect... the speaker impedance on page 42) to the surround back left terminal. Simply connect the speakers you have in the manner shown below.1 The receiver will work with a nominal impedance between 6 Ω to 16 Ω (please see Speaker Setting on page 68 if you connect the...

User Manual
Page 20
... in the event of external shocks such as earthquakes. • Make sure no exposed speaker wire is touching the rear panel, this may cause the receiver to turn off automatically. 20 En Once the wire is in mind. Hints on the size of electric shock when connecting or disconnecting the speaker...
... in the event of external shocks such as earthquakes. • Make sure no exposed speaker wire is touching the rear panel, this may cause the receiver to turn off automatically. 20 En Once the wire is in mind. Hints on the size of electric shock when connecting or disconnecting the speaker...
User Manual
Page 22
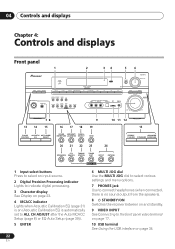
... and displays Chapter 4: Controls and displays Front panel 1 2 34 5 6 PHASE ACOUSTIC AUTO SURR/ CONTROL EQ DIRECT STANDBY/ON PHONES PHASE CONTROL ENTER VSX-917V MULTI JOG DIGITAL PRECISION PROCESSING DVD / LD TV/ SAT DVR/ VCR VIDEO/FRONT AUDIO CD CD-R / TAPE / MD USB FM AM AUX SOUND ... menu options. 7 PHONES jack Use to connect headphones (when connected, there is no sound output from the speakers). 8 STANDBY/ON Switches the receiver between on and standby. 9 VIDEO INPUT See Connecting to the front panel video terminal on page 17. 10 USB terminal See Using the USB...
... and displays Chapter 4: Controls and displays Front panel 1 2 34 5 6 PHASE ACOUSTIC AUTO SURR/ CONTROL EQ DIRECT STANDBY/ON PHONES PHASE CONTROL ENTER VSX-917V MULTI JOG DIGITAL PRECISION PROCESSING DVD / LD TV/ SAT DVR/ VCR VIDEO/FRONT AUDIO CD CD-R / TAPE / MD USB FM AM AUX SOUND ... menu options. 7 PHONES jack Use to connect headphones (when connected, there is no sound output from the speakers). 8 STANDBY/ON Switches the receiver between on and standby. 9 VIDEO INPUT See Connecting to the front panel video terminal on page 17. 10 USB terminal See Using the USB...

User Manual
Page 24
...page 32). 20 EX Lights when a Dolby Digital Surround EX encoded signal is set using the MPX button. - Lights when a digital audio signal is being received in use. DTS - Lights when a broadcast is detected. 2 DIGITAL - ANALOG - Lights when a source with DTS encoded audio signals is detected. 2 Lights...EON mode is detected. 21 Master volume level Shows the overall volume level. 24 En RDS - Lights when the mono mode is being received. 11 EON/RDS indicators EON - Direct playback bypasses the tone controls for the most accurate reproduction of the Advanced Surround modes has been...
...page 32). 20 EX Lights when a Dolby Digital Surround EX encoded signal is set using the MPX button. - Lights when a digital audio signal is being received in use. DTS - Lights when a broadcast is detected. 2 DIGITAL - ANALOG - Lights when a source with DTS encoded audio signals is detected. 2 Lights...EON mode is detected. 21 Master volume level Shows the overall volume level. 24 En RDS - Lights when the mono mode is being received. 11 EON/RDS indicators EON - Direct playback bypasses the tone controls for the most accurate reproduction of the Advanced Surround modes has been...
User Manual
Page 25
...mode (page 31) or virtual surround back mode (page 31). DIMMER - SIGNAL SEL - Switches between standby and on for this receiver. 2 MULTI CONTROL buttons Press to select control of other components (see Controlling the rest of radio station presets (page 45). 25 ... SUBTITLE HDD DVD DISP CH CH 8 AUTO SURR STEREO/ F.S.SURR STANDARD ADV.SURR PHASE ACOUSTIC EQ DIALOG SOUND RETRIEVER SHIFT EFFECT/CHSEL LEVEL 9 16 RECEIVER 1 RECEIVER This switches between the three banks (classes) of your Acoustic Calibration EQ settings on /off (page 60). SR + - CLASS - MIDNIGHT ...
...mode (page 31) or virtual surround back mode (page 31). DIMMER - SIGNAL SEL - Switches between standby and on for this receiver. 2 MULTI CONTROL buttons Press to select control of other components (see Controlling the rest of radio station presets (page 45). 25 ... SUBTITLE HDD DVD DISP CH CH 8 AUTO SURR STEREO/ F.S.SURR STANDARD ADV.SURR PHASE ACOUSTIC EQ DIALOG SOUND RETRIEVER SHIFT EFFECT/CHSEL LEVEL 9 16 RECEIVER 1 RECEIVER This switches between the three banks (classes) of your Acoustic Calibration EQ settings on /off (page 60). SR + - CLASS - MIDNIGHT ...


