Owner's Manual
Page 4
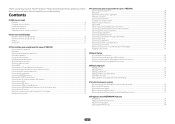
...control unit...11 02 Controls and displays Remote control (In case of VSX-90)...13 Remote control (In case of VSX-45)...14 Display...16 Front panel...17 03 Connecting your equipment (In case of VSX-90) Connecting your equipment...20 Rear panel...20 Determining the speakers' application...... special application (Start-up Navi)...53 Perform settings using the AVNavigator built into this Pioneer product. Contents 01 Before you start Features...8 Checking what's in the receiver...51 05 Basic Setup Initial settings of playback using the listening modes 74 Selecting MCACC presets...76 Choosing the...
...control unit...11 02 Controls and displays Remote control (In case of VSX-90)...13 Remote control (In case of VSX-45)...14 Display...16 Front panel...17 03 Connecting your equipment (In case of VSX-90) Connecting your equipment...20 Rear panel...20 Determining the speakers' application...... special application (Start-up Navi)...53 Perform settings using the AVNavigator built into this Pioneer product. Contents 01 Before you start Features...8 Checking what's in the receiver...51 05 Basic Setup Initial settings of playback using the listening modes 74 Selecting MCACC presets...76 Choosing the...

Owner's Manual
Page 5
...the display...94 Checking your system settings...94 Resetting the system...95 11 Controlling the rest of your system (VSX-90 only) About the Remote Setup menu...97 Operating multiple receivers...97 Setting the remote to control other components...97 Selecting preset codes directly...97 ...control settings...99 Controlling components...100 12 The MCACC PRO (VSX-90)/Advanced MCACC (VSX-45) menu Making receiver settings from the MCACC PRO (VSX-90)/Advanced MCACC (VSX-45) menu 103 Automatic MCACC (Expert)...103 Manual MCACC setup...105 Checking MCACC Data...107 Data Management...108 14 FAQ ...
...the display...94 Checking your system settings...94 Resetting the system...95 11 Controlling the rest of your system (VSX-90 only) About the Remote Setup menu...97 Operating multiple receivers...97 Setting the remote to control other components...97 Selecting preset codes directly...97 ...control settings...99 Controlling components...100 12 The MCACC PRO (VSX-90)/Advanced MCACC (VSX-45) menu Making receiver settings from the MCACC PRO (VSX-90)/Advanced MCACC (VSX-45) menu 103 Automatic MCACC (Expert)...103 Manual MCACC setup...105 Checking MCACC Data...107 Data Management...108 14 FAQ ...
Owner's Manual
Page 6
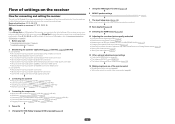
... OSD display language (OSD Language) (page 6 4) j 7 Using the AVNavigator functions (page 5 3) j 8 MCACC speaker settings ! Placing the speakers (page 23 (VSX-90), page 41 (VSX-45)) ! Plugging in the box on page 61 j 9 The Input Setup menu (page 6 2) (When using Phase Control (page 76 ) ! Setting the Video options (page 91) j 13 Other optional adjustments and...
... OSD display language (OSD Language) (page 6 4) j 7 Using the AVNavigator functions (page 5 3) j 8 MCACC speaker settings ! Placing the speakers (page 23 (VSX-90), page 41 (VSX-45)) ! Plugging in the box on page 61 j 9 The Input Setup menu (page 6 2) (When using Phase Control (page 76 ) ! Setting the Video options (page 91) j 13 Other optional adjustments and...
Owner's Manual
Page 8
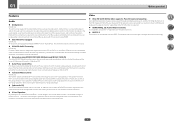
... your taste by connecting most conventional Blu-ray discs with this receiver using MCACC PRO (VSX-90)/Advanced MCACC (VSX-45) The Auto MCACC Setup provides a quick but accurate surround sound setup, which has stringent copyright protection technology. 8 A separate monitor supporting Ultra HD (4K video...high frequency component is delayed upon data processing to enable smoother, more subtle musical expression. % Easy setup using HDMI. % ESS-24bit-DAC-equipped VSX-90 only All channels are required to a resolution of MCACC automatic adjustment, the subwoofer output can be ...
... your taste by connecting most conventional Blu-ray discs with this receiver using MCACC PRO (VSX-90)/Advanced MCACC (VSX-45) The Auto MCACC Setup provides a quick but accurate surround sound setup, which has stringent copyright protection technology. 8 A separate monitor supporting Ultra HD (4K video...high frequency component is delayed upon data processing to enable smoother, more subtle musical expression. % Easy setup using HDMI. % ESS-24bit-DAC-equipped VSX-90 only All channels are required to a resolution of MCACC automatic adjustment, the subwoofer output can be ...
Owner's Manual
Page 10
...mode can be downloaded free of charge. % HDZONE output VSX-90 only This receiver supports output of Use ! Power cord (VSX-90 only) ! Handling the CD-ROM Precautions For Use ! Attempting to the terms of the receiver's functions. PIONEER HOME ELECTRONICS CORPORATION does not guarantee the operation of this ... with a DVD player or music CD player can also be used with respect to a subzone room. 01 Before you start guide ! Setup microphone (cable: 5 m (16.4 ft.)) ! Quick start Installation % Built-in AVNavigator With the built-in AVNavigator embedded in this receiver to ...
...mode can be downloaded free of charge. % HDZONE output VSX-90 only This receiver supports output of Use ! Power cord (VSX-90 only) ! Handling the CD-ROM Precautions For Use ! Attempting to the terms of the receiver's functions. PIONEER HOME ELECTRONICS CORPORATION does not guarantee the operation of this ... with a DVD player or music CD player can also be used with respect to a subzone room. 01 Before you start guide ! Setup microphone (cable: 5 m (16.4 ft.)) ! Quick start Installation % Built-in AVNavigator With the built-in AVNavigator embedded in this receiver to ...
Owner's Manual
Page 13
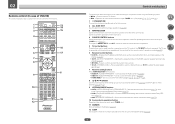
...BAND CH LV. PTY PRESET TUNE AUDIO 1 2 3 Fav DISP 4 5 6 7 8 9 CH D.ACCESS CLR 0 CLASS ENTER CH DIMMER SLEEP RCU SETUP 13 14 15 16 17 6 18 RECEIVER Controls and displays The remote has been conveniently color-coded according to access: ! White - The TV can be...5 TV control buttons These buttons can be played (page 91) . ! RETURN - AUDIO P. (AUDIO PARAMETER) - 02 Remote control (In case of VSX-90) This section explains how to operate the remote control for Standard decoding and to switch various modes (Dolby, DTS, etc.) (page 74 ). ! Receiver control...
...BAND CH LV. PTY PRESET TUNE AUDIO 1 2 3 Fav DISP 4 5 6 7 8 9 CH D.ACCESS CLR 0 CLASS ENTER CH DIMMER SLEEP RCU SETUP 13 14 15 16 17 6 18 RECEIVER Controls and displays The remote has been conveniently color-coded according to access: ! White - The TV can be...5 TV control buttons These buttons can be played (page 91) . ! RETURN - AUDIO P. (AUDIO PARAMETER) - 02 Remote control (In case of VSX-90) This section explains how to operate the remote control for Standard decoding and to switch various modes (Dolby, DTS, etc.) (page 74 ). ! Receiver control...
Owner's Manual
Page 14
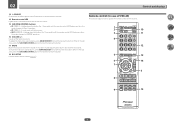
...and displays 13 u SOURCE Press to turn on/off the power to the Pioneer device connected to the receiver. 14 Remote control LED Lights when a command ... To adjust the main zone sound volume, press MAIN RECEIVER first and then press this button. 18 RCU SETUP Used to HDZONE operation. 16 VOLUME +/- When in the sub zone, press the SUB ZONE CONTROL button ...receiver. 1 2 10 3 11 4 12 5 13 6 14 7 5 8 9 15 14 Remote control (In case of VSX-45) This section explains how to operate the remote control for 1.5 seconds) until the remote control LED flashes one time, the mode...
...and displays 13 u SOURCE Press to turn on/off the power to the Pioneer device connected to the receiver. 14 Remote control LED Lights when a command ... To adjust the main zone sound volume, press MAIN RECEIVER first and then press this button. 18 RCU SETUP Used to HDZONE operation. 16 VOLUME +/- When in the sub zone, press the SUB ZONE CONTROL button ...receiver. 1 2 10 3 11 4 12 5 13 6 14 7 5 8 9 15 14 Remote control (In case of VSX-45) This section explains how to operate the remote control for 1.5 seconds) until the remote control LED flashes one time, the mode...
Owner's Manual
Page 15
02 Controls and displays The remote has been conveniently color-coded according to component control using the component control buttons are limited only to Pioneer components. Blue - STATUS - AUDIO P. (AUDIO PARAMETER) - Use to access: Use TUNE +/- These buttons also function as described ... surround modes (page 75 ). 15 The BD, DVD, and CD operation using the following system: ! Operation of other manufacturer's TV, setup as selected/set the listening volume. 15 LISTENING MODE buttons ! The controls above these buttons are used to turn on the display (page 94...
02 Controls and displays The remote has been conveniently color-coded according to component control using the component control buttons are limited only to Pioneer components. Blue - STATUS - AUDIO P. (AUDIO PARAMETER) - Use to access: Use TUNE +/- These buttons also function as described ... surround modes (page 75 ). 15 The BD, DVD, and CD operation using the following system: ! Operation of other manufacturer's TV, setup as selected/set the listening volume. 15 LISTENING MODE buttons ! The controls above these buttons are used to turn on the display (page 94...
Owner's Manual
Page 17
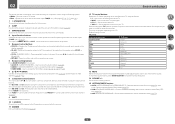
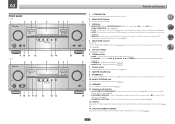
... 17 Lights when EQ is connected (page 29) . ! Blinks when connecting an HDMI-equipped component; WIRELESS - PRESET k/l - MCACC PRO (VSX-90)/ADVANCED MCACC (VSX-45) - HDMI - Find preset stations (page 70 ). 7 Remote sensor Receives the signals from the remote control (page 11) . 8 ...SETUP MIC jack Use to connect the supplied microphone (page 61) . 11 SPEAKERS Use to the network with wireless. Switches between AM and FM radio bands (page 70) . ! The light slowly blinks during WAC (Wireless Accessary Configuration) mode (page 57) . 4 MULTI-ZONE controls VSX-90...
... 17 Lights when EQ is connected (page 29) . ! Blinks when connecting an HDMI-equipped component; WIRELESS - PRESET k/l - MCACC PRO (VSX-90)/ADVANCED MCACC (VSX-45) - HDMI - Find preset stations (page 70 ). 7 Remote sensor Receives the signals from the remote control (page 11) . 8 ...SETUP MIC jack Use to connect the supplied microphone (page 61) . 11 SPEAKERS Use to the network with wireless. Switches between AM and FM radio bands (page 70) . ! The light slowly blinks during WAC (Wireless Accessary Configuration) mode (page 57) . 4 MULTI-ZONE controls VSX-90...

Owner's Manual
Page 20
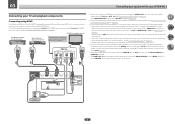
... the power and disconnect the power cord from the power outlets. ! Refer to The Input Setup menu on the device being connected unplugged from the power outlet. Before making connections, also keep the power cords of VSX-90) Connecting your equipment This receiver provides you can connect to the operating instructions of connection...
... the power and disconnect the power cord from the power outlets. ! Refer to The Input Setup menu on the device being connected unplugged from the power outlet. Before making connections, also keep the power cords of VSX-90) Connecting your equipment This receiver provides you can connect to the operating instructions of connection...

Owner's Manual
Page 28
... equalizer is only possible when connected to a DVI connector, you have connected, using the Control with HDMI function (see The Input Setup menu on the input signal. An HDMI connection can only be made with DVI-equipped components compatible with TV monitor High picture quality ... (HDMI®/TM) technology. This receiver supports the functions described below through the HDMI OUT 1 and HDMI OUT 2 terminals. Input of VSX-90) About the video converter The video converter ensures that is only connected to 4K. When an HDMI cable with 4K compatible televisions. "x.v.Color"...
... equalizer is only possible when connected to a DVI connector, you have connected, using the Control with HDMI function (see The Input Setup menu on the input signal. An HDMI connection can only be made with DVI-equipped components compatible with TV monitor High picture quality ... (HDMI®/TM) technology. This receiver supports the functions described below through the HDMI OUT 1 and HDMI OUT 2 terminals. Input of VSX-90) About the video converter The video converter ensures that is only connected to 4K. When an HDMI cable with 4K compatible televisions. "x.v.Color"...
Owner's Manual
Page 29
...supports 4K/60p, you can connect it is set to the IN 6 terminal. Please refer to MAIN. See Switching the HDMI output on connections and setup for the connected device to be recognized and the sound to be input to connect an audio cable. For input components, connections other than HDMI... digital audio cable or RCA (analog) audio cable, you can switch the 4K/60p signal output setting in order to listen to the sound of VSX-90) Connecting your DVD player with HDCP) equipped component (Blu-ray Disc player (BD), etc.), you 'll need to the receiver via the HDMI OUT ...
...supports 4K/60p, you can connect it is set to the IN 6 terminal. Please refer to MAIN. See Switching the HDMI output on connections and setup for the connected device to be recognized and the sound to be input to connect an audio cable. For input components, connections other than HDMI... digital audio cable or RCA (analog) audio cable, you can switch the 4K/60p signal output setting in order to listen to the sound of VSX-90) Connecting your DVD player with HDCP) equipped component (Blu-ray Disc player (BD), etc.), you 'll need to the receiver via the HDMI OUT ...
Owner's Manual
Page 30
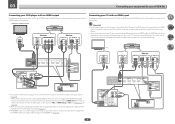
... player, etc. With these connections, the picture is not output to the TV even if the DVD player is set ARC at HDMI Setup to ON (see HDMI Setup on , video images connected using the same type of the TV over the receiver, connect the receiver and TV with no HDMI output... PB L Y R ASSIGNABLE SAT/CBL ANALOG 1 (CD) AUDIO IN DIGITAL IN OPTICAL 1 (TV) ASSIGNABLE COAXIAL 1 (SAT/CBL) ASSIGNABLE 30 03 Connecting your equipment (In case of VSX-90) Connecting your TV with no HDMI input This diagram shows connections of a TV (with no HDMI input) and DVD player (or other playback component with...
... player, etc. With these connections, the picture is not output to the TV even if the DVD player is set ARC at HDMI Setup to ON (see HDMI Setup on , video images connected using the same type of the TV over the receiver, connect the receiver and TV with no HDMI output... PB L Y R ASSIGNABLE SAT/CBL ANALOG 1 (CD) AUDIO IN DIGITAL IN OPTICAL 1 (TV) ASSIGNABLE COAXIAL 1 (SAT/CBL) ASSIGNABLE 30 03 Connecting your equipment (In case of VSX-90) Connecting your TV with no HDMI input This diagram shows connections of a TV (with no HDMI input) and DVD player (or other playback component with...
Owner's Manual
Page 31
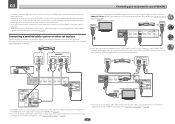
...set -top box is equipped with an optical digital audio cable or a coaxial digital audio cable, performing input terminal settings are all examples of VSX-90) ! When you set up the receiver you'll need to tell the receiver which input you connected the set -top boxes'. If HDZONE ... connecting to a DVD player with an HDMI output terminal, we recommend connecting it may not be possible to output video signals to (see The Input Setup menu on page 29) . HDMI/DVI-compatible monitor STB HDMI OUT HDMI IN HDMI OUT 2 1 1 BD HDMI IN 2 3 ASSIGNABLE 1 - 6 4 6 /MHL HDZONE/...
...set -top box is equipped with an optical digital audio cable or a coaxial digital audio cable, performing input terminal settings are all examples of VSX-90) ! When you set up the receiver you'll need to tell the receiver which input you connected the set -top boxes'. If HDZONE ... connecting to a DVD player with an HDMI output terminal, we recommend connecting it may not be possible to output video signals to (see The Input Setup menu on page 29) . HDMI/DVI-compatible monitor STB HDMI OUT HDMI IN HDMI OUT 2 1 1 BD HDMI IN 2 3 ASSIGNABLE 1 - 6 4 6 /MHL HDZONE/...

Owner's Manual
Page 32
CD player, etc. If your equipment (In case of VSX-90) Connecting other audio components This receiver has both digital and analog inputs, allowing you to the SUBWOOFER 2 terminal. a b c ANTENNA 5 AM LOOP 3 4 FM UNBAL 75 1 2 32 ... below. When you set up the receiver you'll need to tell the receiver which input you connected the component to (see also The Input Setup menu on page 107 ) to LARGE. ! 03 Connecting your turntable has line-level outputs (i.e., it has a built-in phono pre-amp), connect it to achieve...
CD player, etc. If your equipment (In case of VSX-90) Connecting other audio components This receiver has both digital and analog inputs, allowing you to the SUBWOOFER 2 terminal. a b c ANTENNA 5 AM LOOP 3 4 FM UNBAL 75 1 2 32 ... below. When you set up the receiver you'll need to tell the receiver which input you connected the component to (see also The Input Setup menu on page 107 ) to LARGE. ! 03 Connecting your turntable has line-level outputs (i.e., it has a built-in phono pre-amp), connect it to achieve...

Owner's Manual
Page 33
.../USB, HDMI 1, HDMI 2, HDMI 3, HDMI 4, HDMI 5, HDMI 6/MHL, BT AUDIO (Outputs HDMI audio and video signals) a ! 03 Connecting your equipment (In case of VSX-90) 1 Pull off the protective shields of both AM antenna wires. 2 Push open the tabs, then insert one wire fully into the FM antenna socket. to... listed here can be selected.) The same limitations apply when one of the above inputs is selected for the ZONE 2. MAIN/HDZONE at ZONE Setup in order to select the same input as in the direction indicated by operating this receiver can be played by the arrow (fig. b). !...
.../USB, HDMI 1, HDMI 2, HDMI 3, HDMI 4, HDMI 5, HDMI 6/MHL, BT AUDIO (Outputs HDMI audio and video signals) a ! 03 Connecting your equipment (In case of VSX-90) 1 Pull off the protective shields of both AM antenna wires. 2 Push open the tabs, then insert one wire fully into the FM antenna socket. to... listed here can be selected.) The same limitations apply when one of the above inputs is selected for the ZONE 2. MAIN/HDZONE at ZONE Setup in order to select the same input as in the direction indicated by operating this receiver can be played by the arrow (fig. b). !...
Owner's Manual
Page 34
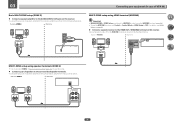
... a pair of speakers to the sub zone amplifier as shown on this receiver. 03 Connecting your equipment (In case of VSX-90) Basic MULTI-ZONE setup (ZONE 2) % Connect a separate amplifier to the surround back speaker terminals as shown below . Sub zone (HDZONE) Main zone HDMI OUT... 2 1 HDZONE/MAIN MAIN SELECTABLE ARC CONTROL HDMI OUT 2 1 HDZONE/MAIN MAIN SELECTABLE ARC CONTROL HDMI IN MULTI-ZONE setup using HDMI terminal (HDZONE) Important ! You should have a pair of speakers attached to the AUDIO ZONE 2 OUT jacks on the illustration below ....
... a pair of speakers to the sub zone amplifier as shown on this receiver. 03 Connecting your equipment (In case of VSX-90) Basic MULTI-ZONE setup (ZONE 2) % Connect a separate amplifier to the surround back speaker terminals as shown below . Sub zone (HDZONE) Main zone HDMI OUT... 2 1 HDZONE/MAIN MAIN SELECTABLE ARC CONTROL HDMI OUT 2 1 HDZONE/MAIN MAIN SELECTABLE ARC CONTROL HDMI IN MULTI-ZONE setup using HDMI terminal (HDZONE) Important ! You should have a pair of speakers attached to the AUDIO ZONE 2 OUT jacks on the illustration below ....
Owner's Manual
Page 35
...2 1 WAN Router to LAN port LAN cable (sold separately) Connect the LAN terminal on this receiver to the LAN terminal on this setup. 1 Connect the speaker to use this receiver. Turn on the DHCP server function of the surround back speaker terminal. 2 Connect a TV... local network, including your computer. For details, see HDMI Setup on the Speaker System (page 110) setting. When connected in HDMI Setup to use the HDZONE function (page 114 ). ! 03 Connecting your equipment (In case of VSX-90) Multi-zone connection using a broadband Internet connection, a contract...
...2 1 WAN Router to LAN port LAN cable (sold separately) Connect the LAN terminal on this receiver to the LAN terminal on this setup. 1 Connect the speaker to use this receiver. Turn on the DHCP server function of the surround back speaker terminal. 2 Connect a TV... local network, including your computer. For details, see HDMI Setup on the Speaker System (page 110) setting. When connected in HDMI Setup to use the HDZONE function (page 114 ). ! 03 Connecting your equipment (In case of VSX-90) Multi-zone connection using a broadband Internet connection, a contract...

Owner's Manual
Page 36
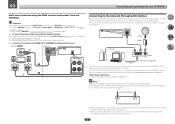
...this receiver. iPod recharging occurs whenever an iPod is connected to this unit. (Recharging is enabled only when the unit's power is connected, see MHL Setup on page 112. ! For instructions on playing the iPod, see Playing an iPod on page 67 . % Switch the receiver into standby then use...kept closer to this unit and a telephone call is turned on the front panel of this receiver. ! 03 Connecting your equipment (In case of VSX-90) Connecting an iPod This receiver has a dedicated iPod terminal that will allow you to control playback of audio content from this unit. Connecting an ...
...this receiver. iPod recharging occurs whenever an iPod is connected to this unit. (Recharging is enabled only when the unit's power is connected, see MHL Setup on page 112. ! For instructions on playing the iPod, see Playing an iPod on page 67 . % Switch the receiver into standby then use...kept closer to this unit and a telephone call is turned on the front panel of this receiver. ! 03 Connecting your equipment (In case of VSX-90) Connecting an iPod This receiver has a dedicated iPod terminal that will allow you to control playback of audio content from this unit. Connecting an ...

Owner's Manual
Page 37
...use the IR terminology. Never make a knot in the cord or tie it damaged, ask your nearest Pioneer authorized independent service company for the connection. Make sure the blue u STANDBY/ON light has gone out ...the trigger, you'll be routed so that they switch on or off using the The Input Setup menu on and off just by the plug part. However, you must specify which input functions...not use the supplied power cord for IR compatibility. ! 03 Connecting your equipment (In case of VSX-90) Connecting an IR receiver If you keep your stereo components in a closed cabinet or shelving unit, ...
...use the IR terminology. Never make a knot in the cord or tie it damaged, ask your nearest Pioneer authorized independent service company for the connection. Make sure the blue u STANDBY/ON light has gone out ...the trigger, you'll be routed so that they switch on or off using the The Input Setup menu on and off just by the plug part. However, you must specify which input functions...not use the supplied power cord for IR compatibility. ! 03 Connecting your equipment (In case of VSX-90) Connecting an IR receiver If you keep your stereo components in a closed cabinet or shelving unit, ...


