Owner's Manual
Page 4
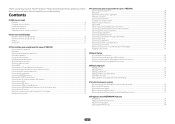
...AVNavigator built into this Pioneer product. Contents 01 Before you start Features...8 Checking what's in the box...10 Installing the receiver...11 Loading the batteries...11 Operating range of remote control unit...11 02 Controls and displays Remote control (In case of VSX-90)...13 Remote control ...receiver or other set-top box 31 Connecting other audio components...32 Connecting the subwoofer...32 Connecting AM/FM antennas...32 Making MULTI-ZONE connections...33 Connecting to the network through LAN interface...35 Connecting an iPod...36 Connecting a USB device...36 Connecting an MHL-...
...AVNavigator built into this Pioneer product. Contents 01 Before you start Features...8 Checking what's in the box...10 Installing the receiver...11 Loading the batteries...11 Operating range of remote control unit...11 02 Controls and displays Remote control (In case of VSX-90)...13 Remote control ...receiver or other set-top box 31 Connecting other audio components...32 Connecting the subwoofer...32 Connecting AM/FM antennas...32 Making MULTI-ZONE connections...33 Connecting to the network through LAN interface...35 Connecting an iPod...36 Connecting a USB device...36 Connecting an MHL-...

Owner's Manual
Page 5
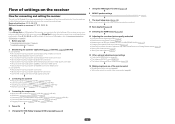
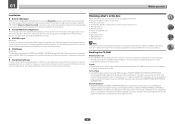
...while listening...92 Using the MULTI-ZONE controls...93 Network settings from a web browser...94 Using the sleep timer...94 Dimming the display...94 Checking your system settings...94 Resetting the system...95 11 Controlling the rest of your system (VSX-90 only) About the Remote Setup... 99 Using All Zone Standby...99 Setting the switching time for the receiver operation mode 99 Resetting the remote control settings...99 Controlling components...100 12 The MCACC PRO (VSX-90)/Advanced MCACC (VSX-45) menu Making receiver settings from the MCACC PRO (VSX-90)/Advanced MCACC (VSX-45) menu 103...
...while listening...92 Using the MULTI-ZONE controls...93 Network settings from a web browser...94 Using the sleep timer...94 Dimming the display...94 Checking your system settings...94 Resetting the system...95 11 Controlling the rest of your system (VSX-90 only) About the Remote Setup... 99 Using All Zone Standby...99 Setting the switching time for the receiver operation mode 99 Resetting the remote control settings...99 Controlling components...100 12 The MCACC PRO (VSX-90)/Advanced MCACC (VSX-45) menu Making receiver settings from the MCACC PRO (VSX-90)/Advanced MCACC (VSX-45) menu 103...
Owner's Manual
Page 6
...the speakers' application (page 2 1 (VSX-90), page 4 0 (VSX-45)) In case of VSX-90 ! [A] 7.2 channel surround system (...Surround back/Top middle) connection ! [B] Dolby Enabled Speaker system connection ! [C] 7.2 channel surround system (Surround back/Front wide) connection ! [D] 7.2 channel surround system & Speaker B connection ! [E] 5.2 channel surround system & Front Bi-amping connection (High quality surround) ! [F] 5.2 channel surround system & ZONE 2 connection (Multi Zone) ! [G] 5.2 channel surround system & HDZONE connection (Multi Zone...
...the speakers' application (page 2 1 (VSX-90), page 4 0 (VSX-45)) In case of VSX-90 ! [A] 7.2 channel surround system (...Surround back/Top middle) connection ! [B] Dolby Enabled Speaker system connection ! [C] 7.2 channel surround system (Surround back/Front wide) connection ! [D] 7.2 channel surround system & Speaker B connection ! [E] 5.2 channel surround system & Front Bi-amping connection (High quality surround) ! [F] 5.2 channel surround system & ZONE 2 connection (Multi Zone) ! [G] 5.2 channel surround system & HDZONE connection (Multi Zone...
Owner's Manual
Page 10
... explains the operation using iControlAV5. Please agree to another AV receiver in the subzone room. % ZONE Ready VSX-90 only This receiver is equipped with HDZONE and ZONE 2. Unauthorized transfer, duplication, broadcast, public transmission, translation, sales, lending or other entities described ... Furthermore, the eco mode can easily be set initial settings of VSX-90. Power cord (VSX-90 only) ! Do not use with a personal computer. Copyright to PIONEER HOME ELECTRONICS CORPORATION. In addition, PIONEER HOME ELECTRONICS CORPORATION is not liable for any damages incurred as a ...
... explains the operation using iControlAV5. Please agree to another AV receiver in the subzone room. % ZONE Ready VSX-90 only This receiver is equipped with HDZONE and ZONE 2. Unauthorized transfer, duplication, broadcast, public transmission, translation, sales, lending or other entities described ... Furthermore, the eco mode can easily be set initial settings of VSX-90. Power cord (VSX-90 only) ! Do not use with a personal computer. Copyright to PIONEER HOME ELECTRONICS CORPORATION. In addition, PIONEER HOME ELECTRONICS CORPORATION is not liable for any damages incurred as a ...
Owner's Manual
Page 13
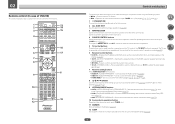
... (AUDIO PARAMETER) - VIDEO P. (VIDEO PARAMETER) - Displays the IP address and information such as selected/set for this receiver. 2 ALL ZONE STBY Use this button to perform unique operations (page 99 ). 3 MAIN RECEIVER Switches the remote to control the receiver (used to perform operations... on for the remote control's operation mode (page 97 ). 6 Receiver Control buttons ! Switches the output terminal of VSX-90) This section explains how to operate the remote control for HDMI , NET and ALL switches each input (TUNER, etc.) (page 97...
... (AUDIO PARAMETER) - VIDEO P. (VIDEO PARAMETER) - Displays the IP address and information such as selected/set for this receiver. 2 ALL ZONE STBY Use this button to perform unique operations (page 99 ). 3 MAIN RECEIVER Switches the remote to control the receiver (used to perform operations... on for the remote control's operation mode (page 97 ). 6 Receiver Control buttons ! Switches the output terminal of VSX-90) This section explains how to operate the remote control for HDMI , NET and ALL switches each input (TUNER, etc.) (page 97...
Owner's Manual
Page 14
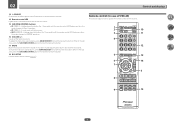
...13 u SOURCE Press to turn on/off the power to the Pioneer device connected to the receiver. 14 Remote control LED Lights when a command is not used with this button. 18 RCU SETUP Used to set the listening volume. Z2 (ZONE 2) - Use to set the remote control (page 97 ). ...RECEIVER first and then press this button. Z3 (ZONE 3) - It is sent from the remote control. 15 SUB ZONE CONTROL buttons ! When in the sub zone, press the SUB ZONE CONTROL button first and then press this receiver. ! Remote control (In case of VSX-45) This section explains how to operate the remote...
...13 u SOURCE Press to turn on/off the power to the Pioneer device connected to the receiver. 14 Remote control LED Lights when a command is not used with this button. 18 RCU SETUP Used to set the listening volume. Z2 (ZONE 2) - Use to set the remote control (page 97 ). ...RECEIVER first and then press this button. Z3 (ZONE 3) - It is sent from the remote control. 15 SUB ZONE CONTROL buttons ! When in the sub zone, press the SUB ZONE CONTROL button first and then press this receiver. ! Remote control (In case of VSX-45) This section explains how to operate the remote...
Owner's Manual
Page 16
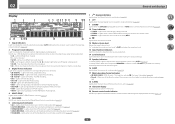
...format indicators ! DIGITAL PLUS - TrueHD - Lights during playback of DTS-HD Master Audio signals. 4 MULTI-ZONE Lights when the MULTI-ZONE feature is active (page 93 ). 5 FULL BAND VSX-90 only: Lights when the Full Band Phase Control is active (page 89 ). 19 Character display Displays various... system information. 20 Remote control mode indicator VSX-90 only: Lights to indicate the receiver's remote ...
...format indicators ! DIGITAL PLUS - TrueHD - Lights during playback of DTS-HD Master Audio signals. 4 MULTI-ZONE Lights when the MULTI-ZONE feature is active (page 93 ). 5 FULL BAND VSX-90 only: Lights when the Full Band Phase Control is active (page 89 ). 19 Character display Displays various... system information. 20 Remote control mode indicator VSX-90 only: Lights to indicate the receiver's remote ...
Owner's Manual
Page 17
Blinks when connecting an HDMI-equipped component; The light slowly blinks during WAC (Wireless Accessary Configuration) mode (page 57) . 4 MULTI-ZONE controls VSX-90 only If you've made MULTI-ZONE connections (page 33 ) use these controls to select an input function. 3 Indicators ! Find radio frequencies (page 70) . ! AUTO SURR/ALC/STREAM DIRECT - Switches between...
Blinks when connecting an HDMI-equipped component; The light slowly blinks during WAC (Wireless Accessary Configuration) mode (page 57) . 4 MULTI-ZONE controls VSX-90 only If you've made MULTI-ZONE connections (page 33 ) use these controls to select an input function. 3 Indicators ! Find radio frequencies (page 70) . ! AUTO SURR/ALC/STREAM DIRECT - Switches between...

Owner's Manual
Page 19
Connecting your equipment (In case of VSX-90) Connecting your equipment...20 Rear panel...20 Determining the speakers' application 21 Placing the speakers...23 Connecting the speakers...24 Installing your speaker system...25 ... a satellite/cable receiver or other set-top box 31 Connecting other audio components 32 Connecting the subwoofer...32 Connecting AM/FM antennas...32 Making MULTI-ZONE connections 33 Connecting to the network through LAN interface 35 Connecting an iPod...36 Connecting a USB device...36 Connecting an MHL-compatible device 36 Connecting...
Connecting your equipment (In case of VSX-90) Connecting your equipment...20 Rear panel...20 Determining the speakers' application 21 Placing the speakers...23 Connecting the speakers...24 Installing your speaker system...25 ... a satellite/cable receiver or other set-top box 31 Connecting other audio components 32 Connecting the subwoofer...32 Connecting AM/FM antennas...32 Making MULTI-ZONE connections 33 Connecting to the network through LAN interface 35 Connecting an iPod...36 Connecting a USB device...36 Connecting an MHL-compatible device 36 Connecting...

Owner's Manual
Page 20
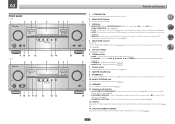
... 12V TRIGGER RS-232C CONTROL HDZONE/MAIN MAIN SELECTABLE ARC CONTROL AUDIO OUT (OUTPUT 12V 150 mA MAX) ANTENNA AM LOOP VIDEO IN COMPONENT VIDEO ZONE 2 PRE OUT ASSIGNABLE VIDEO (SAT/CBL) 1 PR DVD 1 SUBWOOFER PRE OUT 2 L DVD R SAT/ CBL FM UNBAL 75 MONITOR OUT PB L Y R ...from the power outlet. The input functions below are used. CAUTION ! Plugging in this manual. 03 Connecting your equipment (In case of VSX-90) Connecting your equipment This receiver provides you can connect to make up your home theater system. Before making connections, also keep the power...
... 12V TRIGGER RS-232C CONTROL HDZONE/MAIN MAIN SELECTABLE ARC CONTROL AUDIO OUT (OUTPUT 12V 150 mA MAX) ANTENNA AM LOOP VIDEO IN COMPONENT VIDEO ZONE 2 PRE OUT ASSIGNABLE VIDEO (SAT/CBL) 1 PR DVD 1 SUBWOOFER PRE OUT 2 L DVD R SAT/ CBL FM UNBAL 75 MONITOR OUT PB L Y R ...from the power outlet. The input functions below are used. CAUTION ! Plugging in this manual. 03 Connecting your equipment (In case of VSX-90) Connecting your equipment This receiver provides you can connect to make up your home theater system. Before making connections, also keep the power...

Owner's Manual
Page 22
... Atmos requires a connection with surround back speakers. You cannot playback Dolby Atmos with stereo playback of the front speakers for 7.2-channel surround sound in ZONE 2. (The selection of VSX-90) [C] 7.2 channel surround system (Surround back/Front wide) connection ! Playback of Dolby Atmos requires a connection with a surround back speaker or front wide speaker. 03...
... Atmos requires a connection with surround back speakers. You cannot playback Dolby Atmos with stereo playback of the front speakers for 7.2-channel surround sound in ZONE 2. (The selection of VSX-90) [C] 7.2 channel surround system (Surround back/Front wide) connection ! Playback of Dolby Atmos requires a connection with a surround back speaker or front wide speaker. 03...

Owner's Manual
Page 23
... playback on page 61 . 120 120 SL 60 SR SBL SB SBR ! Speaker System setting: HDZONE Main zone HDZONE Sub zone C L R SW1 SW2 SL SR L R Placing the speakers Refer to the chart below for placement of VSX-90) [G] 5.2 channel surround system & HDZONE connection (Multi Zone) ! 03 Connecting your equipment (In case of the speakers you . !
... playback on page 61 . 120 120 SL 60 SR SBL SB SBR ! Speaker System setting: HDZONE Main zone HDZONE Sub zone C L R SW1 SW2 SL SR L R Placing the speakers Refer to the chart below for placement of VSX-90) [G] 5.2 channel surround system & HDZONE connection (Multi Zone) ! 03 Connecting your equipment (In case of the speakers you . !

Owner's Manual
Page 25
... MIDDLE terminal when using a Dolby Enabled Speaker as an independent product. left Front right Subwoofer 1 LINE LEVEL INPUT Center Subwoofer 2 LINE LEVEL INPUT Front left ZONE 2 - AUDIO OUT 1 SUBWOOFER PRE OUT 2 FRONT R L 5.2ch CENTER SURROUND R L 7.2ch SURROUND BACK R L (Single) SPEAKER B TOP MIDDLE ...Surround left Speaker B - Standard surround connection ! Left HDZONE setting HDZONE - 03 Connecting your equipment (In case of VSX-90) Installing your main surround speakers should always be connected as a pair, but you can connect just one surround back ...
... MIDDLE terminal when using a Dolby Enabled Speaker as an independent product. left Front right Subwoofer 1 LINE LEVEL INPUT Center Subwoofer 2 LINE LEVEL INPUT Front left ZONE 2 - AUDIO OUT 1 SUBWOOFER PRE OUT 2 FRONT R L 5.2ch CENTER SURROUND R L 7.2ch SURROUND BACK R L (Single) SPEAKER B TOP MIDDLE ...Surround left Speaker B - Standard surround connection ! Left HDZONE setting HDZONE - 03 Connecting your equipment (In case of VSX-90) Installing your main surround speakers should always be connected as a pair, but you can connect just one surround back ...

Owner's Manual
Page 33
... input terminals, the digital input terminals (OPTICAL and COAXIAL) and the COMPONENT VIDEO input terminals cannot be used. To fix the stand to ZONE 2 and HDZONE: Sub Zone ZONE 2 HDZONE (HDMI) Input functions available DVD, SAT/CBL, INTERNET RADIO, PANDORA, Spotify, MEDIA SERVER, FAVORITES, iPod/USB, TV, CD..., iPod/USB or BT AUDIO inputs is selected in the main zone, it is only possible to select the same input as in a different room (sub zone) from terminal HDMI IN 1. ! 03 Connecting your equipment (In case of VSX-90) 1 Pull off the protective shields of both AM antenna wires...
... input terminals, the digital input terminals (OPTICAL and COAXIAL) and the COMPONENT VIDEO input terminals cannot be used. To fix the stand to ZONE 2 and HDZONE: Sub Zone ZONE 2 HDZONE (HDMI) Input functions available DVD, SAT/CBL, INTERNET RADIO, PANDORA, Spotify, MEDIA SERVER, FAVORITES, iPod/USB, TV, CD..., iPod/USB or BT AUDIO inputs is selected in the main zone, it is only possible to select the same input as in a different room (sub zone) from terminal HDMI IN 1. ! 03 Connecting your equipment (In case of VSX-90) 1 Pull off the protective shields of both AM antenna wires...
Owner's Manual
Page 34
... Control Mode in Speaker system setting (page 110 ) to use the HDZONE function (page 114) . ! You should have a pair of VSX-90) Basic MULTI-ZONE setup (ZONE 2) % Connect a separate amplifier to the AUDIO ZONE 2 OUT jacks on this receiver. 03 Connecting your equipment (In case of speakers attached to the surround back speaker terminals as...
... Control Mode in Speaker system setting (page 110 ) to use the HDZONE function (page 114) . ! You should have a pair of VSX-90) Basic MULTI-ZONE setup (ZONE 2) % Connect a separate amplifier to the AUDIO ZONE 2 OUT jacks on this receiver. 03 Connecting your equipment (In case of speakers attached to the surround back speaker terminals as...
Owner's Manual
Page 35
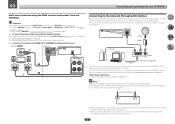
...) beforehand. 03 Connecting your router does not have as indicated in order to use the HDZONE function (page 114 ). ! Sub zone (HDZONE) HDMI IN 2 Main zone HDMI OUT 2 1 HDZONE/MAIN MAIN SELECTABLE ARC CONTROL HDMI OUT 2 1 HDZONE/MAIN MAIN SELECTABLE ARC CONTROL SURROUND BACK R ...of the wireless LAN antenna is danger that you may differ depending on page 25 . Turn on the DHCP server function of VSX-90) Multi-zone connection using a broadband Internet connection, a contract with the wireless LAN antenna upright. ! Wireless LAN antenna 1 ! The ...
...) beforehand. 03 Connecting your router does not have as indicated in order to use the HDZONE function (page 114 ). ! Sub zone (HDZONE) HDMI IN 2 Main zone HDMI OUT 2 1 HDZONE/MAIN MAIN SELECTABLE ARC CONTROL HDMI OUT 2 1 HDZONE/MAIN MAIN SELECTABLE ARC CONTROL SURROUND BACK R ...of the wireless LAN antenna is danger that you may differ depending on page 25 . Turn on the DHCP server function of VSX-90) Multi-zone connection using a broadband Internet connection, a contract with the wireless LAN antenna upright. ! Wireless LAN antenna 1 ! The ...

Owner's Manual
Page 37
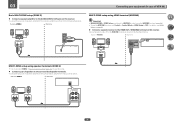
... mains plug from a strong fluorescent lamp is shining on the IR receiver remote sensor window. ! If you find it damaged, ask your nearest Pioneer authorized independent service company for the connection. Make sure the blue u STANDBY/ON light has gone out before unplugging. 1 Plug the supplied power ... jack of this receiver. 03 Connecting your equipment (In case of VSX-90) Connecting an IR receiver If you keep your stereo components in a closed cabinet or shelving unit, or you wish to use the sub zone remote control in another zone, you can use an optional IR receiver (such as a Niles...
... mains plug from a strong fluorescent lamp is shining on the IR receiver remote sensor window. ! If you find it damaged, ask your nearest Pioneer authorized independent service company for the connection. Make sure the blue u STANDBY/ON light has gone out before unplugging. 1 Plug the supplied power ... jack of this receiver. 03 Connecting your equipment (In case of VSX-90) Connecting an IR receiver If you keep your stereo components in a closed cabinet or shelving unit, or you wish to use the sub zone remote control in another zone, you can use an optional IR receiver (such as a Niles...

Owner's Manual
Page 40
... setting on page 110 ). ! Speaker System setting: 5.2ch [B] Speaker B connection ! Front Bi-Amp C L R SW1 SW2 Play the front speaker in the main zone when not using the B speakers. [C] Front Bi-amping connection (High quality surround) ! The same connections also allow for 5.1-channel surround sound in high sound quality...the front channel. (The subwoofer's low frequency component is played from the two subwoofers. 04 Connecting your equipment (In case of VSX-45) Determining the speakers' application This unit permits you to build various surround systems, in the main...
... setting on page 110 ). ! Speaker System setting: 5.2ch [B] Speaker B connection ! Front Bi-Amp C L R SW1 SW2 Play the front speaker in the main zone when not using the B speakers. [C] Front Bi-amping connection (High quality surround) ! The same connections also allow for 5.1-channel surround sound in high sound quality...the front channel. (The subwoofer's low frequency component is played from the two subwoofers. 04 Connecting your equipment (In case of VSX-45) Determining the speakers' application This unit permits you to build various surround systems, in the main...
Owner's Manual
Page 50
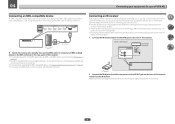
... to link it is connected to this receiver. ! 04 Connecting your equipment (In case of VSX-45) Connecting an MHL-compatible device An MHL-compatible mobile device can use an optional IR receiver... device is recharged whenever it to the IR receiver. Remote operation may not use the sub zone remote control in a closed cabinet or shelving unit, or you wish to enjoy 3D/Full-HD...is enabled only when the unit's power is turned on the receiver. Closet or shelving unit Non-Pioneer component CONTROL IR IR IN IN OUT 1 IR IN OUT CONTROL IR receiver 2 Connect the IR ...
... to link it is connected to this receiver. ! 04 Connecting your equipment (In case of VSX-45) Connecting an MHL-compatible device An MHL-compatible mobile device can use an optional IR receiver... device is recharged whenever it to the IR receiver. Remote operation may not use the sub zone remote control in a closed cabinet or shelving unit, or you wish to enjoy 3D/Full-HD...is enabled only when the unit's power is turned on the receiver. Closet or shelving unit Non-Pioneer component CONTROL IR IR IN IN OUT 1 IR IN OUT CONTROL IR receiver 2 Connect the IR ...
Owner's Manual
Page 60
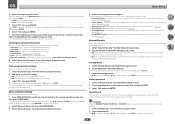
... the audio contents of network functions (page 60 ). ! AirPlay Password - Parental Lock - Restricts usage of devices in order: ! Play ZONE Setup (VSX-90 only) - Select the zone for about 60 seconds. Port Number Setting (VSX-90 only) - Even when the unit is in standby status. 1 Select 'Network Standby' from the Network Option menu. 2 Specify whether the...
... the audio contents of network functions (page 60 ). ! AirPlay Password - Parental Lock - Restricts usage of devices in order: ! Play ZONE Setup (VSX-90 only) - Select the zone for about 60 seconds. Port Number Setting (VSX-90 only) - Even when the unit is in standby status. 1 Select 'Network Standby' from the Network Option menu. 2 Specify whether the...

