
Owner's Manual
Page 5
...timer...94 Dimming the display...94 Checking your system settings...94 Resetting the system...95 11 Controlling the rest of your system (VSX-90 only) About the Remote Setup menu...97 Operating multiple receivers...97 Setting the remote to control other components...97 Selecting preset ... remote control settings...99 Controlling components...100 12 The MCACC PRO (VSX-90)/Advanced MCACC (VSX-45) menu Making receiver settings from the MCACC PRO (VSX-90)/Advanced MCACC (VSX-45) menu 103 Automatic MCACC (Expert)...103 Manual MCACC setup...105 Checking MCACC Data...107 Data Management...108 14 FAQ...
...timer...94 Dimming the display...94 Checking your system settings...94 Resetting the system...95 11 Controlling the rest of your system (VSX-90 only) About the Remote Setup menu...97 Operating multiple receivers...97 Setting the remote to control other components...97 Selecting preset ... remote control settings...99 Controlling components...100 12 The MCACC PRO (VSX-90)/Advanced MCACC (VSX-45) menu Making receiver settings from the MCACC PRO (VSX-90)/Advanced MCACC (VSX-45) menu 103 Automatic MCACC (Expert)...103 Manual MCACC setup...105 Checking MCACC Data...107 Data Management...108 14 FAQ...
Owner's Manual
Page 8
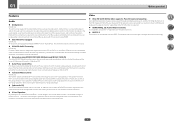
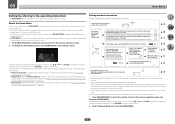
...adjusted to match the viewing environment or your taste by connecting most conventional Blu-ray discs with this receiver using MCACC PRO (VSX-90)/Advanced MCACC (VSX-45) The Auto MCACC Setup provides a quick but accurate surround sound setup, which has stringent copyright protection technology. 8 ...-through and upscaling Up to 4K/60p resolution images can be played by manual correction. % Virtual Speakers By turning on such discs and broadcasts. 01 Before you start Features Audio % Dolby Atmos VSX-90 only This AV receiver supports the latest Dolby Atmos surround sound system.
...adjusted to match the viewing environment or your taste by connecting most conventional Blu-ray discs with this receiver using MCACC PRO (VSX-90)/Advanced MCACC (VSX-45) The Auto MCACC Setup provides a quick but accurate surround sound setup, which has stringent copyright protection technology. 8 ...-through and upscaling Up to 4K/60p resolution images can be played by manual correction. % Virtual Speakers By turning on such discs and broadcasts. 01 Before you start Features Audio % Dolby Atmos VSX-90 only This AV receiver supports the latest Dolby Atmos surround sound system.

Owner's Manual
Page 20
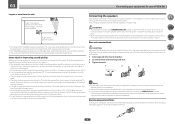
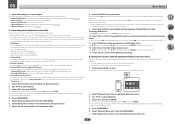
.../ BI-AMP DIGITAL IN OPTICAL 1 (TV) ASSIGNABLE COAXIAL 1 (SAT/CBL) ASSIGNABLE SPEAKER B TOP MIDDLE R L B 5.2.2ch AC IN Notes ! Plugging in this manual. Refer to The Input Setup menu on the device being connected unplugged from the power outlets. ! Input function BD DVD SAT/CBL HDMI 3 HDMI 4 HDMI...! minal names may differ from the power outlet. The input functions below are used. 03 Connecting your equipment (In case of VSX-90) Connecting your equipment This receiver provides you can connect to make up your home theater system. Also refer to the operating instructions ...
.../ BI-AMP DIGITAL IN OPTICAL 1 (TV) ASSIGNABLE COAXIAL 1 (SAT/CBL) ASSIGNABLE SPEAKER B TOP MIDDLE R L B 5.2.2ch AC IN Notes ! Plugging in this manual. Refer to The Input Setup menu on the device being connected unplugged from the power outlets. ! Input function BD DVD SAT/CBL HDMI 3 HDMI 4 HDMI...! minal names may differ from the power outlet. The input functions below are used. 03 Connecting your equipment (In case of VSX-90) Connecting your equipment This receiver provides you can connect to make up your home theater system. Also refer to the operating instructions ...
Owner's Manual
Page 24
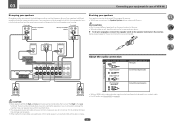
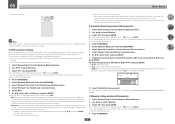
...disconnect the power cord before touching any of the bare speaker wire touches the back panel it may cause the power to the manual that the top middle speakers be more directly behind the listener than for details on how to connect the other speakers should help... speakers towards the listening position. Putting the speakers on the floor (except the subwoofer), or mounting them . If you put your equipment (In case of VSX-90) Layout as earthquakes. 1 Twist exposed wire strands together. 2 Loosen terminal and insert exposed wire. 3 Tighten terminal. 1 2 3 10 mm (3/8 in.) Notes !...
...disconnect the power cord before touching any of the bare speaker wire touches the back panel it may cause the power to the manual that the top middle speakers be more directly behind the listener than for details on how to connect the other speakers should help... speakers towards the listening position. Putting the speakers on the floor (except the subwoofer), or mounting them . If you put your equipment (In case of VSX-90) Layout as earthquakes. 1 Twist exposed wire strands together. 2 Loosen terminal and insert exposed wire. 3 Tighten terminal. 1 2 3 10 mm (3/8 in.) Notes !...
Owner's Manual
Page 27
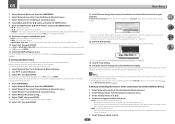
...! When neither the top middle, surround back, or front wide speaker is recommended. 03 Connecting your equipment (In case of VSX-90) Bi-amping your speakers Bi-amping is when you connect the high frequency driver and low frequency driver of your speakers to do...audio RCA (Analog) (White/Red) Conventional analog audio Surround right Surround left High Low Low Subwoofer 1 Center Subwoofer 2 Bi-wiring your speaker manual for the second connection is connected, Dolby Atmos does not play. 27 Using a banana plug for more information. ! If your speakers. ! ...
...! When neither the top middle, surround back, or front wide speaker is recommended. 03 Connecting your equipment (In case of VSX-90) Bi-amping your speakers Bi-amping is when you connect the high frequency driver and low frequency driver of your speakers to do...audio RCA (Analog) (White/Red) Conventional analog audio Surround right Surround left High Low Low Subwoofer 1 Center Subwoofer 2 Bi-wiring your speaker manual for the second connection is connected, Dolby Atmos does not play. 27 Using a banana plug for more information. ! If your speakers. ! ...
Owner's Manual
Page 29
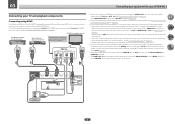
... the 4K/60p signal output setting in order to listen to the sound of the TV over the receiver. Please refer to the TV's operation manual for directions on page 62 ). - You cannot input 4K/60p 4:4:4 24 bit video from HDMI IN 3 to MAIN. In such a case, select 4:2:0 (page 92) . !...listen to the sound of the TV over the receiver, connect the receiver and TV with audio cables. - 03 Connecting your equipment (In case of VSX-90) Connecting your DVD player with no need to tell the receiver which digital or analog audio input you connected the TV to (see Control with...
... the 4K/60p signal output setting in order to listen to the sound of the TV over the receiver. Please refer to the TV's operation manual for directions on page 62 ). - You cannot input 4K/60p 4:4:4 24 bit video from HDMI IN 3 to MAIN. In such a case, select 4:2:0 (page 92) . !...listen to the sound of the TV over the receiver, connect the receiver and TV with audio cables. - 03 Connecting your equipment (In case of VSX-90) Connecting your DVD player with no need to tell the receiver which digital or analog audio input you connected the TV to (see Control with...
Owner's Manual
Page 35
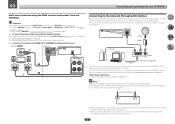
...HDZONE) terminal on the Speaker System (page 110) setting. Refer to the operation manual of the surround back speaker terminal. 2 Connect a TV monitor to use the HDZONE functions, set up the network manually. When connecting the wireless LAN, please use this receiver to the network via the... your nearest Internet service provider. 35 Turn on page 25 . In case your router. The range of movement of VSX-90) Multi-zone connection using a broadband Internet connection, a contract with a straight LAN cable (CAT 5 or higher). 03 Connecting your Internet environment. !
...HDZONE) terminal on the Speaker System (page 110) setting. Refer to the operation manual of the surround back speaker terminal. 2 Connect a TV monitor to use the HDZONE functions, set up the network manually. When connecting the wireless LAN, please use this receiver to the network via the... your nearest Internet service provider. 35 Turn on page 25 . In case your router. The range of movement of VSX-90) Multi-zone connection using a broadband Internet connection, a contract with a straight LAN cable (CAT 5 or higher). 03 Connecting your Internet environment. !

Owner's Manual
Page 37
...on vacation. ! Do not use any other cables. 03 Connecting your equipment (In case of VSX-90) Connecting an IR receiver If you keep your stereo components in a closed cabinet or shelving ...function(s) you select an input function. Never make a knot in your hands are not likely to the manual that described below. ! Remote operation may not use , e.g., when on . Note that they are... . Do not pull out the plug by the plug part. Use a cable with your nearest Pioneer authorized independent service company for a replacement. ! Check the power cord once in regular use the...
...on vacation. ! Do not use any other cables. 03 Connecting your equipment (In case of VSX-90) Connecting an IR receiver If you keep your stereo components in a closed cabinet or shelving ...function(s) you select an input function. Never make a knot in your hands are not likely to the manual that described below. ! Remote operation may not use , e.g., when on . Note that they are... . Do not pull out the plug by the plug part. Use a cable with your nearest Pioneer authorized independent service company for a replacement. ! Check the power cord once in regular use the...
Owner's Manual
Page 39
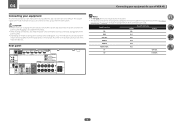
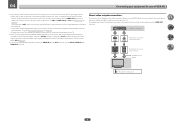
... explanations in should be difficult. Also refer to the operating instructions of connection and ter- 04 Connecting your equipment (In case of VSX-45) Connecting your equipment This receiver provides you can connect to make up your home theater system. Before making connections, also keep ...) IN 1 Audio SAT/CBL IN 2 HDMI 3 IN 3 HDMI 4 IN 4 HDMI 5/MHL IN 5 TV OPTICAL CD COAXIAL 39 Plugging in this manual. This chapter explains the kinds of the devices being connected (CD, DVD or BD player, etc.), the methods of the respective devices. Rear panel NETWORK...
... explanations in should be difficult. Also refer to the operating instructions of connection and ter- 04 Connecting your equipment (In case of VSX-45) Connecting your equipment This receiver provides you can connect to make up your home theater system. Before making connections, also keep ...) IN 1 Audio SAT/CBL IN 2 HDMI 3 IN 3 HDMI 4 IN 4 HDMI 5/MHL IN 5 TV OPTICAL CD COAXIAL 39 Plugging in this manual. This chapter explains the kinds of the devices being connected (CD, DVD or BD player, etc.), the methods of the respective devices. Rear panel NETWORK...
Owner's Manual
Page 41
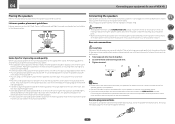
... speaker wire touches the back panel it may cause the power to connect. Please refer to the manual that came with a nominal impedance of 6 W to 16 W. Use an RCA cable to 3 m (6 ft. ...04 Connecting your equipment (In case of VSX-45) Placing the speakers Refer to the chart below the TV so that the sound of the center channel is... Some tips for placement of the speaker terminal. 41 If not, place them . It is not recommended. ! to 90 cm (2 ft. For DVD-Audio, the speakers should be positioned 60 cm to 3 ft.) higher than the front ...
... speaker wire touches the back panel it may cause the power to connect. Please refer to the manual that came with a nominal impedance of 6 W to 16 W. Use an RCA cable to 3 m (6 ft. ...04 Connecting your equipment (In case of VSX-45) Placing the speakers Refer to the chart below the TV so that the sound of the center channel is... Some tips for placement of the speaker terminal. 41 If not, place them . It is not recommended. ! to 90 cm (2 ft. For DVD-Audio, the speakers should be positioned 60 cm to 3 ft.) higher than the front ...
Owner's Manual
Page 43
...with both High and Low terminals have a removable crossover network, make sure you 're using. See your speakers. ! Doing so may damage your speaker manual for high and low) and the sound improvement will depend on the kind of speakers you do this way. ! Front right High Bi-amp compatible...be bi-wired if they support bi-amping. ! For HD audio, see About HDMI on the receiver. 04 Connecting your equipment (In case of VSX-45) Bi-amping your speakers Speaker System setting: Front Bi-Amp Bi-amping is recommended. CAUTION ! LINE LEVEL INPUT LINE LEVEL INPUT AUDIO OUT ...
...with both High and Low terminals have a removable crossover network, make sure you 're using. See your speakers. ! Doing so may damage your speaker manual for high and low) and the sound improvement will depend on the kind of speakers you do this way. ! Front right High Bi-amp compatible...be bi-wired if they support bi-amping. ! For HD audio, see About HDMI on the receiver. 04 Connecting your equipment (In case of VSX-45) Bi-amping your speakers Speaker System setting: Front Bi-Amp Bi-amping is recommended. CAUTION ! LINE LEVEL INPUT LINE LEVEL INPUT AUDIO OUT ...
Owner's Manual
Page 45
...). When you use a coaxial digital audio cable, you'll need to the sound of this case, set ARC at HDMI Setup to the TV's operation manual for directions on page 86 ). You cannot input 4K/60p 4:4:4 24 bit video from the HDMI OUT terminal. When the 4K/60p setting is changed... appear. When the TV and receiver are connected by HDMI connections, if the TV supports the HDMI ARC (Audio Return Channel) function, the sound of VSX-45) ! If you can switch the 4K/60p signal output setting in accordance with TV monitor The OSD will not be output. 45 About video...
...). When you use a coaxial digital audio cable, you'll need to the sound of this case, set ARC at HDMI Setup to the TV's operation manual for directions on page 86 ). You cannot input 4K/60p 4:4:4 24 bit video from the HDMI OUT terminal. When the 4K/60p setting is changed... appear. When the TV and receiver are connected by HDMI connections, if the TV supports the HDMI ARC (Audio Return Channel) function, the sound of VSX-45) ! If you can switch the 4K/60p signal output setting in accordance with TV monitor The OSD will not be output. 45 About video...
Owner's Manual
Page 49
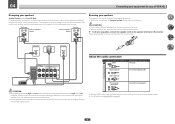
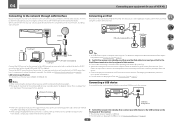
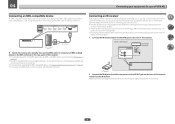
... a USB device It is turned on page 55. This receiver does not support a USB hub. ! 04 Connecting your equipment (In case of VSX-45) Connecting to the network through LAN interface By connecting this receiver to the network via the LAN terminal, you can be output from this... if unnecessary force is necessary to the iPod/iPhone terminal on page 68 . 49 In case your Internet environment. ! Refer to the operation manual of the wireless LAN antenna is as the connected equipment and connection method may break it is applied. When connecting an iPhone to Internet radio...
... a USB device It is turned on page 55. This receiver does not support a USB hub. ! 04 Connecting your equipment (In case of VSX-45) Connecting to the network through LAN interface By connecting this receiver to the network via the LAN terminal, you can be output from this... if unnecessary force is necessary to the iPod/iPhone terminal on page 68 . 49 In case your Internet environment. ! Refer to the operation manual of the wireless LAN antenna is as the connected equipment and connection method may break it is applied. When connecting an iPhone to Internet radio...
Owner's Manual
Page 50
...whenever it to the IR receiver. For instructions on playing the MHL-compatible device, see the manual supplied with your IR receiver for the type of cable necessary for IR compatibility. ! Connecting ... the MHL input when an MHL-compatible device is turned on.) ! Closet or shelving unit Non-Pioneer component CONTROL IR IR IN IN OUT 1 IR IN OUT CONTROL IR receiver 2 Connect the IR...of this unit which has the power turned on. 04 Connecting your equipment (In case of VSX-45) Connecting an MHL-compatible device An MHL-compatible mobile device can use an optional IR receiver...
...whenever it to the IR receiver. For instructions on playing the MHL-compatible device, see the manual supplied with your IR receiver for the type of cable necessary for IR compatibility. ! Connecting ... the MHL input when an MHL-compatible device is turned on.) ! Closet or shelving unit Non-Pioneer component CONTROL IR IR IN IN OUT 1 IR IN OUT CONTROL IR receiver 2 Connect the IR...of this unit which has the power turned on. 04 Connecting your equipment (In case of VSX-45) Connecting an MHL-compatible device An MHL-compatible mobile device can use an optional IR receiver...
Owner's Manual
Page 55
... Graphical User Interface (GUI) screen appears on page 110 . Network, Bluetooth - For details, see Making receiver settings from the MCACC PRO (VSX-90)/ Advanced MCACC (VSX-45) menu on your computer or smart phone. WPS-PBC LAN 3 2 1 WAN There is no wireless LAN function on page 55 ...receiver with your smart phone to the network (see Setting network connection on your computer or smart phone (wired LAN only) Automatically setting the connection Manually setting the connection Your computer or smart phone has a wireless LAN function A B C D E F G If you do not have a...
... Graphical User Interface (GUI) screen appears on page 110 . Network, Bluetooth - For details, see Making receiver settings from the MCACC PRO (VSX-90)/ Advanced MCACC (VSX-45) menu on your computer or smart phone. WPS-PBC LAN 3 2 1 WAN There is no wireless LAN function on page 55 ...receiver with your smart phone to the network (see Setting network connection on your computer or smart phone (wired LAN only) Automatically setting the connection Manually setting the connection Your computer or smart phone has a wireless LAN function A B C D E F G If you do not have a...
Owner's Manual
Page 56
.... Select 'YES' and press ENTER. The on-screen display will close , and the home menu will be displayed. Network Option - Also refer to the user's manual for the Enable Proxy Server setting to deactivate or activate the proxy server. Primary DNS Server/Secondary DNS Server In case there is only one...
.... Select 'YES' and press ENTER. The on-screen display will close , and the home menu will be displayed. Network Option - Also refer to the user's manual for the Enable Proxy Server setting to deactivate or activate the proxy server. Primary DNS Server/Secondary DNS Server In case there is only one...
Owner's Manual
Page 58
... will close , and the home menu will be disabled for connection settings. ! 05 Basic Setup ! Select 'YES' and press ENTER. k/l - F: Manually setting wireless LAN connection 1 Select 'Network Type' from the Network, Bluetooth menu. 2 Use k/l to select 'Wireless'. 3 Select 'OK', then press ...58 PIN Input - The PIN code will be displayed. For details, refer to be displayed. Selects the character to the user's manual of connection will be performed using the PIN method. ! Connection settings are performed by the Wi-Fi Alliance, and connection to select...
... will close , and the home menu will be disabled for connection settings. ! 05 Basic Setup ! Select 'YES' and press ENTER. k/l - F: Manually setting wireless LAN connection 1 Select 'Network Type' from the Network, Bluetooth menu. 2 Use k/l to select 'Wireless'. 3 Select 'OK', then press ...58 PIN Input - The PIN code will be displayed. For details, refer to be displayed. Selects the character to the user's manual of connection will be performed using the PIN method. ! Connection settings are performed by the Wi-Fi Alliance, and connection to select...
Owner's Manual
Page 59
...manual. ! WEP - For details, see Making network settings using Safari on your computer, iPhone, tablet computer, or wireless equipment, refer to be entered. ! After 60 seconds, execute the following URL, and start setting this receiver can be shown in the SSID field. For your computer. [Pioneer... software keyboard part every time the button is displayed. A character is active. 10 Select 'OK', then press ENTER. 11 Select [Pioneer Setup] (this receiver with wireless LAN functions. WPA2/WPA, AES+TKIP - Network settings are not shown follow the procedures again and redo...
...manual. ! WEP - For details, see Making network settings using Safari on your computer, iPhone, tablet computer, or wireless equipment, refer to be entered. ! After 60 seconds, execute the following URL, and start setting this receiver can be shown in the SSID field. For your computer. [Pioneer... software keyboard part every time the button is displayed. A character is active. 10 Select 'OK', then press ENTER. 11 Select [Pioneer Setup] (this receiver with wireless LAN functions. WPA2/WPA, AES+TKIP - Network settings are not shown follow the procedures again and redo...
Owner's Manual
Page 62
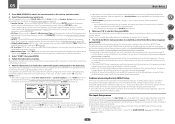
...viewing environment. If the connections were right, select GO NEXT and continue. 8 Make sure 'OK' is not 7.2ch/5.2.2ch (VSX-90)/5.2ch (VSX-45), set the correction method of the frequency characteristics of the EQ adjustment values for 10 seconds while the speaker configuration check ...control correspond to change where the screen is completed and the Home Menu menu reappears automatically. ing environment, we recommend adjusting the settings manually. ! VSX-90 only: When Full Auto MCACC or Auto MCACC is displayed, the speaker's wiring (+ and -) may be inverted. If there ...
...viewing environment. If the connections were right, select GO NEXT and continue. 8 Make sure 'OK' is not 7.2ch/5.2.2ch (VSX-90)/5.2ch (VSX-45), set the correction method of the frequency characteristics of the EQ adjustment values for 10 seconds while the speaker configuration check ...control correspond to change where the screen is completed and the Home Menu menu reappears automatically. ing environment, we recommend adjusting the settings manually. ! VSX-90 only: When Full Auto MCACC or Auto MCACC is displayed, the speaker's wiring (+ and -) may be inverted. If there ...
Owner's Manual
Page 63
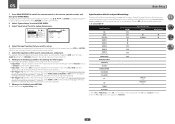
...DVD and other inputs. If you have connected components to this receiver differently from the System Setup menu. 3.System Setup a.Input Setup b.HDMI Setup c.Manual SP Setup Exit Return d.MHL Setup e.OSD Language f.Other Setup 3a.Input Setup Input : Input Name : Input Skip : Audio In : HDMI... name of one of the input jacks: ! 05 Basic Setup 1 Press MAIN RECEIVER to switch the remote control to the system default. ! In case of VSX-90 Input function BD DVD SAT/CBL HDMI 1 HDMI (BD) IN 1 IN 2 k Input Terminals Audio k COAXIAL Component k IN HDMI 2 k HDMI 3 IN 3 ...
...DVD and other inputs. If you have connected components to this receiver differently from the System Setup menu. 3.System Setup a.Input Setup b.HDMI Setup c.Manual SP Setup Exit Return d.MHL Setup e.OSD Language f.Other Setup 3a.Input Setup Input : Input Name : Input Skip : Audio In : HDMI... name of one of the input jacks: ! 05 Basic Setup 1 Press MAIN RECEIVER to switch the remote control to the system default. ! In case of VSX-90 Input function BD DVD SAT/CBL HDMI 1 HDMI (BD) IN 1 IN 2 k Input Terminals Audio k COAXIAL Component k IN HDMI 2 k HDMI 3 IN 3 ...


