Owner's Manual
Page 4
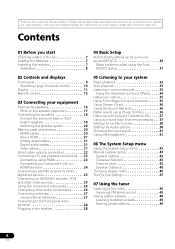
...batteries 7 Installing the receiver 7 Ventilation 8 04 Basic Setup Automatically setting up for buying this Pioneer product. Please read through these operating instructions so you for surround sound (MCACC 29 Other problems when using the Auto MCACC Setup 31 02 Controls and displays Front ... surround effects . . . . . 34 Listening in stereo 35 Using Front Stage Surround Advance 35 Using Stream Direct 36 Using the Sound Retriever 36 Better sound using HDMI 23 Connecting your component with Acoustic Calibration EQ . . . . . 37 Using surround back channel processing . . . ...
...batteries 7 Installing the receiver 7 Ventilation 8 04 Basic Setup Automatically setting up for buying this Pioneer product. Please read through these operating instructions so you for surround sound (MCACC 29 Other problems when using the Auto MCACC Setup 31 02 Controls and displays Front ... surround effects . . . . . 34 Listening in stereo 35 Using Front Stage Surround Advance 35 Using Stream Direct 36 Using the Sound Retriever 36 Better sound using HDMI 23 Connecting your component with Acoustic Calibration EQ . . . . . 37 Using surround back channel processing . . . ...
Owner's Manual
Page 6
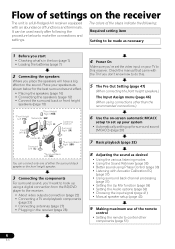
...page 28) 4 Power On Make sure you 'll want to hook up for surround sound (MCACC) (page 29) 7 Basic playback (page 32) 8 Adjusting the sound as shown below to make the connections and settings. It can connect only one of either the surround back ...speaker or the front height speaker. 3 Connecting the components For surround sound, you 've set up your TV to the receiver. • About video outputs connection (page 22) • Connecting a TV and playback components ...
...page 28) 4 Power On Make sure you 'll want to hook up for surround sound (MCACC) (page 29) 7 Basic playback (page 32) 8 Adjusting the sound as shown below to make the connections and settings. It can connect only one of either the surround back ...speaker or the front height speaker. 3 Connecting the components For surround sound, you 've set up your TV to the receiver. • About video outputs connection (page 22) • Connecting a TV and playback components ...
Owner's Manual
Page 7
... life or performance of used batteries, please comply with the same shape may result in the battery case. Pb K058c_A1_En The batteries included with the sound. - on a level and stable surface. This may interfere with the unit are to a device that gives off a magnetic field). in places that have a longer life...
... life or performance of used batteries, please comply with the same shape may result in the battery case. Pb K058c_A1_En The batteries included with the sound. - on a level and stable surface. This may interfere with the unit are to a device that gives off a magnetic field). in places that have a longer life...
Owner's Manual
Page 9
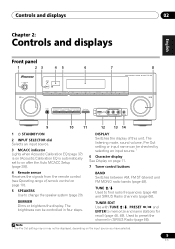
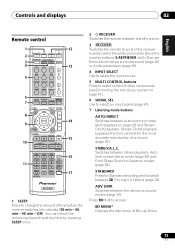
... /, PRESET / and ENTER to find radio frequencies (page 48) and SIRIUS Radio channels (page 66). The listening mode, sound volume, Pre Out setting or input name can be checked by selecting an input source.1 6 Character display See Display on page 11. 7 Tuner... recall (page 48, 49). DISPLAY Switches the display of remote control on after the Auto MCACC Setup (page 29)). CHANNEL RECEIVER VSX-820 TUNE TUNER EDIT PRESET ENTER MASTER VOLUME PHONES AUTO/DIRECT LISTENING MODE STEREO/ALC STANDARD ADV SURROUND iPod iPhone DIRECT CONTROL VIDEO INPUT USB...
... /, PRESET / and ENTER to find radio frequencies (page 48) and SIRIUS Radio channels (page 66). The listening mode, sound volume, Pre Out setting or input name can be checked by selecting an input source.1 6 Character display See Display on page 11. 7 Tuner... recall (page 48, 49). DISPLAY Switches the display of remote control on after the Auto MCACC Setup (page 29)). CHANNEL RECEIVER VSX-820 TUNE TUNER EDIT PRESET ENTER MASTER VOLUME PHONES AUTO/DIRECT LISTENING MODE STEREO/ALC STANDARD ADV SURROUND iPod iPhone DIRECT CONTROL VIDEO INPUT USB...
Owner's Manual
Page 10
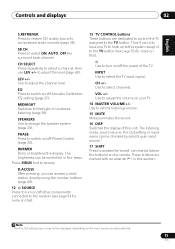
... fluorescent light is shining onto the remote sensor. • The receiver is located near a device that is emitting infrared rays. • The receiver is no sound output from the speakers (page 41). 10 Listening mode buttons AUTO/DIRECT Switches between Auto surround mode (Auto playback on page 28. 14 MCACC SETUP...
... fluorescent light is shining onto the remote sensor. • The receiver is located near a device that is emitting infrared rays. • The receiver is no sound output from the speakers (page 41). 10 Listening mode buttons AUTO/DIRECT Switches between Auto surround mode (Auto playback on page 28. 14 MCACC SETUP...
Owner's Manual
Page 12
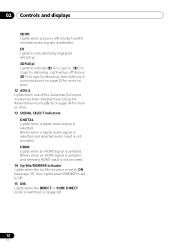
... off during 2 Pro Logic IIz decoding. (see page 37). EX Lights to indicate Dolby Digital EX decoding. 2PLll(x) Lights to ON (see Listening in surround sound on page 33 for more on this ). 13 SIGNAL SELECT indicators DIGITAL Lights when a digital audio signal is set to indicate 2 Pro Logic II / 2 Pro...
... off during 2 Pro Logic IIz decoding. (see page 37). EX Lights to indicate Dolby Digital EX decoding. 2PLll(x) Lights to ON (see Listening in surround sound on page 33 for more on this ). 13 SIGNAL SELECT indicators DIGITAL Lights when a digital audio signal is set to indicate 2 Pro Logic II / 2 Pro...
Owner's Manual
Page 13
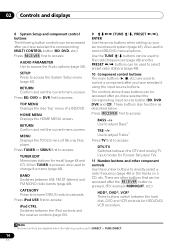
Off). Also use this button to set up surround sound (page 42) or Audio parameters (page 38). 4 INPUT SELECT Use to select the input source. 5 MULTI CONTROL buttons Press to select control of other components (...
Off). Also use this button to set up surround sound (page 42) or Audio parameters (page 38). 4 INPUT SELECT Use to select the input source. 5 MULTI CONTROL buttons Press to select control of other components (...
Owner's Manual
Page 14
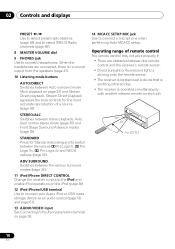
... using the input source buttons. Note 1 The tone controls are used to access: DTV/TV Switches between the DTV and analog TV input modes for Pioneer flat panel TVs. 11 Number buttons and other buttons that can be accessed after the RECEIVER button is pressed. (For example MIDNIGHT, etc.) HDD*, DVD... the iPod controls and the receiver controls (page 60). 9 TUNE /, PRESET /), ENTER Use the arrow buttons when setting up your surround sound system (page 42). CATEGORY Press to control BD/DVD menus/options.
... using the input source buttons. Note 1 The tone controls are used to access: DTV/TV Switches between the DTV and analog TV input modes for Pioneer flat panel TVs. 11 Number buttons and other buttons that can be accessed after the RECEIVER button is pressed. (For example MIDNIGHT, etc.) HDD*, DVD... the iPod controls and the receiver controls (page 60). 9 TUNE /, PRESET /), ENTER Use the arrow buttons when setting up your surround sound system (page 42). CATEGORY Press to control BD/DVD menus/options.
Owner's Manual
Page 15
... a channel, then use LEV +/- Use to change the speaker system (page 20). SPEAKERS Use to adjust the channel level. The listening mode, sound volume, Pre Out setting or input name can access a radio station directly using the number buttons (page 66). 12 SOURCE Press to turn... this unit. VOL +/- English Deutsch Français Italiano Nederlands Español Controls and displays 02 S.RETRIEVER Press to restore CD quality sound to switch on/off Acoustic Calibration EQ setting (page 37). EQ Press to the TV button. PHASE Press to compressed audio sources (page ...
... a channel, then use LEV +/- Use to change the speaker system (page 20). SPEAKERS Use to adjust the channel level. The listening mode, sound volume, Pre Out setting or input name can access a radio station directly using the number buttons (page 66). 12 SOURCE Press to turn... this unit. VOL +/- English Deutsch Français Italiano Nederlands Español Controls and displays 02 S.RETRIEVER Press to restore CD quality sound to switch on/off Acoustic Calibration EQ setting (page 37). EQ Press to the TV button. PHASE Press to compressed audio sources (page ...
Owner's Manual
Page 16
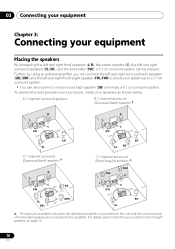
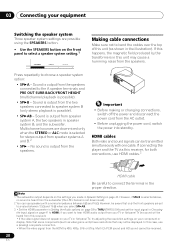
... the subwoofer (SW), a 5.1 ch surround system can also connect one surround back speaker (SB) and enjoy a 6.1 ch surround system. To achieve the best possible surround sound, install your speakers as shown below. 5.1 channel surround system: 6.1 channel surround (Surround back) system: a R L C SW 120 SL 120 SR R L C SW 120 120 SR SL SB...
... the subwoofer (SW), a 5.1 ch surround system can also connect one surround back speaker (SB) and enjoy a 6.1 ch surround system. To achieve the best possible surround sound, install your speakers as shown below. 5.1 channel surround system: 6.1 channel surround (Surround back) system: a R L C SW 120 SL 120 SR R L C SW 120 120 SR SL SB...
Owner's Manual
Page 17
... are securely installed. The Pre Out setting must be at the TV screen. to 9 ft.) apart, at a wider angle. CAUTION • Make sure that the sound of the center channel is best to the additional amplifier (see The Pre Out Setting on page 47). 17 En Important • To connect the... HEIGHT if the front height speaker is connected (If neither the surround back speaker nor the front height speaker is required. This not only improves sound quality, but also reduces the risk of damage or injury resulting from the TV. • If you're going to 90 cm (2 ft. Putting the...
... are securely installed. The Pre Out setting must be at the TV screen. to 9 ft.) apart, at a wider angle. CAUTION • Make sure that the sound of the center channel is best to the additional amplifier (see The Pre Out Setting on page 47). 17 En Important • To connect the... HEIGHT if the front height speaker is connected (If neither the surround back speaker nor the front height speaker is required. This not only improves sound quality, but also reduces the risk of damage or injury resulting from the TV. • If you're going to 90 cm (2 ft. Putting the...
Owner's Manual
Page 18
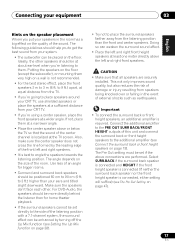
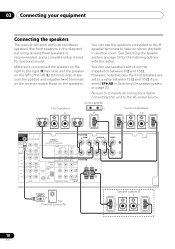
... on the left to the left (L) terminal. Also make sure the positive and negative (+/-) terminals on the receiver match those on page 20 for surround sound. You can use speakers with this unit to stereo playback in another room. 03 Connecting your equipment Connecting the speakers The receiver will work with...
... on the left to the left (L) terminal. Also make sure the positive and negative (+/-) terminals on the receiver match those on page 20 for surround sound. You can use speakers with this unit to stereo playback in another room. 03 Connecting your equipment Connecting the speakers The receiver will work with...
Owner's Manual
Page 20
... the HDMI parameter in Setting the Audio options on page 38 to THRU (THROUGH) and set the input signal in Speaker Setting on page 43. Sound is possible). • SPB - In this receiver, for stereo output from the two speakers connected to speaker system B (only stereo playback is ...audio output from your component or display. Press repeatedly to connect the terminal in the illustration). However, if SPB is selected above, no sound will be heard from the HDMI is not downmixed). 2 You can be received. 20 En If connecting the player and the TV via this ...
... the HDMI parameter in Setting the Audio options on page 38 to THRU (THROUGH) and set the input signal in Speaker Setting on page 43. Sound is possible). • SPB - In this receiver, for stereo output from the two speakers connected to speaker system B (only stereo playback is ...audio output from your component or display. Press repeatedly to connect the terminal in the illustration). However, if SPB is selected above, no sound will be heard from the HDMI is not downmixed). 2 You can be received. 20 En If connecting the player and the TV via this ...
Owner's Manual
Page 23
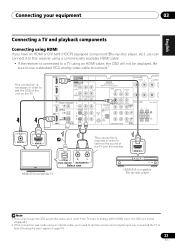
..., etc.), you can connect it to this receiver using a commercially available HDMI cable. • If the receiver is necessary in order to listen to the sound of the unit on page 41). 23 En IN BD DVD TV/SAT SUBWOOFER PRE OUT SURR BACK / FRONT HEIGHT L (Single) CD-R/TAPE DVR/VCR...
..., etc.), you can connect it to this receiver using a commercially available HDMI cable. • If the receiver is necessary in order to listen to the sound of the unit on page 41). 23 En IN BD DVD TV/SAT SUBWOOFER PRE OUT SURR BACK / FRONT HEIGHT L (Single) CD-R/TAPE DVR/VCR...
Owner's Manual
Page 24
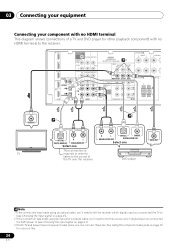
... was made using an optical or a coaxial cable, you'll need to tell the receiver which digital input you connected the DVD player to the sound of a TV and DVD player (or other playback component) with no HDMI terminal to the receiver.123 IN BD DVD TV/SAT SUBWOOFER PRE OUT...
... was made using an optical or a coaxial cable, you'll need to tell the receiver which digital input you connected the DVD player to the sound of a TV and DVD player (or other playback component) with no HDMI terminal to the receiver.123 IN BD DVD TV/SAT SUBWOOFER PRE OUT...
Owner's Manual
Page 27
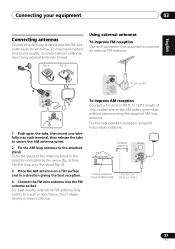
... the arrow (fig. ANTENNA FM UNBAL 75 Ω F connector AM LOOP To improve AM reception Connect a 5 m to 18 ft.) 27 En To improve reception and sound quality, connect external antennas (see Using external antennas below . to 18 ft.) length of vinyl-coated wire to the attached stand. For the best possible...
... the arrow (fig. ANTENNA FM UNBAL 75 Ω F connector AM LOOP To improve AM reception Connect a 5 m to 18 ft.) 27 En To improve reception and sound quality, connect external antennas (see Using external antennas below . to 18 ft.) length of vinyl-coated wire to the attached stand. For the best possible...
Owner's Manual
Page 29
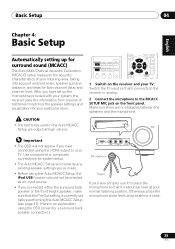
... a table or a chair. 29 En After you have set before performing the Auto MCACC Setup (see page 47). (Here is correctly set up for surround sound (MCACC) The Auto Multi-Channel Acoustic Calibration (MCACC) setup measures the acoustic characteristics of test tones to optimize the speaker settings and equalization for your...
... a table or a chair. 29 En After you have set before performing the Auto MCACC Setup (see page 47). (Here is correctly set up for surround sound (MCACC) The Auto Multi-Channel Acoustic Calibration (MCACC) setup measures the acoustic characteristics of test tones to optimize the speaker settings and equalization for your...
Owner's Manual
Page 31
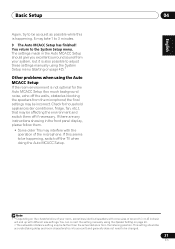
You can correct the setting manually using the Auto MCACC Setup If the room environment is happening. This setting should give you excellent surround sound from your room, sometimes identical speakers with cone sizes of around 12 cm (5 inches) will end up with the operation of the microphone. Check for ...
You can correct the setting manually using the Auto MCACC Setup If the room environment is happening. This setting should give you excellent surround sound from your room, sometimes identical speakers with cone sizes of around 12 cm (5 inches) will end up with the operation of the microphone. Check for ...
Owner's Manual
Page 32
... speaker, 2D is displayed when playing Dolby Digital signals. Turn down the volume of your DVD player or source discs, you will only hear sound from the speakers connected to this case, the receiver must be available depending on the playback component (for example a DVD player), your TV1 ...on your system components and receiver. It is possible to check on your DVD player or digital satellite receiver. Note 1 Make sure that all sound is an MPEG audio option, set this to convert the MPEG audio to adjust the volume level. 05 Listening to your system Chapter 5: Listening...
... speaker, 2D is displayed when playing Dolby Digital signals. Turn down the volume of your DVD player or source discs, you will only hear sound from the speakers connected to this case, the receiver must be available depending on the playback component (for example a DVD player), your TV1 ...on your system components and receiver. It is possible to check on your DVD player or digital satellite receiver. Note 1 Make sure that all sound is an MPEG audio option, set this to convert the MPEG audio to adjust the volume level. 05 Listening to your system Chapter 5: Listening...

Owner's Manual
Page 33
... DOLBY PLII GAME - See above • DOLBY PLII MUSIC - See above • NEO:6 MUSIC - Listening in the display to 5.1 channel sound, especially suited for auto playback of source you're playing and selects multichannel or stereo playback as necessary.1 AUTO/ STEREO/ BD MENU DIRECT A.L.C. Up... page 38). 33 En STANDARD ADV SURR • While listening to movie sources • DOLBY PLII MUSIC3 - Up to 5.1 channel sound, especially suited to a source, press STANDARD. Press repeatedly until AUTO SURROUND shows briefly in the display (it will automatically be selected and...
... DOLBY PLII GAME - See above • DOLBY PLII MUSIC - See above • NEO:6 MUSIC - Listening in the display to 5.1 channel sound, especially suited for auto playback of source you're playing and selects multichannel or stereo playback as necessary.1 AUTO/ STEREO/ BD MENU DIRECT A.L.C. Up... page 38). 33 En STANDARD ADV SURR • While listening to movie sources • DOLBY PLII MUSIC3 - Up to 5.1 channel sound, especially suited to a source, press STANDARD. Press repeatedly until AUTO SURROUND shows briefly in the display (it will automatically be selected and...


