
Owner's Manual
Page 1
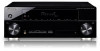
http://www.pioneerelectronics.com (US) http://www.pioneerelectronics.ca (Canada) Operating Instructions Mode d'emploi Manual de instrucciones AUDIO/VIDEO MULTI-CHANNEL RECEIVER RECEPTEUR AUDIOVISUEL A VOIES MULTIPLES RECEPTOR MULTICANAL DE AUDIO/VÍDEO VSX-820 Register your product on http://www.pioneerelectronics.com (US) http://www.pioneerelectronics.ca (Canada) •...product • Improve product development Your input helps us continue to design products that meet your needs. • Receive a free Pioneer newsletter Registered customers can opt in to receive a monthly newsletter.
http://www.pioneerelectronics.com (US) http://www.pioneerelectronics.ca (Canada) Operating Instructions Mode d'emploi Manual de instrucciones AUDIO/VIDEO MULTI-CHANNEL RECEIVER RECEPTEUR AUDIOVISUEL A VOIES MULTIPLES RECEPTOR MULTICANAL DE AUDIO/VÍDEO VSX-820 Register your product on http://www.pioneerelectronics.com (US) http://www.pioneerelectronics.ca (Canada) •...product • Improve product development Your input helps us continue to design products that meet your needs. • Receive a free Pioneer newsletter Registered customers can opt in to receive a monthly newsletter.
Owner's Manual
Page 4
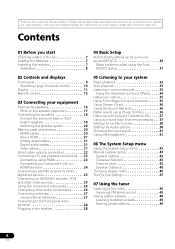
... the receiver 7 Ventilation 8 04 Basic Setup Automatically setting up for future reference. Please read through these operating instructions so you for buying this Pioneer product. Contents 01 Before you have finished reading the instructions, put them away in a safe place for surround sound (MCACC 29 Other problems ...Audio options 38 Choosing the input signal 41 Using the headphone 41 06 The System Setup menu Using the System Setup menu 42 Manual speaker setup 43 Speaker Setting 43 Crossover Network 45 Channel Level 45 Speaker Distance 46 The Input Assign menu 46 The Pre ...
... the receiver 7 Ventilation 8 04 Basic Setup Automatically setting up for future reference. Please read through these operating instructions so you for buying this Pioneer product. Contents 01 Before you have finished reading the instructions, put them away in a safe place for surround sound (MCACC 29 Other problems ...Audio options 38 Choosing the input signal 41 Using the headphone 41 06 The System Setup menu Using the System Setup menu 42 Manual speaker setup 43 Speaker Setting 43 Crossover Network 45 Channel Level 45 Speaker Distance 46 The Input Assign menu 46 The Pre ...
Owner's Manual
Page 6
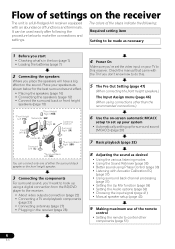
...) (When connecting the front height speakers.) The Input Assign menu (page 46) (When using connections other components (page 51) 6 En Check the manual that came with Acoustic Calibration EQ (page 37) • Using surround back channel processing (page 37) • Setting the Up Mix function (page... 38) • Setting the Audio options (page 38) • Choosing the input signal (page 41) • Manual speaker setup (page 43) 9 Making maximum use of the remote control • Setting the remote to make the connections and settings. Flow of...
...) (When connecting the front height speakers.) The Input Assign menu (page 46) (When using connections other components (page 51) 6 En Check the manual that came with Acoustic Calibration EQ (page 37) • Using surround back channel processing (page 37) • Setting the Up Mix function (page... 38) • Setting the Audio options (page 38) • Choosing the input signal (page 41) • Manual speaker setup (page 43) 9 Making maximum use of the remote control • Setting the remote to make the connections and settings. Flow of...

Owner's Manual
Page 26
... your equipment Using the component video jacks Component video should deliver superior picture quality when compared to the input source you've connected. See the manuals that you must connect digital components to analog audio jacks if you want to record to/from digital components (like an MD) to/from analog...
... your equipment Using the component video jacks Component video should deliver superior picture quality when compared to the input source you've connected. See the manuals that you must connect digital components to analog audio jacks if you want to record to/from digital components (like an MD) to/from analog...
Owner's Manual
Page 30
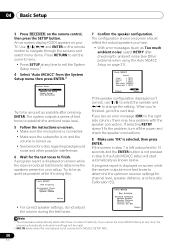
... SETUP at any time to exit the System Setup menu.1 4 Select 'Auto MCACC' from the System Setup menu then press ENTER.2 System Setup 1.Auto MCACC 2.Manual SP Setup 3.Input Assign 4.Pre Out Setting Return Try to be as quiet as possible while it's doing this. 1.Auto MCACC Now Analyzing Environment Check...
... SETUP at any time to exit the System Setup menu.1 4 Select 'Auto MCACC' from the System Setup menu then press ENTER.2 System Setup 1.Auto MCACC 2.Manual SP Setup 3.Input Assign 4.Pre Out Setting Return Try to be as quiet as possible while it's doing this. 1.Auto MCACC Now Analyzing Environment Check...
Owner's Manual
Page 31
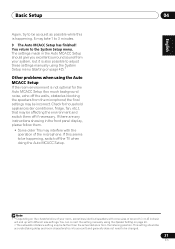
...from the listening position. It may be farther than the actual distance from your system, but it is also possible to adjust these settings manually using the System Setup menu (starting on page 42).1 Other problems when using the Speaker Setting on the characteristics of your room, sometimes ... operation of the microphone. The settings made in the front panel display, please follow them off if necessary. You can correct the setting manually using the Auto MCACC Setup If the room environment is happening. If there are any instructions showing in the Auto MCACC Setup should be...
...from the listening position. It may be farther than the actual distance from your system, but it is also possible to adjust these settings manually using the System Setup menu (starting on page 42).1 Other problems when using the Speaker Setting on the characteristics of your room, sometimes ... operation of the microphone. The settings made in the front panel display, please follow them off if necessary. You can correct the setting manually using the Auto MCACC Setup If the room environment is happening. If there are any instructions showing in the Auto MCACC Setup should be...
Owner's Manual
Page 32
... subwoofer (if you have one), then the receiver (press RECEIVER). • Make sure the setup microphone is now selected). 2 If you may need to manually switch the input signal type press SIGNAL SEL (page 41). 3 • You may only get digital 2 channel stereo and analog sound. In this case, the...
... subwoofer (if you have one), then the receiver (press RECEIVER). • Make sure the setup microphone is now selected). 2 If you may need to manually switch the input signal type press SIGNAL SEL (page 41). 3 • You may only get digital 2 channel stereo and analog sound. In this case, the...
Owner's Manual
Page 40
...) a. c. This setting works only with most SACD discs, but if the sound distorts, it is automatically adjusted according to OFF and adjust the delay time manually. If you find the automatically set delay time unsuitable, set to 2-channel sources in NEO:6 CINEMA and NEO:6 MUSIC mode. 40 En i. The video delay...
...) a. c. This setting works only with most SACD discs, but if the sound distorts, it is automatically adjusted according to OFF and adjust the delay time manually. If you find the automatically set delay time unsuitable, set to 2-channel sources in NEO:6 CINEMA and NEO:6 MUSIC mode. 40 En i. The video delay...
Owner's Manual
Page 41
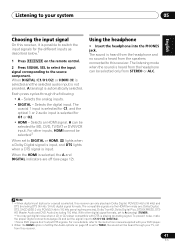
... audio input is not provided, A (analog) is selected, the A and DIGITAL indicators are : Dolby Digital, DTS, SACD (DSD 2 ch), PCM (32 kHz to the instruction manual supplied with DTS is selected for O1 or O2. • HDMI - When the HDMI is automatically selected. The compatible signals via the HDMI terminals are...
... audio input is not provided, A (analog) is selected, the A and DIGITAL indicators are : Dolby Digital, DTS, SACD (DSD 2 ch), PCM (32 kHz to the instruction manual supplied with DTS is selected for O1 or O2. • HDMI - When the HDMI is automatically selected. The compatible signals via the HDMI terminals are...
Owner's Manual
Page 42
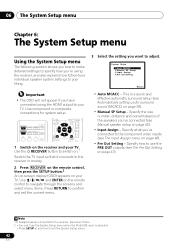
... to navigate through the screens and select menu items. Press RETURN to confirm and exit the current menu. 3 Select the setting you 've connected (see Manual speaker setup on page 29). • Manual SP Setup - System Setup 1.Auto MCACC 2.Manual SP Setup 3.Input Assign 4.Pre Out Setting Return • Auto MCACC -
... to navigate through the screens and select menu items. Press RETURN to confirm and exit the current menu. 3 Select the setting you 've connected (see Manual speaker setup on page 29). • Manual SP Setup - System Setup 1.Auto MCACC 2.Manual SP Setup 3.Input Assign 4.Pre Out Setting Return • Auto MCACC -
Owner's Manual
Page 43
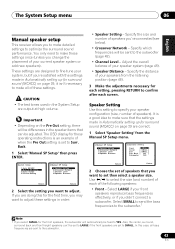
... are sent to confirm after each screen. Adjust the overall balance of speakers). It is set of your speakers from the Manual SP Setup menu. 2.Manual SP Setup a.Speaker Setting b.Crossover Network c.Channel Level d.Speaker Distance 2a.Speaker Setting Front SMALL Center [ SMALL ] Surr ... size (and number) of each setting, pressing RETURN to the subwoofer. 43 En System Setup 1.Auto MCACC 2.Manual SP Setup 3.Input Assign 4.Pre Out Setting 2.Manual SP Setup a.Speaker Setting b.Crossover Network c.Channel Level d.Speaker Distance Return Return 2 Select the setting you want to...
... are sent to confirm after each screen. Adjust the overall balance of speakers). It is set of your speakers from the Manual SP Setup menu. 2.Manual SP Setup a.Speaker Setting b.Crossover Network c.Channel Level d.Speaker Distance 2a.Speaker Setting Front SMALL Center [ SMALL ] Surr ... size (and number) of each setting, pressing RETURN to the subwoofer. 43 En System Setup 1.Auto MCACC 2.Manual SP Setup 3.Input Assign 4.Pre Out Setting 2.Manual SP Setup a.Speaker Setting b.Crossover Network c.Channel Level d.Speaker Distance Return Return 2 Select the setting you want to...
Owner's Manual
Page 44
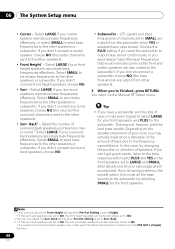
... Surr. Note 1 • You can only adjust the Surr. You return to the other speakers). • Surr. Select SMALL to send bass frequencies to the Manual SP Setup menu. Select LARGE if your room you 're finished, press RETURN. If you didn't connect surround speakers choose NO (the sound of your...
... Surr. Note 1 • You can only adjust the Surr. You return to the other speakers). • Surr. Select SMALL to send bass frequencies to the Manual SP Setup menu. Select LARGE if your room you 're finished, press RETURN. If you didn't connect surround speakers choose NO (the sound of your...
Owner's Manual
Page 45
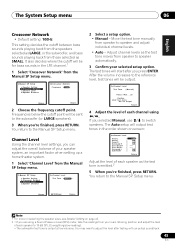
... between bass sounds playing back from the speakers selected as LARGE, or the subwoofer, and bass sounds playing back from the Manual SP Setup menu. 2.Manual SP Setup a.Speaker Setting b.Crossover Network c.Channel Level d.Speaker Distance 2b.Crossover Network Frequency 100Hz Return Return 2 Choose the ... level settings, you press ENTER. After the volume increases to the reference level, test tones will be output. 2c.Channel Level Test Tone [ Manual ] Please Wait . . .20 Caution Loud test tones will be output Return 4 Adjust the level of your speaker system, an important factor...
... between bass sounds playing back from the speakers selected as LARGE, or the subwoofer, and bass sounds playing back from the Manual SP Setup menu. 2.Manual SP Setup a.Speaker Setting b.Crossover Network c.Channel Level d.Speaker Distance 2b.Crossover Network Frequency 100Hz Return Return 2 Choose the ... level settings, you press ENTER. After the volume increases to the reference level, test tones will be output. 2c.Channel Level Test Tone [ Manual ] Please Wait . . .20 Caution Loud test tones will be output Return 4 Adjust the level of your speaker system, an important factor...
Owner's Manual
Page 46
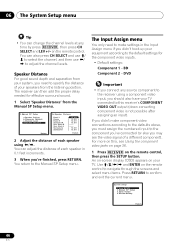
.... Back R Surr. You return to adjust the channel levels. DVD Important • If you should also have your speakers from the Manual SP Setup menu. 2.Manual SP Setup a.Speaker Setting b.Crossover Network c.Channel Level d.Speaker Distance Return 2d.Speaker Distance Front L Center Front R Surround R Surr. System...You can also press CH SELECT and use / to select the channel, and then use / to the Manual SP Setup menu. For more on the remote control to navigate through the screens and select menu items. Press RETURN to specify the distance of...
.... Back R Surr. You return to adjust the channel levels. DVD Important • If you should also have your speakers from the Manual SP Setup menu. 2.Manual SP Setup a.Speaker Setting b.Crossover Network c.Channel Level d.Speaker Distance Return 2d.Speaker Distance Front L Center Front R Surround R Surr. System...You can also press CH SELECT and use / to select the channel, and then use / to the Manual SP Setup menu. For more on the remote control to navigate through the screens and select menu items. Press RETURN to specify the distance of...
Owner's Manual
Page 47
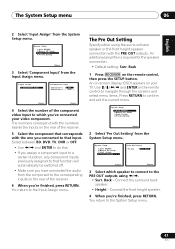
... confirm and exit the current menu. Use and ENTER on the remote control, then press the SETUP button. System Setup 1.Auto MCACC 2.Manual SP Setup 3.Input Assign 4.Pre Out Setting Return 2 Select 'Pre Out Setting' from the System Setup menu. Back - System Setup 1.Auto MCACC...speaker to connect to that input. An additional amplifier is required for the speaker connection. • Default setting: Surr. System Setup 1.Auto MCACC 2.Manual SP Setup 3.Input Assign 4.Pre Out Setting 4.Pre Out Setting Pre Out Surr. You return to the Input Assign menu. The numbers correspond with ...
... confirm and exit the current menu. Use and ENTER on the remote control, then press the SETUP button. System Setup 1.Auto MCACC 2.Manual SP Setup 3.Input Assign 4.Pre Out Setting Return 2 Select 'Pre Out Setting' from the System Setup menu. Back - System Setup 1.Auto MCACC...speaker to connect to that input. An additional amplifier is required for the speaker connection. • Default setting: Surr. System Setup 1.Auto MCACC 2.Manual SP Setup 3.Input Assign 4.Pre Out Setting 4.Pre Out Setting Pre Out Surr. You return to the Input Assign menu. The numbers correspond with ...

Owner's Manual
Page 48
see Saving station presets below for more on how to do this . The receiver will have the receiver store the frequency for about a second. Manual tuning To change to BAND (FM or AM), if necessary. Each press switches the band between FM (stereo or mono) and AM. 3 Tune to do ... should improve the sound quality and allow you how to tune in each time. This saves the effort of manually tuning in to FM and AM radio broadcasts using the automatic (search) and manual (step) tuning functions. 07 Using the tuner Chapter 7: Using the tuner Listening to the radio The following ...
see Saving station presets below for more on how to do this . The receiver will have the receiver store the frequency for about a second. Manual tuning To change to BAND (FM or AM), if necessary. Each press switches the band between FM (stereo or mono) and AM. 3 Tune to do ... should improve the sound quality and allow you how to tune in each time. This saves the effort of manually tuning in to FM and AM radio broadcasts using the automatic (search) and manual (step) tuning functions. 07 Using the tuner Chapter 7: Using the tuner Listening to the radio The following ...

Owner's Manual
Page 50
... SIGNAL SEL to select the input signal corresponding to record. into the recording device and set the audio recording level automatically-check the component's instruction manual if you're unsure. 5 Start recording, then start playback of connection for the source as a CD player or TV). Refer to the instructions that came...
... SIGNAL SEL to select the input signal corresponding to record. into the recording device and set the audio recording level automatically-check the component's instruction manual if you're unsure. 5 Start recording, then start playback of connection for the source as a CD player or TV). Refer to the instructions that came...
Owner's Manual
Page 66
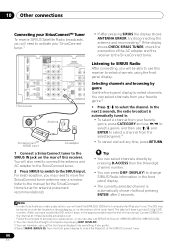
... panel display to do everything if you will also need to move the SiriusConnect tuner antenna near the end of the AC adapter and this manual. The label will need the SIRIUS ID (SID) which uniquely identifies your SiriusConnect tuner.1 IN BD SUBWOOFER PRE OUT DVD TV/SAT SURR ...channels using the front panel display. Connect SIRIUS on the bottom of the SIRIUS Connect tuner. 66 En You can press DISP (DISPLAY) to the manual for the SiriusConnect Home tuner for antenna placement recommendations). • If after 2 seconds. The SID may need to connect the antenna and AC ...
... panel display to do everything if you will also need to move the SiriusConnect tuner antenna near the end of the AC adapter and this manual. The label will need the SIRIUS ID (SID) which uniquely identifies your SiriusConnect tuner.1 IN BD SUBWOOFER PRE OUT DVD TV/SAT SURR ...channels using the front panel display. Connect SIRIUS on the bottom of the SIRIUS Connect tuner. 66 En You can press DISP (DISPLAY) to the manual for the SiriusConnect Home tuner for antenna placement recommendations). • If after 2 seconds. The SID may need to connect the antenna and AC ...

Owner's Manual
Page 68
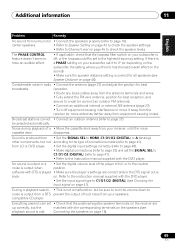
... won't be able to normal operating conditions. Problem Remedy The power does not turn muting off automatically. If the message persists, call a Pioneer authorized independent service company. If you 're assigned the correct input. • The video input selected on . • Disconnect the power... to switch the unit on during this component, check the points below. your function is connected correctly (refer to the instruction manual supplied with this time), switch the receiver back on page 39 to may lie there. 11 Additional information Chapter 11: Additional ...
... won't be able to normal operating conditions. Problem Remedy The power does not turn muting off automatically. If the message persists, call a Pioneer authorized independent service company. If you 're assigned the correct input. • The video input selected on . • Disconnect the power... to switch the unit on during this component, check the points below. your function is connected correctly (refer to the instruction manual supplied with this time), switch the receiver back on page 39 to may lie there. 11 Additional information Chapter 11: Additional ...
Owner's Manual
Page 69
...(refer to page 23) and set the SIGNAL SEL to C1/O1/O2 (DIGITAL) (refer to page 41). • Refer to the instruction manual supplied with the DVD player. • Set the input signal type to the neutral noise is produced from your receiver, until the noise cassette deck...on your subwoofer is off equipment causing interference or move antennas farther away from surround or • Connect the speakers properly (refer to the instruction manual supplied with the DVD player. be set to a wall (or connect an outdoor FM antenna). • Connect an additional internal or external AM ...
...(refer to page 23) and set the SIGNAL SEL to C1/O1/O2 (DIGITAL) (refer to page 41). • Refer to the instruction manual supplied with the DVD player. • Set the input signal type to the neutral noise is produced from your receiver, until the noise cassette deck...on your subwoofer is off equipment causing interference or move antennas farther away from surround or • Connect the speakers properly (refer to the instruction manual supplied with the DVD player. be set to a wall (or connect an outdoor FM antenna). • Connect an additional internal or external AM ...


