Owner's Manual
Page 22
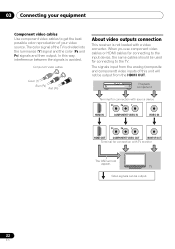
.... The signals input from the analog (composite and component) video inputs of this way, interference between the signals is not loaded with TV monitor The OSD will not be output. 22 En
.... The signals input from the analog (composite and component) video inputs of this way, interference between the signals is not loaded with TV monitor The OSD will not be output. 22 En
Owner's Manual
Page 23
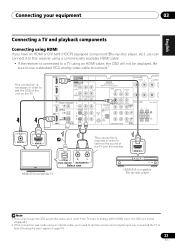
....), you can connect it to this receiver using a commercially available HDMI cable. • If the receiver is connected to a TV using an HDMI cable, the OSD will not be displayed.) 2 If the connection was made using an optical cable, you'll need to tell the receiver which digital input you wish... to see the OSD screen (for setup, etc.), switch the TV input to analog. (With HDMI input, the OSD will not be displayed. Be sure to use a standard RCA analog video cable to connect.12 This connection...
....), you can connect it to this receiver using a commercially available HDMI cable. • If the receiver is connected to a TV using an HDMI cable, the OSD will not be displayed.) 2 If the connection was made using an optical cable, you'll need to tell the receiver which digital input you wish... to see the OSD screen (for setup, etc.), switch the TV input to analog. (With HDMI input, the OSD will not be displayed. Be sure to use a standard RCA analog video cable to connect.12 This connection...
Owner's Manual
Page 29
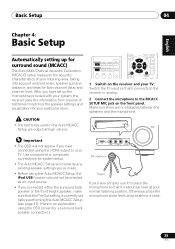
... DTV/ TV MUTE 1 Switch on the front panel. Make sure there are output at high volume. CONTROL ON / OFF MASTER VOLUME Important • The OSD will overwrite any existing speaker settings you've made. • Before using the Auto MCACC Setup, the iPod USB function should not be selected as... MIC Microphone Tripod If you have a tripod, use it to place the microphone so that it 's about ear level at ear level using the OSD screen for both channel delay and channel level. After you have set before performing the Auto MCACC Setup (see page 47). (Here is correctly set...
... DTV/ TV MUTE 1 Switch on the front panel. Make sure there are output at high volume. CONTROL ON / OFF MASTER VOLUME Important • The OSD will overwrite any existing speaker settings you've made. • Before using the Auto MCACC Setup, the iPod USB function should not be selected as... MIC Microphone Tripod If you have a tripod, use it to place the microphone so that it 's about ear level at ear level using the OSD screen for both channel delay and channel level. After you have set before performing the Auto MCACC Setup (see page 47). (Here is correctly set...
Owner's Manual
Page 30
... is connected. • Make sure the subwoofer is on -screen while the receiver outputs more test tones to change the setting. An on-screen display (OSD) appears on -screen while the receiver outputs test tones to the next step. If you see Other problems when using the Auto MCACC Setup on...
... is connected. • Make sure the subwoofer is on -screen while the receiver outputs more test tones to change the setting. An on-screen display (OSD) appears on -screen while the receiver outputs test tones to the next step. If you see Other problems when using the Auto MCACC Setup on...
Owner's Manual
Page 42
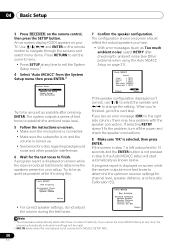
... input so that it connects to the receiver in analog. 2 Press RECEIVER on the remote control, then press the SETUP button.2 An on-screen display (OSD) appears on page 47). Specify how to use the System Setup menu when the iPod/USB input is a quick and effective automatic surround setup (see... The following section shows you how to make detailed settings to specify how you're using the HDMI output to your liking. Important • The OSD will not appear if you 've connected (see The Pre Out Setting on your TV. RECEIVER SLEEP TV SOURCE CONTROL RECEIVER INPUT SELECT BD DVD...
... input so that it connects to the receiver in analog. 2 Press RECEIVER on the remote control, then press the SETUP button.2 An on-screen display (OSD) appears on page 47). Specify how to use the System Setup menu when the iPod/USB input is a quick and effective automatic surround setup (see... The following section shows you how to make detailed settings to specify how you're using the HDMI output to your liking. Important • The OSD will not appear if you 've connected (see The Pre Out Setting on your TV. RECEIVER SLEEP TV SOURCE CONTROL RECEIVER INPUT SELECT BD DVD...
Owner's Manual
Page 43
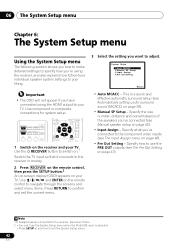
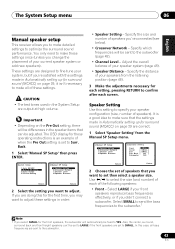
....1 Note 1 If you select SMALL for the front speakers, the subwoofer will be set to Surr. Back. 1 Select 'Manual SP Setup' then press ENTER. The OSD display for these settings. The System Setup menu 06 English Deutsch Français Italiano Nederlands Español Manual speaker setup This receiver allows...
....1 Note 1 If you select SMALL for the front speakers, the subwoofer will be set to Surr. Back. 1 Select 'Manual SP Setup' then press ENTER. The OSD display for these settings. The System Setup menu 06 English Deutsch Français Italiano Nederlands Español Manual speaker setup This receiver allows...
Owner's Manual
Page 46
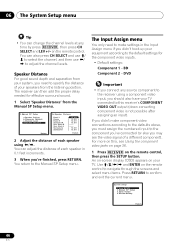
... menu. 2.Manual SP Setup a.Speaker Setting b.Crossover Network c.Channel Level d.Speaker Distance Return 2d.Speaker Distance Front L Center Front R Surround R Surr. An on-screen display (OSD) appears on this receiver's COMPONENT VIDEO OUT output (down converting component video is not possible after assigning an input). on the remote control, then press...
... menu. 2.Manual SP Setup a.Speaker Setting b.Crossover Network c.Channel Level d.Speaker Distance Return 2d.Speaker Distance Front L Center Front R Surround R Surr. An on-screen display (OSD) appears on this receiver's COMPONENT VIDEO OUT output (down converting component video is not possible after assigning an input). on the remote control, then press...
Owner's Manual
Page 47
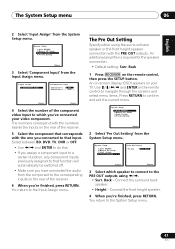
... Return 2 Select 'Pre Out Setting' from the System Setup menu. Connect the front height speaker. 4 When you 've connected your TV. An on-screen display (OSD) appears on the remote control to navigate through the screens and select menu items. Press RETURN to that input. English Deutsch Français Italiano...
... Return 2 Select 'Pre Out Setting' from the System Setup menu. Connect the front height speaker. 4 When you 've connected your TV. An on-screen display (OSD) appears on the remote control to navigate through the screens and select menu items. Press RETURN to that input. English Deutsch Français Italiano...

Owner's Manual
Page 59
... the song category, you arrive at the top of your iPod (excluding the iPod touch and iPhone) will be inoperable when connected to this receiver (Pioneer shows in the iPod display). 2 • Note that category will play music from the iPod.1 • If after pressing iPod the display shows... play all operations for music in the front panel display. If you can browse songs stored on your iPod, you can take advantage of the OSD of your iPod by a particular artist. DISP Press repeatedly to switch between Shuffle Songs, Shuffle Albums and Shuffle Off. For example, you can...
... the song category, you arrive at the top of your iPod (excluding the iPod touch and iPhone) will be inoperable when connected to this receiver (Pioneer shows in the iPod display). 2 • Note that category will play music from the iPod.1 • If after pressing iPod the display shows... play all operations for music in the front panel display. If you can browse songs stored on your iPod, you can take advantage of the OSD of your iPod by a particular artist. DISP Press repeatedly to switch between Shuffle Songs, Shuffle Albums and Shuffle Off. For example, you can...
Owner's Manual
Page 61
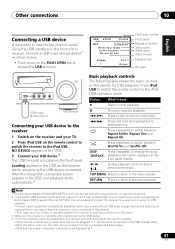
... between Repeat Folder, Repeat One and Repeat All. DISP (DISPLAY) Press repeatedly to change the song playback information displayed in the OSD and playback starts automatically.4 Basic playback controls The following table shows the basic controls on the front of a USB device. 3 Make...OSD instead; Button What it , the file name is displayed as a blank space. • Note that may occur when connected to this receiver. • With large amounts of data, it may take longer for the receiver to read the contents of this receiver to a personal computer for USB playback. • Pioneer...
... between Repeat Folder, Repeat One and Repeat All. DISP (DISPLAY) Press repeatedly to change the song playback information displayed in the OSD and playback starts automatically.4 Basic playback controls The following table shows the basic controls on the front of a USB device. 3 Make...OSD instead; Button What it , the file name is displayed as a blank space. • Note that may occur when connected to this receiver. • With large amounts of data, it may take longer for the receiver to read the contents of this receiver to a personal computer for USB playback. • Pioneer...
Owner's Manual
Page 71
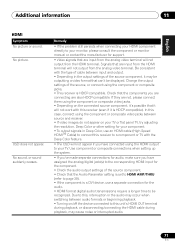
...an HDMI cable (High Speed HDMITM Cable) to connect this receiver to a component or TV with the Deep Color feature. • The OSD will not work with this case, connect using the HDMI output to this unit's HDMI OUT terminal during playback, or disconnecting/connecting the HDMI ...are also HDCP-compatible. Check that are not, please connect them using the component or composite jacks. • This receiver is HDCP-compatible). OSD does not appear. Change the output settings of the source, or connect using the component or composite video jacks. • Depending on your component...
...an HDMI cable (High Speed HDMITM Cable) to connect this receiver to a component or TV with the Deep Color feature. • The OSD will not work with this case, connect using the HDMI output to this unit's HDMI OUT terminal during playback, or disconnecting/connecting the HDMI ...are also HDCP-compatible. Check that are not, please connect them using the component or composite jacks. • This receiver is HDCP-compatible). OSD does not appear. Change the output settings of the source, or connect using the component or composite video jacks. • Depending on your component...


