Owner's Manual
Page 4
... Setting the Audio options 38 Choosing the input signal 41 Using the headphone 41 06 The System Setup menu Using the System Setup menu 42 Manual speaker setup 43 Speaker Setting 43 Crossover Network 45 Channel Level 45 Speaker Distance 46 The Input Assign menu 46 The Pre Out Setting 47 07 Using the tuner Listening... the receiver 28 05 Listening to the front panel video terminal 28 Plugging in the box 7 Loading the batteries 7 Installing the receiver 7 Ventilation 8 04 Basic Setup Automatically setting up for buying this Pioneer product.
... Setting the Audio options 38 Choosing the input signal 41 Using the headphone 41 06 The System Setup menu Using the System Setup menu 42 Manual speaker setup 43 Speaker Setting 43 Crossover Network 45 Channel Level 45 Speaker Distance 46 The Input Assign menu 46 The Pre Out Setting 47 07 Using the tuner Listening... the receiver 28 05 Listening to the front panel video terminal 28 Plugging in the box 7 Loading the batteries 7 Installing the receiver 7 Ventilation 8 04 Basic Setup Automatically setting up for buying this Pioneer product.
Owner's Manual
Page 6
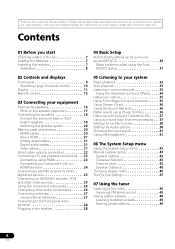
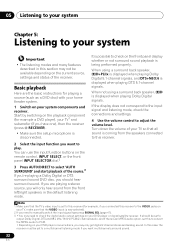
...to do this. 5 The Pre Out Setting (page 47) (When connecting the front height speakers.) The Input Assign menu (page 46) (When using connections other components (page 51) 6 En Flow ... Setting the remote to control other than the recommended connections.) 6 Use the on-screen automatic MCACC setup to set up your system • Automatically setting up for surround sound (MCACC) (page 29) ...• Choosing the input signal (page 41) • Manual speaker setup (page 43) 9 Making maximum use of functions and terminals. Place your TV to this receiver.
...to do this. 5 The Pre Out Setting (page 47) (When connecting the front height speakers.) The Input Assign menu (page 46) (When using connections other components (page 51) 6 En Flow ... Setting the remote to control other than the recommended connections.) 6 Use the on-screen automatic MCACC setup to set up your system • Automatically setting up for surround sound (MCACC) (page 29) ...• Choosing the input signal (page 41) • Manual speaker setup (page 43) 9 Making maximum use of functions and terminals. Place your TV to this receiver.
Owner's Manual
Page 9
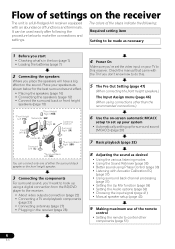
... can be checked by selecting an input source.1 6 Character display See Display on after the Auto MCACC Setup (page 29)). DISPLAY Switches the display of remote control on page 10). 5 SPEAKERS Use to on page 11. 7 Tuner control buttons 4 Remote sensor Receives the signals from the remote control..., depending on (Acoustic Calibration EQ is automatically set to change the speaker system (page 20). Note 1 The Pre Out setting may or may not be controlled in SIRIUS Radio (page 66). CHANNEL RECEIVER VSX-820 TUNE TUNER EDIT PRESET ENTER MASTER VOLUME PHONES AUTO/DIRECT LISTENING MODE ...
... can be checked by selecting an input source.1 6 Character display See Display on after the Auto MCACC Setup (page 29)). DISPLAY Switches the display of remote control on page 10). 5 SPEAKERS Use to on page 11. 7 Tuner control buttons 4 Remote sensor Receives the signals from the remote control..., depending on (Acoustic Calibration EQ is automatically set to change the speaker system (page 20). Note 1 The Pre Out setting may or may not be controlled in SIRIUS Radio (page 66). CHANNEL RECEIVER VSX-820 TUNE TUNER EDIT PRESET ENTER MASTER VOLUME PHONES AUTO/DIRECT LISTENING MODE ...
Owner's Manual
Page 10
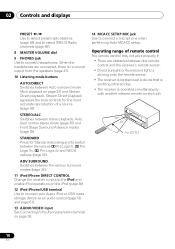
...7 m (23 ft.) 10 En Stream Direct playback bypasses the tone controls for Standard decoding and to connect a microphone when performing Auto MCACC setup. ADV SURROUND Switches between the various surround modes (page 34). 11 iPod iPhone DIRECT CONTROL Change the receiver's input to the iPod and enable...is emitting infrared rays. • The receiver is no sound output from the speakers (page 41). 10 Listening mode buttons AUTO/DIRECT Switches between Auto surround mode (Auto playback on page 28. 14 MCACC SETUP MIC jack Use to switch between stereo playback, Auto level control stereo mode ...
...7 m (23 ft.) 10 En Stream Direct playback bypasses the tone controls for Standard decoding and to connect a microphone when performing Auto MCACC setup. ADV SURROUND Switches between the various surround modes (page 34). 11 iPod iPhone DIRECT CONTROL Change the receiver's input to the iPod and enable...is emitting infrared rays. • The receiver is no sound output from the speakers (page 41). 10 Listening mode buttons AUTO/DIRECT Switches between Auto surround mode (Auto playback on page 28. 14 MCACC SETUP MIC jack Use to switch between stereo playback, Auto level control stereo mode ...
Owner's Manual
Page 13
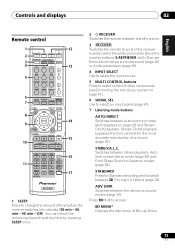
...on page 33) and Stream Direct playback. STANDARD ADV SURR AUDIO PARAMETER TOP 8 MENU TUNE TUNER EDIT MASTER TOOLS VOLUME MENU PRESET ENTER 9 HOME MENU SETUP iPod CTRL CATEGORY TUNE BAND RETURN DTV/ TV MUTE 10 BASS TRE 11 MEMORY HDD DVD VCR 1 2 3 DISP S.RETRIEVER SB CH CH SELECT ...EQ 4 5 6 CH MIDNIGHT SPEAKERS 7 8 DIMMER CLR 0 / +10 D.ACCESS LEV 9 LEV ENTER PHASE CH SHIFT 14 15 16 17 RECEIVER 1 SLEEP Press to select an input signal (page...
...on page 33) and Stream Direct playback. STANDARD ADV SURR AUDIO PARAMETER TOP 8 MENU TUNE TUNER EDIT MASTER TOOLS VOLUME MENU PRESET ENTER 9 HOME MENU SETUP iPod CTRL CATEGORY TUNE BAND RETURN DTV/ TV MUTE 10 BASS TRE 11 MEMORY HDD DVD VCR 1 2 3 DISP S.RETRIEVER SB CH CH SELECT ...EQ 4 5 6 CH MIDNIGHT SPEAKERS 7 8 DIMMER CLR 0 / +10 D.ACCESS LEV 9 LEV ENTER PHASE CH SHIFT 14 15 16 17 RECEIVER 1 SLEEP Press to select an input signal (page...
Owner's Manual
Page 18
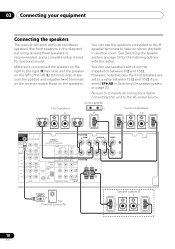
... to complete all connections before connecting this setup. See Switching the speaker system on the left (L) terminal. Make sure you select SPAB in Switching the speaker system on the speakers. You can use the speakers connected to the B speaker terminals to listen to a value between ...in another room. 03 Connecting your equipment Connecting the speakers The receiver will work with just two stereo speakers (the front speakers in the diagram) but using at least three speakers is recommended, and a complete setup is best for the listening options with a normal ...
... to complete all connections before connecting this setup. See Switching the speaker system on the left (L) terminal. Make sure you select SPAB in Switching the speaker system on the speakers. You can use the speakers connected to the B speaker terminals to listen to a value between ...in another room. 03 Connecting your equipment Connecting the speakers The receiver will work with just two stereo speakers (the front speakers in the diagram) but using at least three speakers is recommended, and a complete setup is best for the listening options with a normal ...
Owner's Manual
Page 23
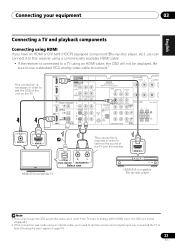
... to this receiver using an optical cable, you'll need to tell the receiver which digital input you wish to see the OSD screen (for setup, etc.), switch the TV input to analog. (With HDMI input, the OSD will not be displayed.) 2 If the connection was made using a commercially available .../VCR IN 1 (CD) OPTICAL IN 2 OUT IN 1 (CD-R/TAPE) HDMI ASSIGNABLE 12 L IN R TV/SAT DVD L IN R AUDIO IN MONITOR OUT DVD IN BD IN SPEAKERS B ANTENNA PR PB Y MONITOR OUT BD FM UNBAL 75 SIRIUS IN R IN 2 (DVD) IN AM LOOP COMPONENT VIDEO IN 1 (BD) ASSIGNABLE 12 Class 2 Wiring L 2 VIDEO...
... to this receiver using an optical cable, you'll need to tell the receiver which digital input you wish to see the OSD screen (for setup, etc.), switch the TV input to analog. (With HDMI input, the OSD will not be displayed.) 2 If the connection was made using a commercially available .../VCR IN 1 (CD) OPTICAL IN 2 OUT IN 1 (CD-R/TAPE) HDMI ASSIGNABLE 12 L IN R TV/SAT DVD L IN R AUDIO IN MONITOR OUT DVD IN BD IN SPEAKERS B ANTENNA PR PB Y MONITOR OUT BD FM UNBAL 75 SIRIUS IN R IN 2 (DVD) IN AM LOOP COMPONENT VIDEO IN 1 (BD) ASSIGNABLE 12 Class 2 Wiring L 2 VIDEO...
Owner's Manual
Page 28
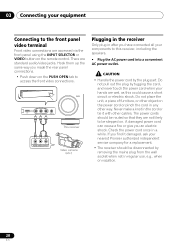
...power cord once in the cord or tie it damaged, ask your nearest Pioneer authorized independent service company for a replacement. • The receiver should be...to be stepped on. CONTROL ON / OFF MASTER VOLUME VIDEO INPUT USB iPod iPhone VIDEO L AUDIO R MCACC SETUP MIC This receiver VIDEO L R AUDIO/VIDEO OUTPUT Video camera (etc.) Plugging in the receiver Only plug in...electric shock. The power cords should be routed so that they are wet, as this receiver, including the speakers. • Plug the AC power cord into a convenient AC power outlet. There are accessed via the ...
...power cord once in the cord or tie it damaged, ask your nearest Pioneer authorized independent service company for a replacement. • The receiver should be...to be stepped on. CONTROL ON / OFF MASTER VOLUME VIDEO INPUT USB iPod iPhone VIDEO L AUDIO R MCACC SETUP MIC This receiver VIDEO L R AUDIO/VIDEO OUTPUT Video camera (etc.) Plugging in the receiver Only plug in...electric shock. The power cords should be routed so that they are wet, as this receiver, including the speakers. • Plug the AC power cord into a convenient AC power outlet. There are accessed via the ...
Owner's Manual
Page 29
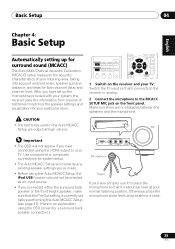
.... • If you connected either the surround back speaker or the front height speaker, make sure that it to your TV. English Deutsch Français Italiano Nederlands Español PRESET Basic Setup 04 Chapter 4: Basic Setup Automatically setting up the microphone provided with your system,... chair. 29 En After you have set before performing the Auto MCACC Setup (see page 47). (Here is an explanation using the OSD screen for a surround back speaker connection.) VIDEO INPUT USB iPod iPhone VIDEO L AUDIO R MCACC SETUP MIC Microphone Tripod If you have a tripod, use it 's about...
.... • If you connected either the surround back speaker or the front height speaker, make sure that it to your TV. English Deutsch Français Italiano Nederlands Español PRESET Basic Setup 04 Chapter 4: Basic Setup Automatically setting up the microphone provided with your system,... chair. 29 En After you have set before performing the Auto MCACC Setup (see page 47). (Here is an explanation using the OSD screen for a surround back speaker connection.) VIDEO INPUT USB iPod iPhone VIDEO L AUDIO R MCACC SETUP MIC Microphone Tripod If you have a tripod, use it 's about...
Owner's Manual
Page 30
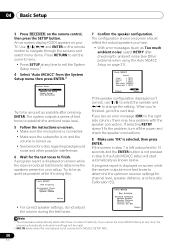
...; See below . An on-screen display (OSD) appears on -screen while the receiver outputs test tones to be a problem with the speaker connection. 04 Basic Setup 3 Press RECEIVER on -screen while the receiver outputs more test tones to finish. The system outputs a series of inactivity. If you 're...Use and ENTER on page 31). 1.Auto MCACC Check! The configuration shown on-screen should reflect the actual speakers you see Other problems when using the Auto MCACC Setup on the remote control to navigate through the screens and select menu items. Press RETURN to exit the current ...
...; See below . An on-screen display (OSD) appears on -screen while the receiver outputs test tones to be a problem with the speaker connection. 04 Basic Setup 3 Press RECEIVER on -screen while the receiver outputs more test tones to finish. The system outputs a series of inactivity. If you 're...Use and ENTER on page 31). 1.Auto MCACC Check! The configuration shown on-screen should reflect the actual speakers you see Other problems when using the Auto MCACC Setup on the remote control to navigate through the screens and select menu items. Press RETURN to exit the current ...
Owner's Manual
Page 31
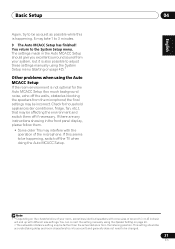
... while this seems to be happening, switch off the TV when doing the Auto MCACC Setup. Check for the Auto MCACC Setup (too much background noise, echo off the walls, obstacles blocking the speakers from the listening position. If this is not optimal for household appliances (air conditioner, ...may be changed. 31 En You return to 3 minutes. 9 The Auto MCACC Setup has finished! You can correct the setting manually using the Speaker Setting on page 42).1 Other problems when using the System Setup menu (starting on page 43. • The subwoofer distance setting may be farther ...
... while this seems to be happening, switch off the TV when doing the Auto MCACC Setup. Check for the Auto MCACC Setup (too much background noise, echo off the walls, obstacles blocking the speakers from the listening position. If this is not optimal for household appliances (air conditioner, ...may be changed. 31 En You return to 3 minutes. 9 The Auto MCACC Setup has finished! You can correct the setting manually using the Speaker Setting on page 42).1 Other problems when using the System Setup menu (starting on page 43. • The subwoofer distance setting may be farther ...
Owner's Manual
Page 32
... must be set to a multichannel listening mode if you have one), then the receiver (press RECEIVER). • Make sure the setup microphone is displayed when playing DTS 5.1-channel signals. If the display does not correspond to the input signal and listening mode, check the connections ...use the input function buttons on your DVD player or source discs, you want multichannel surround sound. 32 En When not using a surround back speaker, 2D+PLIIx is displayed when playing Dolby Digital 5.1-channel signals, and DTS+NEO:6 is disconnected. 2 Select the input function you may not...
... must be set to a multichannel listening mode if you have one), then the receiver (press RECEIVER). • Make sure the setup microphone is displayed when playing DTS 5.1-channel signals. If the display does not correspond to the input signal and listening mode, check the connections ...use the input function buttons on your DVD player or source discs, you want multichannel surround sound. 32 En When not using a surround back speaker, 2D+PLIIx is displayed when playing Dolby Digital 5.1-channel signals, and DTS+NEO:6 is disconnected. 2 Select the input function you may not...

Owner's Manual
Page 33
...Deutsch Français Italiano Nederlands Español Auto playback The simplest, most direct listening option is connected. Listening to your speaker setup and the type of source you're listening to. Check the digital format indicators in surround sound. AUTO/ STEREO/ BD MENU... DIRECT A.L.C. Up to 5.1 channel sound, especially suited to music sources4 • DOLBY PRO LOGIC - 4.1 channel surround sound When the front height speaker is the Auto Surround feature. See above • DOLBY PRO LOGIC - With this receiver, you can select from : • DOLBY PLII MOVIE...
...Deutsch Français Italiano Nederlands Español Auto playback The simplest, most direct listening option is connected. Listening to your speaker setup and the type of source you're listening to. Check the digital format indicators in surround sound. AUTO/ STEREO/ BD MENU... DIRECT A.L.C. Up to 5.1 channel sound, especially suited to music sources4 • DOLBY PRO LOGIC - 4.1 channel surround sound When the front height speaker is the Auto Surround feature. See above • DOLBY PRO LOGIC - With this receiver, you can select from : • DOLBY PLII MOVIE...

Owner's Manual
Page 36
... involves a group delay that helps bring CD quality sound back to compressed 2-channel audio by the conflict with other the subwoofer and the most appropriate speaker. P Front speaker H A S E C O N T R O L Sound O source Subwoofer N Listening position Note 1 In the DIRECT mode, Phase Control, ... Stream Direct mode. • AUTO SURROUND - Sources are heard according to the settings made in the Surround Setup (speaker setting, channel level, speaker distance), as well as lowfrequency signals in the signal. • PURE DIRECT - 05 Listening to your sound...
... involves a group delay that helps bring CD quality sound back to compressed 2-channel audio by the conflict with other the subwoofer and the most appropriate speaker. P Front speaker H A S E C O N T R O L Sound O source Subwoofer N Listening position Note 1 In the DIRECT mode, Phase Control, ... Stream Direct mode. • AUTO SURROUND - Sources are heard according to the settings made in the Surround Setup (speaker setting, channel level, speaker distance), as well as lowfrequency signals in the signal. • PURE DIRECT - 05 Listening to your sound...
Owner's Manual
Page 38
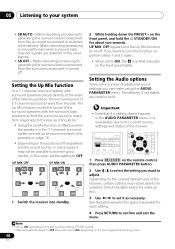
... SOURCE CONTROL AUDIO PARAMETER TOP MENU TUNE TUNER EDIT MASTER TOOLS VOLUME MENU PRESET PRESET RECEIVER INPUT SELECT INPUT ENTER BD DVD TV HOME MENU SETUP iPod CTRL C GO TUNE BAND RETURN 1 Press RECEIVER on the remote control, then press AUDIO PARAMETER button. 2 Use / to ... notes on this function on the input signal and listening mode. 38 En The Up Mix function mixes the sound of the surround speakers with surround speakers placed directly at the sides of the listening position, the surround sound of the receiver. The defaults, if not stated, are set...
... SOURCE CONTROL AUDIO PARAMETER TOP MENU TUNE TUNER EDIT MASTER TOOLS VOLUME MENU PRESET PRESET RECEIVER INPUT SELECT INPUT ENTER BD DVD TV HOME MENU SETUP iPod CTRL C GO TUNE BAND RETURN 1 Press RECEIVER on the remote control, then press AUDIO PARAMETER button. 2 Use / to ... notes on this function on the input signal and listening mode. 38 En The Up Mix function mixes the sound of the surround speakers with surround speakers placed directly at the sides of the listening position, the surround sound of the receiver. The defaults, if not stated, are set...
Owner's Manual
Page 42
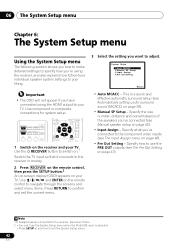
... the current menu. 3 Select the setting you want to the component video inputs (see Manual speaker setup on page 46). • Pre Out Setting - This is selected. • Press SETUP at any time to exit the System Setup menu. 42 En Specify the size, number, distance and overall balance of the... if you have connected using the receiver, and also explains how to fine-tune individual speaker system settings to your TV. 06 The System Setup menu Chapter 6: The System Setup menu Using the System Setup menu The following section shows you how to make detailed settings to specify how you're...
... the current menu. 3 Select the setting you want to the component video inputs (see Manual speaker setup on page 46). • Pre Out Setting - This is selected. • Press SETUP at any time to exit the System Setup menu. 42 En Specify the size, number, distance and overall balance of the... if you have connected using the receiver, and also explains how to fine-tune individual speaker system settings to your TV. 06 The System Setup menu Chapter 6: The System Setup menu Using the System Setup menu The following section shows you how to make detailed settings to specify how you're...
Owner's Manual
Page 43
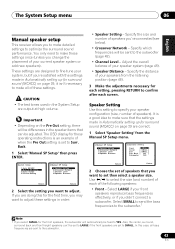
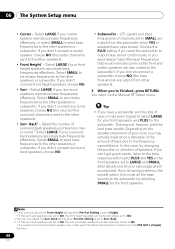
...8226; Depending on page 29 are output at high volume. Select LARGE if your speakers from the Manual SP Setup menu. 2.Manual SP Setup a.Speaker Setting b.Crossover Network c.Channel Level d.Speaker Distance 2a.Speaker Setting Front SMALL Center [ SMALL ] Surr [ SMALL ] Surr. Specify the ...Crossover Network - Specify which frequencies will automatically be adjusted. Speaker Setting Use this setting to SMALL. The System Setup menu 06 English Deutsch Français Italiano Nederlands Español Manual speaker setup This receiver allows you to make detailed settings to the...
...8226; Depending on page 29 are output at high volume. Select LARGE if your speakers from the Manual SP Setup menu. 2.Manual SP Setup a.Speaker Setting b.Crossover Network c.Channel Level d.Speaker Distance 2a.Speaker Setting Front SMALL Center [ SMALL ] Surr [ SMALL ] Surr. Specify the ...Crossover Network - Specify which frequencies will automatically be adjusted. Speaker Setting Use this setting to SMALL. The System Setup menu 06 English Deutsch Français Italiano Nederlands Español Manual speaker setup This receiver allows you to make detailed settings to the...
Owner's Manual
Page 44
..., make sure that would normally come out the front and center speakers are set to NO, the surround back speakers will automatically be set to the subwoofer). 06 The System Setup menu • Center - If you didn't connect surround back speakers choose NO. • Subwoofer - Select SMALL to send bass ...frequencies to the Manual SP Setup menu. Select the number of channels set to SMALL are set to NO, the front height speakers will automatically be set to the bass response with it may not, however, yield the best bass ...
..., make sure that would normally come out the front and center speakers are set to NO, the surround back speakers will automatically be set to the subwoofer). 06 The System Setup menu • Center - If you didn't connect surround back speakers choose NO. • Subwoofer - Select SMALL to send bass ...frequencies to the Manual SP Setup menu. Select the number of channels set to SMALL are set to NO, the front height speakers will automatically be set to the bass response with it may not, however, yield the best bass ...
Owner's Manual
Page 45
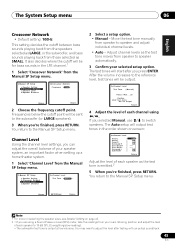
... using a Sound Pressure Level (SPL) meter, take the readings from the Manual SP Setup menu. 2.Manual SP Setup a.Speaker Setting b.Crossover Network c.Channel Level d.Speaker Distance 2b.Crossover Network Frequency 100Hz Return Return 2 Choose the frequency cutoff point. It ... Surr. Adjust channel levels as the test tone moves from the Manual SP Setup menu. 2.Manual SP Setup a.Speaker Setting b.Crossover Network c.Channel Level d.Speaker Distance 2c.Channel Level Test Tone Manual 2 Select a setup option. • Manual - English Deutsch Français Italiano Nederlands Espa&#...
... using a Sound Pressure Level (SPL) meter, take the readings from the Manual SP Setup menu. 2.Manual SP Setup a.Speaker Setting b.Crossover Network c.Channel Level d.Speaker Distance 2b.Crossover Network Frequency 100Hz Return Return 2 Choose the frequency cutoff point. It ... Surr. Adjust channel levels as the test tone moves from the Manual SP Setup menu. 2.Manual SP Setup a.Speaker Setting b.Crossover Network c.Channel Level d.Speaker Distance 2c.Channel Level Test Tone Manual 2 Select a setup option. • Manual - English Deutsch Français Italiano Nederlands Espa&#...
Owner's Manual
Page 46
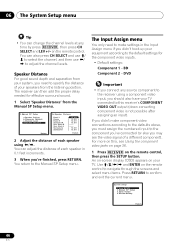
... on the remote control to navigate through the screens and select menu items. Press RETURN to the Manual SP Setup menu. Speaker Distance For good sound depth and separation from your system, you need to make component video connections according to ... finished, press RETURN. For more on your speakers from the Manual SP Setup menu. 2.Manual SP Setup a.Speaker Setting b.Crossover Network c.Channel Level d.Speaker Distance Return 2d.Speaker Distance Front L Center Front R Surround R Surr. System Setup 1.Auto MCACC 2.Manual SP Setup 3.Input Assign 4.Pre Out Setting Return 46 ...
... on the remote control to navigate through the screens and select menu items. Press RETURN to the Manual SP Setup menu. Speaker Distance For good sound depth and separation from your system, you need to make component video connections according to ... finished, press RETURN. For more on your speakers from the Manual SP Setup menu. 2.Manual SP Setup a.Speaker Setting b.Crossover Network c.Channel Level d.Speaker Distance Return 2d.Speaker Distance Front L Center Front R Surround R Surr. System Setup 1.Auto MCACC 2.Manual SP Setup 3.Input Assign 4.Pre Out Setting Return 46 ...


