Owner's Manual
Page 4
... TV 12 Connecting the multichannel analog outputs 13 Connecting a satellite receiver or other digital set-top box 13 Connecting other audio components 14... menu 37 Manual MCACC speaker setup 37 Fine Channel Level 38 Fine Speaker Distance 39 Acoustic Calibration EQ 40 Manual speaker setup .... . . . . 31 Listening in a safe place for buying this Pioneer product. Please read through these operating instructions so you have finished reading the .... . . . 33 Using Virtual Surround Back (VSB 33 Setting the AV options 34 Playing other video sources 15 Using the component video jacks 16 ...
... TV 12 Connecting the multichannel analog outputs 13 Connecting a satellite receiver or other digital set-top box 13 Connecting other audio components 14... menu 37 Manual MCACC speaker setup 37 Fine Channel Level 38 Fine Speaker Distance 39 Acoustic Calibration EQ 40 Manual speaker setup .... . . . . 31 Listening in a safe place for buying this Pioneer product. Please read through these operating instructions so you have finished reading the .... . . . 33 Using Virtual Surround Back (VSB 33 Setting the AV options 34 Playing other video sources 15 Using the component video jacks 16 ...
Owner's Manual
Page 7
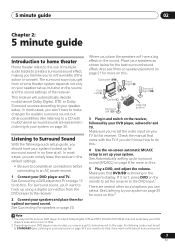
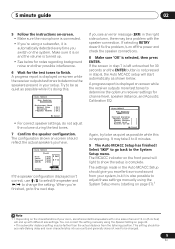
...you feel like listening to a CD with the TV if you don't know how to do this. Check the manual that DVD/BD is showing in no time at all connections before connecting to the receiver. 2 Connect your speakers and place them for more on page 30 for surround sound in the...to an AC power source. 1 Connect your DVD player's manual for optimal surround sound. See Listening to your DVD player to output Dolby Digital, DTS and 88.2 kHz/96 kHz PCM (2 channel) audio (see Listening in surround sound on page 30. This receiver will have to make changes for realistic surround sound...
...you feel like listening to a CD with the TV if you don't know how to do this. Check the manual that DVD/BD is showing in no time at all connections before connecting to the receiver. 2 Connect your speakers and place them for more on page 30 for surround sound in the...to an AC power source. 1 Connect your DVD player's manual for optimal surround sound. See Listening to your DVD player to output Dolby Digital, DTS and 88.2 kHz/96 kHz PCM (2 channel) audio (see Listening in surround sound on page 30. This receiver will have to make changes for realistic surround sound...
Owner's Manual
Page 8
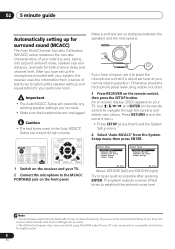
... Assign 5.Other Setup System Setup 1.Auto MCACC 2.Manual MCACC 3.Manual SP Setup 4.Input Assign : Exit : Exit Above: VSX-918V (left) and VSX-818V (right) Try to optimize the speaker settings and equalization for your particular room. Use component or composite connections for both channel delay and channel level. RECEIVER INPUT SELECT SOURCE MULTI CONTROL TV CTRL...
... Assign 5.Other Setup System Setup 1.Auto MCACC 2.Manual MCACC 3.Manual SP Setup 4.Input Assign : Exit : Exit Above: VSX-918V (left) and VSX-818V (right) Try to optimize the speaker settings and equalization for your particular room. Use component or composite connections for both channel delay and channel level. RECEIVER INPUT SELECT SOURCE MULTI CONTROL TV CTRL...
Owner's Manual
Page 9
.... • If you're using a subwoofer, it is automatically detected every time you switch on -screen while the receiver outputs more test tones to determine the optimum receiver settings for channel level, speaker distance, and Acoustic Calibration EQ. 1.Auto MCACC Now Analyzing Surround Analyzing Speaker System [ ]... distance from your system, but it is also possible to adjust these settings manually using the System Setup menu (starting on page 37).1 Note 1 • Depending on -screen while the receiver outputs test tones to determine the speakers present in the Auto MCACC Setup should...
.... • If you're using a subwoofer, it is automatically detected every time you switch on -screen while the receiver outputs more test tones to determine the optimum receiver settings for channel level, speaker distance, and Acoustic Calibration EQ. 1.Auto MCACC Now Analyzing Surround Analyzing Speaker System [ ]... distance from your system, but it is also possible to adjust these settings manually using the System Setup menu (starting on page 37).1 Note 1 • Depending on -screen while the receiver outputs test tones to determine the speakers present in the Auto MCACC Setup should...
Owner's Manual
Page 16
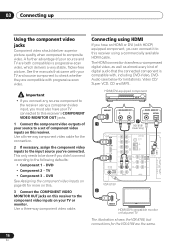
See the manuals that the connected component is progressive-scan video, which delivers a very stable, flicker-free picture. Important • If you must also have an HDMI or ... page 65 for more on this. 3 Connect the COMPONENT VIDEO MONITOR OUT jacks on this receiver to the receiver using a commercially available HDMI cable. HDMI/DVI-equipped component HDMI OUT 1 ANALOG AUDIO OUT R L DIGITAL AUDIO OUT COAXIAL OPTICAL 3 (VSX-818V model only) HDMI IN R IN AUX L CD ANTENNA FM UNBAL DIGITAL IN (DVD / BD...
See the manuals that the connected component is progressive-scan video, which delivers a very stable, flicker-free picture. Important • If you must also have an HDMI or ... page 65 for more on this. 3 Connect the COMPONENT VIDEO MONITOR OUT jacks on this receiver to the receiver using a commercially available HDMI cable. HDMI/DVI-equipped component HDMI OUT 1 ANALOG AUDIO OUT R L DIGITAL AUDIO OUT COAXIAL OPTICAL 3 (VSX-818V model only) HDMI IN R IN AUX L CD ANTENNA FM UNBAL DIGITAL IN (DVD / BD...
Owner's Manual
Page 36
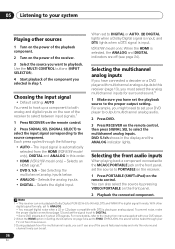
... from the HDMI (VSX-918V model only), DIGITAL...source to PORTABLE on the receiver. 1 Press PORTABLE (SHIFT... Press DVD. 3 Press RECEIVER on the front panel. ...of the receiver. For more...manual supplied with multichannel analog outputs to the source component. Note 1 • This receiver...receiver to select between input signals.1 1 Press RECEIVER on the remote...receiver. 3 During playback from this receiver (page 13), you must select the analog multichannel inputs for surround sound.3 1 Make sure you selected in this order. • HDMI (VSX...set . 36 En VSX-918V model only: When ...
... from the HDMI (VSX-918V model only), DIGITAL...source to PORTABLE on the receiver. 1 Press PORTABLE (SHIFT... Press DVD. 3 Press RECEIVER on the front panel. ...of the receiver. For more...manual supplied with multichannel analog outputs to the source component. Note 1 • This receiver...receiver to select between input signals.1 1 Press RECEIVER on the remote...receiver. 3 During playback from this receiver (page 13), you must select the analog multichannel inputs for surround sound.3 1 Make sure you selected in this order. • HDMI (VSX...set . 36 En VSX-918V model only: When ...
Owner's Manual
Page 37
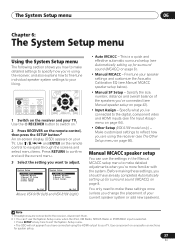
... AM PORTABLE iPod RECEIVER RECEIVER CONTROL ONE TOUCH COPY CH+ AV PARAMETER TOP MENU ST TUNE ENTER T.EDIT MENU ST GUIDE CATEGORY TUNE CH- System Setup 1.Auto MCACC 2.Manual MCACC 3.Manual SP Setup 4.Input Assign 5.Other Setup System Setup 1.Auto MCACC 2.Manual MCACC 3.Manual SP Setup 4.Input Assign : Exit : Exit Above: VSX-918V (left) and VSX-818V (right) • Auto...
... AM PORTABLE iPod RECEIVER RECEIVER CONTROL ONE TOUCH COPY CH+ AV PARAMETER TOP MENU ST TUNE ENTER T.EDIT MENU ST GUIDE CATEGORY TUNE CH- System Setup 1.Auto MCACC 2.Manual MCACC 3.Manual SP Setup 4.Input Assign 5.Other Setup System Setup 1.Auto MCACC 2.Manual MCACC 3.Manual SP Setup 4.Input Assign : Exit : Exit Above: VSX-918V (left) and VSX-818V (right) • Auto...
Owner's Manual
Page 40
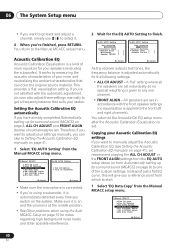
...any one of just a flat EQ curve, this will give you have already completed Automatically setting up for the EQ AUTO Setting to the Manual MCACC setup menu. This provides a 'flat' equalization setting. You return to finish. 2c.EQ AUTO Setting Now Analyzing Environment Check Ambient ...] Speaker YES/NO [ ] 2c.EQ AUTO Setting Now Analyzing Surround Analyzing Channel Level [ ] Acoustic Cal EQ [ ] :Cancel :Cancel As the receiver outputs test tones, the frequency balance is at the middle position. • See Other problems when using a subwoofer, it is on and the volume is...
...any one of just a flat EQ curve, this will give you have already completed Automatically setting up for the EQ AUTO Setting to the Manual MCACC setup menu. This provides a 'flat' equalization setting. You return to finish. 2c.EQ AUTO Setting Now Analyzing Environment Check Ambient ...] Speaker YES/NO [ ] 2c.EQ AUTO Setting Now Analyzing Surround Analyzing Channel Level [ ] Acoustic Cal EQ [ ] :Cancel :Cancel As the receiver outputs test tones, the frequency balance is at the middle position. • See Other problems when using a subwoofer, it is on and the volume is...
Owner's Manual
Page 42
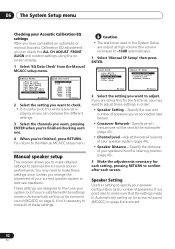
... are correct. 42 En Manual speaker setup This receiver allows you to make sure that the settings made in Automatically setting up for the first time, you may want to adjust. Specify the distance of your speakers from the Manual MCACC setup menu. 2.Manual MCACC a.Fine Ch Level ... to make all of speakers). 06 The System Setup menu Checking your Acoustic Calibration EQ settings After you have completed an automatic or manual Acoustic Calibration EQ adjustment, you can compare the different settings. 3 Select the channels you want, pressing ENTER when you're finished...
... are correct. 42 En Manual speaker setup This receiver allows you to make sure that the settings made in Automatically setting up for the first time, you may want to adjust. Specify the distance of your speakers from the Manual MCACC setup menu. 2.Manual MCACC a.Fine Ch Level ... to make all of speakers). 06 The System Setup menu Checking your Acoustic Calibration EQ settings After you have completed an automatic or manual Acoustic Calibration EQ adjustment, you can compare the different settings. 3 Select the channels you want, pressing ENTER when you're finished...
Owner's Manual
Page 45
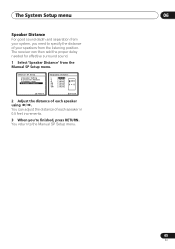
... Setup menu. 3.Manual SP Setup a.Speaker Setting b.Crossover Network c.Channel Level d.Speaker Distance 3d.Speaker Distance L 10.0ft C [ 10.0ft ] R [ 10.0ft ] RS [ 10.0ft ] LS [ 10.0ft ] SW [ 10.0ft ] :Return :Finish 2 Adjust the distance of each speaker using / . The receiver can adjust the distance of... each speaker in 0.5 feet increments. 3 When you need to the Manual SP Setup menu. 45 En
... Setup menu. 3.Manual SP Setup a.Speaker Setting b.Crossover Network c.Channel Level d.Speaker Distance 3d.Speaker Distance L 10.0ft C [ 10.0ft ] R [ 10.0ft ] RS [ 10.0ft ] LS [ 10.0ft ] SW [ 10.0ft ] :Return :Finish 2 Adjust the distance of each speaker using / . The receiver can adjust the distance of... each speaker in 0.5 feet increments. 3 When you need to the Manual SP Setup menu. 45 En
Owner's Manual
Page 46
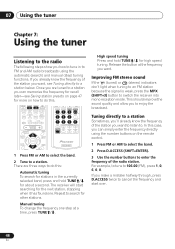
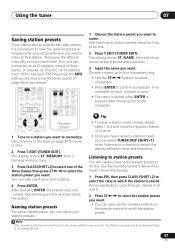
...to a station you can simply enter the frequency directly using the automatic (search) and manual (step) tuning functions. High speed tuning Press and hold TUNE / for about a second. CD-R XM SIRIUS CD FM AM RECEIVER AUTO/DIRECT STEREO/ A.L.C. Improving FM stereo sound If the (tuned) or (stereo)...ACCESS twice to enjoy the broadcast. STANDARD ADV SURR ACOUSTIC SOUND PHASE EQ DIALOG RETRIEVER CH SEL MUTE LEVEL MASTER VOLUME RECEIVER CONTROL ONE TOUCH COPY CH+ AV PARAMETER TOP MENU ST TUNE ENTER T.EDIT MENU ST GUIDE CATEGORY TUNE CH- For example, to tune to search ...
...to a station you can simply enter the frequency directly using the automatic (search) and manual (step) tuning functions. High speed tuning Press and hold TUNE / for about a second. CD-R XM SIRIUS CD FM AM RECEIVER AUTO/DIRECT STEREO/ A.L.C. Improving FM stereo sound If the (tuned) or (stereo)...ACCESS twice to enjoy the broadcast. STANDARD ADV SURR ACOUSTIC SOUND PHASE EQ DIALOG RETRIEVER CH SEL MUTE LEVEL MASTER VOLUME RECEIVER CONTROL ONE TOUCH COPY CH+ AV PARAMETER TOP MENU ST TUNE ENTER T.EDIT MENU ST GUIDE CATEGORY TUNE CH- For example, to tune to search ...
Owner's Manual
Page 47
...also use the number buttons. 4 Press ENTER. Tip • To erase a station name, simply repeat steps 1 to 3 and input four spaces instead of manually tuning in each . Press repeatedly to cycle through classes A, B and C. 2 Press ST / to select the station preset you want . SETUP RETURN TUNER ... CLASS (SHIFT+2) to that station. STANDARD ADV SURR ACOUSTIC SOUND PHASE EQ DIALOG RETRIEVER CH SEL MUTE LEVEL MASTER VOLUME RECEIVER CONTROL ONE TOUCH COPY CH+ AV PARAMETER TOP MENU ST TUNE ENTER T.EDIT MENU ST GUIDE CATEGORY TUNE CH- After pressing ENTER, the preset class and ...
...also use the number buttons. 4 Press ENTER. Tip • To erase a station name, simply repeat steps 1 to 3 and input four spaces instead of manually tuning in each . Press repeatedly to cycle through classes A, B and C. 2 Press ST / to select the station preset you want . SETUP RETURN TUNER ... CLASS (SHIFT+2) to that station. STANDARD ADV SURR ACOUSTIC SOUND PHASE EQ DIALOG RETRIEVER CH SEL MUTE LEVEL MASTER VOLUME RECEIVER CONTROL ONE TOUCH COPY CH+ AV PARAMETER TOP MENU ST TUNE ENTER T.EDIT MENU ST GUIDE CATEGORY TUNE CH- After pressing ENTER, the preset class and ...
Owner's Manual
Page 48
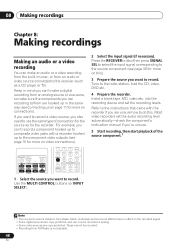
Press the RECEIVER button then press SIGNAL SEL to select the input signal corresponding to record. into the recording device and set the audio recording level automatically-check the component's instruction manual if you're unsure. 5 Start recording, then start playback of connection for the source ...as a CD player or TV). Insert a blank tape, MD, video etc. Most video recorders set the recording levels. Use the MULTI CONTROL buttons (or INPUT SELECT). Note 1 • The receiver's...
Press the RECEIVER button then press SIGNAL SEL to select the input signal corresponding to record. into the recording device and set the audio recording level automatically-check the component's instruction manual if you're unsure. 5 Start recording, then start playback of connection for the source ...as a CD player or TV). Insert a blank tape, MD, video etc. Most video recorders set the recording levels. Use the MULTI CONTROL buttons (or INPUT SELECT). Note 1 • The receiver's...
Owner's Manual
Page 60
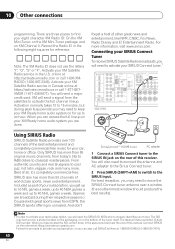
... prompts to activate the full channel lineup. And don't forget a host of this manual. For more . For best reception, you are done. Connect SIRIUS on your SIRIUS...signal from ESPN, the SIRIUS sports offering is unrivaled. SIRIUS also has more than 55 channels of this receiver. You will need to activate your radio subscription, you can access the full lineup on the internet at .../ VCR) IN 3 PB PR Y FRONT MONITOR OUT COMPONENT VIDEO LR SURROUND L CENTER R VSX-918V SIRIUS ★ Antenna SIRIUS ★ SiriusConnect™ HOME tuner AC adapter 1 Connect a...
... prompts to activate the full channel lineup. And don't forget a host of this manual. For more . For best reception, you are done. Connect SIRIUS on your SIRIUS...signal from ESPN, the SIRIUS sports offering is unrivaled. SIRIUS also has more than 55 channels of this receiver. You will need to activate your radio subscription, you can access the full lineup on the internet at .../ VCR) IN 3 PB PR Y FRONT MONITOR OUT COMPONENT VIDEO LR SURROUND L CENTER R VSX-918V SIRIUS ★ Antenna SIRIUS ★ SiriusConnect™ HOME tuner AC adapter 1 Connect a...
Owner's Manual
Page 64
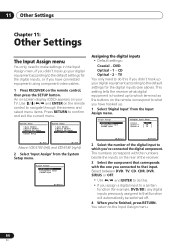
.... System Setup 1.Auto MCACC 2.Manual MCACC 3.Manual SP Setup 4.Input Assign 5.Other Setup System Setup 1.Auto MCACC 2.Manual MCACC 3.Manual SP Setup 4.Input Assign : Exit : Exit Above: VSX-918V (left) and VSX-818V (right) 2 Select 'Input Assign...' from the Input Assign menu. 4.Input Assign a.Digital Input b.Component Input c.HDMI Input 4a.Digital Input Setup Coaxial Optical-1 Optical-2 DVD [ CD ] [ TV ] :Return :Finish 2 Select the number of the receiver...
.... System Setup 1.Auto MCACC 2.Manual MCACC 3.Manual SP Setup 4.Input Assign 5.Other Setup System Setup 1.Auto MCACC 2.Manual MCACC 3.Manual SP Setup 4.Input Assign : Exit : Exit Above: VSX-918V (left) and VSX-818V (right) 2 Select 'Input Assign...' from the Input Assign menu. 4.Input Assign a.Digital Input b.Component Input c.HDMI Input 4a.Digital Input Setup Coaxial Optical-1 Optical-2 DVD [ CD ] [ TV ] :Return :Finish 2 Select the number of the receiver...
Owner's Manual
Page 66
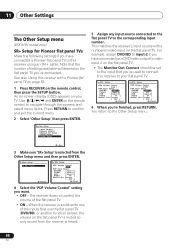
... Press RETURN to the input that the number of the flat panel TV. • ON - This matches the receiver's input source with a Pioneer flat panel TV on page 62. 1 Press RECEIVER on the flat panel TV. • The Monitor Out Connect should be set to confirm and exit the current ... 1.Auto MCACC 2.Manual MCACC 3.Manual SP Setup 4.Input Assign 5.Other Setup 5 Assign any input source connected to the flat panel TV to video input 2 on the remote control, then press the SETUP button. 11 Other Settings The Other Setup menu (VSX-918V model only) SR+ Setup for Pioneer flat panel TVs Make...
... Press RETURN to the input that the number of the flat panel TV. • ON - This matches the receiver's input source with a Pioneer flat panel TV on page 62. 1 Press RECEIVER on the flat panel TV. • The Monitor Out Connect should be set to confirm and exit the current ... 1.Auto MCACC 2.Manual MCACC 3.Manual SP Setup 4.Input Assign 5.Other Setup 5 Assign any input source connected to the flat panel TV to video input 2 on the remote control, then press the SETUP button. 11 Other Settings The Other Setup menu (VSX-918V model only) SR+ Setup for Pioneer flat panel TVs Make...
Owner's Manual
Page 67
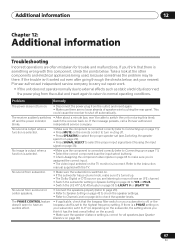
... does not turn muting off automatically. If the message persists, call a Pioneer authorized blinks. Refer to the instruction manual supplied with this time), off and the power indicator switch the receiver back on your nearest Pioneer authorized independent service company to carry out repair work. • If the... to YES or PLUS. • Switch the LFE ATT (LFE Attenuate) on the TV monitor is correct for trouble and malfunctions. The receiver suddenly switches • After about a minute (you are often mistaken for all speakers (see Choosing the input signal on page 44 to...
... does not turn muting off automatically. If the message persists, call a Pioneer authorized blinks. Refer to the instruction manual supplied with this time), off and the power indicator switch the receiver back on your nearest Pioneer authorized independent service company to carry out repair work. • If the... to YES or PLUS. • Switch the LFE ATT (LFE Attenuate) on the TV monitor is correct for trouble and malfunctions. The receiver suddenly switches • After about a minute (you are often mistaken for all speakers (see Choosing the input signal on page 44 to...
Owner's Manual
Page 68
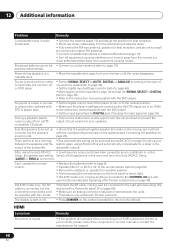
...default. Remedy • If the problem still persists when connecting your HDMI component directly to your receiver, until the noise disappears. subwoofer output). After using MCACC (this receiver with a Pioneer flat panel TV on page 62). • Make sure an analog connection has been made (...terminals on the receiver are correct and/or the DTS signal out is output when software with the DVD player. No sound is output or a noise is on. HDMI Symptom No picture or sound. Refer to the instruction manual supplied with Pioneer products. VSX-918V model only:...
...default. Remedy • If the problem still persists when connecting your HDMI component directly to your receiver, until the noise disappears. subwoofer output). After using MCACC (this receiver with a Pioneer flat panel TV on page 62). • Make sure an analog connection has been made (...terminals on the receiver are correct and/or the DTS signal out is output when software with the DVD player. No sound is output or a noise is on. HDMI Symptom No picture or sound. Refer to the instruction manual supplied with Pioneer products. VSX-918V model only:...
Owner's Manual
Page 75
..., SUBSEQUENT DAMAGE FROM LEAKING, DAMAGE FROM INOPERATIVE BATTERIES, OR THE USE OF BATTERIES NOT CONFORMING TO THOSE SPECIFIED IN THE OWNER'S MANUAL. P.O. or (2) respond to your unit or to locate an Authorized Service Company, please call 1-800-421-1404 and explain to...You are experiencing, steps you have taken to you for a definitive statement of receiving your complaint, Pioneer will investigate the dispute and will not take , and in writing informing you and Pioneer, Pioneer makes available its Complaint Resolution Program to an Authorized Service Company. THIS LIMITED ...
..., SUBSEQUENT DAMAGE FROM LEAKING, DAMAGE FROM INOPERATIVE BATTERIES, OR THE USE OF BATTERIES NOT CONFORMING TO THOSE SPECIFIED IN THE OWNER'S MANUAL. P.O. or (2) respond to your unit or to locate an Authorized Service Company, please call 1-800-421-1404 and explain to...You are experiencing, steps you have taken to you for a definitive statement of receiving your complaint, Pioneer will investigate the dispute and will not take , and in writing informing you and Pioneer, Pioneer makes available its Complaint Resolution Program to an Authorized Service Company. THIS LIMITED ...


