
Operating Instructions
Page 4
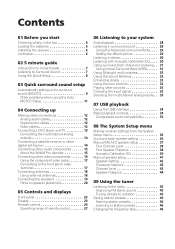
... System Setup menu Making receiver settings from the System Setup menu 36 Surround back speaker setting 36 Manual MCACC speaker setup 37 Fine Channel Level 38 Fine Speaker Distance 38 Acoustic Calibration EQ 39 Manual speaker setup 41 Speaker Setting 42 Crossover Network 43 Channel Level 43 Speaker Distance 44 09 Using...
... System Setup menu Making receiver settings from the System Setup menu 36 Surround back speaker setting 36 Manual MCACC speaker setup 37 Fine Channel Level 38 Fine Speaker Distance 38 Acoustic Calibration EQ 39 Manual speaker setup 41 Speaker Setting 42 Crossover Network 43 Channel Level 43 Speaker Distance 44 09 Using...
Operating Instructions
Page 7
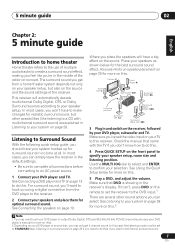
... and the sound settings of the action or concert. Use the MULTI JOG dial to select and ENTER to confirm your DVD player's manual for more on this receiver. Make sure that came with multichannel surround sound) are several other possibilities (like you're in the middle... This receiver will have your speaker setup. Listening to an AC power source. 1 Connect your DVD player, subwoofer and TV. Check the manual that DVD is showing in Listening to your speaker setup, but other sound options you place the speakers will automatically decode multichannel Dolby Digital, DTS...
... and the sound settings of the action or concert. Use the MULTI JOG dial to select and ENTER to confirm your DVD player's manual for more on this receiver. Make sure that came with multichannel surround sound) are several other possibilities (like you're in the middle... This receiver will have your speaker setup. Listening to an AC power source. 1 Connect your DVD player, subwoofer and TV. Check the manual that DVD is showing in Listening to your speaker setup, but other sound options you place the speakers will automatically decode multichannel Dolby Digital, DTS...
Operating Instructions
Page 9
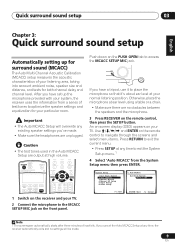
... on the PUSH OPEN tab to place the microphone so that it's about ear level at high volume. System Setup 1.Surr Back System 2.Auto MCACC 3.Manual MCACC 4.Manual SP Setup 5.Input Assign 6.Other Setup 2. MCACC SETUP MIC DOWN MASTER VOLUME UP If you 've made . 9 En An on-screen display (OSD) appears...
... on the PUSH OPEN tab to place the microphone so that it's about ear level at high volume. System Setup 1.Surr Back System 2.Auto MCACC 3.Manual MCACC 4.Manual SP Setup 5.Input Assign 6.Other Setup 2. MCACC SETUP MIC DOWN MASTER VOLUME UP If you 've made . 9 En An on-screen display (OSD) appears...
Operating Instructions
Page 10
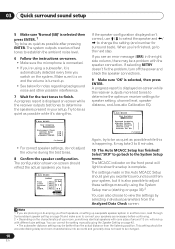
... should give you excellent surround sound from your system, but it is also possible to adjust these settings manually using the System Setup menu (starting on page 36).2 You can correct the setting manually using a subwoofer, it is automatically detected every time you have. 2.Auto MCACC CHECK! A progress report is displayed on...
... should give you excellent surround sound from your system, but it is also possible to adjust these settings manually using the System Setup menu (starting on page 36).2 You can correct the setting manually using a subwoofer, it is automatically detected every time you have. 2.Auto MCACC CHECK! A progress report is displayed on...
Operating Instructions
Page 17
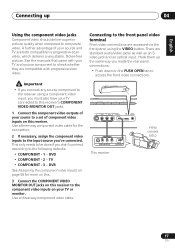
... the front panel video terminal Front video connections are standard audio/video jacks as well as an Svideo jack and an optical input. See the manuals that came with progressive-scan video. VIDEO VIDEO INPUT VIDEO L AUDIO R DIGITAL IN USB MCACC SETUP MIC PUSH OPEN PROCESSING CD CD-R / TAPE / MD FM...
... the front panel video terminal Front video connections are standard audio/video jacks as well as an Svideo jack and an optical input. See the manuals that came with progressive-scan video. VIDEO VIDEO INPUT VIDEO L AUDIO R DIGITAL IN USB MCACC SETUP MIC PUSH OPEN PROCESSING CD CD-R / TAPE / MD FM...
Operating Instructions
Page 33
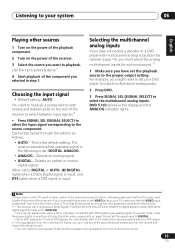
... to 96 kHz), DTS and WMA9 Pro digital signal formats. DVD 5.1ch shows in the following order: DIGITAL; For more details, refer to the instruction manual supplied with your DVD player. 3 • During playback from the multichannel inputs. 33 En Use the input select buttons.1 4 Start playback of the receiver to...
... to 96 kHz), DTS and WMA9 Pro digital signal formats. DVD 5.1ch shows in the following order: DIGITAL; For more details, refer to the instruction manual supplied with your DVD player. 3 • During playback from the multichannel inputs. 33 En Use the input select buttons.1 4 Start playback of the receiver to...
Operating Instructions
Page 36
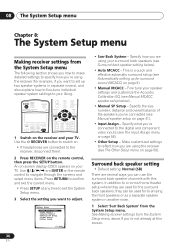
...8226; Other Setup - Fine tune your TV. This is a quick and effective automatic surround setup (see Surround back speaker setting below ). • Manual SP Setup - Use the RECEIVER button to switch on. • If headphones are several ways you can be used for the surround back speakers,...speaker channels with this screen. 36 En An on-screen display (OSD) appears on your liking. System Setup 1.Surr Back System 2.Auto MCACC 3.Manual MCACC 4.Manual SP Setup 5.Input Assign 6.Other Setup : Exit • Surr Back System - Specify what you've connected to the digital and component video...
...8226; Other Setup - Fine tune your TV. This is a quick and effective automatic surround setup (see Surround back speaker setting below ). • Manual SP Setup - Use the RECEIVER button to switch on. • If headphones are several ways you can be used for the surround back speakers,...speaker channels with this screen. 36 En An on-screen display (OSD) appears on your liking. System Setup 1.Surr Back System 2.Auto MCACC 3.Manual MCACC 4.Manual SP Setup 5.Input Assign 6.Other Setup : Exit • Surr Back System - Specify what you've connected to the digital and component video...
Operating Instructions
Page 37
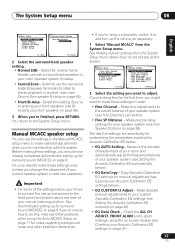
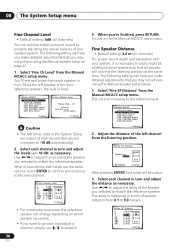
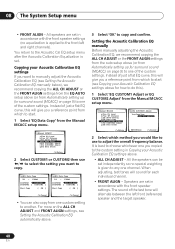
...the Acoustic Calibration EQ automatically below). • EQ Data Copy - System Setup 1.Surr Back System 2.Auto MCACC 3.Manual MCACC 4.Manual SP Setup 5.Input Assign 6.Other Setup : Exit 3.Manual MCACC a.Fine Ch Level b.Fine SP Distance c.EQ AUTO Setting d.EQ Data Copy e.EQ CUSTOM1 Adjust f ....Distance - The System Setup menu 08 English Deutsch Français Italiano Nederlands Español System Setup 1.Surr Back System 2.Auto MCACC 3.Manual MCACC 4.Manual SP Setup 5.Input Assign 6.Other Setup 1.Surround Back System Surr Back System Normal (SB) ] : Exit : Finish 2 Select the ...
...the Acoustic Calibration EQ automatically below). • EQ Data Copy - System Setup 1.Surr Back System 2.Auto MCACC 3.Manual MCACC 4.Manual SP Setup 5.Input Assign 6.Other Setup : Exit 3.Manual MCACC a.Fine Ch Level b.Fine SP Distance c.EQ AUTO Setting d.EQ Data Copy e.EQ CUSTOM1 Adjust f ....Distance - The System Setup menu 08 English Deutsch Français Italiano Nederlands Español System Setup 1.Surr Back System 2.Auto MCACC 3.Manual MCACC 4.Manual SP Setup 5.Input Assign 6.Other Setup 1.Surround Back System Surr Back System Normal (SB) ] : Exit : Finish 2 Select the ...
Operating Instructions
Page 38
...9.5dB ] [- 1.5dB ] :Finish • For comparison purposes, the reference speaker will be output. 3 Select each speaker in terms of speaker distance from the Manual MCACC setup menu. You return to match the reference speaker. Use / to adjust the volume of the speaker you 're finished, press RETURN. Use / to...selected to some speakers so that all sounds will arrive at the listening position at high volume (the volume increases to the reference level. 3.Manual MCACC a.Fine Ch Level b.Fine SP Distance c.EQ AUTO Setting d.EQ Data Copy e.EQ CUSTOM1 Adjust f .EQ CUSTOM2 Adjust g.EQ Data...
...9.5dB ] [- 1.5dB ] :Finish • For comparison purposes, the reference speaker will be output. 3 Select each speaker in terms of speaker distance from the Manual MCACC setup menu. You return to match the reference speaker. Use / to adjust the volume of the speaker you 're finished, press RETURN. Use / to...selected to some speakers so that all sounds will arrive at the listening position at high volume (the volume increases to the reference level. 3.Manual MCACC a.Fine Ch Level b.Fine SP Distance c.EQ AUTO Setting d.EQ Data Copy e.EQ CUSTOM1 Adjust f .EQ CUSTOM2 Adjust g.EQ Data...
Operating Instructions
Page 39
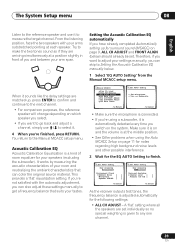
...for notes regarding high background noise levels and other possible interference. 2 Wait for your room and neutralizing the ambient characteristics that suits your settings manually, you 're finished, press RETURN. This provides a 'flat' equalization setting. Make sure it is connected. • If you're...on which speaker you select. • If you want to get a frequency balance that can skip to Setting the Acoustic Calibration EQ manually below ) should already be set individually so no special weighting is given to finish. 3c.EQ AUTO Setting Now Analyzing Environment Check ...
...for notes regarding high background noise levels and other possible interference. 2 Wait for your room and neutralizing the ambient characteristics that suits your settings manually, you 're finished, press RETURN. This provides a 'flat' equalization setting. Make sure it is connected. • If you're...on which speaker you select. • If you want to get a frequency balance that can skip to Setting the Acoustic Calibration EQ manually below ) should already be set individually so no special weighting is given to finish. 3c.EQ AUTO Setting Now Analyzing Environment Check ...
Operating Instructions
Page 40
... (see Setting the Acoustic Calibration EQ automatically above . • ALL CH ADJUST - All the speakers can also copy from the Manual MCACC setup menu. 3.Manual MCACC a.Fine Ch Level b.Fine SP Distance c.EQ AUTO Setting d.EQ Data Copy e.EQ CUSTOM1 Adjust f .EQ CUSTOM2 Adjust g.EQ... Automatically setting up for surround sound (MCACC) on page 9) to adjust the overall frequency balance. Setting the Acoustic Calibration EQ manually Before manually adjusting the Acoustic Calibration EQ, we recommend copying the ALL CH ADJUST or the FRONT ALIGN settings from the EQ AUTO setup above...
... (see Setting the Acoustic Calibration EQ automatically above . • ALL CH ADJUST - All the speakers can also copy from the Manual MCACC setup menu. 3.Manual MCACC a.Fine Ch Level b.Fine SP Distance c.EQ AUTO Setting d.EQ Data Copy e.EQ CUSTOM1 Adjust f .EQ CUSTOM2 Adjust g.EQ... Automatically setting up for surround sound (MCACC) on page 9) to adjust the overall frequency balance. Setting the Acoustic Calibration EQ manually Before manually adjusting the Acoustic Calibration EQ, we recommend copying the ALL CH ADJUST or the FRONT ALIGN settings from the EQ AUTO setup above...
Operating Instructions
Page 41
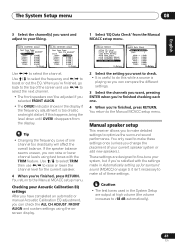
... system or add new speakers.). When you're finished, go back to the top of one . 4 When you're finished, press RETURN. disappears from the Manual MCACC setup menu. 3e.EQ CUSTOM1 Adjust Test Tone Type: "ALL CH ADJUST" Left 40Hz : [+ 1.0dB ] 125Hz : [ 0.0dB ] 250Hz : [ 0.0dB ] 4kHz : [ ... ADJUST" [ Left ] 40Hz : + 1.0dB 125Hz : [ 0.0dB ] 250Hz : [ 0.0dB ] 4kHz : [ 0.0dB ] 13kHz : [ 0.0dB ] TRIM : [ 0.0dB ] :Finish Use / to the Manual MCACC setup menu. Tip • Changing the frequency curve of the screen and use / to raise or lower the channel level for surround sound (MCACC...
... system or add new speakers.). When you're finished, go back to the top of one . 4 When you're finished, press RETURN. disappears from the Manual MCACC setup menu. 3e.EQ CUSTOM1 Adjust Test Tone Type: "ALL CH ADJUST" Left 40Hz : [+ 1.0dB ] 125Hz : [ 0.0dB ] 250Hz : [ 0.0dB ] 4kHz : [ ... ADJUST" [ Left ] 40Hz : + 1.0dB 125Hz : [ 0.0dB ] 250Hz : [ 0.0dB ] 4kHz : [ 0.0dB ] 13kHz : [ 0.0dB ] TRIM : [ 0.0dB ] :Finish Use / to the Manual MCACC setup menu. Tip • Changing the frequency curve of the screen and use / to raise or lower the channel level for surround sound (MCACC...
Operating Instructions
Page 42
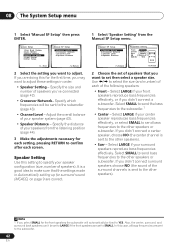
... reproduce bass frequencies effectively, or if you 've connected (page 42). • Crossover Network- 08 The System Setup menu 1 Select 'Manual SP Setup' then press ENTER. 1 Select 'Speaker Setting' from the listening position (page 44). 3 Make the adjustments necessary for each ...the front speakers are sent to the other speakers or subwoofer. System Setup 1.Surr Back System 2.Auto MCACC 3.Manual MCACC 4.Manual SP Setup 5.Input Assign 6.Other Setup 4.Manual SP Setup a.Speaker Setting b.Crossover Network c.Channel Level d.Speaker Distance : Exit :Return 2 Select the setting you...
... reproduce bass frequencies effectively, or if you 've connected (page 42). • Crossover Network- 08 The System Setup menu 1 Select 'Manual SP Setup' then press ENTER. 1 Select 'Speaker Setting' from the listening position (page 44). 3 Make the adjustments necessary for each ...the front speakers are sent to the other speakers or subwoofer. System Setup 1.Surr Back System 2.Auto MCACC 3.Manual MCACC 4.Manual SP Setup 5.Input Assign 6.Other Setup 4.Manual SP Setup a.Speaker Setting b.Crossover Network c.Channel Level d.Speaker Distance : Exit :Return 2 Select the setting you...
Operating Instructions
Page 43
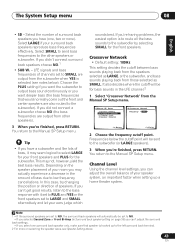
... LARGE, or the subwoofer, and bass sounds playing back from the subwoofer when YES is to route all the bass sounds to the Manual SP Setup menu. Channel Level Using the channel level settings, you selected Second Zone or Front Bi-Amp (in Surround back speaker setting... option is selected (see Speaker Setting above. 43 En LFE signals and bass frequencies of bass due to SMALL are output from the Manual SP Setup menu. 4.Manual SP Setup a.Speaker Setting b.Crossover Network c.Channel Level d.Speaker Distance 4b.Crossover Network Frequency 80Hz :Return :Finish 2 Choose the frequency ...
... LARGE, or the subwoofer, and bass sounds playing back from the subwoofer when YES is to route all the bass sounds to the Manual SP Setup menu. Channel Level Using the channel level settings, you selected Second Zone or Front Bi-Amp (in Surround back speaker setting... option is selected (see Speaker Setting above. 43 En LFE signals and bass frequencies of bass due to SMALL are output from the Manual SP Setup menu. 4.Manual SP Setup a.Speaker Setting b.Crossover Network c.Channel Level d.Speaker Distance 4b.Crossover Network Frequency 80Hz :Return :Finish 2 Choose the frequency ...
Operating Instructions
Page 44
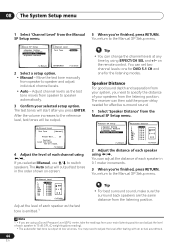
... the remote control. You can set two channel levels: one for DVD 5.1 CH and one for effective surround sound. 1 Select 'Speaker Distance' from the Manual SP Setup menu. 4.Manual SP Setup a.Speaker Setting b.Crossover Network c.Channel Level d.Speaker Distance :Return 4d.Speaker Distance L C R RS SBR SBL LS SW 3.0 m [ 3.0 m ] [ 3.0... you 're finished, press RETURN. After the volume increases to the reference level, test tones will be output. 4c.Channel Level Test Tone [ Manual ] Please Wait . . . 20 Caution! SP Setup menu. on -screen: 4c.Channel Level L 0.0dB C [ 0.0dB ] R [...
... the remote control. You can set two channel levels: one for DVD 5.1 CH and one for effective surround sound. 1 Select 'Speaker Distance' from the Manual SP Setup menu. 4.Manual SP Setup a.Speaker Setting b.Crossover Network c.Channel Level d.Speaker Distance :Return 4d.Speaker Distance L C R RS SBR SBL LS SW 3.0 m [ 3.0 m ] [ 3.0... you 're finished, press RETURN. After the volume increases to the reference level, test tones will be output. 4c.Channel Level Test Tone [ Manual ] Please Wait . . . 20 Caution! SP Setup menu. on -screen: 4c.Channel Level L 0.0dB C [ 0.0dB ] R [...
Operating Instructions
Page 45
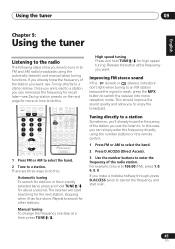
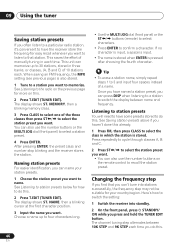
The receiver will start over. 45 En Manual tuning To change the frequency one . DVD CD TV CD-R/TAPE FM DVR TVCTRL USB AM RECEIVER SLEEP SR+ SB ch DIMMER ANALOG ATT MIDNIGHT/ ... signal is weak, press the MPX button to 106.00 (FM), press 1, 0, 6, 0, 0. Once you can simply enter the frequency directly using the automatic (search) and manual (step) tuning functions. For example, to tune to switch the receiver into mono reception mode.
The receiver will start over. 45 En Manual tuning To change the frequency one . DVD CD TV CD-R/TAPE FM DVR TVCTRL USB AM RECEIVER SLEEP SR+ SB ch DIMMER ANALOG ATT MIDNIGHT/ ... signal is weak, press the MPX button to 106.00 (FM), press 1, 0, 6, 0, 0. Once you can simply enter the frequency directly using the automatic (search) and manual (step) tuning functions. For example, to tune to switch the receiver into mono reception mode.
Operating Instructions
Page 46
... ENTER, the preset class and number stop blinking and the receiver stores the station. MEMORY, then a blinking memory class. 3 Press CLASS to select one of manually tuning in three banks, or classes, (A, B and C) of a name. Listening to station presets You will need to have named a station preset, you want . This saves...
... ENTER, the preset class and number stop blinking and the receiver stores the station. MEMORY, then a blinking memory class. 3 Press CLASS to select one of manually tuning in three banks, or classes, (A, B and C) of a name. Listening to station presets You will need to have named a station preset, you want . This saves...
Operating Instructions
Page 47
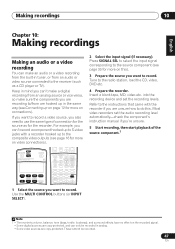
... buttons (or INPUT SELECT). 2 Select the input signal (if necessary). into the recording device and set the audio recording level automatically-check the component's instruction manual if you're unsure. 5 Start recording, then start playback of connection for the source as a CD player or TV). Most video recorders set the recording...
... buttons (or INPUT SELECT). 2 Select the input signal (if necessary). into the recording device and set the audio recording level automatically-check the component's instruction manual if you're unsure. 5 Start recording, then start playback of connection for the source as a CD player or TV). Most video recorders set the recording...
Operating Instructions
Page 55
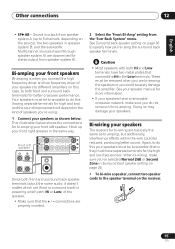
... terminals for better crossover performance. Caution • Most speakers with both front and surround back terminals) for the high and low frequencies). See your speaker manual for more information. • If your front speakers Bi-amping is they must be bi-ampable to both Hi and Low terminals have two metal...
... terminals for better crossover performance. Caution • Most speakers with both front and surround back terminals) for the high and low frequencies). See your speaker manual for more information. • If your front speakers Bi-amping is they must be bi-ampable to both Hi and Low terminals have two metal...
Operating Instructions
Page 58
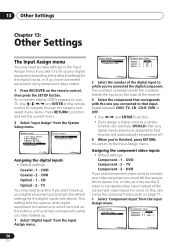
... (OSD) appears on the remote control, then press the SETUP button. You return to the Input Assign menu. System Setup 1.Surr Back System 2.Auto MCACC 3.Manual MCACC 4.Manual SP Setup 5.Input Assign 6.Other Setup 5.Input Assign a.Digital Input b.Component Input : Exit :Return Assigning the digital inputs • Default settings: Coaxial - 1 - DVR If...
... (OSD) appears on the remote control, then press the SETUP button. You return to the Input Assign menu. System Setup 1.Surr Back System 2.Auto MCACC 3.Manual MCACC 4.Manual SP Setup 5.Input Assign 6.Other Setup 5.Input Assign a.Digital Input b.Component Input : Exit :Return Assigning the digital inputs • Default settings: Coaxial - 1 - DVR If...


