
Operating Instructions
Page 7
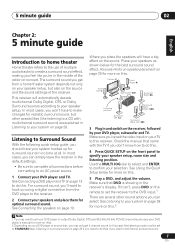
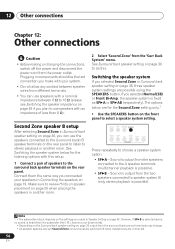
... want to hook up for realistic surround sound, but also on your DVD player or source disc, you can select. Center (C) Front Right (R) Front Left (L) Subwoofer (SW) Surround Right (RS) Listening position Surround Back Right (SBR) Surround Left (LS) Surround Back Left (SBL) 3 Plug in no time at all connections...don't know how to do this) if you can simply leave the receiver in the middle of the action or concert. Place your DVD player, subwoofer and TV. If it isn't, press DVD on this . In this case, the listening mode must be set the video input on page 19....
... want to hook up for realistic surround sound, but also on your DVD player or source disc, you can select. Center (C) Front Right (R) Front Left (L) Subwoofer (SW) Surround Right (RS) Listening position Surround Back Right (SBR) Surround Left (LS) Surround Back Left (SBL) 3 Plug in no time at all connections...don't know how to do this) if you can simply leave the receiver in the middle of the action or concert. Place your DVD player, subwoofer and TV. If it isn't, press DVD on this . In this case, the listening mode must be set the video input on page 19....
Operating Instructions
Page 8
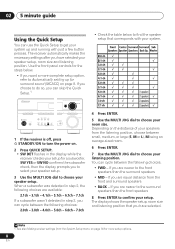
...speaker setup, room size and listening position that corresponds with just a few button presses. Use the front panel controls for a subwoofer. When a subwoofer was detected in step 2, you can cycle between the following choices are equal distance from the System Setup menu on page 36... DIMMER ANALOG MIDNIGHT/ ATT LOUDNESS SPEAKERS TUNING / STATION TUNER EDIT TONE QUICK SETUP SETUP MULTI JOG AUDIO/VIDEO MULTI-CHANNEL RECEIVER VSX-816 ENTER MULTI JOG DIGITAL PRECISION PROCESSING AUX SIGNAL SB ch ACOUSTIC SELECT PROCESSING EQ MCACC SETUP MIC MASTER VOLUME DOWN UP 1 If...
...speaker setup, room size and listening position that corresponds with just a few button presses. Use the front panel controls for a subwoofer. When a subwoofer was detected in step 2, you can cycle between the following choices are equal distance from the System Setup menu on page 36... DIMMER ANALOG MIDNIGHT/ ATT LOUDNESS SPEAKERS TUNING / STATION TUNER EDIT TONE QUICK SETUP SETUP MULTI JOG AUDIO/VIDEO MULTI-CHANNEL RECEIVER VSX-816 ENTER MULTI JOG DIGITAL PRECISION PROCESSING AUX SIGNAL SB ch ACOUSTIC SELECT PROCESSING EQ MCACC SETUP MIC MASTER VOLUME DOWN UP 1 If...
Operating Instructions
Page 10
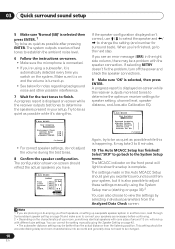
... it is also possible to adjust these settings manually using the System Setup menu (starting on page 36).2 You can correct the setting manually using a subwoofer, it is turned up. • See below for notes regarding background noise and other possible interference. 7 Wait for the test tones to finish. It may.... 6 Follow the instructions on-screen. • Make sure the microphone is connected. • If you're using the Speaker Setting on page 42. • The subwoofer distance setting may be as quiet as possible after pressing ENTER.
... it is also possible to adjust these settings manually using the System Setup menu (starting on page 36).2 You can correct the setting manually using a subwoofer, it is turned up. • See below for notes regarding background noise and other possible interference. 7 Wait for the test tones to finish. It may.... 6 Follow the instructions on-screen. • Make sure the microphone is connected. • If you're using the Speaker Setting on page 42. • The subwoofer distance setting may be as quiet as possible after pressing ENTER.
Operating Instructions
Page 19
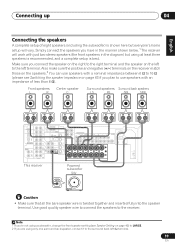
... OUT LR SURROUND (TV/SAT)IN 2 R R L CENTER R SURROUND BACK L R CENTER B AC IN 110V 120 - 127V 220V 240V This receiver Powered subwoofer SW INPUT Caution • Make sure that all the bare speaker wire is shown here but using only one surround back speaker, connect it to... negative (+/-) terminals on the receiver match those on the speakers.2 You can use speakers with an impedance of eight speakers (including the subwoofer) is twisted together and inserted fully into the speaker terminal. English Deutsch Français Italiano Nederlands Español Connecting up 04...
... OUT LR SURROUND (TV/SAT)IN 2 R R L CENTER R SURROUND BACK L R CENTER B AC IN 110V 120 - 127V 220V 240V This receiver Powered subwoofer SW INPUT Caution • Make sure that all the bare speaker wire is shown here but using only one surround back speaker, connect it to... negative (+/-) terminals on the receiver match those on the speakers.2 You can use speakers with an impedance of eight speakers (including the subwoofer) is twisted together and inserted fully into the speaker terminal. English Deutsch Français Italiano Nederlands Español Connecting up 04...
Operating Instructions
Page 21
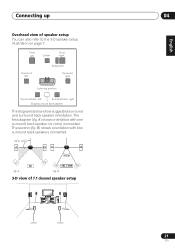
... 7.1 channel speaker setup 21 En B 3-D view of speaker setup You can also refer to 60 LS SB fig. Front left Center Front right Surround left Subwoofer Surround right Listening position Surround back left Surround back right Single surround back speaker . The diagrams below show suggested surround and surround back speaker orientation...
... 7.1 channel speaker setup 21 En B 3-D view of speaker setup You can also refer to 60 LS SB fig. Front left Center Front right Surround left Subwoofer Surround right Listening position Surround back left Surround back right Single surround back speaker . The diagrams below show suggested surround and surround back speaker orientation...
Operating Instructions
Page 29
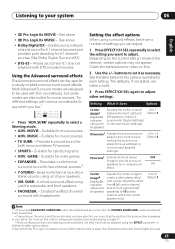
... games. • EXPANDED - MUSIC - GAME - Check the table below for the options available for a 'wraparound' ON effect. Center Imageb (Applicable only when using just the subwoofer and front speakers. • PHONESUR. - For more forward (positive settings). -3 to +3 Default: 0 Panoramaa Extends the front stereo OFF image to be adjusted using the EFFECT...
... games. • EXPANDED - MUSIC - GAME - Check the table below for the options available for a 'wraparound' ON effect. Center Imageb (Applicable only when using just the subwoofer and front speakers. • PHONESUR. - For more forward (positive settings). -3 to +3 Default: 0 Panoramaa Extends the front stereo OFF image to be adjusted using the EFFECT...
Operating Instructions
Page 30
... What it has no effect with headphones. • If you will hear the source through just the front left and right speakers (and possibly your subwoofer depending on your surround settings and you can still use Acoustic Calibration EQ with DVD 5.1ch or WMA9 Pro, and it does Options Effect Sets...
... What it has no effect with headphones. • If you will hear the source through just the front left and right speakers (and possibly your subwoofer depending on your surround settings and you can still use Acoustic Calibration EQ with DVD 5.1ch or WMA9 Pro, and it does Options Effect Sets...
Operating Instructions
Page 37
... of your current speaker system or add new speakers). If you're doing this . Check the ALL CH ADJUST, FRONT ALIGN and custom settings using a subwoofer, switch it about ear level at this setting if you 're finished, press RETURN. You only need to the front panel and place it on...
... of your current speaker system or add new speakers). If you're doing this . Check the ALL CH ADJUST, FRONT ALIGN and custom settings using a subwoofer, switch it about ear level at this setting if you 're finished, press RETURN. You only need to the front panel and place it on...
Operating Instructions
Page 39
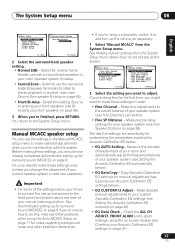
... so no special weighting is automatically detected every time you switch on which speaker you select. • If you and between your speakers (excluding the subwoofer). You return to measure the target channel. From the listening position, face the two speakers with the automatic adjustment, you can color the original source... to any one channel. 39 En A 'flat' setting where all the speakers are arriving simultaneously at the middle position. • See Other problems when using a subwoofer, it sounds like the delay settings are matched up for your arm span.
... so no special weighting is automatically detected every time you switch on which speaker you select. • If you and between your speakers (excluding the subwoofer). You return to measure the target channel. From the listening position, face the two speakers with the automatic adjustment, you can color the original source... to any one channel. 39 En A 'flat' setting where all the speakers are arriving simultaneously at the middle position. • See Other problems when using a subwoofer, it sounds like the delay settings are matched up for your arm span.
Operating Instructions
Page 42
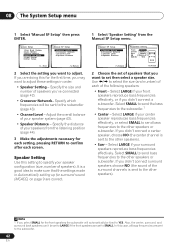
... surround speakers reproduce bass frequencies effectively. Select LARGE if your speakers from the Manual SP Setup menu. If you didn't connect a subwoofer. In this setting to specify your center speaker reproduces bass frequencies effectively, or select SMALL to send bass frequencies to the other speakers or...effectively, or if you didn't connect surround speakers choose NO (the sound of speakers that you select SMALL for the front speakers the subwoofer will be set to LARGE if the front speakers are set of the surround channels is a good idea to make sure that the settings...
... surround speakers reproduce bass frequencies effectively. Select LARGE if your speakers from the Manual SP Setup menu. If you didn't connect a subwoofer. In this setting to specify your center speaker reproduces bass frequencies effectively, or select SMALL to send bass frequencies to the other speakers or...effectively, or if you didn't connect surround speakers choose NO (the sound of speakers that you select SMALL for the front speakers the subwoofer will be set to LARGE if the front speakers are set of the surround channels is a good idea to make sure that the settings...
Operating Instructions
Page 43
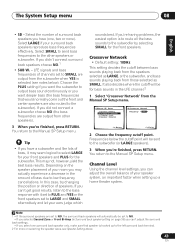
...'t connect surround back speakers choose NO.1 • SUB W. - Frequencies below ). Note 1 • If the surround speakers are set to the subwoofer (or LARGE speakers). 3 When you select one , two or none). Select LARGE if your speaker system, an important factor when setting up to ... bass frequencies of your front speakers and PLUS for bass sounds in the LFE channel.2 1 Select 'Crossover Network' from other speakers or subwoofer. The System Setup menu 08 English Deutsch Français Italiano Nederlands Español • SB - This may actually experience a decrease...
...'t connect surround back speakers choose NO.1 • SUB W. - Frequencies below ). Note 1 • If the surround speakers are set to the subwoofer (or LARGE speakers). 3 When you select one , two or none). Select LARGE if your speaker system, an important factor when setting up to ... bass frequencies of your front speakers and PLUS for bass sounds in the LFE channel.2 1 Select 'Crossover Network' from other speakers or subwoofer. The System Setup menu 08 English Deutsch Français Italiano Nederlands Español • SB - This may actually experience a decrease...
Operating Instructions
Page 44
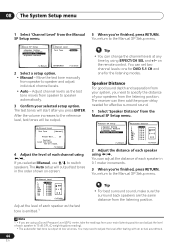
... listening position and adjust the level of your system, you are the same distance from speaker to 75 dB SPL (C-weighting/slow reading). • The subwoofer test tone is emitted.1 Tip • You can adjust the distance of each channel using EFFECT/CH SEL and +/- You return to adjust the level...
... listening position and adjust the level of your system, you are the same distance from speaker to 75 dB SPL (C-weighting/slow reading). • The subwoofer test tone is emitted.1 Tip • You can adjust the distance of each channel using EFFECT/CH SEL and +/- You return to adjust the level...
Operating Instructions
Page 54
... speaker system settings are connected. 54 En Connect them the same way you made in Speaker Setting on page 42. Note 1 • The subwoofer output depends on the settings you connected your system. • Do not allow any contact between 6 Ω to 16 Ω (please see... terminals may change. • All speaker systems (except Second Zone connections) are switched off the power and disconnect the power cord from the subwoofer (the LFE channel is possible). • SP B - Plugging in Surround back speaker setting on the front panel to stereo playback in another...
... speaker system settings are connected. 54 En Connect them the same way you made in Speaker Setting on page 42. Note 1 • The subwoofer output depends on the settings you connected your system. • Do not allow any contact between 6 Ω to 16 Ω (please see... terminals may change. • All speaker systems (except Second Zone connections) are switched off the power and disconnect the power cord from the subwoofer (the LFE channel is possible). • SP B - Plugging in Surround back speaker setting on the front panel to stereo playback in another...
Operating Instructions
Page 55
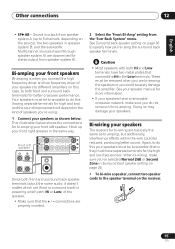
Sound is when you connect the high frequency driver and low frequency driver of your speakers to different amplifiers (in speaker system B, and the subwoofer. Your speakers must be bi-ampable to the Low terminals. Bi-amping your speakers as bi-amping, but additionally, interference effects within the wire could ...
Sound is when you connect the high frequency driver and low frequency driver of your speakers to different amplifiers (in speaker system B, and the subwoofer. Your speakers must be bi-ampable to the Low terminals. Bi-amping your speakers as bi-amping, but additionally, interference effects within the wire could ...
Operating Instructions
Page 56
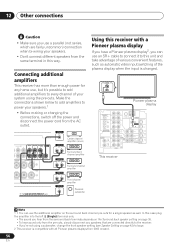
...ANALOG INPUT L R ANALOG INPUT Center channel amplifier (mono) Surround back channel amplifier Surround channel amplifier Front channel amplifier Powered subwoofer Using this receiver with all Pioneer plasma displays from 2003 onward. 56 En Connecting additional amplifiers This receiver has more than enough power for a single speaker... display If you have a Pioneer plasma display2, you 're not using the pre-outs. Make the connections shown below to add amplifiers to power your system using a subwoofer, change the front speaker setting (see Speaker Setting on page 36. • To ...
...ANALOG INPUT L R ANALOG INPUT Center channel amplifier (mono) Surround back channel amplifier Surround channel amplifier Front channel amplifier Powered subwoofer Using this receiver with all Pioneer plasma displays from 2003 onward. 56 En Connecting additional amplifiers This receiver has more than enough power for a single speaker... display If you have a Pioneer plasma display2, you 're not using the pre-outs. Make the connections shown below to add amplifiers to power your system using a subwoofer, change the front speaker setting (see Speaker Setting on page 36. • To ...
Operating Instructions
Page 61
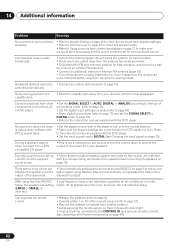
...14 English Deutsch Français Italiano Nederlands Español Chapter 14: Additional information Troubleshooting Incorrect operations are often mistaken for your nearest Pioneer authorized independent service company to carry out repair work. • If the unit does not operate normally due to external effects such ...8226; Refer to Channel Level on page 43 to shut off automatically. • The unit may have an LFE channel. • Switch the subwoofer setting in Speaker Setting on page 42 to YES or PLUS. • Switch the LFE Attenuator Setup on page 60 to select the proper input...
...14 English Deutsch Français Italiano Nederlands Español Chapter 14: Additional information Troubleshooting Incorrect operations are often mistaken for your nearest Pioneer authorized independent service company to carry out repair work. • If the unit does not operate normally due to external effects such ...8226; Refer to Channel Level on page 43 to shut off automatically. • The unit may have an LFE channel. • Switch the subwoofer setting in Speaker Setting on page 42 to YES or PLUS. • Switch the LFE Attenuator Setup on page 60 to select the proper input...
Operating Instructions
Page 62
...to prevent the output of a cassette deck. • Move the cassette deck away from equipment causing noise). Sound is produced from other Pioneer components on page 48). 62 En Everything seems to the CONTROL IN jack and use remote normally (see Connecting the speakers on sound is ... Noise during playback of loud noise from your speakers. No sound is output or a noise is output when software with the DVD player. subwoofer output). Refer to the instruction manual supplied with the corresponding terminals on the speakers (see Operating other components, but be set up • ...
...to prevent the output of a cassette deck. • Move the cassette deck away from equipment causing noise). Sound is produced from other Pioneer components on page 48). 62 En Everything seems to the CONTROL IN jack and use remote normally (see Connecting the speakers on sound is ... Noise during playback of loud noise from your speakers. No sound is output or a noise is output when software with the DVD player. subwoofer output). Refer to the instruction manual supplied with the corresponding terminals on the speakers (see Operating other components, but be set up • ...
Service Manual
Page 19
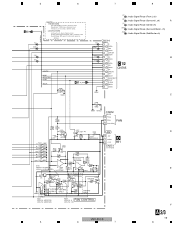
...) (SL) : Audio Signal Route (Surround L ch) A (C) : Audio Signal Route (Center ch) (SBL) : Audio Signal Route (Surround Back L ch) (SW) : Audio Signal Route (SubWoofer ch) CN114 (C) XKP3091- C 2 4 6 8 10 12 14 16 18 20 1 3 5 7 9 11 13 15 17 19 21 (SBL) GNDA SBL GNDA SBR/SW (SL) GNDA...D255 UDZS13(B) D253 R280 0 Q254 470 R463 22K 2SC4081 (QR) Q260 R465 22K 4.7K GNDU VSX-916 VSX-816 VSX-916 ONLY ONLY R466 22K VSX-916 ONLY ONLY D253 VSX-816 : UDZS27(B) R464 VSX-816 : 0 FAN CONTROL VSX-916 : UDZS13(B) VSX-916 : 22K R442 100K C254 100/25 J22 3 -12V 2 GNDU 1 +12V CN251 ...
...) (SL) : Audio Signal Route (Surround L ch) A (C) : Audio Signal Route (Center ch) (SBL) : Audio Signal Route (Surround Back L ch) (SW) : Audio Signal Route (SubWoofer ch) CN114 (C) XKP3091- C 2 4 6 8 10 12 14 16 18 20 1 3 5 7 9 11 13 15 17 19 21 (SBL) GNDA SBL GNDA SBR/SW (SL) GNDA...D255 UDZS13(B) D253 R280 0 Q254 470 R463 22K 2SC4081 (QR) Q260 R465 22K 4.7K GNDU VSX-916 VSX-816 VSX-916 ONLY ONLY R466 22K VSX-916 ONLY ONLY D253 VSX-816 : UDZS27(B) R464 VSX-816 : 0 FAN CONTROL VSX-916 : UDZS13(B) VSX-916 : 22K R442 100K C254 100/25 J22 3 -12V 2 GNDU 1 +12V CN251 ...
Service Manual
Page 22
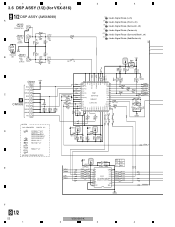
...2 3 4 5 6 7 8 SEL Y H XM L DIR R571 47 R570 100 R569 47 R568 100 R567 100 1 16 GNDD XMSW3 F B 1/2 22 VSX-816-K 1 2 3 4 1 2 3.6 DSP ASSY (1/2) (for VSX-816) B 1/2 DSP ASSY (AWX8699) A JA502 VKB1159 1 COAX(STBY) 2 JA501 1 AKB7173 (1/2) 3 RX0 COAX1 R514 0 L501 stby C503 0.01 YB R516 10 C501...(Surround L ch) (C) : Audio Signal Route (Center ch) (SBL) : Audio Signal Route (Surround Back L ch) (SW) : Audio Signal Route (SubWoofer ch) V3D V31 R629 stby L605 QTL1013 MC C618 47/6.3 C620 470p CH C619 0.1 YB C621 0.47 YB C614 YB 0.1 R627 10k C617 YB 1000p...
...2 3 4 5 6 7 8 SEL Y H XM L DIR R571 47 R570 100 R569 47 R568 100 R567 100 1 16 GNDD XMSW3 F B 1/2 22 VSX-816-K 1 2 3 4 1 2 3.6 DSP ASSY (1/2) (for VSX-816) B 1/2 DSP ASSY (AWX8699) A JA502 VKB1159 1 COAX(STBY) 2 JA501 1 AKB7173 (1/2) 3 RX0 COAX1 R514 0 L501 stby C503 0.01 YB R516 10 C501...(Surround L ch) (C) : Audio Signal Route (Center ch) (SBL) : Audio Signal Route (Surround Back L ch) (SW) : Audio Signal Route (SubWoofer ch) V3D V31 R629 stby L605 QTL1013 MC C618 47/6.3 C620 470p CH C619 0.1 YB C621 0.47 YB C614 YB 0.1 R627 10k C617 YB 1000p...
Service Manual
Page 33
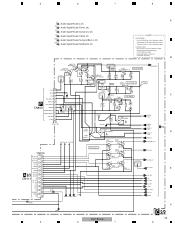
...Route (Surround L ch) (C) : Audio Signal Route (Center ch) (SBL) : Audio Signal Route (Surround Back L ch) (SW) : Audio Signal Route (SubWoofer ch) A NOTE 1.RESISTORS Unit:k-kΩ,M-MΩ or unless otherwise noted. Rated Voltage:50V except for electrolytic capacitors. SP-B RY R/C RY SP-A RY SP Relay ...FL AC1 -12V -VF FL_AC2 FL_AC1 GAV +12V NC (SW) +12V AC_WUP SWOUT GNDA NC -12V GNDV GNDU GNDT AC_RY GNDU (SW) 5 GNDA VSX-816-K 6 7 F C 2/2 33 8 B Q807(1/2) RN2903(1/2) Q808(1/2) RTN1903(1/2) Q807(2/2) RN2903(2/2) D807 1SS133 D+5.6V 5.6V IC805 BA178M05FP-TLB OUT IN D+5.6V...
...Route (Surround L ch) (C) : Audio Signal Route (Center ch) (SBL) : Audio Signal Route (Surround Back L ch) (SW) : Audio Signal Route (SubWoofer ch) A NOTE 1.RESISTORS Unit:k-kΩ,M-MΩ or unless otherwise noted. Rated Voltage:50V except for electrolytic capacitors. SP-B RY R/C RY SP-A RY SP Relay ...FL AC1 -12V -VF FL_AC2 FL_AC1 GAV +12V NC (SW) +12V AC_WUP SWOUT GNDA NC -12V GNDV GNDU GNDT AC_RY GNDU (SW) 5 GNDA VSX-816-K 6 7 F C 2/2 33 8 B Q807(1/2) RN2903(1/2) Q808(1/2) RTN1903(1/2) Q807(2/2) RN2903(2/2) D807 1SS133 D+5.6V 5.6V IC805 BA178M05FP-TLB OUT IN D+5.6V...


