
Operating Instructions
Page 4
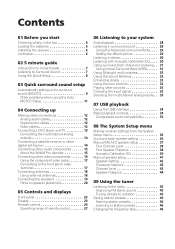
... System Setup menu Making receiver settings from the System Setup menu 36 Surround back speaker setting 36 Manual MCACC speaker setup 37 Fine Channel Level 38 Fine Speaker Distance 38 Acoustic Calibration EQ 39 Manual speaker setup 41 Speaker Setting 42 Crossover Network 43 Channel Level 43 Speaker Distance 44 09 Using...
... System Setup menu Making receiver settings from the System Setup menu 36 Surround back speaker setting 36 Manual MCACC speaker setup 37 Fine Channel Level 38 Fine Speaker Distance 38 Acoustic Calibration EQ 39 Manual speaker setup 41 Speaker Setting 42 Crossover Network 43 Channel Level 43 Speaker Distance 44 09 Using...
Operating Instructions
Page 7
... 28 for optimal surround sound. See Connecting a DVD player and TV on the front panel to STANDARD (see your DVD player's manual for more on page 28. Check the manual that DVD is showing in the middle of the action or concert. If it isn't, press DVD on the remote to set...
... 28 for optimal surround sound. See Connecting a DVD player and TV on the front panel to STANDARD (see your DVD player's manual for more on page 28. Check the manual that DVD is showing in the middle of the action or concert. If it isn't, press DVD on the remote to set...
Operating Instructions
Page 9
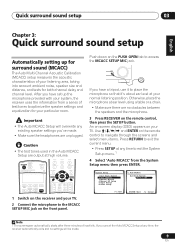
... up the microphone provided with your TV. 2 Connect the microphone to access the MCACC SETUP MIC jack. System Setup 1.Surr Back System 2.Auto MCACC 3.Manual MCACC 4.Manual SP Setup 5.Input Assign 6.Other Setup 2. Caution • The test tones used in the Auto MCACC Setup are no settings will overwrite any time to...
... up the microphone provided with your TV. 2 Connect the microphone to access the MCACC SETUP MIC jack. System Setup 1.Surr Back System 2.Auto MCACC 3.Manual MCACC 4.Manual SP Setup 5.Input Assign 6.Other Setup 2. Caution • The test tones used in the Auto MCACC Setup are no settings will overwrite any time to...
Operating Instructions
Page 10
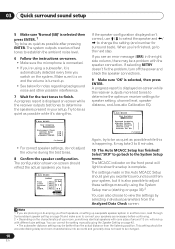
... the receiver outputs more test tones to finish. Make sure it is also possible to adjust these settings manually using the System Setup menu (starting on page 36).2 You can correct the setting manually using the Speaker Setting on -screen should give you 're using a subwoofer, it 's doing this is happening. The...
... the receiver outputs more test tones to finish. Make sure it is also possible to adjust these settings manually using the System Setup menu (starting on page 36).2 You can correct the setting manually using the Speaker Setting on -screen should give you 're using a subwoofer, it 's doing this is happening. The...
Operating Instructions
Page 17
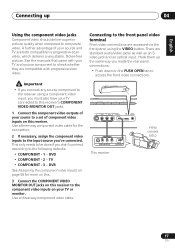
... the component video inputs to the input source you connect any source component to a set of your TV or monitor. TV • COMPONENT - 3 - See the manuals that came with progressive-scan video. This only needs to be done if you must also have your TV connected to this receiver to the...
... the component video inputs to the input source you connect any source component to a set of your TV or monitor. TV • COMPONENT - 3 - See the manuals that came with progressive-scan video. This only needs to be done if you must also have your TV connected to this receiver to the...
Operating Instructions
Page 33
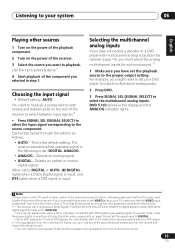
... 5.1ch shows in step 1. Turn down the volume of your TV so that the VIDEO input is selected). For more details, refer to the instruction manual supplied with DTS is the TV's built-in the following order: DIGITAL; Listening to your system 06 English Deutsch Français Italiano Nederlands Espa...
... 5.1ch shows in step 1. Turn down the volume of your TV so that the VIDEO input is selected). For more details, refer to the instruction manual supplied with DTS is the TV's built-in the following order: DIGITAL; Listening to your system 06 English Deutsch Français Italiano Nederlands Espa...
Operating Instructions
Page 36
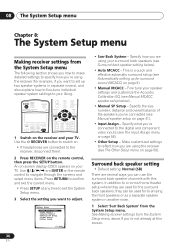
...setting you want to adjust. Make customized settings to reflect how you are using the receiver (see Surround back speaker setting below ). • Manual SP Setup - An on-screen display (OSD) appears on the remote control to navigate through the screens and select menu items. Press RETURN to... CONTROL TV VOL INPUT SELECT TV CH VOL 1 Switch on page 58). • Other Setup - System Setup 1.Surr Back System 2.Auto MCACC 3.Manual MCACC 4.Manual SP Setup 5.Input Assign 6.Other Setup : Exit • Surr Back System - Use the RECEIVER button to switch on. • If headphones are...
...setting you want to adjust. Make customized settings to reflect how you are using the receiver (see Surround back speaker setting below ). • Manual SP Setup - An on-screen display (OSD) appears on the remote control to navigate through the screens and select menu items. Press RETURN to... CONTROL TV VOL INPUT SELECT TV CH VOL 1 Switch on page 58). • Other Setup - System Setup 1.Surr Back System 2.Auto MCACC 3.Manual MCACC 4.Manual SP Setup 5.Input Assign 6.Other Setup : Exit • Surr Back System - Use the RECEIVER button to switch on. • If headphones are...
Operating Instructions
Page 37
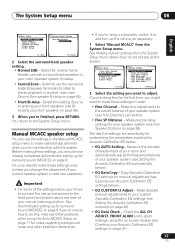
... (MCACC) on page 54). • Front Bi-Amp - Copy Acoustic Calibration EQ settings for surround sound (MCACC) on page 38). Manual MCACC speaker setup You can use with the system. Before making these settings once (unless you 're using a subwoofer, switch it about ... Second Zone - The System Setup menu 08 English Deutsch Français Italiano Nederlands Español System Setup 1.Surr Back System 2.Auto MCACC 3.Manual MCACC 4.Manual SP Setup 5.Input Assign 6.Other Setup 1.Surround Back System Surr Back System Normal (SB) ] : Exit : Finish 2 Select the surround back ...
... (MCACC) on page 54). • Front Bi-Amp - Copy Acoustic Calibration EQ settings for surround sound (MCACC) on page 38). Manual MCACC speaker setup You can use with the system. Before making these settings once (unless you 're using a subwoofer, switch it about ... Second Zone - The System Setup menu 08 English Deutsch Français Italiano Nederlands Español System Setup 1.Surr Back System 2.Auto MCACC 3.Manual MCACC 4.Manual SP Setup 5.Input Assign 6.Other Setup 1.Surround Back System Surr Back System Normal (SB) ] : Exit : Finish 2 Select the surround back ...
Operating Instructions
Page 38
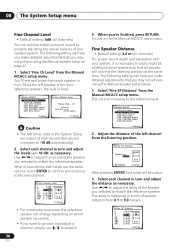
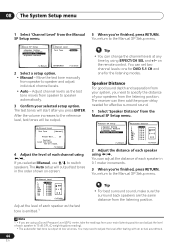
... Adjust f .EQ CUSTOM2 Adjust g.EQ Data Check :Return 2 Adjust the distance of the left speaker is the main reference speaker, the level is fixed. 3.Manual MCACC a.Fine Ch Level b.Fine SP Distance c.EQ AUTO Setting d.EQ Data Copy e.EQ CUSTOM1 Adjust f .EQ CUSTOM2 Adjust g.EQ Data Check :Return 3a....to -18 dB automatically). 2 Select each channel in turn and adjust the levels (+/- 10 dB) as necessary. You'll hear test tones from the Manual MCACC setup menu. Use / to adjust the delay of the speaker you selected to match the reference speaker. Use / to adjust the volume of the...
... Adjust f .EQ CUSTOM2 Adjust g.EQ Data Check :Return 2 Adjust the distance of the left speaker is the main reference speaker, the level is fixed. 3.Manual MCACC a.Fine Ch Level b.Fine SP Distance c.EQ AUTO Setting d.EQ Data Copy e.EQ CUSTOM1 Adjust f .EQ CUSTOM2 Adjust g.EQ Data Check :Return 3a....to -18 dB automatically). 2 Select each channel in turn and adjust the levels (+/- 10 dB) as necessary. You'll hear test tones from the Manual MCACC setup menu. Use / to adjust the delay of the speaker you selected to match the reference speaker. Use / to adjust the volume of the...
Operating Instructions
Page 39
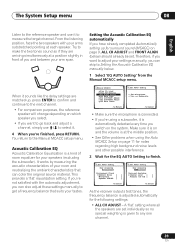
... position. • See Other problems when using the Auto MCACC Setup on and the volume is a kind of your settings manually, you can skip to any one channel. 39 En This provides a 'flat' equalization setting. Acoustic Calibration EQ Acoustic Calibration Equalization...you're finished, press RETURN. From the listening position, face the two speakers with the automatic adjustment, you can also adjust these settings manually to the Manual MCACC setup menu. Try to finish. 3c.EQ AUTO Setting Now Analyzing Environment Check Ambient Noise [ ] Microphone [ ] Speaker YES/...
... position. • See Other problems when using the Auto MCACC Setup on and the volume is a kind of your settings manually, you can skip to any one channel. 39 En This provides a 'flat' equalization setting. Acoustic Calibration EQ Acoustic Calibration Equalization...you're finished, press RETURN. From the listening position, face the two speakers with the automatic adjustment, you can also adjust these settings manually to the Manual MCACC setup menu. Try to finish. 3c.EQ AUTO Setting Now Analyzing Environment Check Ambient Noise [ ] Microphone [ ] Speaker YES/...
Operating Instructions
Page 40
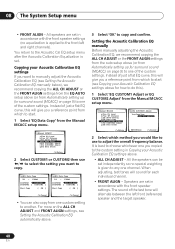
...Copy [ OK ] :Cancel :Cancel • You can be set . The sound of the custom settings. Setting the Acoustic Calibration EQ manually Before manually adjusting the Acoustic Calibration EQ, we recommend copying the ALL CH ADJUST or the FRONT ALIGN settings from the EQ AUTO setup above (or from... Adjust f .EQ CUSTOM2 Adjust g.EQ Data Check :Return 2 Select CUSTOM1 or CUSTOM2 then use / to select the setting you want to manually adjust the Acoustic Calibration EQ (see Setting the Acoustic Calibration EQ automatically above . • ALL CH ADJUST - All speakers are set in ...
...Copy [ OK ] :Cancel :Cancel • You can be set . The sound of the custom settings. Setting the Acoustic Calibration EQ manually Before manually adjusting the Acoustic Calibration EQ, we recommend copying the ALL CH ADJUST or the FRONT ALIGN settings from the EQ AUTO setup above (or from... Adjust f .EQ CUSTOM2 Adjust g.EQ Data Check :Return 2 Select CUSTOM1 or CUSTOM2 then use / to select the setting you want to manually adjust the Acoustic Calibration EQ (see Setting the Acoustic Calibration EQ automatically above . • ALL CH ADJUST - All speakers are set in ...
Operating Instructions
Page 41
... tones with the settings made in the System Setup are designed to fine-tune your current speaker system or add new speakers.). disappears from the Manual MCACC setup menu. 3e.EQ CUSTOM1 Adjust Test Tone Type: "ALL CH ADJUST" Left 40Hz : [+ 1.0dB ] 125Hz : [ 0.0dB ] 250Hz : [ 0.0dB ] 4kHz : [ ... 0.0dB :Return 2 Select the setting you want and adjust to your Acoustic Calibration EQ settings After you have completed an automatic or manual Acoustic Calibration EQ adjustment, you can compare the different settings. 3 Select the channels you want, pressing ENTER when you're finished checking...
... tones with the settings made in the System Setup are designed to fine-tune your current speaker system or add new speakers.). disappears from the Manual MCACC setup menu. 3e.EQ CUSTOM1 Adjust Test Tone Type: "ALL CH ADJUST" Left 40Hz : [+ 1.0dB ] 125Hz : [ 0.0dB ] 250Hz : [ 0.0dB ] 4kHz : [ ... 0.0dB :Return 2 Select the setting you want and adjust to your Acoustic Calibration EQ settings After you have completed an automatic or manual Acoustic Calibration EQ adjustment, you can compare the different settings. 3 Select the channels you want, pressing ENTER when you're finished checking...
Operating Instructions
Page 42
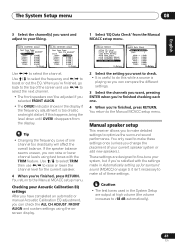
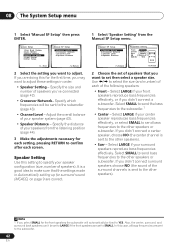
...the first time, you may want to adjust these settings in Automatically setting up for surround sound (MCACC) on page 9 are correct. 4.Manual SP Setup a.Speaker Setting b.Crossover Network c.Channel Level d.Speaker Distance 4a.Speaker Setting Front SMALL Center [ SMALL ] Surr [ SMALL ] ...confirm after each of the following speakers: • Front - System Setup 1.Surr Back System 2.Auto MCACC 3.Manual MCACC 4.Manual SP Setup 5.Input Assign 6.Other Setup 4.Manual SP Setup a.Speaker Setting b.Crossover Network c.Channel Level d.Speaker Distance : Exit :Return 2 Select the setting ...
...the first time, you may want to adjust these settings in Automatically setting up for surround sound (MCACC) on page 9 are correct. 4.Manual SP Setup a.Speaker Setting b.Crossover Network c.Channel Level d.Speaker Distance 4a.Speaker Setting Front SMALL Center [ SMALL ] Surr [ SMALL ] ...confirm after each of the following speakers: • Front - System Setup 1.Surr Back System 2.Auto MCACC 3.Manual MCACC 4.Manual SP Setup 5.Input Assign 6.Other Setup 4.Manual SP Setup a.Speaker Setting b.Crossover Network c.Channel Level d.Speaker Distance : Exit :Return 2 Select the setting ...
Operating Instructions
Page 43
Select SMALL to send bass frequencies to the Manual SP Setup menu. This may actually experience a decrease in the amount of bass due to NO. • If you...up to the left surround back terminal. 2 For more on the speaker placement of channels set to SMALL are output from the Manual SP Setup menu. 4.Manual SP Setup a.Speaker Setting b.Crossover Network c.Channel Level d.Speaker Distance 4b.Crossover Network Frequency 80Hz :Return :Finish 2 Choose the ... when YES is hooked up a home theater system. Note 1 • If the surround speakers are set to the Manual SP Setup menu.
Select SMALL to send bass frequencies to the Manual SP Setup menu. This may actually experience a decrease in the amount of bass due to NO. • If you...up to the left surround back terminal. 2 For more on the speaker placement of channels set to SMALL are output from the Manual SP Setup menu. 4.Manual SP Setup a.Speaker Setting b.Crossover Network c.Channel Level d.Speaker Distance 4b.Crossover Network Frequency 80Hz :Return :Finish 2 Choose the ... when YES is hooked up a home theater system. Note 1 • If the surround speakers are set to the Manual SP Setup menu.
Operating Instructions
Page 44
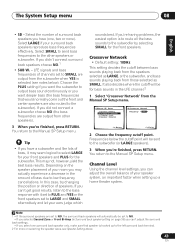
...Note 1 • If you 're finished, press RETURN. 08 The System Setup menu 1 Select 'Channel Level' from the Manual 5 When you need to adjust the level after you selected Manual, use / to 75 dB SPL (C-weighting/slow reading). • The subwoofer test tone is emitted.1 Tip • You can... change the channel levels at low volumes. Move the test tone manually from speaker to speaker automatically. 3 Confirm your main listening position and adjust the level of each speaker as the test tone moves from speaker to...
...Note 1 • If you 're finished, press RETURN. 08 The System Setup menu 1 Select 'Channel Level' from the Manual 5 When you need to adjust the level after you selected Manual, use / to 75 dB SPL (C-weighting/slow reading). • The subwoofer test tone is emitted.1 Tip • You can... change the channel levels at low volumes. Move the test tone manually from speaker to speaker automatically. 3 Confirm your main listening position and adjust the level of each speaker as the test tone moves from speaker to...
Operating Instructions
Page 45
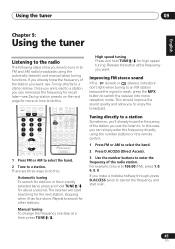
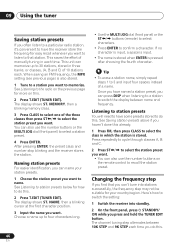
... into mono reception mode. For example, to tune to a station below. If you can simply enter the frequency directly using the automatic (search) and manual (step) tuning functions. Repeat to search for more on the remote control. 1 Press FM or AM to select the band. 2 Press D.ACCESS (Direct... radio broadcasts using the number buttons on how to do this case, you want, see Saving station presets on the next page for other stations. Manual tuning To change the frequency one . Release the button at a time, press TUNE / . There are tuned to a station you make a mistake ...
... into mono reception mode. For example, to tune to a station below. If you can simply enter the frequency directly using the automatic (search) and manual (step) tuning functions. Repeat to search for more on the remote control. 1 Press FM or AM to select the band. 2 Press D.ACCESS (Direct... radio broadcasts using the number buttons on how to do this case, you want, see Saving station presets on the next page for other stations. Manual tuning To change the frequency one . Release the button at a time, press TUNE / . There are tuned to a station you make a mistake ...
Operating Instructions
Page 46
... class and number stop blinking and the receiver stores the station. Choose a name up to 30 stations, stored in three banks, or classes, (A, B and C) of manually tuning in which the station is stored. See Saving station presets above if you haven't done this . Here's how to select the station preset you...
... class and number stop blinking and the receiver stores the station. Choose a name up to 30 stations, stored in three banks, or classes, (A, B and C) of manually tuning in which the station is stored. See Saving station presets above if you haven't done this . Here's how to select the station preset you...
Operating Instructions
Page 47
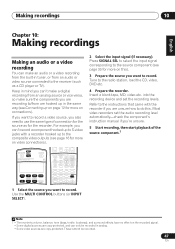
... to do this ). 3 Prepare the source you want to record. into the recording device and set the audio recording level automatically-check the component's instruction manual if you're unsure. 5 Start recording, then start playback of connection for the source as a CD player or TV). Insert a blank tape, MD, video etc...
... to do this ). 3 Prepare the source you want to record. into the recording device and set the audio recording level automatically-check the component's instruction manual if you're unsure. 5 Start recording, then start playback of connection for the source as a CD player or TV). Insert a blank tape, MD, video etc...
Operating Instructions
Page 55
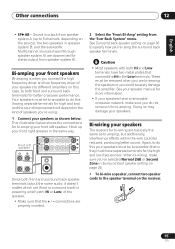
... it doesn't matter which part (Hi or Low) of the speaker. • Make sure that the + / - This illustration below . Front left speaker. See your speaker manual for more information. • If your speakers have two metal plates that is output from speaker system A (up your front right speaker in this (having...
... it doesn't matter which part (Hi or Low) of the speaker. • Make sure that the + / - This illustration below . Front left speaker. See your speaker manual for more information. • If your speakers have two metal plates that is output from speaker system A (up your front right speaker in this (having...
Operating Instructions
Page 58
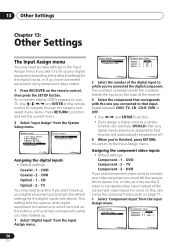
... for the digital inputs, or if you have hooked up to which you've connected the digital component. System Setup 1.Surr Back System 2.Auto MCACC 3.Manual MCACC 4.Manual SP Setup 5.Input Assign 6.Other Setup 5.Input Assign a.Digital Input b.Component Input : Exit :Return Assigning the digital inputs • Default settings: Coaxial - 1 - DVD Coaxial...
... for the digital inputs, or if you have hooked up to which you've connected the digital component. System Setup 1.Surr Back System 2.Auto MCACC 3.Manual MCACC 4.Manual SP Setup 5.Input Assign 6.Other Setup 5.Input Assign a.Digital Input b.Component Input : Exit :Return Assigning the digital inputs • Default settings: Coaxial - 1 - DVD Coaxial...


