
Operating Instructions
Page 4
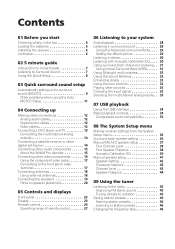
...jacks 17 Connecting to the front panel video terminal 17 Connecting antennas 18 Using external antennas 18 Connecting the speakers 19 Hints on speaker placement 20 05 Controls and displays Front panel 22 Display 23 Remote control 25 Operating range of remote control...The System Setup menu Making receiver settings from the System Setup menu 36 Surround back speaker setting 36 Manual MCACC speaker setup 37 Fine Channel Level 38 Fine Speaker Distance 38 Acoustic Calibration EQ 39 Manual speaker setup 41 Speaker Setting 42 Crossover Network 43 Channel Level 43 Speaker Distance 44...
...jacks 17 Connecting to the front panel video terminal 17 Connecting antennas 18 Using external antennas 18 Connecting the speakers 19 Hints on speaker placement 20 05 Controls and displays Front panel 22 Display 23 Remote control 25 Operating range of remote control...The System Setup menu Making receiver settings from the System Setup menu 36 Surround back speaker setting 36 Manual MCACC speaker setup 37 Fine Channel Level 38 Fine Speaker Distance 38 Acoustic Calibration EQ 39 Manual speaker setup 41 Speaker Setting 42 Crossover Network 43 Channel Level 43 Speaker Distance 44...
Operating Instructions
Page 5
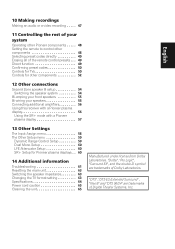
... 12 Other connections Second Zone speaker B setup 54 Switching the speaker system 54 Bi-amping your front speakers 55 Bi-wiring your speakers 55 Connecting additional amplifiers 56 Using this receiver with a Pioneer plasma display 56 Using the SR+ mode with a Pioneer plasma display 57 13 Other ...Input Assign menu 58 The Other Setup menu 59 Dynamic Range Control Setup 59 Dual Mono Setup 60 LFE Attenuator Setup 60 SR+ Setup for Pioneer plasma displays . . 60 14 Additional information Troubleshooting 61 Resetting the main unit 63 Switching the speaker impedance 63 Changing the TV ...
... 12 Other connections Second Zone speaker B setup 54 Switching the speaker system 54 Bi-amping your front speakers 55 Bi-wiring your speakers 55 Connecting additional amplifiers 56 Using this receiver with a Pioneer plasma display 56 Using the SR+ mode with a Pioneer plasma display 57 13 Other ...Input Assign menu 58 The Other Setup menu 59 Dynamic Range Control Setup 59 Dual Mono Setup 60 LFE Attenuator Setup 60 SR+ Setup for Pioneer plasma displays . . 60 14 Additional information Troubleshooting 61 Resetting the main unit 63 Switching the speaker impedance 63 Changing the TV ...
Operating Instructions
Page 7
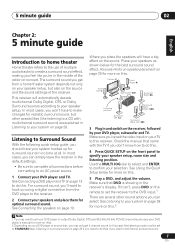
...MULTI JOG dial to select and ENTER to the DVD input.1 There are explained in no time at all connections before connecting to specify your speaker setup, room size and listening position. If it isn't, press DVD on page 28. 5 minute guide 02 English Deutsch Français Italiano Nederlands... Español Chapter 2: 5 minute guide Introduction to home theater Home theater refers to the use of multiple audio tracks to your speaker setup. This receiver will have a big effect on this .2 Note 1 You may only get from the DVD player to your system on the remote ...
...MULTI JOG dial to select and ENTER to the DVD input.1 There are explained in no time at all connections before connecting to specify your speaker setup, room size and listening position. If it isn't, press DVD on page 28. 5 minute guide 02 English Deutsch Français Italiano Nederlands... Español Chapter 2: 5 minute guide Introduction to home theater Home theater refers to the use of multiple audio tracks to your speaker setup. This receiver will have a big effect on this .2 Note 1 You may only get from the DVD player to your system on the remote ...
Operating Instructions
Page 8
... ST/DIRECT/ STANDARD SURR AUTO SURR LISTENING MODE DVD / LD TV/ SAT DVR / VCR STANDBY/ON PHONES DIMMER ANALOG MIDNIGHT/ ATT LOUDNESS SPEAKERS TUNING / STATION TUNER EDIT TONE QUICK SETUP SETUP MULTI JOG AUDIO/VIDEO MULTI-CHANNEL RECEIVER VSX-816 ENTER MULTI JOG DIGITAL PRECISION PROCESSING AUX SIGNAL SB ch ACOUSTIC SELECT PROCESSING EQ MCACC...
... ST/DIRECT/ STANDARD SURR AUTO SURR LISTENING MODE DVD / LD TV/ SAT DVR / VCR STANDBY/ON PHONES DIMMER ANALOG MIDNIGHT/ ATT LOUDNESS SPEAKERS TUNING / STATION TUNER EDIT TONE QUICK SETUP SETUP MULTI JOG AUDIO/VIDEO MULTI-CHANNEL RECEIVER VSX-816 ENTER MULTI JOG DIGITAL PRECISION PROCESSING AUX SIGNAL SB ch ACOUSTIC SELECT PROCESSING EQ MCACC...
Operating Instructions
Page 9
.... 2 Connect the microphone to optimize the speaker settings and equalization for your listening area, taking into account ambient noise, speaker size and distance, and tests for surround sound (MCACC) The Auto Multi-Channel Acoustic Calibration (MCACC) setup measures the acoustic characteristics of inactivity. Otherwise,... the information from the System Setup menu then press ENTER. After you cancel the Auto MCACC Setup at your TV. Important • The Auto MCACC Setup will be made . • Make sure the headphones are output at any existing speaker settings you have set up ...
.... 2 Connect the microphone to optimize the speaker settings and equalization for your listening area, taking into account ambient noise, speaker size and distance, and tests for surround sound (MCACC) The Auto Multi-Channel Acoustic Calibration (MCACC) setup measures the acoustic characteristics of inactivity. Otherwise,... the information from the System Setup menu then press ENTER. After you cancel the Auto MCACC Setup at your TV. Important • The Auto MCACC Setup will be made . • Make sure the headphones are output at any existing speaker settings you have set up ...
Operating Instructions
Page 10
...A progress report is displayed on-screen while the receiver outputs test tones to determine the speakers present in the Auto MCACC Setup should give you excellent surround sound from your room, sometimes identical speakers with cone sizes of test tones to establish the ambient noise level. 6 Follow the...necessary before continuing. 2 • Depending on the characteristics of your system, but it is turned up with the speaker connection. If you are planning on bi-amping your setup. A progress report is displayed on the front panel will end up . • See below for notes regarding ...
...A progress report is displayed on-screen while the receiver outputs test tones to determine the speakers present in the Auto MCACC Setup should give you excellent surround sound from your room, sometimes identical speakers with cone sizes of test tones to establish the ambient noise level. 6 Follow the...necessary before continuing. 2 • Depending on the characteristics of your system, but it is turned up with the speaker connection. If you are planning on bi-amping your setup. A progress report is displayed on the front panel will end up . • See below for notes regarding ...
Operating Instructions
Page 11
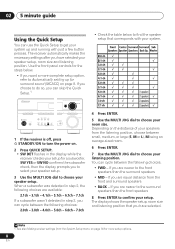
...not optimal for more on this seems to the System Setup menu. The overall balance of your speaker system (see page 39 for the Auto MCACC Setup (too much background noise, echo off the walls, obstacles blocking the speakers from the listening position (see page 42 for more ... necessary. English Deutsch Français Italiano Nederlands Español Quick surround sound setup 03 • Speaker Setting - The size and number of the microphone. Check for more on this ) • Speaker Distance - If there are any instructions showing in the front panel display, please ...
...not optimal for more on this seems to the System Setup menu. The overall balance of your speaker system (see page 39 for the Auto MCACC Setup (too much background noise, echo off the walls, obstacles blocking the speakers from the listening position (see page 42 for more ... necessary. English Deutsch Français Italiano Nederlands Español Quick surround sound setup 03 • Speaker Setting - The size and number of the microphone. Check for more on this ) • Speaker Distance - If there are any instructions showing in the front panel display, please ...
Operating Instructions
Page 19
... match those on the speakers.2 You can use speakers with just two stereo speakers (the front speakers in the diagram) but everyone's home setup will work with an impedance of eight speakers (including the subwoofer) is twisted together and inserted fully into the speaker terminal. Use good quality speaker wire to connect the speakers to use speakers with a nominal impedance...
... match those on the speakers.2 You can use speakers with just two stereo speakers (the front speakers in the diagram) but everyone's home setup will work with an impedance of eight speakers (including the subwoofer) is twisted together and inserted fully into the speaker terminal. Use good quality speaker wire to connect the speakers to use speakers with a nominal impedance...
Operating Instructions
Page 21
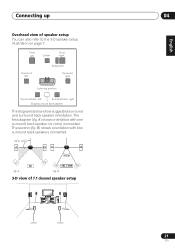
...Front left Center Front right Surround left Subwoofer Surround right Listening position Surround back left Surround back right Single surround back speaker . B 3-D view of speaker setup You can also refer to 60 LS SB fig. The second (fig. A RS SBL SBL SBR SBR fig... Deutsch Français Italiano Nederlands Español Connecting up 04 Overhead view of 7.1 channel speaker setup 21 En The diagrams below show suggested surround and surround back speaker orientation. B) shows orientation with one surround back speaker (or none) connected. The first diagram (fig.
...Front left Center Front right Surround left Subwoofer Surround right Listening position Surround back left Surround back right Single surround back speaker . B 3-D view of speaker setup You can also refer to 60 LS SB fig. The second (fig. A RS SBL SBL SBR SBR fig... Deutsch Français Italiano Nederlands Español Connecting up 04 Overhead view of 7.1 channel speaker setup 21 En The diagrams below show suggested surround and surround back speaker orientation. B) shows orientation with one surround back speaker (or none) connected. The first diagram (fig.
Operating Instructions
Page 22
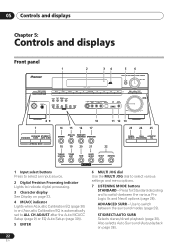
... MULTI-CHANNEL RECEIVER VSX-816 ENTER MULTI JOG DVD / LD TV / SAT DVR / VCR VIDEO DIGITAL PRECISION PROCESSING CD CD-R / TAPE / MD FM AM USB AUX SIGNAL SB ch ACOUSTIC SELECT PROCESSING EQ DIMMER ANALOG MIDNIGHT/ ATT LOUDNESS SPEAKERS TUNING / STATION TUNER EDIT TONE QUICK SETUP SETUP RETURN MULTI JOG ...MODE 10 14 15 16 17 DIMMER ANALOG MIDNIGHT/ ATT LOUDNESS SPEAKERS 11 12 13 23 24 25 SIGNAL SB ch ACOUSTIC SELECT PROCESSING EQ 18 19 20 21 22 TUNING / STATION TUNER EDIT TONE QUICK SETUP SETUP RETURN MULTI JOG 1 Input select buttons Press to select an ...
... MULTI-CHANNEL RECEIVER VSX-816 ENTER MULTI JOG DVD / LD TV / SAT DVR / VCR VIDEO DIGITAL PRECISION PROCESSING CD CD-R / TAPE / MD FM AM USB AUX SIGNAL SB ch ACOUSTIC SELECT PROCESSING EQ DIMMER ANALOG MIDNIGHT/ ATT LOUDNESS SPEAKERS TUNING / STATION TUNER EDIT TONE QUICK SETUP SETUP RETURN MULTI JOG ...MODE 10 14 15 16 17 DIMMER ANALOG MIDNIGHT/ ATT LOUDNESS SPEAKERS 11 12 13 23 24 25 SIGNAL SB ch ACOUSTIC SELECT PROCESSING EQ 18 19 20 21 22 TUNING / STATION TUNER EDIT TONE QUICK SETUP SETUP RETURN MULTI JOG 1 Input select buttons Press to select an ...
Operating Instructions
Page 23
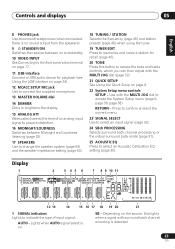
... AUTO signal select is on the source, this lights when a signal with surround back channel encoding is no sound output from the speakers). 9 STANDBY/ON Switches the receiver between on and standby. 10 VIDEO INPUT See Connecting to the front panel video terminal on page... (lowers) the level of input signal: AUTO - SB - Depending on . Use with the MULTI JOG dial (page 32). 21 QUICK SETUP See Using the Quick Setup on page 8. 22 System Setup menu controls SETUP - Display 1 2 3 45 6 7 8 9 10 11 [L] 6 [C] SP AB [ R ] [R s ] [SBR] 0 [S B L ] [L s ] 6 4 0 125 25 0 4 K1 3 K 12 13...
... AUTO signal select is on the source, this lights when a signal with surround back channel encoding is no sound output from the speakers). 9 STANDBY/ON Switches the receiver between on and standby. 10 VIDEO INPUT See Connecting to the front panel video terminal on page... (lowers) the level of input signal: AUTO - SB - Depending on . Use with the MULTI JOG dial (page 32). 21 QUICK SETUP See Using the Quick Setup on page 8. 22 System Setup menu controls SETUP - Display 1 2 3 45 6 7 8 9 10 11 [L] 6 [C] SP AB [ R ] [R s ] [SBR] 0 [S B L ] [L s ] 6 4 0 125 25 0 4 K1 3 K 12 13...
Operating Instructions
Page 28
... decoded accordingly using Neo:6 CINEMA or 2 Pro Logic IIx MOVIE (see also Using surround back channel processing on your speaker setup and the type of a source. Check the digital format indicators in the display. AUTOSURR. If necessary, press repeatedly to select a ... movie sources • Neo:6 MUSIC - 6.1 channel sound, especially suited to music sources With multichannel sources, if you have connected surround back speaker(s) and have selected SB ON, you can select (according to . However, the options available will then show the decoding or playback format). ...
... decoded accordingly using Neo:6 CINEMA or 2 Pro Logic IIx MOVIE (see also Using surround back channel processing on your speaker setup and the type of a source. Check the digital format indicators in the display. AUTOSURR. If necessary, press repeatedly to select a ... movie sources • Neo:6 MUSIC - 6.1 channel sound, especially suited to music sources With multichannel sources, if you have connected surround back speaker(s) and have selected SB ON, you can select (according to . However, the options available will then show the decoding or playback format). ...
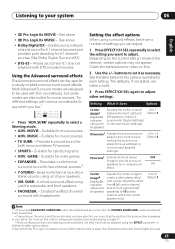
Operating Instructions
Page 29
... when using just the subwoofer and front speakers. • PHONESUR. - Creates surround...A virtual surround effect using a center speaker) Adjusts the center image to create...speaker) Spreads the center channel between the front right and left speakers) to 10 (center channel sent to the center speaker...Extends the front stereo OFF image to include surround speakers for 6.1 channel sources (like .1 CH CH...front right and left speakers, making the sound... sound balance from the surround back speakers in Setting the effect options above...to your speakers. • VIR. See above &#...
... when using just the subwoofer and front speakers. • PHONESUR. - Creates surround...A virtual surround effect using a center speaker) Adjusts the center image to create...speaker) Spreads the center channel between the front right and left speakers) to 10 (center channel sent to the center speaker...Extends the front stereo OFF image to include surround speakers for 6.1 channel sources (like .1 CH CH...front right and left speakers, making the sound... sound balance from the surround back speakers in Setting the effect options above...to your speakers. • VIR. See above &#...
Operating Instructions
Page 30
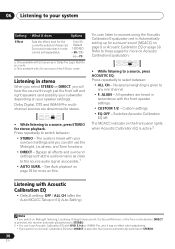
...panel lights when Acoustic Calibration EQ is active.2 Listening with Acoustic Calibration EQ • Default setting: OFF / ALL CH (after the Auto MCACC Setup or EQ Auto Setting) Note 1 If you switch on Midnight listening, Loudness, Dialog Enhancement, the Sound Retriever, or the Tone controls when ... (each mode can be set in accordance with your surround settings and you will hear the source through just the front left and right speakers (and possibly your speaker settings). ALIGN - STANDARD ADV.SURR STEREO AUTO SURR • While listening to 90 Default: 7-STEREO - 90 / Others - 70 a ...
...panel lights when Acoustic Calibration EQ is active.2 Listening with Acoustic Calibration EQ • Default setting: OFF / ALL CH (after the Auto MCACC Setup or EQ Auto Setting) Note 1 If you switch on Midnight listening, Loudness, Dialog Enhancement, the Sound Retriever, or the Tone controls when ... (each mode can be set in accordance with your surround settings and you will hear the source through just the front left and right speakers (and possibly your speaker settings). ALIGN - STANDARD ADV.SURR STEREO AUTO SURR • While listening to 90 Default: 7-STEREO - 90 / Others - 70 a ...
Operating Instructions
Page 36
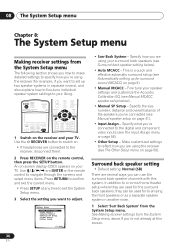
.... Specify how you want to confirm and exit the current menu. • Press SETUP at this system. This is a quick and effective automatic surround setup (see Manual MCACC speaker setup below ). • Auto MCACC - In addition to the receiver, disconnect them. 2 Press RECEIVER on the remote control to navigate through the screens and select...
.... Specify how you want to confirm and exit the current menu. • Press SETUP at this system. This is a quick and effective automatic surround setup (see Manual MCACC speaker setup below ). • Auto MCACC - In addition to the receiver, disconnect them. 2 Press RECEIVER on the remote control to navigate through the screens and select...
Operating Instructions
Page 37
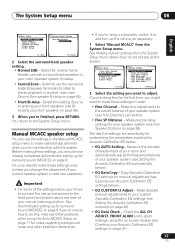
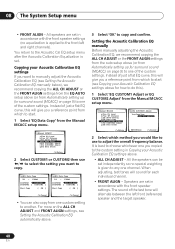
...EQ CUSTOM1/2 Adjust - Select this screen. Make fine adjustments to adjust. Copy Acoustic Calibration EQ settings for manual adjustment (see Copying your speaker system (see Second Zone speaker B setup on page 55). 3 When you 're unsure how to do this for surround sound (MCACC) on page 9 if you 're finished..., press RETURN. Manual MCACC speaker setup You can use the (surround back) B speaker terminals to listen to the front panel and place it on page 40). • EQ Data Check - If you're ...
...EQ CUSTOM1/2 Adjust - Select this screen. Make fine adjustments to adjust. Copy Acoustic Calibration EQ settings for manual adjustment (see Copying your speaker system (see Second Zone speaker B setup on page 55). 3 When you 're unsure how to do this for surround sound (MCACC) on page 9 if you 're finished..., press RETURN. Manual MCACC speaker setup You can use the (surround back) B speaker terminals to listen to the front panel and place it on page 40). • EQ Data Check - If you're ...
Operating Instructions
Page 38
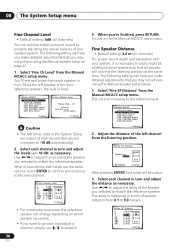
...Use / to adjust the delay of the speaker you may not achieve using the Manual speaker setup below. 1 Select 'Fine SP Distance' from the Manual MCACC setup menu. Loud test tones will be output. :Cancel Caution • The test tones used in the System Setup are the same volume, press ENTER to confirm.... When it is necessary to add a slight bit of delay to some speakers so that you selected to adjust the volume of the speaker you may not achieve using the Manual speaker setup on which speaker you select. • If you want to go back and adjust a channel, simply use / to select...
...Use / to adjust the delay of the speaker you may not achieve using the Manual speaker setup below. 1 Select 'Fine SP Distance' from the Manual MCACC setup menu. Loud test tones will be output. :Cancel Caution • The test tones used in the System Setup are the same volume, press ENTER to confirm.... When it is necessary to add a slight bit of delay to some speakers so that you selected to adjust the volume of the speaker you may not achieve using the Manual speaker setup on which speaker you select. • If you want to go back and adjust a channel, simply use / to select...
Operating Instructions
Page 39
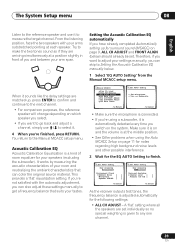
...and FRONT ALIGN (below . 1 Select 'EQ AUTO Setting' from the Manual MCACC setup menu. A 'flat' setting where all the speakers are arriving simultaneously at the middle position. • See Other problems when using the Auto MCACC Setup on the system. Therefore, if you want to go back and adjust a channel... material. Try to make the two tones sound as if they are set . The System Setup menu 08 English Deutsch Français Italiano Nederlands Español Listen to the reference speaker and use / to select it to measure the target channel. From the listening position, face...
...and FRONT ALIGN (below . 1 Select 'EQ AUTO Setting' from the Manual MCACC setup menu. A 'flat' setting where all the speakers are arriving simultaneously at the middle position. • See Other problems when using the Auto MCACC Setup on the system. Therefore, if you want to go back and adjust a channel... material. Try to make the two tones sound as if they are set . The System Setup menu 08 English Deutsch Français Italiano Nederlands Español Listen to the reference speaker and use / to select it to measure the target channel. From the listening position, face...
Operating Instructions
Page 40
...CH ADJUST or the FRONT ALIGN settings from the EQ AUTO setup above . • ALL CH ADJUST - When adjusting, test tones will sound for surround sound (MCACC) on page 9) to the front left front (reference) speaker and the target speaker. 40 En For more on the ALL CH ADJUST and ...Acoustic Calibration EQ, we recommend copying the ALL CH ADJUST or the FRONT ALIGN settings from the auto setup above . 3 Select 'OK' to another. 08 The System Setup menu • FRONT ALIGN - All speakers are set independently so no equalization is given to any one custom setting to copy and confirm...
...CH ADJUST or the FRONT ALIGN settings from the EQ AUTO setup above . • ALL CH ADJUST - When adjusting, test tones will sound for surround sound (MCACC) on page 9) to the front left front (reference) speaker and the target speaker. 40 En For more on the ALL CH ADJUST and ...Acoustic Calibration EQ, we recommend copying the ALL CH ADJUST or the FRONT ALIGN settings from the auto setup above . 3 Select 'OK' to another. 08 The System Setup menu • FRONT ALIGN - All speakers are set independently so no equalization is given to any one custom setting to copy and confirm...
Operating Instructions
Page 41
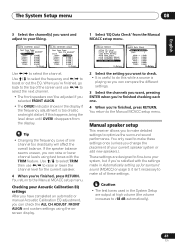
... only need to select the next channel. • The front speakers can compare the different settings. 3 Select the channels you 're satisfied with the TRIM feature. Caution • The test tones used in the System Setup are designed to optimize the surround sound performance. Use / to select the frequency and ... you 're finished, go back to do this happens, bring the level down until OVER! You return to select the channel. Manual speaker setup This receiver allows you 're finished, press RETURN. These settings are output at high volume (the volume increases to raise or lower the...
... only need to select the next channel. • The front speakers can compare the different settings. 3 Select the channels you 're satisfied with the TRIM feature. Caution • The test tones used in the System Setup are designed to optimize the surround sound performance. Use / to select the frequency and ... you 're finished, go back to do this happens, bring the level down until OVER! You return to select the channel. Manual speaker setup This receiver allows you 're finished, press RETURN. These settings are output at high volume (the volume increases to raise or lower the...


