
Owner's Manual
Page 4
... antenna 22 AM loop antenna 22 Using external antennas 22 Connecting the speakers 23 Hints on speaker placement 24 AC outlet 25 Operating other Pioneer components 26 05 Controls and displays Front panel 27 Display 29 Remote control 30 Operating range of remote control unit . . . 33 ...menu Making receiver settings from the System Setup menu 43 Surround back speaker setting 43 Manual MCACC speaker setup 44 Fine Channel Level 44 Fine Channel Distance 45 Acoustic Calibration EQ 46 Manual speaker setup 48 Speaker setting 48 Crossover network 49 Channel level 49 Speaker Distance ...
... antenna 22 AM loop antenna 22 Using external antennas 22 Connecting the speakers 23 Hints on speaker placement 24 AC outlet 25 Operating other Pioneer components 26 05 Controls and displays Front panel 27 Display 29 Remote control 30 Operating range of remote control unit . . . 33 ...menu Making receiver settings from the System Setup menu 43 Surround back speaker setting 43 Manual MCACC speaker setup 44 Fine Channel Level 44 Fine Channel Distance 45 Acoustic Calibration EQ 46 Manual speaker setup 48 Speaker setting 48 Crossover network 49 Channel level 49 Speaker Distance ...

Owner's Manual
Page 10
... speaker cable you may need to your system on page 34 for more on this . 5 Press QUICK SETUP on your selection. Place your DVD player's manual for more on this). 3 Depending on the front panel to this ) if you don't know how to output Dolby Digital, DTS and 88.2/96kHz PCM...) audio (see Listening in the receiver and switch it isn't, press DVD/LD on your TV to specify your subwoofer and the TV. Check the manual that came with the exposed wire strands twisted together (fig. Note 1 See also Making receiver settings from each wire, with the TV if you want...
... speaker cable you may need to your system on page 34 for more on this . 5 Press QUICK SETUP on your selection. Place your DVD player's manual for more on this). 3 Depending on the front panel to this ) if you don't know how to output Dolby Digital, DTS and 88.2/96kHz PCM...) audio (see Listening in the receiver and switch it isn't, press DVD/LD on your TV to specify your subwoofer and the TV. Check the manual that came with the exposed wire strands twisted together (fig. Note 1 See also Making receiver settings from each wire, with the TV if you want...

Owner's Manual
Page 13
Make sure the subwoofer has been switched on and volume on the subwoofer is also possible to adjust these settings manually using the Speaker setting on page 48. • The subwoofer distance setting may result in incorrect speaker settings. To exit and check your speaker system..., and check the problem indicated by checking the subwoofer level. • If the subwoofer output level is too high, NOISY! You can correct the setting manually using the System Setup menu (starting on this ) • CHK LEVEL - When you 're prompted to check the settings: • CHK SP - The Auto...
Make sure the subwoofer has been switched on and volume on the subwoofer is also possible to adjust these settings manually using the Speaker setting on page 48. • The subwoofer distance setting may result in incorrect speaker settings. To exit and check your speaker system..., and check the problem indicated by checking the subwoofer level. • If the subwoofer output level is too high, NOISY! You can correct the setting manually using the System Setup menu (starting on this ) • CHK LEVEL - When you 're prompted to check the settings: • CHK SP - The Auto...
Owner's Manual
Page 21
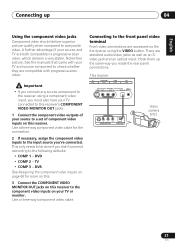
... VIDEO INPUT L AUDIO R MCACC DIGITAL IN SETUP MIC V L R VIDEO OUTPUT DIGITAL OUT Video camera (etc.) 21 En Use a three-way component video cable. See the manuals that came with your TV and source component to the front panel video terminal Front video connections are both compatible) is progressive-scan video, which...
... VIDEO INPUT L AUDIO R MCACC DIGITAL IN SETUP MIC V L R VIDEO OUTPUT DIGITAL OUT Video camera (etc.) 21 En Use a three-way component video cable. See the manuals that came with your TV and source component to the front panel video terminal Front video connections are both compatible) is progressive-scan video, which...

Owner's Manual
Page 24
... about 3/8 in . (10mm) fig. Caution • If you 're using is switched on. C • The speaker terminals also accept single banana plugs. (Refer to speaker manual for bigger rooms. • Surround and surround back speakers should be placed near the TV, we recommend using a center speaker, place the front speakers at...
... about 3/8 in . (10mm) fig. Caution • If you 're using is switched on. C • The speaker terminals also accept single banana plugs. (Refer to speaker manual for bigger rooms. • Surround and surround back speakers should be placed near the TV, we recommend using a center speaker, place the front speakers at...

Owner's Manual
Page 38
... Digital, PCM (32kHz-96 kHz), WMA9 Pro and DTS digital signal formats. Selects the analog inputs. • DIGITAL - For more details, refer to the instruction manual supplied with DTS is input. This automatically switches to select between input signals.1 ADVANCED ST/DIRECT SIGNAL STANDARD SURR /AUTO SURR SELECT LISTENING MODE 1 Press...
... Digital, PCM (32kHz-96 kHz), WMA9 Pro and DTS digital signal formats. Selects the analog inputs. • DIGITAL - For more details, refer to the instruction manual supplied with DTS is input. This automatically switches to select between input signals.1 ADVANCED ST/DIRECT SIGNAL STANDARD SURR /AUTO SURR SELECT LISTENING MODE 1 Press...

Owner's Manual
Page 43
...separate rooms), and also explains how to fine-tune individual speaker system settings to your speaker settings and customize the Acoustic Calibration EQ (see Manual MCACC speaker setup below ). RECEIVER INPUT SELECT SOURCE DVD/LD TV/SAT DVR/VCR TVCONT MULTI CONTROL CD CD-R/TAPE TUNER RECEIVER FL DIMMER ...The following section shows you how to make detailed settings to specify how you're using the receiver (for example, if you 've connected (see Manual speaker setup on page 48). • IN ASSIG. - Select for bi-amping the front speakers or as a separate speaker system in your ...
...separate rooms), and also explains how to fine-tune individual speaker system settings to your speaker settings and customize the Acoustic Calibration EQ (see Manual MCACC speaker setup below ). RECEIVER INPUT SELECT SOURCE DVD/LD TV/SAT DVR/VCR TVCONT MULTI CONTROL CD CD-R/TAPE TUNER RECEIVER FL DIMMER ...The following section shows you how to make detailed settings to specify how you're using the receiver (for example, if you 've connected (see Manual speaker setup on page 48). • IN ASSIG. - Select for bi-amping the front speakers or as a separate speaker system in your ...

Owner's Manual
Page 44
...following setting can achieve better surround sound by properly adjusting the overall balance of your Acoustic Calibration EQ settings on page 12. Manual MCACC speaker setup You can use the (surround back) B speaker terminals to listen to adjust. Measure the acoustic characteristics of ... possible interference. • If you 're finished, press RETURN. See Making receiver settings from the System Setup menu. Make detailed manual adjustments to the System Setup menu. Important • For some of your speaker system. Also see Copying your front speakers on page...
...following setting can achieve better surround sound by properly adjusting the overall balance of your Acoustic Calibration EQ settings on page 12. Manual MCACC speaker setup You can use the (surround back) B speaker terminals to listen to adjust. Measure the acoustic characteristics of ... possible interference. • If you 're finished, press RETURN. See Making receiver settings from the System Setup menu. Make detailed manual adjustments to the System Setup menu. Important • For some of your speaker system. Also see Copying your front speakers on page...

Owner's Manual
Page 45
...When you 're finished, press RETURN. Use / (cursor up /down ) to adjust the delay of the selected speaker to match the reference speaker. from the Manual MCACC setup menu. 2 Use / (cursor up , press (cursor right) to confirm and continue to the next channel. • For comparison purposes, the ... channel. • For comparison purposes, the reference speaker will change depending on page 12. 1 Select 'CH DISTN.' You will return to the Manual MCACC setup menu. Use / (cursor up /down ) to adjust the volume of the selected speaker to match the reference speaker. The delay is...
...When you 're finished, press RETURN. Use / (cursor up /down ) to adjust the delay of the selected speaker to match the reference speaker. from the Manual MCACC setup menu. 2 Use / (cursor up , press (cursor right) to confirm and continue to the next channel. • For comparison purposes, the ... channel. • For comparison purposes, the reference speaker will change depending on page 12. 1 Select 'CH DISTN.' You will return to the Manual MCACC setup menu. Use / (cursor up /down ) to adjust the volume of the selected speaker to match the reference speaker. The delay is...

Owner's Manual
Page 46
...front speaker settings (no special weighting is given to copy and confirm. You will give you can also adjust these settings manually to manually adjust the Acoustic Calibration EQ (see Setting the Acoustic Calibration EQ automatically above (or from one of just a flat EQ...notes regarding high background noise levels and other possible interference. 2 Wait for the Auto MCACC Setup to Setting the Acoustic Calibration EQ manually below ), we recommend copying the A. 07 The System Setup menu Acoustic Calibration EQ Acoustic Calibration Equalization is adjusted automatically for the ...
...front speaker settings (no special weighting is given to copy and confirm. You will give you can also adjust these settings manually to manually adjust the Acoustic Calibration EQ (see Setting the Acoustic Calibration EQ automatically above (or from one of just a flat EQ...notes regarding high background noise levels and other possible interference. 2 Wait for the Auto MCACC Setup to Setting the Acoustic Calibration EQ manually below ), we recommend copying the A. 07 The System Setup menu Acoustic Calibration EQ Acoustic Calibration Equalization is adjusted automatically for the ...

Owner's Manual
Page 47
... the different settings. 3 Use / (cursor up/down) to select the channel you want to use / (cursor up/down until OVER!! disappears from the Manual MCACC setup menu. 2 Use / (cursor up /down) to proceed to the next channel. • The front speakers can't be set in Copying your...drastically will sound for the current speaker. 4 When you want and adjust to your Acoustic Calibration EQ settings After you have completed an automatic or manual Acoustic Calibration EQ adjustment, you want to check. • It is too drastic and might distort. When you're finished, use the / ...
... the different settings. 3 Use / (cursor up/down) to select the channel you want to use / (cursor up/down until OVER!! disappears from the Manual MCACC setup menu. 2 Use / (cursor up /down) to proceed to the next channel. • The front speakers can't be set in Copying your...drastically will sound for the current speaker. 4 When you want and adjust to your Acoustic Calibration EQ settings After you have completed an automatic or manual Acoustic Calibration EQ adjustment, you want to check. • It is too drastic and might distort. When you're finished, use the / ...

Owner's Manual
Page 48
... your center speaker reproduces bass frequencies effectively, or select SMALL to send bass frequencies to the other speakers or subwoofer. 07 The System Setup menu Manual speaker setup This receiver allows you are doing this for the front speakers the subwoofer will be sent to the subwoofer (see notes below ). •...
... your center speaker reproduces bass frequencies effectively, or select SMALL to send bass frequencies to the other speakers or subwoofer. 07 The System Setup menu Manual speaker setup This receiver allows you are doing this for the front speakers the subwoofer will be sent to the subwoofer (see notes below ). •...

Owner's Manual
Page 49
... easiest option is hooked up a home theater system. 1 Select CH LEVEL from speaker to speaker and adjust individual channel levels. • T. Move the test tone manually from the SP SETUP menu. 2 Use / (cursor up/down ) to switch speakers. If you selected T. TONE A. - setup will output test tones in Surround back speaker...
... easiest option is hooked up a home theater system. 1 Select CH LEVEL from speaker to speaker and adjust individual channel levels. • T. Move the test tone manually from the SP SETUP menu. 2 Use / (cursor up/down ) to switch speakers. If you selected T. TONE A. - setup will output test tones in Surround back speaker...
Owner's Manual
Page 51
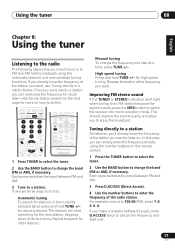
...EFFECT /CH SEL LEVEL RECEIVER 1 Press TUNER to select the tuner. 2 Use the BAND button to switch the receiver into mono reception mode. Manual tuning To change the frequency one step at the frequency you make a mistake halfway through, press D.ACCESS twice to cancel the frequency and start ... band (FM or AM), if necessary. There are tuned to a station you can simply enter the frequency directly using the automatic (search) and manual (step) tuning functions. This should improve the sound quality and allow you want to listen to. In this . Each press switches the band between...
...EFFECT /CH SEL LEVEL RECEIVER 1 Press TUNER to select the tuner. 2 Use the BAND button to switch the receiver into mono reception mode. Manual tuning To change the frequency one step at the frequency you make a mistake halfway through, press D.ACCESS twice to cancel the frequency and start ... band (FM or AM), if necessary. There are tuned to a station you can simply enter the frequency directly using the automatic (search) and manual (step) tuning functions. This should improve the sound quality and allow you want to listen to. In this . Each press switches the band between...
Owner's Manual
Page 52
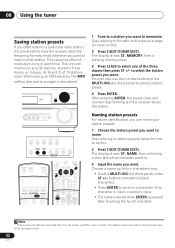
This saves the effort of manually tuning in three banks, or classes, (A, B and C) of the three classes then press ST +/- This unit can memorize up to four characters long. • Use ...
This saves the effort of manually tuning in three banks, or classes, (A, B and C) of the three classes then press ST +/- This unit can memorize up to four characters long. • Use ...

Owner's Manual
Page 54
..., treble, loudness), and surround effects have no effect on connections). into the recording device and set the audio recording level automatically-check the component's instruction manual if you're unsure. 5 Start recording, then start playback of connection for more on the recorded signal. • Some digital sources are unsure how to...
..., treble, loudness), and surround effects have no effect on connections). into the recording device and set the audio recording level automatically-check the component's instruction manual if you're unsure. 5 Start recording, then start playback of connection for more on the recorded signal. • Some digital sources are unsure how to...

Owner's Manual
Page 63
... same way. See Surround back speaker setting on the kind of speakers you do this case, to 5 channels, depending on the receiver. See your speaker manual for more information. • If your speakers The reasons for high and low) and the sound improvement will depend on page 43 to the Low...
... same way. See Surround back speaker setting on the kind of speakers you do this case, to 5 channels, depending on the receiver. See your speaker manual for more information. • If your speakers The reasons for high and low) and the sound improvement will depend on page 43 to the Low...

Owner's Manual
Page 69
... nearest Pioneer authorized independent service company to carry out repair work. • If the unit does not operate normally due to normal operating conditions. No sound is output when a function is selected. • Make sure the component is something wrong with the TV. • VSX-915 ...correctly (refer to Connecting up on page 15). • Press MUTE on page 62). • Press SIGNAL SELECT to the instruction manual supplied with this . 69 En English Deutsch Français Italiano Nederlands Español Additional information 13 Chapter 13: Additional information ...
... nearest Pioneer authorized independent service company to carry out repair work. • If the unit does not operate normally due to normal operating conditions. No sound is output when a function is selected. • Make sure the component is something wrong with the TV. • VSX-915 ...correctly (refer to Connecting up on page 15). • Press MUTE on page 62). • Press SIGNAL SELECT to the instruction manual supplied with this . 69 En English Deutsch Français Italiano Nederlands Español Additional information 13 Chapter 13: Additional information ...

Owner's Manual
Page 70
... up. • The Dolby Digital or DTS source you are set the SIGNAL SELECT to DIGITAL (refer to page 38). • Refer to the instruction manual supplied with the DVD player. 70 En disappears. No sound from equipment causing the noise. No sound from subwoofer. • Make sure the subwoofer is...
... up. • The Dolby Digital or DTS source you are set the SIGNAL SELECT to DIGITAL (refer to page 38). • Refer to the instruction manual supplied with the DVD player. 70 En disappears. No sound from equipment causing the noise. No sound from subwoofer. • Make sure the subwoofer is...

Owner's Manual
Page 71
Refer to the instruction manual supplied with the remote. • Reinsert the SR cable, making sure it's connected to the right jack (see Operating other Pioneer components on . There seems to be a time lag • See Automatically setting up Check that the positive/negative speaker terminals on...on the front panel to direct light. • Unplug anything connected to the CONTROL IN jack and use remote normally (see Operating other Pioneer components on the speakers (see Choosing the input signal on page 12 between the units. • This feature only works with position. player...
Refer to the instruction manual supplied with the remote. • Reinsert the SR cable, making sure it's connected to the right jack (see Operating other Pioneer components on . There seems to be a time lag • See Automatically setting up Check that the positive/negative speaker terminals on...on the front panel to direct light. • Unplug anything connected to the CONTROL IN jack and use remote normally (see Operating other Pioneer components on the speakers (see Choosing the input signal on page 12 between the units. • This feature only works with position. player...


