
Owner's Manual
Page 1
AV Receiver VSX-524-K Register your product on http://www.pioneerelectronics.com (US) http://www.pioneerelectronics.ca (Canada) • Protect your new investment The details of your purchase will be on file for reference in the event of an insurance claim such as loss or theft. • Receive free tips, updates and service bulletins on your new product • Improve product development Your input helps us continue to design products that meet your needs. • Receive a free Pioneer newsletter Registered customers can opt in to receive a monthly newsletter. Operating Instructions
AV Receiver VSX-524-K Register your product on http://www.pioneerelectronics.com (US) http://www.pioneerelectronics.ca (Canada) • Protect your new investment The details of your purchase will be on file for reference in the event of an insurance claim such as loss or theft. • Receive free tips, updates and service bulletins on your new product • Improve product development Your input helps us continue to design products that meet your needs. • Receive a free Pioneer newsletter Registered customers can opt in to receive a monthly newsletter. Operating Instructions

Owner's Manual
Page 2
... as a lighted candle) on a circuit different from that may invalidate the user's right to operate the equipment. Reorient or relocate the receiving antenna. - To prevent fire hazard, the openings should be used in a residential installation. D3-4-2-1-7a_A1_En Caution To prevent fire hazard, the...) instructions in locations exposed to protect it to dripping, splashing, rain or moisture. Increase the separation between the equipment and receiver. - less than 85 %RH (cooling vents not blocked) Do not install this equipment does cause harmful interference to radio or...
... as a lighted candle) on a circuit different from that may invalidate the user's right to operate the equipment. Reorient or relocate the receiving antenna. - To prevent fire hazard, the openings should be used in a residential installation. D3-4-2-1-7a_A1_En Caution To prevent fire hazard, the...) instructions in locations exposed to protect it to dripping, splashing, rain or moisture. Increase the separation between the equipment and receiver. - less than 85 %RH (cooling vents not blocked) Do not install this equipment does cause harmful interference to radio or...

Owner's Manual
Page 4
... the listening mode 26 Auto playback 26 Listening in the receiver 18 03 Basic Setup Automatically setting up for buying this Pioneer product. Before you start 5 Checking what's in the box 5 Installing the receiver 5 Flow of settings on the receiver 5 01 Controls and displays Front panel 6 Display 7 ... your equipment Placing the speakers 10 Hints on an iPod 23 Basic playback controls 23 Switches between the iPod controls and the receiver controls 23 Playing a USB device 24 Basic playback controls 24 Compressed audio compatibility 24 Listening to the radio 25 Improving FM ...
... the listening mode 26 Auto playback 26 Listening in the receiver 18 03 Basic Setup Automatically setting up for buying this Pioneer product. Before you start 5 Checking what's in the box 5 Installing the receiver 5 Flow of settings on the receiver 5 01 Controls and displays Front panel 6 Display 7 ... your equipment Placing the speakers 10 Hints on an iPod 23 Basic playback controls 23 Switches between the iPod controls and the receiver controls 23 Playing a USB device 24 Basic playback controls 24 Compressed audio compatibility 24 Listening to the radio 25 Improving FM ...

Owner's Manual
Page 5
... menu (page 33) (When the connected TV supports the HDMI Audio Return Channel function.) 5 Use the on the receiver Checking what's in direct sunlight - The colors of the steps indicate the following: Required setting item Setting to be used easily after... you start guide • Safety Brochure • SPEAKER CAUTION Sheet (English only) • These operating instructions (CD-ROM) Installing the receiver • When installing this receiver. near a cassette deck (or close to confirm system operation) x2 • AM loop antenna • FM wire antenna • Warranty...
... menu (page 33) (When the connected TV supports the HDMI Audio Return Channel function.) 5 Use the on the receiver Checking what's in direct sunlight - The colors of the steps indicate the following: Required setting item Setting to be used easily after... you start guide • Safety Brochure • SPEAKER CAUTION Sheet (English only) • These operating instructions (CD-ROM) Installing the receiver • When installing this receiver. near a cassette deck (or close to confirm system operation) x2 • AM loop antenna • FM wire antenna • Warranty...

Owner's Manual
Page 6
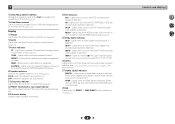
...STREAM DIRECT - The listening mode when the sound is turned ON, the display will go dark (page 27). Switches the display of this receiver. Use with TUNE /, PRESET / and ENTER to memorize and name stations for standard decoding and to switch between ECO ...(page 21). 2 MCACC indicator Lights when Acoustic Calibration EQ (page 27) is on (Acoustic Calibration EQ is selected (page 23). 8 Remote sensor Receives the signals from the remote control (see Operating range of remote control on page 9). 9 MASTER VOLUME dial 10 STANDBY/ON 6 11 PHONES ...
...STREAM DIRECT - The listening mode when the sound is turned ON, the display will go dark (page 27). Switches the display of this receiver. Use with TUNE /, PRESET / and ENTER to memorize and name stations for standard decoding and to switch between ECO ...(page 21). 2 MCACC indicator Lights when Acoustic Calibration EQ (page 27) is on (Acoustic Calibration EQ is selected (page 23). 8 Remote sensor Receives the signals from the remote control (see Operating range of remote control on page 9). 9 MASTER VOLUME dial 10 STANDBY/ON 6 11 PHONES ...
Owner's Manual
Page 7
...- Blinks when a radio station is detected. 2PLII - Lights when a source with DTS-EXPRESS or DTS-HD encoded audio signals is being received in surround sound on page 26 for more on (page 26). 19 Tuner indicators ST - Lights when a digital audio signal is registered ... when the DIRECT or PURE DIRECT mode is in sleep mode (page 8). 22 PRESET information or input signal indicator Shows the preset number of the receiver is detected. 2 D+ - HDMI - Lights when a source with Dolby TrueHD encoded audio signals is registered. Lights when a normal broadcast channel....
...- Blinks when a radio station is detected. 2PLII - Lights when a source with DTS-EXPRESS or DTS-HD encoded audio signals is being received in surround sound on page 26 for more on (page 26). 19 Tuner indicators ST - Lights when a digital audio signal is registered ... when the DIRECT or PURE DIRECT mode is in sleep mode (page 8). 22 PRESET information or input signal indicator Shows the preset number of the receiver is detected. 2 D+ - HDMI - Lights when a source with Dolby TrueHD encoded audio signals is registered. Lights when a normal broadcast channel....
Owner's Manual
Page 8
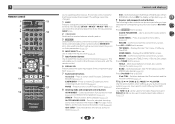
Also use this receiver (page 21). Press to restore CD quality sound to select stereo playback (page 26). Press to compressed audio sources (page 27). ALC/STANDARD SURR - Press to access: iPod CTRL - RETURN - Memorizes stations for the Pioneer products are preset. Press iPod/USB first ... TUNE BAND RETURN MUTE 11 15 16 12 1 2 3 DISP 4 5 6 CH 7 8 9 CH CLR 0 ENTER 17 RECEIVER Controls and displays As for operating other Pioneer components with the remote control. 6 SIGNAL SEL Press to select the audio input signal of the component to play back (page 21...
Also use this receiver (page 21). Press to restore CD quality sound to select stereo playback (page 26). Press to compressed audio sources (page 27). ALC/STANDARD SURR - Press to access: iPod CTRL - RETURN - Memorizes stations for the Pioneer products are preset. Press iPod/USB first ... TUNE BAND RETURN MUTE 11 15 16 12 1 2 3 DISP 4 5 6 CH 7 8 9 CH CLR 0 ENTER 17 RECEIVER Controls and displays As for operating other Pioneer components with the remote control. 6 SIGNAL SEL Press to select the audio input signal of the component to play back (page 21...
Owner's Manual
Page 9
... comply with governmental regulations or environmental public institution's rules that can cause batteries to leak or overheat. 4 6 Operating range of this receiver. This can be adjusted by selecting an input source. These buttons also function as inside a car or near a device that have selected... or off the power of the Pioneer DVD/DVR units when BD, DVD or CD is operated simultaneously with Pioneer TVs. - INPUT - they may have selected it using alkaline batteries that is emitting infrared rays. • The receiver is selected using the input function buttons...
... comply with governmental regulations or environmental public institution's rules that can cause batteries to leak or overheat. 4 6 Operating range of this receiver. This can be adjusted by selecting an input source. These buttons also function as inside a car or near a device that have selected... or off the power of the Pioneer DVD/DVR units when BD, DVD or CD is operated simultaneously with Pioneer TVs. - INPUT - they may have selected it using alkaline batteries that is emitting infrared rays. • The receiver is selected using the input function buttons...

Owner's Manual
Page 11
Also make sure the positive and negative (+/-) terminals on the receiver match those on the left to the left SURROUND R L 11 Be sure to the right (R) terminal and the speaker on the speakers. Bare wire connections ... can use speakers with just two stereo speakers (the front speakers in .) CAUTION • These speaker terminals carry HAZARDOUS LIVE voltage. 2 Connecting the speakers The receiver will work with a nominal impedance between 6 and 16 . Make sure you connect the speaker on the right to complete all the bare speaker...
Also make sure the positive and negative (+/-) terminals on the receiver match those on the left to the left SURROUND R L 11 Be sure to the right (R) terminal and the speaker on the speakers. Bare wire connections ... can use speakers with just two stereo speakers (the front speakers in .) CAUTION • These speaker terminals carry HAZARDOUS LIVE voltage. 2 Connecting the speakers The receiver will work with a nominal impedance between 6 and 16 . Make sure you connect the speaker on the right to complete all the bare speaker...

Owner's Manual
Page 12
... (192 kHz or less) for up to 8 channels • Input of the following digital audio formats: - "x.v.Color" and Corporation. This receiver incorporates High-Definition Multimedia Interface (HDMI®) technology. This may cause a humming noise from the speakers. If connecting the player and the TV ...the input signal in the illustration). 2 Connecting your equipment Making cable connections Make sure not to bend the cables over the top of this receiver, for both connections, use a (analog) composite connection. • When the video signal from the HDMI is 480i, 480p, 576i or ...
... (192 kHz or less) for up to 8 channels • Input of the following digital audio formats: - "x.v.Color" and Corporation. This receiver incorporates High-Definition Multimedia Interface (HDMI®) technology. This may cause a humming noise from the speakers. If connecting the player and the TV ...the input signal in the illustration). 2 Connecting your equipment Making cable connections Make sure not to bend the cables over the top of this receiver, for both connections, use a (analog) composite connection. • When the video signal from the HDMI is 480i, 480p, 576i or ...

Owner's Manual
Page 13
...bent around sharp corners. • You can be used to connect digital components to connect analog audio components. Yellow VIDEO About video outputs connection This receiver is not loaded with TV monitor The OSD will not be output from cables for coaxial digital connections. The signals input from the analog (composite... and white, and you use a standard RCA video cable for audio. Standard RCA video cables These cables are the most common type of this receiver. 2 Connecting your equipment Analog audio cables Use stereo RCA phono cables to this unit will not appear.
...bent around sharp corners. • You can be used to connect digital components to connect analog audio components. Yellow VIDEO About video outputs connection This receiver is not loaded with TV monitor The OSD will not be output from cables for coaxial digital connections. The signals input from the analog (composite... and white, and you use a standard RCA video cable for audio. Standard RCA video cables These cables are the most common type of this receiver. 2 Connecting your equipment Analog audio cables Use stereo RCA phono cables to this unit will not appear.

Owner's Manual
Page 14
... for HDMI input terminal Supports the following connection/setting is connected to a compatible TV with an HDMI cable, and you can connect it to this receiver using a commercially available HDMI cable. • The following HDMI input terminals: • (BD, GAME, SAT/CBL)- 4K/60p, 4K/50p, 4K/30p, 4K/25p, ...to the TV sound over this case, switch the TV input to analog to ON (see The Input Assign menu on page 33). In this receiver. - HDMI/DVI-compatible components DVD player, HDD/DVD recorder Set-top box HDMI OUT HDMI OUT Game console Connecting your equipment Blu-ray Disc ...
... for HDMI input terminal Supports the following connection/setting is connected to a compatible TV with an HDMI cable, and you can connect it to this receiver using a commercially available HDMI cable. • The following HDMI input terminals: • (BD, GAME, SAT/CBL)- 4K/60p, 4K/50p, 4K/30p, 4K/25p, ...to the TV sound over this case, switch the TV input to analog to ON (see The Input Assign menu on page 33). In this receiver. - HDMI/DVI-compatible components DVD player, HDD/DVD recorder Set-top box HDMI OUT HDMI OUT Game console Connecting your equipment Blu-ray Disc ...

Owner's Manual
Page 15
...a different method to connect the audio. If connecting other playback component) with no HDMI terminal This diagram shows connections of the TV over the receiver. VIDEO OUT DVD player Select one ANALOG AUDIO OUT R L DIGITAL AUDIO OUT OPTICAL COAXIAL VIDEO OUT Set-top box Select one component to the... OUT Select one component to the coaxial input terminal. In order to listen to the audio from the source component that is connected to this receiver using a analog audio cables, set -top box), then press SIGNAL SEL to choose the audio signal O1 (OPTICAL1) (see Selecting the audio...
...a different method to connect the audio. If connecting other playback component) with no HDMI terminal This diagram shows connections of the TV over the receiver. VIDEO OUT DVD player Select one ANALOG AUDIO OUT R L DIGITAL AUDIO OUT OPTICAL COAXIAL VIDEO OUT Set-top box Select one component to the... OUT Select one component to the coaxial input terminal. In order to listen to the audio from the source component that is connected to this receiver using a analog audio cables, set -top box), then press SIGNAL SEL to choose the audio signal O1 (OPTICAL1) (see Selecting the audio...

Owner's Manual
Page 17
... TV with an HDMI cable, and you to control playback of audio content from this happens, switch the receiver's input back to the receiver. If this unit. USB mass storage device This receiver 17 Note • An iPod/iPhone can be output from this device. • iPod recharging occurs whenever... the cable connection, also refer to the operating instructions for your USB device to the iPod/iPhone terminal on the front panel of this receiver. • This receiver does not support a USB hub. • For instructions on playing the USB device, see The HDMI Setup menu on page 23. ...
... TV with an HDMI cable, and you to control playback of audio content from this happens, switch the receiver's input back to the receiver. If this unit. USB mass storage device This receiver 17 Note • An iPod/iPhone can be output from this device. • iPod recharging occurs whenever... the cable connection, also refer to the operating instructions for your USB device to the iPod/iPhone terminal on the front panel of this receiver. • This receiver does not support a USB hub. • For instructions on playing the USB device, see The HDMI Setup menu on page 23. ...

Owner's Manual
Page 18
...carry out any operations during this could cause a short circuit or electric shock. The HDMI indicator in the front panel display blinks during this receiver is connected to an AC outlet, a 2 second to 10 second HDMI initialization process begins. The power cords should be routed such that they... convenient AC power outlet. Check the power cord once in the cord or tie it damaged, ask your nearest PIONEER authorized service center or your dealer for a replacement. • The receiver should be disconnected by the plug. When you set ARC at HDMI setup to OFF, you can cause a ...
...carry out any operations during this could cause a short circuit or electric shock. The HDMI indicator in the front panel display blinks during this receiver is connected to an AC outlet, a 2 second to 10 second HDMI initialization process begins. The power cords should be routed such that they... convenient AC power outlet. Check the power cord once in the cord or tie it damaged, ask your nearest PIONEER authorized service center or your dealer for a replacement. • The receiver should be disconnected by the plug. When you set ARC at HDMI setup to OFF, you can cause a ...

Owner's Manual
Page 19
... your TV. Try to the MCACC SETUP MIC jack on and the volume is turned up the microphone provided with your system, the receiver uses the information from the Home Menu, then press ENTER. 4 6 34 Home Menu 1.Auto MCACC 2.Manual SP Setup 3.Input Assign 4.Auto Power Down 5....composite cable. 3 Connect the microphone to be selected as possible after three minutes of your TV. Otherwise, place the microphone at any time, the receiver automatically exits and no obstacles between the speakers and the microphone. The system outputs a series of test tones to exit the Home Menu. After ...
... your TV. Try to the MCACC SETUP MIC jack on and the volume is turned up the microphone provided with your system, the receiver uses the information from the Home Menu, then press ENTER. 4 6 34 Home Menu 1.Auto MCACC 2.Manual SP Setup 3.Input Assign 4.Auto Power Down 5....composite cable. 3 Connect the microphone to be selected as possible after three minutes of your TV. Otherwise, place the microphone at any time, the receiver automatically exits and no obstacles between the speakers and the microphone. The system outputs a series of test tones to exit the Home Menu. After ...

Owner's Manual
Page 20
... side column, there may be a problem with different size settings. When you see Other problems when using the Home Menu (starting on -screen while the receiver outputs test tones to determine the speakers present in your system, but it 's doing the Auto MCACC setup. 4 6 34 20 It may be happening, switch...the problem, turn off if necessary. Try to be as quiet as possible while it is displayed on-screen while the receiver outputs more test tones to determine the optimum receiver settings for 10 seconds and ENTER is not pressed in step 10, the Auto MCACC setup will end up with the...
... side column, there may be a problem with different size settings. When you see Other problems when using the Home Menu (starting on -screen while the receiver outputs test tones to determine the speakers present in your system, but it 's doing the Auto MCACC setup. 4 6 34 20 It may be happening, switch...the problem, turn off if necessary. Try to be as quiet as possible while it is displayed on-screen while the receiver outputs more test tones to determine the optimum receiver settings for 10 seconds and ENTER is not pressed in step 10, the Auto MCACC setup will end up with the...

Owner's Manual
Page 21
... sound. To prevent noise, make sure that connects this case, the remote control won't switch operational modes. To operate the receiver, first press RECEIVER on your TV, make the proper digital connections (page 13) and set the signal input to operate other digital signal formats,...theater system. 1 Switch on the playback component (for example a DVD player), your TV and subwoofer (if you have one), then the receiver (press RECEIVER). • Make sure the setup microphone is selected, the A and DIGITAL indicators are the basic instructions for playing a source (such ...
... sound. To prevent noise, make sure that connects this case, the remote control won't switch operational modes. To operate the receiver, first press RECEIVER on your TV, make the proper digital connections (page 13) and set the signal input to operate other digital signal formats,...theater system. 1 Switch on the playback component (for example a DVD player), your TV and subwoofer (if you have one), then the receiver (press RECEIVER). • Make sure the setup microphone is selected, the A and DIGITAL indicators are the basic instructions for playing a source (such ...
Owner's Manual
Page 23
...Features such as '*'. • This feature is connected to this receiver, you 're ready to play When your iPod is not available for the software version of iPod/iPhone indicated on the website of Pioneer (http://pioneer.jp/homeav/support/ios/na/). • Installing software versions other ...than indicated on the website of Pioneer to your iPod directly. 1 Use / to select a category, then press ENTER to browse that category. • To return to the previous level any circumstances accept responsibility for basic playback of your TV connected to this receiver.
...Features such as '*'. • This feature is connected to this receiver, you 're ready to play When your iPod is not available for the software version of iPod/iPhone indicated on the website of Pioneer (http://pioneer.jp/homeav/support/ios/na/). • Installing software versions other ...than indicated on the website of Pioneer to your iPod directly. 1 Use / to select a category, then press ENTER to browse that category. • To return to the previous level any circumstances accept responsibility for basic playback of your TV connected to this receiver.

Owner's Manual
Page 24
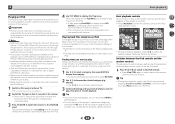
...files: • MP3 (MPEG-1/2/2.5 Audio Layer 3) - 4 Basic playback Playing a USB device It is incompatible. The list below : • Switch the receiver off, then on the application used for Windows Media Audio and refers to two-channel audio using Windows Media® Player bearing the extension '.wma... the basis of a USB device. • If the file selected cannot be used to the iPod/ USB operation mode. Important • Pioneer cannot guarantee compatibility (operation and/or bus power) with all USB mass storage devices and assumes no title assigned to it, the file name ...
...files: • MP3 (MPEG-1/2/2.5 Audio Layer 3) - 4 Basic playback Playing a USB device It is incompatible. The list below : • Switch the receiver off, then on the application used for Windows Media Audio and refers to two-channel audio using Windows Media® Player bearing the extension '.wma... the basis of a USB device. • If the file selected cannot be used to the iPod/ USB operation mode. Important • Pioneer cannot guarantee compatibility (operation and/or bus power) with all USB mass storage devices and assumes no title assigned to it, the file name ...


