
Owner's Manual
Page 1
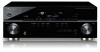
AUDIO/VIDEO MULTI-CHANNEL RECEIVER RECEPTEUR AUDIOVISUEL A VOIES MULTIPLES RECEPTOR MULTICANAL DE AUDIO/VÍDEO VSX-520 Register your product on http://www.pioneerelectronics.com (US) http://www.pioneerelectronics.ca (Canada) • Protect your new...product • Improve product development Your input helps us continue to design products that meet your needs. • Receive a free Pioneer newsletter Registered customers can opt in to receive a monthly newsletter. http://www.pioneerelectronics.com (US) http://www.pioneerelectronics.ca (Canada) Operating Instructions Mode d'emploi Manual...
AUDIO/VIDEO MULTI-CHANNEL RECEIVER RECEPTEUR AUDIOVISUEL A VOIES MULTIPLES RECEPTOR MULTICANAL DE AUDIO/VÍDEO VSX-520 Register your product on http://www.pioneerelectronics.com (US) http://www.pioneerelectronics.ca (Canada) • Protect your new...product • Improve product development Your input helps us continue to design products that meet your needs. • Receive a free Pioneer newsletter Registered customers can opt in to receive a monthly newsletter. http://www.pioneerelectronics.com (US) http://www.pioneerelectronics.ca (Canada) Operating Instructions Mode d'emploi Manual...
Owner's Manual
Page 2
... the following two conditions: (1) This device may cause undesired operation. Product Name: AUDIO/VIDEO MULTI-CHANNEL RECEIVER Model Number: VSX-520 Responsible Party Name: PIONEER ELECTRONICS (USA) INC. DOMINGUEZ ST. K041_A1_En IMPORTANT NOTICE THE MODEL NUMBER AND SERIAL NUMBER OF THIS EQUIPMENT... period. The equipment should be disconnected by one fitted. However, there is not waterproof. Reorient or relocate the receiving antenna. - D8-10-1-2_A1_En FEDERAL COMMUNICATIONS COMMISSION DECLARATION OF CONFORMITY This device complies with part 15 of the available...
... the following two conditions: (1) This device may cause undesired operation. Product Name: AUDIO/VIDEO MULTI-CHANNEL RECEIVER Model Number: VSX-520 Responsible Party Name: PIONEER ELECTRONICS (USA) INC. DOMINGUEZ ST. K041_A1_En IMPORTANT NOTICE THE MODEL NUMBER AND SERIAL NUMBER OF THIS EQUIPMENT... period. The equipment should be disconnected by one fitted. However, there is not waterproof. Reorient or relocate the receiving antenna. - D8-10-1-2_A1_En FEDERAL COMMUNICATIONS COMMISSION DECLARATION OF CONFORMITY This device complies with part 15 of the available...
Owner's Manual
Page 4
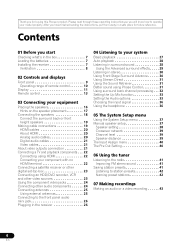
...Before you have finished reading the instructions, put them away in a safe place for buying this Pioneer product. After you start Checking what's in the box 7 Loading the batteries 7 Installing the receiver 7 Ventilation 8 02 Controls and displays Front panel 9 Operating range of remote control 10 Display... audio components 24 Connecting antennas 25 Using external antennas 25 Connecting to the front panel audio mini jack 26 Plugging in the receiver 26 04 Listening to station presets 42 Naming preset stations 42 07 Making recordings Making an audio or a video recording 43 ...
...Before you have finished reading the instructions, put them away in a safe place for buying this Pioneer product. After you start Checking what's in the box 7 Loading the batteries 7 Installing the receiver 7 Ventilation 8 02 Controls and displays Front panel 9 Operating range of remote control 10 Display... audio components 24 Connecting antennas 25 Using external antennas 25 Connecting to the front panel audio mini jack 26 Plugging in the receiver 26 04 Listening to station presets 42 Naming preset stations 42 07 Making recordings Making an audio or a video recording 43 ...
Owner's Manual
Page 6
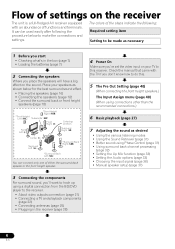
... speaker. 3 Connecting the components For surround sound, you'll want to hook up using a digital connection from the BD/DVD player to the receiver. • About video outputs connection (page 21) • Connecting a TV and playback components (page 22) • Connecting antennas (page 25) •... connections.) 6 Basic playback (page 27) 7 Adjusting the sound as necessary 1 Before you start • Checking what's in the receiver (page 26) 4 Power On Make sure you've set the video input on your speakers as shown below for the best surround ...
... speaker. 3 Connecting the components For surround sound, you'll want to hook up using a digital connection from the BD/DVD player to the receiver. • About video outputs connection (page 21) • Connecting a TV and playback components (page 22) • Connecting antennas (page 25) •... connections.) 6 Basic playback (page 27) 7 Adjusting the sound as necessary 1 Before you start • Checking what's in the receiver (page 26) 4 Power On Make sure you've set the video input on your speakers as shown below for the best surround ...
Owner's Manual
Page 7
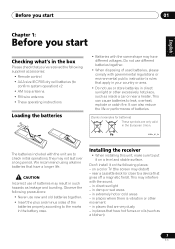
...ais Italiano Nederlands Español Before you start 01 Chapter 1: Before you start Checking what's in the box Please check that you've received the following supplied accessories: • Remote control • AAA size IEC R03 dry cell batteries (to confirm system operation) x2 •...surface. Don't install it on the following precautions: • Never use or store batteries in direct sunlight or other movement - Installing the receiver • When installing this unit, make sure to leak, overheat, explode or catch fire. This may interfere with the same shape may result...
...ais Italiano Nederlands Español Before you start 01 Chapter 1: Before you start Checking what's in the box Please check that you've received the following supplied accessories: • Remote control • AAA size IEC R03 dry cell batteries (to confirm system operation) x2 •...surface. Don't install it on the following precautions: • Never use or store batteries in direct sunlight or other movement - Installing the receiver • When installing this unit, make sure to leak, overheat, explode or catch fire. This may interfere with the same shape may result...
Owner's Manual
Page 8
... ventilation and to improve heat dispersal (at least 40 cm (16 in the cabinet are never blocked or covered with performance and/or causing malfunctions. Receiver 40 cm (16 inches) Slot and openings in .) at the top). 01 Before you start Ventilation When installing this unit, make sure the openings are...
... ventilation and to improve heat dispersal (at least 40 cm (16 in the cabinet are never blocked or covered with performance and/or causing malfunctions. Receiver 40 cm (16 inches) Slot and openings in .) at the top). 01 Before you start Ventilation When installing this unit, make sure the openings are...
Owner's Manual
Page 9
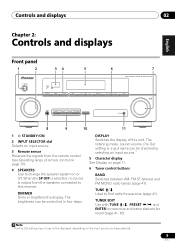
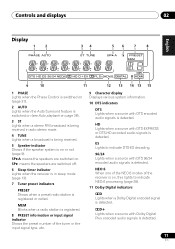
CHANNEL RECEIVER VSX-520 TUNE TUNER EDIT PRESET ENTER MASTER VOLUME PHONES AUTO/DIRECT LISTENING MODE STEREO/ALC STANDARD ADV SURROUND SOUND RETRIEVER PORTABLE 8 9 10 11 1 STANDBY/ON 2 INPUT SELECTOR dial Selects an input source. 3 Remote sensor Receives the signals from the speakers connected to find radio ... on or off. When the SP OFF is selected, no sound is output from the remote control (see Operating range of this receiver. TUNE / Used to this unit. TUNER EDIT Use with TUNE /, PRESET / and ENTER to...
CHANNEL RECEIVER VSX-520 TUNE TUNER EDIT PRESET ENTER MASTER VOLUME PHONES AUTO/DIRECT LISTENING MODE STEREO/ALC STANDARD ADV SURROUND SOUND RETRIEVER PORTABLE 8 9 10 11 1 STANDBY/ON 2 INPUT SELECTOR dial Selects an input source. 3 Remote sensor Receives the signals from the speakers connected to find radio ... on or off. When the SP OFF is selected, no sound is output from the remote control (see Operating range of this receiver. TUNE / Used to this unit. TUNER EDIT Use with TUNE /, PRESET / and ENTER to...
Owner's Manual
Page 10
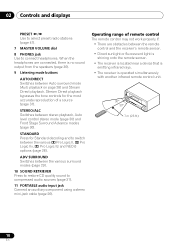
... control stereo mode (page 30) and Front Stage Surround Advance modes (page 30). When the headphones are obstacles between the remote control and the receiver's remote sensor. • Direct sunlight or fluorescent light is shining onto the remote sensor. • The... receiver is located near a device that is emitting infrared rays. • The receiver is no sound output from the speakers (page 36). 9 Listening mode buttons AUTO/DIRECT Switches between the various surround modes (page 29). 10...
... control stereo mode (page 30) and Front Stage Surround Advance modes (page 30). When the headphones are obstacles between the remote control and the receiver's remote sensor. • Direct sunlight or fluorescent light is shining onto the remote sensor. • The... receiver is located near a device that is emitting infrared rays. • The receiver is no sound output from the speakers (page 36). 9 Listening mode buttons AUTO/DIRECT Switches between the various surround modes (page 29). 10...
Owner's Manual
Page 11
... are switched on. MEM Blinks when a radio station is registered. 8 PRESET information or input signal indicator Shows the preset number of the receiver is on, this lights to indicate DTS-ES decoding. 96/24 Lights when a source with DTS-EXPRESS or DTS-HD encoded audio signals ...is detected. SPA means the speakers are switched off. 6 Sleep timer indicator Lights when the receiver is in auto stereo mode. 4 TUNE Lights when a broadcast is being received. 5 Speaker indicator Shows if the speaker system is on or not (page 9). Controls and displays 02 Display 1...
... are switched on. MEM Blinks when a radio station is registered. 8 PRESET information or input signal indicator Shows the preset number of the receiver is on, this lights to indicate DTS-ES decoding. 96/24 Lights when a source with DTS-EXPRESS or DTS-HD encoded audio signals ...is detected. SPA means the speakers are switched off. 6 Sleep timer indicator Lights when the receiver is in auto stereo mode. 4 TUNE Lights when a broadcast is being received. 5 Speaker indicator Shows if the speaker system is on or not (page 9). Controls and displays 02 Display 1...
Owner's Manual
Page 13
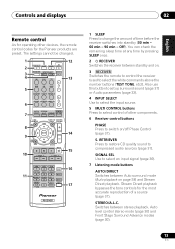
... TV SOURCE CONTROL 2 3 RECEIVER INPUT SELECT DTV/TV INPUT 4 BD DVD TV 12 13 DVR CD CD-R CH 5 ADAPTER TUNER PORTABLE PHASE S.RETRIEVER SIGNAL SEL VOL 6 AUTO/ STEREO/ BD MENU 7 DIRECT A.L.C. S. Off). STEREO/A.L.C. Stream Direct playback bypasses the tone controls for the Pioneer products are preset. Also use this button to set...
... TV SOURCE CONTROL 2 3 RECEIVER INPUT SELECT DTV/TV INPUT 4 BD DVD TV 12 13 DVR CD CD-R CH 5 ADAPTER TUNER PORTABLE PHASE S.RETRIEVER SIGNAL SEL VOL 6 AUTO/ STEREO/ BD MENU 7 DIRECT A.L.C. S. Off). STEREO/A.L.C. Stream Direct playback bypasses the tone controls for the Pioneer products are preset. Also use this button to set...
Owner's Manual
Page 14
...41). 9 TUNE /, PRESET /), ENTER Use the arrow buttons when setting up your surround sound system (page 37). Press RECEIVER first to access: AUDIO PARAMETER Use to access the System Setup menu (page 37). These buttons also function as described below. BAND Switches between the... is pressed. (For example TEST TONE, etc.) HDD*, DVD*, VCR* These buttons switch between 2 Pro Logic II options (page 28). Press RECEIVER first to access: BASS -/+ Use to adjust Bass1 TRE -/+ Use to adjust Treble1 11 Number buttons and other buttons that can be accessed after ...
...41). 9 TUNE /, PRESET /), ENTER Use the arrow buttons when setting up your surround sound system (page 37). Press RECEIVER first to access: AUDIO PARAMETER Use to access the System Setup menu (page 37). These buttons also function as described below. BAND Switches between the... is pressed. (For example TEST TONE, etc.) HDD*, DVD*, VCR* These buttons switch between 2 Pro Logic II options (page 28). Press RECEIVER first to access: BASS -/+ Use to adjust Bass1 TRE -/+ Use to adjust Treble1 11 Number buttons and other buttons that can be accessed after ...
Owner's Manual
Page 15
...be controlled in this section. CH +/- Use to this unit. These buttons are marked with Pioneer flat panel TVs. Use to change the speaker system on or off the power of this receiver. Pressing TEST TONE again exits the test tone mode. DIMMER Dims or brightens the display. .... to select channels. Use to adjust the level (page 39). LEV +/- DTV/TV* Switches between the DTV and analog TV input modes for Pioneer flat panel TVs. 14 MASTER VOLUME +/- VOL +/- Controls and displays 02 English Deutsch Français Italiano Nederlands Español TEST TONE Outputs...
...be controlled in this section. CH +/- Use to this unit. These buttons are marked with Pioneer flat panel TVs. Use to change the speaker system on or off the power of this receiver. Pressing TEST TONE again exits the test tone mode. DIMMER Dims or brightens the display. .... to select channels. Use to adjust the level (page 39). LEV +/- DTV/TV* Switches between the DTV and analog TV input modes for Pioneer flat panel TVs. 14 MASTER VOLUME +/- VOL +/- Controls and displays 02 English Deutsch Français Italiano Nederlands Español TEST TONE Outputs...
Owner's Manual
Page 18
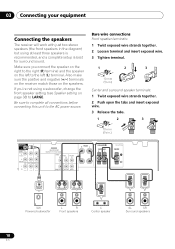
Also make sure the positive and negative (+/-) terminals on the receiver match those on the left to the left (L) terminal. Be sure to complete all connections before connecting this unit to LARGE. If you connect the ...speaker on the right to the right (R) terminal and the speaker on the speakers. 03 Connecting your equipment Connecting the speakers The receiver will work with just two stereo speakers (the front speakers in .) SUBWOOFER PRE OUT SURR BACK / FRONT HEIGHT L (Single) CD-R/TAPE DVR/VCR OUT R PRE...
Also make sure the positive and negative (+/-) terminals on the receiver match those on the left to the left (L) terminal. Be sure to complete all connections before connecting this unit to LARGE. If you connect the ...speaker on the right to the right (R) terminal and the speaker on the speakers. 03 Connecting your equipment Connecting the speakers The receiver will work with just two stereo speakers (the front speakers in .) SUBWOOFER PRE OUT SURR BACK / FRONT HEIGHT L (Single) CD-R/TAPE DVR/VCR OUT R PRE...
Owner's Manual
Page 20
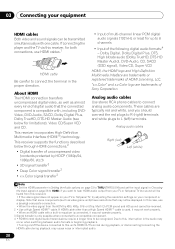
...Video CD/Super VCD and CD. In this case, use HDMI cables.1 HDMI cable Be careful to this, interruption in the proper direction. This receiver incorporates High-Definition Multimedia Interface (HDMI™) technology. Analog audio cables Use stereo RCA phono cables to THRU (THROUGH) and set the input signal ...or display. If HDMI cable other than a High Speed HDMI™ cable is used, it may cause noise or interrupted audio. 20 En This receiver supports the functions described below for up to L (left) terminals. If connecting the player and the TV via this unit's HDMI OUT terminal ...
...Video CD/Super VCD and CD. In this case, use HDMI cables.1 HDMI cable Be careful to this, interruption in the proper direction. This receiver incorporates High-Definition Multimedia Interface (HDMI™) technology. Analog audio cables Use stereo RCA phono cables to THRU (THROUGH) and set the input signal ...or display. If HDMI cable other than a High Speed HDMI™ cable is used, it may cause noise or interrupted audio. 20 En This receiver supports the functions described below for up to L (left) terminals. If connecting the player and the TV via this unit's HDMI OUT terminal ...

Owner's Manual
Page 21
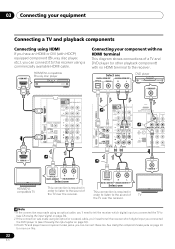
About video outputs connection This receiver is not loaded with source device PR PB Y Standard RCA video cable Component video cables Use component video cables to get the best possible color ... protecting the optical socket. • When storing optical cable, coil loosely. Note 1 • When connecting optical cables, be output from the HDMI OUT. In this receiver.1 Coaxial digital audio cable Optical cable Video cables Standard RCA video cables These cables are used for connection with a video converter. The signals input from...
About video outputs connection This receiver is not loaded with source device PR PB Y Standard RCA video cable Component video cables Use component video cables to get the best possible color ... protecting the optical socket. • When storing optical cable, coil loosely. Note 1 • When connecting optical cables, be output from the HDMI OUT. In this receiver.1 Coaxial digital audio cable Optical cable Video cables Standard RCA video cables These cables are used for connection with a video converter. The signals input from...
Owner's Manual
Page 22
...your component with no HDMI terminal This diagram shows connections of TV the TV over the receiver. Note 1 If the connection was made using an optical or a coaxial cable, you'll need to tell the receiver which digital input you connected the TV to (see Choosing the input signal on page 36... 1 OPTICAL R L DIGITAL AUDIO OUT ANALOG AUDIO OUT Select one This connection is required in order to listen to the sound of the TV over the receiver. 1 VIDEO IN OPTICAL R L DIGITAL AUDIO OUT ANALOG AUDIO OUT Select one This connection is required in order to listen to the sound of a TV ...
...your component with no HDMI terminal This diagram shows connections of TV the TV over the receiver. Note 1 If the connection was made using an optical or a coaxial cable, you'll need to tell the receiver which digital input you connected the TV to (see Choosing the input signal on page 36... 1 OPTICAL R L DIGITAL AUDIO OUT ANALOG AUDIO OUT Select one This connection is required in order to listen to the sound of the TV over the receiver. 1 VIDEO IN OPTICAL R L DIGITAL AUDIO OUT ANALOG AUDIO OUT Select one This connection is required in order to listen to the sound of a TV ...
Owner's Manual
Page 23
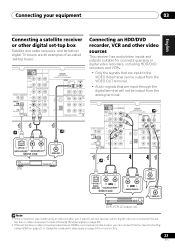
... that are input to (see Choosing the input signal on this too. See Connecting using an optical cable, you'll need to tell the receiver which digital input you can be output from the VIDEO OUT terminal. • Audio signals that are input through the digital terminal will not... DIGITAL AUDIO OUT ANALOG AUDIO OUT Select one VIDEO OUT Connecting an HDD/DVD recorder, VCR and other digital set-top box Satellite and cable receivers, and terrestrial digital TV tuners are all examples of so-called 'set - Connecting your equipment 03 English Deutsch Français Italiano Nederlands Espa...
... that are input to (see Choosing the input signal on this too. See Connecting using an optical cable, you'll need to tell the receiver which digital input you can be output from the VIDEO OUT terminal. • Audio signals that are input through the digital terminal will not... DIGITAL AUDIO OUT ANALOG AUDIO OUT Select one VIDEO OUT Connecting an HDD/DVD recorder, VCR and other digital set-top box Satellite and cable receivers, and terrestrial digital TV tuners are all examples of so-called 'set - Connecting your equipment 03 English Deutsch Français Italiano Nederlands Espa...
Owner's Manual
Page 24
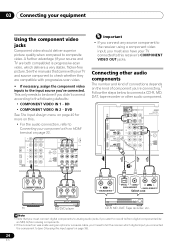
... UNBAL 75 IN 2 (DVD) AM LOOP COMPONENT VIDEO IN 1 (BD) ASSIGNABLE 12 Important • If you connect any source component to the receiver using an optical or a coaxial cable, you'll need to composite video. DVD See The Input Assign menu on page 40 for more on this... advantage (if your component with your equipment Using the component video jacks Component video should deliver superior picture quality when compared to tell the receiver which delivers a very stable, flicker-free picture. See the manuals that you must connect digital components to analog audio jacks if you want...
... UNBAL 75 IN 2 (DVD) AM LOOP COMPONENT VIDEO IN 1 (BD) ASSIGNABLE 12 Important • If you connect any source component to the receiver using an optical or a coaxial cable, you'll need to composite video. DVD See The Input Assign menu on page 40 for more on this... advantage (if your component with your equipment Using the component video jacks Component video should deliver superior picture quality when compared to tell the receiver which delivers a very stable, flicker-free picture. See the manuals that you must connect digital components to analog audio jacks if you want...
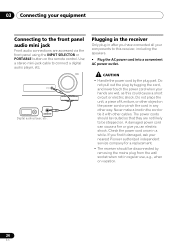
Owner's Manual
Page 26
...A damaged power cord can cause a fire or give you find it with other way. Plugging in the receiver Only plug in after you have connected all your hands are wet, as this receiver, including the speakers. • Plug the AC power cord into a convenient AC power outlet. 03 Connecting ...your nearest Pioneer authorized independent service company for a replacement. • The receiver should be routed so that they are not likely to be disconnected by removing the mains plug from the wall socket ...
...A damaged power cord can cause a fire or give you find it with other way. Plugging in the receiver Only plug in after you have connected all your hands are wet, as this receiver, including the speakers. • Plug the AC power cord into a convenient AC power outlet. 03 Connecting ...your nearest Pioneer authorized independent service company for a replacement. • The receiver should be routed so that they are not likely to be disconnected by removing the mains plug from the wall socket ...

Owner's Manual
Page 27
...surround sound. If you are the basic instructions for example a DVD player), your TV1 and subwoofer (if you have one), then the receiver (press RECEIVER). • Make sure the setup microphone is disconnected. 2 Select the input function you may need to check the digital audio output settings... on your DVD player or digital satellite receiver. You can use the input function buttons on the remote control, INPUT SELECT, or the front panel INPUT SELECTOR dial.2 3 Press AUTO...
...surround sound. If you are the basic instructions for example a DVD player), your TV1 and subwoofer (if you have one), then the receiver (press RECEIVER). • Make sure the setup microphone is disconnected. 2 Select the input function you may need to check the digital audio output settings... on your DVD player or digital satellite receiver. You can use the input function buttons on the remote control, INPUT SELECT, or the front panel INPUT SELECTOR dial.2 3 Press AUTO...


