Owner's Manual
Page 4
... function 33 Setting the Audio options 33 Choosing the input signal 36 Using the headphone 36 05 The System Setup menu Using the System Setup menu 37 Manual speaker setup 37 Speaker setting 38 Crossover network 39 Channel level 39 Speaker distance 39 The Input Assign menu 40 The...27 Auto playback 28 Listening in surround sound 28 Using the Advanced surround effects . . . . . 29 Listening in a safe place for buying this Pioneer product. Contents 01 Before you will know how to station presets 42 Naming preset stations 42 07 Making recordings Making an audio or a video recording...
... function 33 Setting the Audio options 33 Choosing the input signal 36 Using the headphone 36 05 The System Setup menu Using the System Setup menu 37 Manual speaker setup 37 Speaker setting 38 Crossover network 39 Channel level 39 Speaker distance 39 The Input Assign menu 40 The...27 Auto playback 28 Listening in surround sound 28 Using the Advanced surround effects . . . . . 29 Listening in a safe place for buying this Pioneer product. Contents 01 Before you will know how to station presets 42 Naming preset stations 42 07 Making recordings Making an audio or a video recording...
Owner's Manual
Page 6
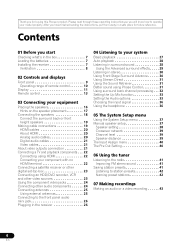
...) • Setting the Up Mix function (page 33) • Setting the Audio options (page 33) • Choosing the input signal (page 36) • Manual speaker setup (page 37) 6 En
...) • Setting the Up Mix function (page 33) • Setting the Audio options (page 33) • Choosing the input signal (page 36) • Manual speaker setup (page 37) 6 En
Owner's Manual
Page 13
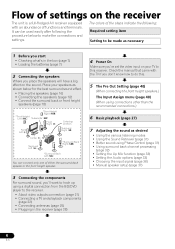
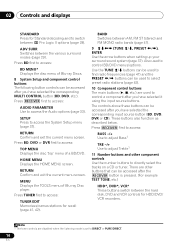
STANDARD ADV SURR AUDIO PARAMETER TOP 8 MENU TUNE TUNER EDIT MASTER TOOLS VOLUME MENU PRESET 9 HOME MENU SETUP ENTER TUNE BAND RETURN MUTE 10 BASS TRE 14 15 11 HDD DVD VCR 1 2 3 DISP TEST TONE SB CH CH SELECT 4 5 6 CH MIDNIGHT SPEAKERS 7...17 RECEIVER 1 SLEEP Press to select the white commands above the number buttons (TEST TONE, etc)). Stream Direct playback bypasses the tone controls for the Pioneer products are preset. S. Switches between stereo playback, Auto level control stereo mode (page 30) and Front Stage Surround Advance modes (page 30). 13 ...
STANDARD ADV SURR AUDIO PARAMETER TOP 8 MENU TUNE TUNER EDIT MASTER TOOLS VOLUME MENU PRESET 9 HOME MENU SETUP ENTER TUNE BAND RETURN MUTE 10 BASS TRE 14 15 11 HDD DVD VCR 1 2 3 DISP TEST TONE SB CH CH SELECT 4 5 6 CH MIDNIGHT SPEAKERS 7...17 RECEIVER 1 SLEEP Press to select the white commands above the number buttons (TEST TONE, etc)). Stream Direct playback bypasses the tone controls for the Pioneer products are preset. S. Switches between stereo playback, Auto level control stereo mode (page 30) and Front Stage Surround Advance modes (page 30). 13 ...
Owner's Manual
Page 14
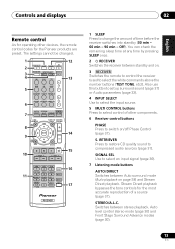
... Audio options (page 33). RETURN Confirm and exit the current menu screen. MENU Displays the TOOLS menu of Blu-ray Discs. 8 System Setup and component control buttons The following button controls can be accessed after you have selected the corresponding MULTI CONTROL button (BD, DVD, etc.). BAND...the arrow buttons when setting up your surround sound system (page 37). Press RECEIVER first to access: AUDIO PARAMETER Use to access the System Setup menu (page 37). RETURN Confirm and exit the current menu screen. These buttons also function as described below. There are disabled when the ...
... Audio options (page 33). RETURN Confirm and exit the current menu screen. MENU Displays the TOOLS menu of Blu-ray Discs. 8 System Setup and component control buttons The following button controls can be accessed after you have selected the corresponding MULTI CONTROL button (BD, DVD, etc.). BAND...the arrow buttons when setting up your surround sound system (page 37). Press RECEIVER first to access: AUDIO PARAMETER Use to access the System Setup menu (page 37). RETURN Confirm and exit the current menu screen. These buttons also function as described below. There are disabled when the ...
Owner's Manual
Page 18
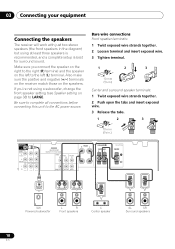
... the right (R) terminal and the speaker on page 38) to LARGE. Make sure you 're not using at least three speakers is recommended, and a complete setup is best for surround sound. Also make sure the positive and negative (+/-) terminals on the receiver match those on the speakers.
... the right (R) terminal and the speaker on page 38) to LARGE. Make sure you 're not using at least three speakers is recommended, and a complete setup is best for surround sound. Also make sure the positive and negative (+/-) terminals on the receiver match those on the speakers.

Owner's Manual
Page 27
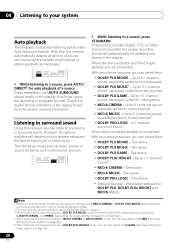
... to this receiver. Start by switching on your TV1 and subwoofer (if you have one), then the receiver (press RECEIVER). • Make sure the setup microphone is disconnected. 2 Select the input function you need to manually switch the input signal type press SIGNAL SEL (page 36). 3 • You may not...
... to this receiver. Start by switching on your TV1 and subwoofer (if you have one), then the receiver (press RECEIVER). • Make sure the setup microphone is disconnected. 2 Select the input function you need to manually switch the input signal type press SIGNAL SEL (page 36). 3 • You may not...
Owner's Manual
Page 28
... games • NEO:6 CINEMA - Up to 5.1 channel sound, especially suited for stereo and multichannel sources. See above • NEO:6 MUSIC - 04 Listening to your speaker setup and the type of source you can select from : • DOLBY PLII MOVIE - AUTO/ STEREO/ BD MENU DIRECT A.L.C. See above • Straight Decode - Up to...
... games • NEO:6 CINEMA - Up to 5.1 channel sound, especially suited for stereo and multichannel sources. See above • NEO:6 MUSIC - 04 Listening to your speaker setup and the type of source you can select from : • DOLBY PLII MOVIE - AUTO/ STEREO/ BD MENU DIRECT A.L.C. See above • Straight Decode - Up to...
Owner's Manual
Page 31
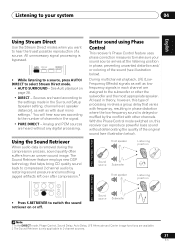
... the DIRECT mode, Phase Control, Sound Delay, Auto Delay, LFE Attenuate and Center image functions are heard according to the settings made in the Surround Setup (speaker setting, channel level, speaker distance), as well as lowfrequency signals in each channel are heard without deteriorating the quality of the original sound (see...
... the DIRECT mode, Phase Control, Sound Delay, Auto Delay, LFE Attenuate and Center image functions are heard according to the settings made in the Surround Setup (speaker setting, channel level, speaker distance), as well as lowfrequency signals in each channel are heard without deteriorating the quality of the original sound (see...
Owner's Manual
Page 33
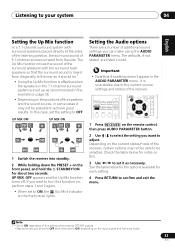
... AUDIO PARAMETER TOP MENU TUNE TUNER EDIT MASTER TOOLS VOLUME MENU PRESET RECEIVER INPUT SELECT DTV/TV INPUT BD DVD TV CH ENTER HOME MENU SETUP TUNE BAND RETURN 1 Press RECEIVER on the front panel, and hold the STANDBY/ON for each setting. 4 Press RETURN to confirm and exit the...
... AUDIO PARAMETER TOP MENU TUNE TUNER EDIT MASTER TOOLS VOLUME MENU PRESET RECEIVER INPUT SELECT DTV/TV INPUT BD DVD TV CH ENTER HOME MENU SETUP TUNE BAND RETURN 1 Press RECEIVER on the front panel, and hold the STANDBY/ON for each setting. 4 Press RETURN to confirm and exit the...
Owner's Manual
Page 37
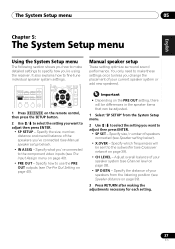
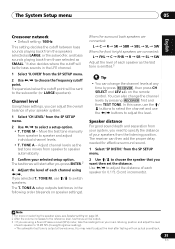
... setting optimize surround sound performance. Specify which frequencies will be differences in the speaker items that can be adjusted. 1 Select 'SP SETUP' from the listening position (see Speaker distance on the PRE OUT setting, there will be sent to the subwoofer (see Crossover network on the... remote control, then press the SETUP button. 2 Use / to select the setting you want to adjust then press ENTER. • SP SET - Specify size / number of your ...
... setting optimize surround sound performance. Specify which frequencies will be differences in the speaker items that can be adjusted. 1 Select 'SP SETUP' from the listening position (see Speaker distance on the PRE OUT setting, there will be sent to the subwoofer (see Crossover network on the... remote control, then press the SETUP button. 2 Use / to select the setting you want to adjust then press ENTER. • SP SET - Specify size / number of your ...

Owner's Manual
Page 38
... subwoofer by selecting SMALL for the front speakers, the subwoofer will automatically be set to NO. 3 You can 't be fixed to YES. 05 The System Setup menu Speaker setting Use this setting to specify your speaker configuration (size, number of speakers). 1 Select 'SP SET' from the SP... SETUP menu. 2 Use / to choose the speaker(s) that you didn't connect front height speakers choose NO. • Surround (S) - If you want to set to ...
... subwoofer by selecting SMALL for the front speakers, the subwoofer will automatically be set to NO. 3 You can 't be fixed to YES. 05 The System Setup menu Speaker setting Use this setting to specify your speaker configuration (size, number of speakers). 1 Select 'SP SET' from the SP... SETUP menu. 2 Use / to choose the speaker(s) that you didn't connect front height speakers choose NO. • Surround (S) - If you want to set to ...
Owner's Manual
Page 39
... subwoofer, and bass sounds playing back from those selected as the test tone moves from speaker to speaker automatically. 3 Confirm your selected setup option. Move the test tone manually from speaker to switch speakers. TONE M, use the / buttons to adjust the level after...C FHR R SR SL SW Adjust the level of each speaker to the subwoofer (or LARGE speakers). TONE A setup outputs test tones in 0.1 ft. (3 cm) increments). Note 1 For more on selecting the speaker sizes, see Speaker setting on page 38. 2 After the volume ...
... subwoofer, and bass sounds playing back from those selected as the test tone moves from speaker to speaker automatically. 3 Confirm your selected setup option. Move the test tone manually from speaker to switch speakers. TONE M, use the / buttons to adjust the level after...C FHR R SR SL SW Adjust the level of each speaker to the subwoofer (or LARGE speakers). TONE A setup outputs test tones in 0.1 ft. (3 cm) increments). Note 1 For more on selecting the speaker sizes, see Speaker setting on page 38. 2 After the volume ...
Owner's Manual
Page 40
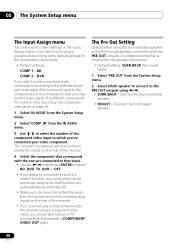
... according to the default settings for the speaker connection. • Default setting: SURR.BACK (Surround back) 1 Select 'PRE OUT' from the System Setup menu. 2 Select which you've connected your TV connected to this , see the video signal of the receiver. 4 Select the component that function ...; SURR.BACK - The numbers correspond with the numbers beside the inputs on the rear of a different component). BD COMP 2 - 05 The System Setup menu The Input Assign menu You only need to make component video connections according to the defaults above, you must assign the numbered input to...
... according to the default settings for the speaker connection. • Default setting: SURR.BACK (Surround back) 1 Select 'PRE OUT' from the System Setup menu. 2 Select which you've connected your TV connected to this , see the video signal of the receiver. 4 Select the component that function ...; SURR.BACK - The numbers correspond with the numbers beside the inputs on the rear of a different component). BD COMP 2 - 05 The System Setup menu The Input Assign menu You only need to make component video connections according to the defaults above, you must assign the numbered input to...
Owner's Manual
Page 41
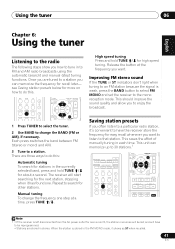
... CD CD-R CH ADAPTER TUNER PORTABLE PHASE S.RETRIEVER SIGNAL SEL VOL AUDIO PARAMETER TOP MENU TUNE TUNER EDIT MASTER TOOLS VOLUME MENU ENTER HOME MENU SETUP TUNE BAND RETURN 1 Press TUNER to select the tuner. 2 Use BAND to change the frequency one . Release the button at a time, press TUNE ... SELECT BD DVD TV DTV/TV INPUT DVR CD CD-R CH AUDIO PARAMETER TOP MENU TUNE TUNER EDIT MASTER TOOLS VOLUME MENU ENTER HOME MENU SETUP TUNE BAND RETURN MUTE ADAPTER TUNER PORTABLE BASS TRE PHASE S.RETRIEVER SIGNAL SEL VOL HDD 1 DVD 2 VCR 3 DISP Note 1 • If the ...
... CD CD-R CH ADAPTER TUNER PORTABLE PHASE S.RETRIEVER SIGNAL SEL VOL AUDIO PARAMETER TOP MENU TUNE TUNER EDIT MASTER TOOLS VOLUME MENU ENTER HOME MENU SETUP TUNE BAND RETURN 1 Press TUNER to select the tuner. 2 Use BAND to change the frequency one . Release the button at a time, press TUNE ... SELECT BD DVD TV DTV/TV INPUT DVR CD CD-R CH AUDIO PARAMETER TOP MENU TUNE TUNER EDIT MASTER TOOLS VOLUME MENU ENTER HOME MENU SETUP TUNE BAND RETURN MUTE ADAPTER TUNER PORTABLE BASS TRE PHASE S.RETRIEVER SIGNAL SEL VOL HDD 1 DVD 2 VCR 3 DISP Note 1 • If the ...


