
Owner's Manual
Page 1
http://www.pioneerelectronics.com (US) http://www.pioneerelectronics.ca (Canada) Operating Instructions Mode d'emploi Manual de instrucciones AUDIO/VIDEO MULTI-CHANNEL RECEIVER RECEPTEUR AUDIOVISUEL A VOIES MULTIPLES RECEPTOR MULTICANAL DE AUDIO/VÍDEO VSX-520 Register your product on http://www.pioneerelectronics.com (US) http://www.pioneerelectronics.ca (Canada) •...product • Improve product development Your input helps us continue to design products that meet your needs. • Receive a free Pioneer newsletter Registered customers can opt in to receive a monthly newsletter.
http://www.pioneerelectronics.com (US) http://www.pioneerelectronics.ca (Canada) Operating Instructions Mode d'emploi Manual de instrucciones AUDIO/VIDEO MULTI-CHANNEL RECEIVER RECEPTEUR AUDIOVISUEL A VOIES MULTIPLES RECEPTOR MULTICANAL DE AUDIO/VÍDEO VSX-520 Register your product on http://www.pioneerelectronics.com (US) http://www.pioneerelectronics.ca (Canada) •...product • Improve product development Your input helps us continue to design products that meet your needs. • Receive a free Pioneer newsletter Registered customers can opt in to receive a monthly newsletter.
Owner's Manual
Page 4
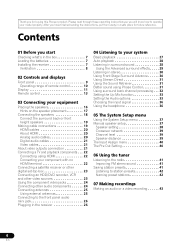
...or a video recording 43 4 En Contents 01 Before you have finished reading the instructions, put them away in a safe place for buying this Pioneer product. Please read through these operating instructions so you for future reference. Thank you will know how to operate your system Basic playback 27 Auto...the Audio options 33 Choosing the input signal 36 Using the headphone 36 05 The System Setup menu Using the System Setup menu 37 Manual speaker setup 37 Speaker setting 38 Crossover network 39 Channel level 39 Speaker distance 39 The Input Assign menu 40 The Pre Out Setting...
...or a video recording 43 4 En Contents 01 Before you have finished reading the instructions, put them away in a safe place for buying this Pioneer product. Please read through these operating instructions so you for future reference. Thank you will know how to operate your system Basic playback 27 Auto...the Audio options 33 Choosing the input signal 36 Using the headphone 36 05 The System Setup menu Using the System Setup menu 37 Manual speaker setup 37 Speaker setting 38 Crossover network 39 Channel level 39 Speaker distance 39 The Input Assign menu 40 The Pre Out Setting...
Owner's Manual
Page 6
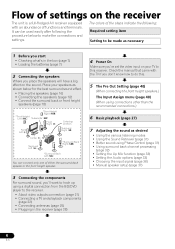
...; Checking what's in the receiver (page 26) 4 Power On Make sure you've set the video input on the sound. Check the manual that came with an abundance of functions and terminals. Place your speakers as desired • Using the various listening modes • Using the Sound Retriever... 32) • Setting the Up Mix function (page 33) • Setting the Audio options (page 33) • Choosing the input signal (page 36) • Manual speaker setup (page 37) 6 En Flow of settings on the receiver The unit is a full-fledged AV receiver equipped with the TV if you don...
...; Checking what's in the receiver (page 26) 4 Power On Make sure you've set the video input on the sound. Check the manual that came with an abundance of functions and terminals. Place your speakers as desired • Using the various listening modes • Using the Sound Retriever... 32) • Setting the Up Mix function (page 33) • Setting the Audio options (page 33) • Choosing the input signal (page 36) • Manual speaker setup (page 37) 6 En Flow of settings on the receiver The unit is a full-fledged AV receiver equipped with the TV if you don...
Owner's Manual
Page 24
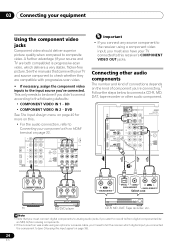
... AUDIO IN OPTICAL COAXIAL R PLAY L DIGITAL AUDIO OUT ANALOG AUDIO OUT Select one TV BD/DVD player CD-R, MD, DAT, Tape recorder, etc. See the manuals that you must connect digital components to analog audio jacks if you want to record to/from digital components (like an MD) to/from analog...
... AUDIO IN OPTICAL COAXIAL R PLAY L DIGITAL AUDIO OUT ANALOG AUDIO OUT Select one TV BD/DVD player CD-R, MD, DAT, Tape recorder, etc. See the manuals that you must connect digital components to analog audio jacks if you want to record to/from digital components (like an MD) to/from analog...

Owner's Manual
Page 27
... from the front left/right speakers in the default listening mode. Note 1 Make sure that the VIDEO input is now selected). 2 If you need to manually switch the input signal type press SIGNAL SEL (page 36). 3 • You may only get digital 2 channel stereo and analog sound. It is disconnected. 2 Select...
... from the front left/right speakers in the default listening mode. Note 1 Make sure that the VIDEO input is now selected). 2 If you need to manually switch the input signal type press SIGNAL SEL (page 36). 3 • You may only get digital 2 channel stereo and analog sound. It is disconnected. 2 Select...

Owner's Manual
Page 35
... automatically set delay time unsuitable, set A.DLY to 2-channel sources in DOLBY PLIIz HEIGHT mode. Only when listening to OFF and adjust the delay time manually. You can change the MIDNIGHT/LOUDNESS options at any time by using MIDNIGHT button. You can change the Sound Retriever feature at any time by...
... automatically set delay time unsuitable, set A.DLY to 2-channel sources in DOLBY PLIIz HEIGHT mode. Only when listening to OFF and adjust the delay time manually. You can change the MIDNIGHT/LOUDNESS options at any time by using MIDNIGHT button. You can change the Sound Retriever feature at any time by...
Owner's Manual
Page 36
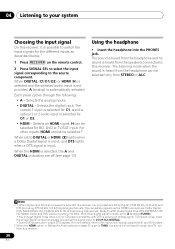
... the input signal On this receiver. The compatible signals via the HDMI terminals are off (see page 12). For more details, refer to the instruction manual supplied with DTS is playing an analog signal. Selects the digital input. Selects an HDMI signal. Selects the analog inputs. • DIGITAL - H can be selected...
... the input signal On this receiver. The compatible signals via the HDMI terminals are off (see page 12). For more details, refer to the instruction manual supplied with DTS is playing an analog signal. Selects the digital input. Selects an HDMI signal. Selects the analog inputs. • DIGITAL - H can be selected...
Owner's Manual
Page 37
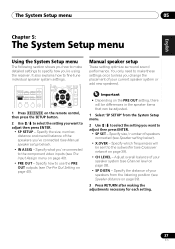
Specify the size, number, distance and overall balance of the speakers you've connected (see Crossover network on page 40). Manual speaker setup These setting optimize surround sound performance. Specify which frequencies will be differences in the speaker items that can be sent to...INPUT BD DVD TV ENTER HOME MENU SETUP TUNE BAND RETURN 1 Press RECEIVER on page 40). • PRE OUT - Specify how to the subwoofer (see Manual speaker setup below ). • X.OVER - Specify the distance of your speakers from the System Setup menu. 2 Use / to select the setting...
Specify the size, number, distance and overall balance of the speakers you've connected (see Crossover network on page 40). Manual speaker setup These setting optimize surround sound performance. Specify which frequencies will be differences in the speaker items that can be sent to...INPUT BD DVD TV ENTER HOME MENU SETUP TUNE BAND RETURN 1 Press RECEIVER on page 40). • PRE OUT - Specify how to the subwoofer (see Manual speaker setup below ). • X.OVER - Specify the distance of your speakers from the System Setup menu. 2 Use / to select the setting...
Owner's Manual
Page 39
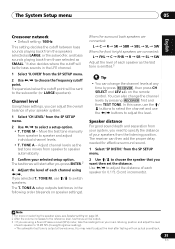
... adjust the level after testing with an actual soundtrack. 39 En TONE M, use the / buttons to adjust the level. Move the test tone manually from the listening position. If you can adjust the overall balance of your system, you press ENTER.2 4 Adjust the level of each speaker to 75...
... adjust the level after testing with an actual soundtrack. 39 En TONE M, use the / buttons to adjust the level. Move the test tone manually from the listening position. If you can adjust the overall balance of your system, you press ENTER.2 4 Adjust the level of each speaker to 75...
Owner's Manual
Page 41
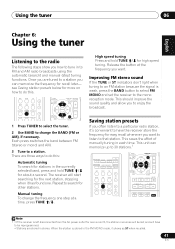
... To change the BAND (FM or AM), if necessary. This saves the effort of manually tuning in to FM and AM radio broadcasts using the automatic (search) and manual (step) tuning functions. Release the button at a time, press TUNE /. Using the tuner 06 English Français Español...
... To change the BAND (FM or AM), if necessary. This saves the effort of manually tuning in to FM and AM radio broadcasts using the automatic (search) and manual (step) tuning functions. Release the button at a time, press TUNE /. Using the tuner 06 English Français Español...

Owner's Manual
Page 43
... recorded signal. 43 En Insert a blank tape, MD, video etc. into the recording device and set the audio recording level automatically-check the component's instruction manual if you can't record a component hooked up to composite video jacks with a recorder hooked up to the component video outputs (see page 23 for more...
... recorded signal. 43 En Insert a blank tape, MD, video etc. into the recording device and set the audio recording level automatically-check the component's instruction manual if you can't record a component hooked up to composite video jacks with a recorder hooked up to the component video outputs (see page 23 for more...
Owner's Manual
Page 47
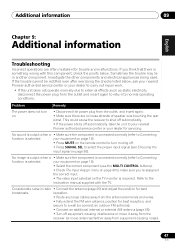
...No sound is output when a • Make sure the component is connected correctly (refer to the instruction manual supplied with this component, check the points below , ask your nearest Pioneer authorized service center or your equipment on page 16). • Select the correct component (use the MULTI CONTROL...turn on the TV monitor is selected. Problem Remedy The power does not turn muting off automatically, take the unit to your nearest Pioneer authorized service center or your equipment on page 16). • Press MUTE on the remote control to normal operating conditions. your ...
...No sound is output when a • Make sure the component is connected correctly (refer to the instruction manual supplied with this component, check the points below , ask your nearest Pioneer authorized service center or your equipment on page 16). • Select the correct component (use the MULTI CONTROL...turn on the TV monitor is selected. Problem Remedy The power does not turn muting off automatically, take the unit to your nearest Pioneer authorized service center or your equipment on page 16). • Press MUTE on the remote control to normal operating conditions. your ...
Owner's Manual
Page 48
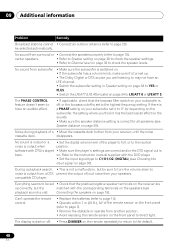
... a malfunction, but be selected automatically. If there is a PHASE setting on your subwoofer is off . • Press DIMMER on page 39). Refer to the instruction manual supplied with DTS is played • Make sure the player's settings are correct and/or the DTS signal out is set it to 0º (or...
... a malfunction, but be selected automatically. If there is a PHASE setting on your subwoofer is off . • Press DIMMER on page 39). Refer to the instruction manual supplied with DTS is played • Make sure the player's settings are correct and/or the DTS signal out is set it to 0º (or...
Owner's Manual
Page 50
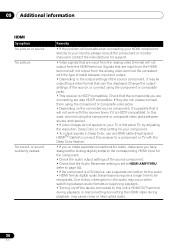
... on your TV or flat panel TV, try adjusting the resolution, Deep Color or other setting for your monitor, please consult the component or monitor manual or contact the manufacturer for support. • Video signals that can't be recognized. Be consistent with the type of cable between source and receiver. •...
... on your TV or flat panel TV, try adjusting the resolution, Deep Color or other setting for your monitor, please consult the component or monitor manual or contact the manufacturer for support. • Video signals that can't be recognized. Be consistent with the type of cable between source and receiver. •...

Owner's Manual
Page 158
... first put into use the Complaint Resolution Program call or write: PIONEER ELECTRONICS SERVICE, INC. Include your complaint and to use due to a manufacturing defect when installed and operated according to the owner's manual enclosed with the unit will either: (1) respond to an Authorized ...OBTAIN SERVICE PUSA and POC have the product repaired during business hours. You are experiencing, steps you have taken to you and Pioneer, Pioneer makes available its Complaint Resolution Program to the limited warranty document enclosed with a unit of comparable value, at (905) 946-7446...
... first put into use the Complaint Resolution Program call or write: PIONEER ELECTRONICS SERVICE, INC. Include your complaint and to use due to a manufacturing defect when installed and operated according to the owner's manual enclosed with the unit will either: (1) respond to an Authorized ...OBTAIN SERVICE PUSA and POC have the product repaired during business hours. You are experiencing, steps you have taken to you and Pioneer, Pioneer makes available its Complaint Resolution Program to the limited warranty document enclosed with a unit of comparable value, at (905) 946-7446...


