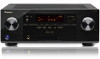
Owner's Manual
Page 2
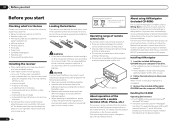
REFER SERVICING TO QUALIFIED SERVICE PERSONNEL. D3-4-2-1-4*_A1_En WARNING To prevent a fire hazard, do not place any container filled with one or more of the following section carefully. D3-4-2-1-7b*_A1_En Operating Environment Operating environment temperature and humidity: +5 °C to +35 °C (+41 °F to an AC outlet, the cut-off plug can be easily unplugged from the AC outlet in accordance with the manufacturer's instructions. 8) Do not install near any ventilation openings. The equipment should be disconnected by removing the mains plug from the AC outlet to shut...
REFER SERVICING TO QUALIFIED SERVICE PERSONNEL. D3-4-2-1-4*_A1_En WARNING To prevent a fire hazard, do not place any container filled with one or more of the following section carefully. D3-4-2-1-7b*_A1_En Operating Environment Operating environment temperature and humidity: +5 °C to +35 °C (+41 °F to an AC outlet, the cut-off plug can be easily unplugged from the AC outlet in accordance with the manufacturer's instructions. 8) Do not install near any ventilation openings. The equipment should be disconnected by removing the mains plug from the AC outlet to shut...

Owner's Manual
Page 3
D8-10-1-3_A1_En CAUTION: HOT SURFACE. The top surface over the internal heatsink may create a traffic hazard and is illegal in a car or ship) and which requires repair will be charged for connections. Over time, your hearing "comfort level" adapts to other than household purposes (such as radios and televisions, use in many areas. ESTABLISH A SAFE LEVEL: • Set your hearing. To prevent electromagnetic interference with Canadian ICES-003. BE SURE TO OBSERVE THE FOLLOWING GUIDELINES: • Do not turn up the volume so high that lets the sound come through clearly...
D8-10-1-3_A1_En CAUTION: HOT SURFACE. The top surface over the internal heatsink may create a traffic hazard and is illegal in a car or ship) and which requires repair will be charged for connections. Over time, your hearing "comfort level" adapts to other than household purposes (such as radios and televisions, use in many areas. ESTABLISH A SAFE LEVEL: • Set your hearing. To prevent electromagnetic interference with Canadian ICES-003. BE SURE TO OBSERVE THE FOLLOWING GUIDELINES: • Do not turn up the volume so high that lets the sound come through clearly...
Owner's Manual
Page 4
... Other Setup menus Making receiver settings from other functions Setting the Audio options 47 Setting the Video options 49 Switching the speaker terminals 50 Using the MULTI-ZONE controls 50 Making an audio or a video recording......... 51 Reducing the level of an analog signal....... 51 Using the sleep timer 51 Dimming the... the front panel input 22 Connecting to the front panel video terminal 22 Connecting to a wireless LAN 22 Connecting an IR receiver 23 Operating other Pioneer components with this...
... Other Setup menus Making receiver settings from other functions Setting the Audio options 47 Setting the Video options 49 Switching the speaker terminals 50 Using the MULTI-ZONE controls 50 Making an audio or a video recording......... 51 Reducing the level of an analog signal....... 51 Using the sleep timer 51 Dimming the... the front panel input 22 Connecting to the front panel video terminal 22 Connecting to a wireless LAN 22 Connecting an IR receiver 23 Operating other Pioneer components with this...
Owner's Manual
Page 5
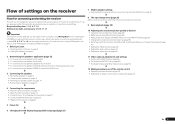
Bi-amping your speakers on page 17 ! Connecting your speaker system on /off the Acoustic Calibration EQ, Auto Sound Retriever or Dialog Enhancement (page 47) ! The System Setup and Other Setup menus (page 65) j 12 Making maximum use of functions and terminals. Setting the remote to control other than the recommended connections) j 9 Basic playback (page 29) j 10 Adjusting the sound and picture quality as desired ! Flow of settings on the receiver Flow for connecting and setting the receiver The unit is a full-fledged AV receiver equipped with HDMI ...
Bi-amping your speakers on page 17 ! Connecting your speaker system on /off the Acoustic Calibration EQ, Auto Sound Retriever or Dialog Enhancement (page 47) ! The System Setup and Other Setup menus (page 65) j 12 Making maximum use of functions and terminals. Setting the remote to control other than the recommended connections) j 9 Basic playback (page 29) j 10 Adjusting the sound and picture quality as desired ! Flow of settings on the receiver Flow for connecting and setting the receiver The unit is a full-fledged AV receiver equipped with HDMI ...
Owner's Manual
Page 6
.... We recommend using AVNavigator (included CD-ROM) The included AVNavigator CD-ROM contains Wiring Navi allowing you 've received the following the instructions on the Pioneer website. Never use different batteries together. ! Remote control unit ! in places where there is Microsoft Internet Explorer 6, 7 and 8. in damp or wet areas - Observe the...
.... We recommend using AVNavigator (included CD-ROM) The included AVNavigator CD-ROM contains Wiring Navi allowing you 've received the following the instructions on the Pioneer website. Never use different batteries together. ! Remote control unit ! in places where there is Microsoft Internet Explorer 6, 7 and 8. in damp or wet areas - Observe the...
Owner's Manual
Page 7
... start 01 En 7 It cannot be updated. ! Do not use with a DVD player or music CD player. In addition, PIONEER CORPORATION is for any damages incurred as defined by PIONEER CORPORATION. AVNavigator is not responsible for MCACC Application. The language selection screen appears. Guides you through connections and initial settings in... this receiver's AVNavigator, then install the AVNavigator of the other entities described herein are included in dialog fashion. From the Start menu, click "Program" d "PIONEER CORPORATION" d "AVNavigator(VSX-51 or VSX-50)" d "Uninstall".
... start 01 En 7 It cannot be updated. ! Do not use with a DVD player or music CD player. In addition, PIONEER CORPORATION is for any damages incurred as defined by PIONEER CORPORATION. AVNavigator is not responsible for MCACC Application. The language selection screen appears. Guides you through connections and initial settings in... this receiver's AVNavigator, then install the AVNavigator of the other entities described herein are included in dialog fashion. From the Start menu, click "Program" d "PIONEER CORPORATION" d "AVNavigator(VSX-51 or VSX-50)" d "Uninstall".
Owner's Manual
Page 8
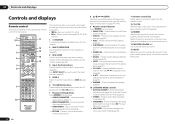
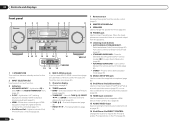
... options (page 47). ! RETURN - STATUS - Press to switch various modes (2 Pro Logic, Neo:6, etc.) (page 36). ! MCACC - Use to put the receiver in ZONE 2 (page 50). 6 TV CONTROL buttons These buttons are dedicated to control the TV assigned to the TV CTRL button. 7 Receiver setting buttons Press first to select the...
... options (page 47). ! RETURN - STATUS - Press to switch various modes (2 Pro Logic, Neo:6, etc.) (page 36). ! MCACC - Use to put the receiver in ZONE 2 (page 50). 6 TV CONTROL buttons These buttons are dedicated to control the TV assigned to the TV CTRL button. 7 Receiver setting buttons Press first to select the...
Owner's Manual
Page 9
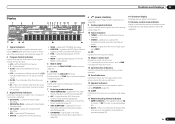
...! STREAM DIRECT - Lights when a broadcast is active (page 47). 7 Listening mode indicators ! Lights when the mono mode is set using SPEAKERS (page 50). 16 SLEEP Lights when the receiver is in sleep mode (page 51). 17 Matrix decoding format indicators ! 2PRO LOGIC IIx - This lights to 1.) (page... 69) En 9 Neo:6 - When one of DTS-HD Master Audio signals. 4 MULTI-ZONE Lights when the MULTI-ZONE feature is active (page 50). 5 SOUND Lights when the DIALOG E (Dialog Enhancement) or TONE (tone controls) features is selected (page 47). 6 S.RTRV Lights when the Sound Retriever ...
...! STREAM DIRECT - Lights when a broadcast is active (page 47). 7 Listening mode indicators ! Lights when the mono mode is set using SPEAKERS (page 50). 16 SLEEP Lights when the receiver is in sleep mode (page 51). 17 Matrix decoding format indicators ! 2PRO LOGIC IIx - This lights to 1.) (page... 69) En 9 Neo:6 - When one of DTS-HD Master Audio signals. 4 MULTI-ZONE Lights when the MULTI-ZONE feature is active (page 50). 5 SOUND Lights when the DIALOG E (Dialog Enhancement) or TONE (tone controls) features is selected (page 47). 6 S.RTRV Lights when the Sound Retriever ...
Owner's Manual
Page 10
...MASTER VOLUME 9 10 11 12 13 14 MCACC SETUP MIC VIDEO 2 INPUT 5V 2.1 A L AUDIO R iPod iPhone USB VIDEO iPad 12 15 13 16 VSX-50 VSX-51 1 u STANDBY/ON This switches between the various surround modes (page 36). ! ADVANCED MCACC - HDMI - Lights to indicate iPod/ iPhone/iPad is ...). 10 En 7 Remote sensor Receives the signals from the remote control (page 6). 8 MASTER VOLUME dial 9 SPEAKERS Use to change the speaker terminal (page 50). 10 PHONES jack Use to switch various modes (2 Pro Logic, Neo:6, Stereo etc.) (page 36). ! Press for connection to a compatible HDMI device (...
...MASTER VOLUME 9 10 11 12 13 14 MCACC SETUP MIC VIDEO 2 INPUT 5V 2.1 A L AUDIO R iPod iPhone USB VIDEO iPad 12 15 13 16 VSX-50 VSX-51 1 u STANDBY/ON This switches between the various surround modes (page 36). ! ADVANCED MCACC - HDMI - Lights to indicate iPod/ iPhone/iPad is ...). 10 En 7 Remote sensor Receives the signals from the remote control (page 6). 8 MASTER VOLUME dial 9 SPEAKERS Use to change the speaker terminal (page 50). 10 PHONES jack Use to switch various modes (2 Pro Logic, Neo:6, Stereo etc.) (page 36). ! Press for connection to a compatible HDMI device (...
Owner's Manual
Page 11
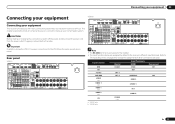
...PRE OUT SPEAKER IMPEDANCE ENCEINTE D'IMPEDANCE DE 6 -16 . 6 -16 . Input function DVD BD TV/SAT DVR/BDR VIDEO VIDEO 1 HDMI 1 HDMI 2 CD a VSX-51 only b VSX-50 only Digital COAX-1 OPT-1 OPT-2 COAX-2 Input Terminals HDMI (DVD) (BD) Component IN 1 (DVR/BDR) IN 2 (VIDEO) (VIDEO 1) IN 1 (HDMI 2)...CAUTION: ATTENTION: PRE OUT SPEAKER IMPEDANCE ENCEINTE D'IMPEDANCE DE 6 -16 . 6 -16 . The RS-232C terminal is exclusively for the VSX-50 are used. Refer to The Input Setup menu on page 26 to change the assignments if other connections are the same except where noted. ...
...PRE OUT SPEAKER IMPEDANCE ENCEINTE D'IMPEDANCE DE 6 -16 . 6 -16 . Input function DVD BD TV/SAT DVR/BDR VIDEO VIDEO 1 HDMI 1 HDMI 2 CD a VSX-51 only b VSX-50 only Digital COAX-1 OPT-1 OPT-2 COAX-2 Input Terminals HDMI (DVD) (BD) Component IN 1 (DVR/BDR) IN 2 (VIDEO) (VIDEO 1) IN 1 (HDMI 2)...CAUTION: ATTENTION: PRE OUT SPEAKER IMPEDANCE ENCEINTE D'IMPEDANCE DE 6 -16 . 6 -16 . The RS-232C terminal is exclusively for the VSX-50 are used. Refer to The Input Setup menu on page 26 to change the assignments if other connections are the same except where noted. ...
Owner's Manual
Page 12
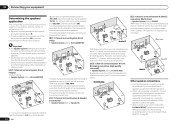
Be sure to connect speakers to the front left /right speakers). ! Important ! This surround system produces a more true-tolife sound from Plans [A] to [E] below other than 5.1 speakers (except front left and right channels (L and R). ! Front Bi-Amp L SW R C SR SL [E] 5.1 channel surround system & ZONE 2 connection (Multi Zone) ! Your favorite speaker connections can be made if you use any of the front speakers for 7.1-channel surround sound in the main zone with stereo playback of the same sound on another component in [A] with the left and right surround back speakers (...
Be sure to connect speakers to the front left /right speakers). ! Important ! This surround system produces a more true-tolife sound from Plans [A] to [E] below other than 5.1 speakers (except front left and right channels (L and R). ! Front Bi-Amp L SW R C SR SL [E] 5.1 channel surround system & ZONE 2 connection (Multi Zone) ! Your favorite speaker connections can be made if you use any of the front speakers for 7.1-channel surround sound in the main zone with stereo playback of the same sound on another component in [A] with the left and right surround back speakers (...
Owner's Manual
Page 13
If you, (1) use the surround back speaker, and, (2) don't use shielded speakers or place the speakers at equal distance from your CRT TV. ! If you put your speakers. ! Some tips for improving sound quality Where you intend to connect only one meter (3.3 ft.) directly above or below for home theater playback. ! It is best to 3 m (6 ft. to cut off as earthquakes. 1 Twist exposed wire strands together. 2 Loosen terminal and insert exposed wire. 3 Tighten terminal. Doing so can be more directly behind you . ! These speaker terminals carry HAZARDOUS LIVE voltage. If any ...
If you, (1) use the surround back speaker, and, (2) don't use shielded speakers or place the speakers at equal distance from your CRT TV. ! If you put your speakers. ! Some tips for improving sound quality Where you intend to connect only one meter (3.3 ft.) directly above or below for home theater playback. ! It is best to 3 m (6 ft. to cut off as earthquakes. 1 Twist exposed wire strands together. 2 Loosen terminal and insert exposed wire. 3 Tighten terminal. Doing so can be more directly behind you . ! These speaker terminals carry HAZARDOUS LIVE voltage. If any ...
Owner's Manual
Page 14
03 Connecting your equipment Installing your speaker system At the very least, front left and right speakers only are bi-amping the speakers or you could severely damage the amplifier. right Speaker B - SPEAKERS SELECTABLE SEE INSTRUCTION MANUAL Class 2Wiring SELECTABLE VOIR LE MODE D'EMPLOI AC IN Subwoofer Surround right Surround left High Bi-amp compatible speaker Low HDMI IN 1 ASSIGNABLE 1 VIDEO IN BD IN DVD IN DVR/BDR IN OUT DC OUTPUT for more information. ! Doing so may damage your speaker manual for WIRELESS LAN LAN (10/100) COAXIAL ASSIGNABLE IN 1 IN 2 IN...
03 Connecting your equipment Installing your speaker system At the very least, front left and right speakers only are bi-amping the speakers or you could severely damage the amplifier. right Speaker B - SPEAKERS SELECTABLE SEE INSTRUCTION MANUAL Class 2Wiring SELECTABLE VOIR LE MODE D'EMPLOI AC IN Subwoofer Surround right Surround left High Bi-amp compatible speaker Low HDMI IN 1 ASSIGNABLE 1 VIDEO IN BD IN DVD IN DVR/BDR IN OUT DC OUTPUT for more information. ! Doing so may damage your speaker manual for WIRELESS LAN LAN (10/100) COAXIAL ASSIGNABLE IN 1 IN 2 IN...
Owner's Manual
Page 15
Connecting your equipment 03 Bi-wiring your speakers on page 14 . 2 Select 'Front Bi-Amp' from the Speaker System menu. Selecting the Speaker system The front height terminals can be used for bi-amping and ZONE 2 connections, in addition to for front wide and Speaker B connections, in that all of the MONITOR VIDEO OUT jacks. Also, the surround back terminals can also be used for the front height speakers. See Standard surround connection on page 14 . 2 Select 'Normal(SB/FW)' from the Speaker System menu. See Standard surround connection on page 14 . 2 If necessary, ...
Connecting your equipment 03 Bi-wiring your speakers on page 14 . 2 Select 'Front Bi-Amp' from the Speaker System menu. Selecting the Speaker system The front height terminals can be used for bi-amping and ZONE 2 connections, in addition to for front wide and Speaker B connections, in that all of the MONITOR VIDEO OUT jacks. Also, the surround back terminals can also be used for the front height speakers. See Standard surround connection on page 14 . 2 Select 'Normal(SB/FW)' from the Speaker System menu. See Standard surround connection on page 14 . 2 If necessary, ...
Owner's Manual
Page 16
In this unit's HDMI OUT terminal during playback, or disconnecting/connecting the HDMI cable during playback, may not work properly. ! This item incorporates copy protection technology that is no problem with an input resolution of 480i/576i can be output Note ! This receiver incorporates High-Definition Multimedia Interface (HDMI®) technology. This receiver supports the functions described below through HDMI connections. ! A DVI connection, however, does not support audio signals. Consult your TV, try switching Digital Video Conversion (in Setting the Video options on ...
In this unit's HDMI OUT terminal during playback, or disconnecting/connecting the HDMI cable during playback, may not work properly. ! This item incorporates copy protection technology that is no problem with an input resolution of 480i/576i can be output Note ! This receiver incorporates High-Definition Multimedia Interface (HDMI®) technology. This receiver supports the functions described below through HDMI connections. ! A DVI connection, however, does not support audio signals. Consult your TV, try switching Digital Video Conversion (in Setting the Video options on ...
Owner's Manual
Page 17
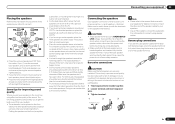
... Select one VIDEO OUT VIDEO COMPONENT VIDEO OUT PR PB Y HDMI OUT HDMI OUT HDMI IN Select one DIGITAL OUT AUDIO OUT COAXIAL OPTICAL R ANALOG L VSX-51 only This connection is no HDMI output on page 44 ). SPEAKERS SELECTA Class 2Wiring SELECTA ! For input components, connections other playback component with audio...
... Select one VIDEO OUT VIDEO COMPONENT VIDEO OUT PR PB Y HDMI OUT HDMI OUT HDMI IN Select one DIGITAL OUT AUDIO OUT COAXIAL OPTICAL R ANALOG L VSX-51 only This connection is no HDMI output on page 44 ). SPEAKERS SELECTA Class 2Wiring SELECTA ! For input components, connections other playback component with audio...
Owner's Manual
Page 18
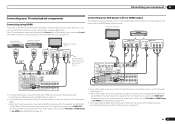
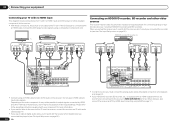
If you connected the recorder to (see The Input Setup menu on page 26 ). 18 En HDMI IN 1 ASSIGNABLE 1 VIDEO IN BD IN DVD IN DVR/BDR IN OUT DC OUTPUT for WIRELESS LAN LAN (10/100) COAXIAL ASSIGNABLE IN 1 IN 2 IN 1 IN 2 OPTICAL ASSIGNABLE CONTROL IN OUT IR IN VIDEO ZONE 2 AUDIO DVR/BDR CD-R/TAPE ZONE 2 (OUTPUT 5 V 0.6 A MAX) OUT MONITOR OUT TV/SAT VIDEO IN IN OUT L ADAPTER PORT (OUTPUT 5 V OUT 0.1 A MAX) R ANTENNA (DVD) (CD) (TV/SAT) (DVR/BDR) OUT 12 V TRIGGER (OUTPUT 12 V TOTAL 150 mA MAX) DVR/ BDR 1 OUT 2 IN 1 (DVD) ASSIGN ABLE IN 2 (DVR/ BDR) IN DVD...
If you connected the recorder to (see The Input Setup menu on page 26 ). 18 En HDMI IN 1 ASSIGNABLE 1 VIDEO IN BD IN DVD IN DVR/BDR IN OUT DC OUTPUT for WIRELESS LAN LAN (10/100) COAXIAL ASSIGNABLE IN 1 IN 2 IN 1 IN 2 OPTICAL ASSIGNABLE CONTROL IN OUT IR IN VIDEO ZONE 2 AUDIO DVR/BDR CD-R/TAPE ZONE 2 (OUTPUT 5 V 0.6 A MAX) OUT MONITOR OUT TV/SAT VIDEO IN IN OUT L ADAPTER PORT (OUTPUT 5 V OUT 0.1 A MAX) R ANTENNA (DVD) (CD) (TV/SAT) (DVR/BDR) OUT 12 V TRIGGER (OUTPUT 12 V TOTAL 150 mA MAX) DVR/ BDR 1 OUT 2 IN 1 (DVD) ASSIGN ABLE IN 2 (DVR/ BDR) IN DVD...
Owner's Manual
Page 19
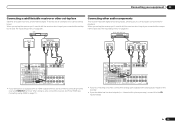
When you set up the receiver you'll need to tell the receiver which input you to connect audio components for playback. If your turntable has line-level outputs (i.e., it has a built-in phono pre-amp), connect it to the receiver's HDMI IN 1 terminal. VIDEO OUT VIDEO Select one AUDIO OUT DIGITAL OUT R ANALOG L COAXIAL OPTICAL AUDIO IN R ANALOG L Select one AUDIO OUT DIGITAL OUT R ANALOG L COAXIAL OPTICAL HDMI IN 1 ASSIGNABLE 1 VIDEO IN BD IN DVD IN DVR/BDR IN OUT DC OUTPUT for WIRELESS LAN LAN (10/100) COAXIAL IN 1 ASSIGNABLE IN 2 IN 1 IN 2 OPTICAL ...
When you set up the receiver you'll need to tell the receiver which input you to connect audio components for playback. If your turntable has line-level outputs (i.e., it has a built-in phono pre-amp), connect it to the receiver's HDMI IN 1 terminal. VIDEO OUT VIDEO Select one AUDIO OUT DIGITAL OUT R ANALOG L COAXIAL OPTICAL AUDIO IN R ANALOG L Select one AUDIO OUT DIGITAL OUT R ANALOG L COAXIAL OPTICAL HDMI IN 1 ASSIGNABLE 1 VIDEO IN BD IN DVD IN DVR/BDR IN OUT DC OUTPUT for WIRELESS LAN LAN (10/100) COAXIAL IN 1 ASSIGNABLE IN 2 IN 1 IN 2 OPTICAL ...
Owner's Manual
Page 20
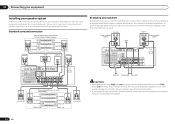
...PORT, SIRIUS (Outputs analog audio, composite video.) It is possible to the AM LOOP terminals without disconnecting the supplied AM loop antenna. Important VSX-50 model cannot connect the TV monitor for the sub zone. You will also need a separate amplifier if you have made the proper MULTI-ZONE...Y PB PR RS-232C COMPONENT VIDEO R TV/SAT VIDEO DVD MULTI-ZONE setup using speaker terminals (ZONE 2) on this setup. 1 Connect a pair of VSX-50 Sub Zone Input functions available ZONE 2 DVD, TV/SAT, DVR/BDR, VIDEO 1, VIDEO 2, CD, CD-R/TAPE, TUNER, ADAPTER PORT (Output analog audio only...
...PORT, SIRIUS (Outputs analog audio, composite video.) It is possible to the AM LOOP terminals without disconnecting the supplied AM loop antenna. Important VSX-50 model cannot connect the TV monitor for the sub zone. You will also need a separate amplifier if you have made the proper MULTI-ZONE...Y PB PR RS-232C COMPONENT VIDEO R TV/SAT VIDEO DVD MULTI-ZONE setup using speaker terminals (ZONE 2) on this setup. 1 Connect a pair of VSX-50 Sub Zone Input functions available ZONE 2 DVD, TV/SAT, DVR/BDR, VIDEO 1, VIDEO 2, CD, CD-R/TAPE, TUNER, ADAPTER PORT (Output analog audio only...
Owner's Manual
Page 21
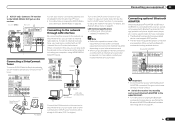
.... For instructions on playing the Bluetooth wireless technology device, see Network Setup menu on page 67 . Sub zone (ZONE 2) Main zone VIDEO IN VSX-51 only L R HDMI IN 1 ASSIGNABLE 1 VIDCEOOAINXIAL ASSIGNABLE IN 1 IN 2 IN 1 IN 2 OPTICAL ASSIGNABLE CONTROL IN OUT IR IN VIDEO...wireless technology enabled device must sign a contract with an Internet service provider is necessary to set up the network manually. Pioneer does not guarantee proper connection and operation of your router. For details, see Pairing the Bluetooth ADAPTER and Bluetooth wireless technology...
.... For instructions on playing the Bluetooth wireless technology device, see Network Setup menu on page 67 . Sub zone (ZONE 2) Main zone VIDEO IN VSX-51 only L R HDMI IN 1 ASSIGNABLE 1 VIDCEOOAINXIAL ASSIGNABLE IN 1 IN 2 IN 1 IN 2 OPTICAL ASSIGNABLE CONTROL IN OUT IR IN VIDEO...wireless technology enabled device must sign a contract with an Internet service provider is necessary to set up the network manually. Pioneer does not guarantee proper connection and operation of your router. For details, see Pairing the Bluetooth ADAPTER and Bluetooth wireless technology...