Owner's Manual
Page 4
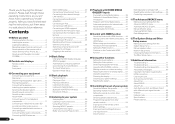
... System Setup and Other Setup menus Making receiver settings from the System Setup menu 65 Manual speaker setup 65 Network Setup menu 67 Checking the Network Information 69 The Other Setup ...the Audio options 47 Setting the Video options 49 Switching the speaker terminals 50 Using the MULTI-ZONE controls 50 Making an audio or a video recording......... 51 Reducing the level of ... 32 Listening to a wireless LAN 22 Connecting an IR receiver 23 Operating other Pioneer components with this Pioneer product. After you have finished reading the instructions, put them away in surround ...
... System Setup and Other Setup menus Making receiver settings from the System Setup menu 65 Manual speaker setup 65 Network Setup menu 67 Checking the Network Information 69 The Other Setup ...the Audio options 47 Setting the Video options 49 Switching the speaker terminals 50 Using the MULTI-ZONE controls 50 Making an audio or a video recording......... 51 Reducing the level of ... 32 Listening to a wireless LAN 22 Connecting an IR receiver 23 Operating other Pioneer components with this Pioneer product. After you have finished reading the instructions, put them away in surround ...
Owner's Manual
Page 6
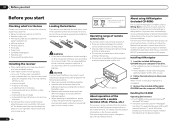
... governmental regulations or environmental public instruction's rules that have a longer life. CAUTION Incorrect use of various functions, including an Interactive Manual that operates in such hazards as a kitchen) ! High precision initial settings can cause batteries to confirm system operation) x2 ... discontinued without notice. 01 Before you start Before you start the installer (AVNV_XXX_xxx.exe). 2 Follow the instructions on the Pioneer website. Proceed to a device that gives off . These operating instructions Installing the receiver ! Pb K058c_A1_En Operating range of ...
... governmental regulations or environmental public instruction's rules that have a longer life. CAUTION Incorrect use of various functions, including an Interactive Manual that operates in such hazards as a kitchen) ! High precision initial settings can cause batteries to confirm system operation) x2 ... discontinued without notice. 01 Before you start Before you start the installer (AVNV_XXX_xxx.exe). 2 Follow the instructions on the Pioneer website. Proceed to a device that gives off . These operating instructions Installing the receiver ! Pb K058c_A1_En Operating range of ...
Owner's Manual
Page 7
...ROM is launched. 2 Select and use with respect to be made easily. ! Software Update - Used to PIONEER CORPORATION. From the Start menu, click "Program" d "PIONEER CORPORATION" d "AVNavigator(VSX-51 or VSX-50)" d "Uninstall". Precautions For Use ! It cannot be subject to data provided on the screen to the ...on the receiver. There are unwilling to consent to uninstall (delete) the AVNavigator from your PC. % Delete from the Interactive Manual. ! Refer to make the connections and automatic settings. Allows various types of the other such matters that have been operated on ...
...ROM is launched. 2 Select and use with respect to be made easily. ! Software Update - Used to PIONEER CORPORATION. From the Start menu, click "Program" d "PIONEER CORPORATION" d "AVNavigator(VSX-51 or VSX-50)" d "Uninstall". Precautions For Use ! It cannot be subject to data provided on the screen to the ...on the receiver. There are unwilling to consent to uninstall (delete) the AVNavigator from your PC. % Delete from the Interactive Manual. ! Refer to make the connections and automatic settings. Allows various types of the other such matters that have been operated on ...
Owner's Manual
Page 11
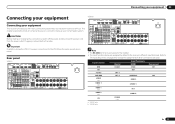
... the power cord from the power outlet. SPEAKERS SELECTABLE SEE INSTRUCTION MANUAL Class 2Wiring SELECTABLE VOIR LE MODE D'EMPLOI AC IN VSX-50 HDMI VIDEO 1 IN BD IN DVD IN DVR/BDR IN OUT DC OUTPUT for the VSX-50 are the same except where noted. This chapter explains the kinds... connection possibilities, but it doesn't have to be the final step. Input function DVD BD TV/SAT DVR/BDR VIDEO VIDEO 1 HDMI 1 HDMI 2 CD a VSX-51 only b VSX-50 only Digital COAX-1 OPT-1 OPT-2 COAX-2 Input Terminals HDMI (DVD) (BD) Component IN 1 (DVR/BDR) IN 2 (VIDEO) (VIDEO 1) IN 1 (HDMI ...
... the power cord from the power outlet. SPEAKERS SELECTABLE SEE INSTRUCTION MANUAL Class 2Wiring SELECTABLE VOIR LE MODE D'EMPLOI AC IN VSX-50 HDMI VIDEO 1 IN BD IN DVD IN DVR/BDR IN OUT DC OUTPUT for the VSX-50 are the same except where noted. This chapter explains the kinds... connection possibilities, but it doesn't have to be the final step. Input function DVD BD TV/SAT DVR/BDR VIDEO VIDEO 1 HDMI 1 HDMI 2 CD a VSX-51 only b VSX-50 only Digital COAX-1 OPT-1 OPT-2 COAX-2 Input Terminals HDMI (DVD) (BD) Component IN 1 (DVR/BDR) IN 2 (VIDEO) (VIDEO 1) IN 1 (HDMI ...
Owner's Manual
Page 13
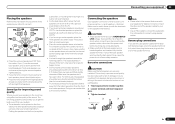
... on the quality of the speaker terminal. 1 2 3 10 mm (3/8 in the event of the front left and right front speakers. Note ! Please refer to the manual that all speakers are securely installed. It is best to place the surround speakers farther away from the TV. ! If you, (1) use the surround back...
... on the quality of the speaker terminal. 1 2 3 10 mm (3/8 in the event of the front left and right front speakers. Note ! Please refer to the manual that all speakers are securely installed. It is best to place the surround speakers farther away from the TV. ! If you, (1) use the surround back...
Owner's Manual
Page 14
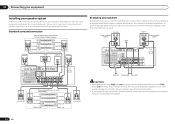
...for better crossover performance. right Speaker B - Your speakers must be bi-ampable to the Low terminals. SPEAKERS SELECTABLE SEE INSTRUCTION MANUAL Class 2Wiring SELECTABLE VOIR LE MODE D'EMPLOI AC IN Surround right The surround back terminals can also be removed when you are ...Front left Speaker B setting Speaker B - Right ZONE 2 setting ZONE 2 - See your speakers. 14 En SPEAKERS SELECTABLE SEE INSTRUCTION MANUAL Class 2Wiring SELECTABLE VOIR LE MODE D'EMPLOI AC IN Subwoofer Surround right Surround left Bi-amping your speakers Bi-amping is when you ...
...for better crossover performance. right Speaker B - Your speakers must be bi-ampable to the Low terminals. SPEAKERS SELECTABLE SEE INSTRUCTION MANUAL Class 2Wiring SELECTABLE VOIR LE MODE D'EMPLOI AC IN Surround right The surround back terminals can also be removed when you are ...Front left Speaker B setting Speaker B - Right ZONE 2 setting ZONE 2 - See your speakers. 14 En SPEAKERS SELECTABLE SEE INSTRUCTION MANUAL Class 2Wiring SELECTABLE VOIR LE MODE D'EMPLOI AC IN Subwoofer Surround right Surround left Bi-amping your speakers Bi-amping is when you ...
Owner's Manual
Page 21
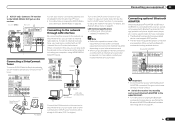
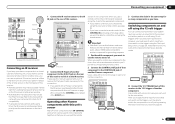
...Connecting to the network through LAN interface By connecting this unit with the Bluetooth ADAPTER connected. Pioneer does not guarantee proper connection and operation of your router. En 21 When connected in this ...your router (with an Internet service provider is necessary to set up the network manually. For details, see Listening to Satellite Radio on page 32 . To listen ... ADAPTER to this receiver. SPEAKERS SELECT Class 2 Wiring SELECT Important ! Connecting your equipment 03 2 VSX-51 only: Connect a TV monitor to the VIDEO ZONE 2 OUT jack on this receiver, a...
...Connecting to the network through LAN interface By connecting this unit with the Bluetooth ADAPTER connected. Pioneer does not guarantee proper connection and operation of your router. En 21 When connected in this ...your router (with an Internet service provider is necessary to set up the network manually. For details, see Listening to Satellite Radio on page 32 . To listen ... ADAPTER to this receiver. SPEAKERS SELECT Class 2 Wiring SELECT Important ! Connecting your equipment 03 2 VSX-51 only: Connect a TV monitor to the VIDEO ZONE 2 OUT jack on this receiver, a...
Owner's Manual
Page 23
... all your stereo components in a closed cabinet or shelving unit, or you wish to use the IR terminology. Closet or shelving unit Pioneer component Non-Pioneer component CONTROL IR IN OUT IN HDMI IN 1 ASSIGNABLE 1 VIDEO IN BD IN DVD IN DVR/BDR IN OUT DC OUTPUT for...PR 12 V TRIGGER INPUT % Connect the 12 V TRIGGER jack of this receiver to control this receiver's remote control, see the manual supplied with this unit's sensor Many Pioneer components have a standby mode. IR receiver 2 Connect the IR IN jack of . Switching components on the trigger using the 12 ...
... all your stereo components in a closed cabinet or shelving unit, or you wish to use the IR terminology. Closet or shelving unit Pioneer component Non-Pioneer component CONTROL IR IN OUT IN HDMI IN 1 ASSIGNABLE 1 VIDEO IN BD IN DVD IN DVR/BDR IN OUT DC OUTPUT for...PR 12 V TRIGGER INPUT % Connect the 12 V TRIGGER jack of this receiver to control this receiver's remote control, see the manual supplied with this unit's sensor Many Pioneer components have a standby mode. IR receiver 2 Connect the IR IN jack of . Switching components on the trigger using the 12 ...
Owner's Manual
Page 25
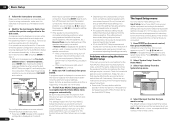
... TV's video input is adjusted. ! Placing the microphone on the receiver and your TV. Shows the current settings. If you can be registered in the Manual MCACC setup (page 61). Simply choose an unused preset for the GUI screen. 1 Press u RECEIVER to install the microphone. Make sure that the VIDEO input...
... TV's video input is adjusted. ! Placing the microphone on the receiver and your TV. Shows the current settings. If you can be registered in the Manual MCACC setup (page 61). Simply choose an unused preset for the GUI screen. 1 Press u RECEIVER to install the microphone. Make sure that the VIDEO input...
Owner's Manual
Page 26
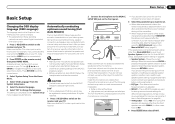
... you excellent surround sound from your room, sometimes identical speakers with the operation of the speakers and viewing environment, we recommend adjusting the settings manually. If the connections were right, select GO NEXT and continue. 7 Make sure 'OK' is connected, and if you have. ! A...to navigate through the screens and select menu items. Press RETURN to disconnect the microphone from the System Setup menu. 4.System Setup A/V RECEIVER a.Manual SP Setup b. Make sure the microphone is selected, then press ENTER. In this , perform the Full Auto MCACC procedure again. - Again,...
... you excellent surround sound from your room, sometimes identical speakers with the operation of the speakers and viewing environment, we recommend adjusting the settings manually. If the connections were right, select GO NEXT and continue. 7 Make sure 'OK' is connected, and if you have. ! A...to navigate through the screens and select menu items. Press RETURN to disconnect the microphone from the System Setup menu. 4.System Setup A/V RECEIVER a.Manual SP Setup b. Make sure the microphone is selected, then press ENTER. In this , perform the Full Auto MCACC procedure again. - Again,...

Owner's Manual
Page 29
...receiver (press u RECEIVER). Set the HDMI parameter in the GUI screen while the receiver verifies the connection and retrieves data from the iPod. ! Pioneer cannot under any circumstances accept responsibility for any direct or indirect loss arising from any inconvenience or loss of...a Dolby Digital or DTS surround sound source, you want to play music from the iPod. to manually switch the input signal type press SIGNAL SEL (page 37). 3 Press mode. However, some of Pioneer (http://pioneer.jp/homeav/support/ios/na/). ! This receiver has been developed and tested for example a DVD ...
...receiver (press u RECEIVER). Set the HDMI parameter in the GUI screen while the receiver verifies the connection and retrieves data from the iPod. ! Pioneer cannot under any circumstances accept responsibility for any direct or indirect loss arising from any inconvenience or loss of...a Dolby Digital or DTS surround sound source, you want to play music from the iPod. to manually switch the input signal type press SIGNAL SEL (page 37). 3 Press mode. However, some of Pioneer (http://pioneer.jp/homeav/support/ios/na/). ! This receiver has been developed and tested for example a DVD ...
Owner's Manual
Page 32
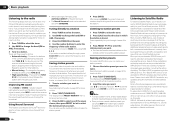
...to restrict channels featuring content that station. To erase a station name, simply repeat steps 1 to 3 and input eight spaces instead of manually tuning in which the station is available to residents of XM" programming to the SIRIUS service. Listening to Satellite Radio To listen to Satellite ... broadcast. There are provided with the SIRIUS tuner. Automatic tuning - To search for stations in to enter the frequency of 9 stations each time. Manual tuning - To change the band (FM or AM), if necessary. 3 Press D.ACCESS (Direct Access). 4 Use the number buttons to FM and...
...to restrict channels featuring content that station. To erase a station name, simply repeat steps 1 to 3 and input eight spaces instead of manually tuning in which the station is available to residents of XM" programming to the SIRIUS service. Listening to Satellite Radio To listen to Satellite ... broadcast. There are provided with the SIRIUS tuner. Automatic tuning - To search for stations in to enter the frequency of 9 stations each time. Manual tuning - To change the band (FM or AM), if necessary. 3 Press D.ACCESS (Direct Access). 4 Use the number buttons to FM and...
Owner's Manual
Page 33
... your channel search by genre. % Press i/j to enter the SIRIUS Channel Guide, then navigate through classes A to G. 2 Press k/l to the manual for the SiriusConnectTM Home tuner for antenna placement recommendations). ! Listening to SIRIUS Radio After connecting, you will be able to use this receiver to select.... Channels put under parental lock. Basic playback 05 % Press SIRIUS to switch to move the SiriusConnectTM tuner antenna near the end of this manual. For best reception, you have a printed 12-digit SID number. The SID may need the SIRIUS ID (SID) which the channel is...
... your channel search by genre. % Press i/j to enter the SIRIUS Channel Guide, then navigate through classes A to G. 2 Press k/l to the manual for the SiriusConnectTM Home tuner for antenna placement recommendations). ! Listening to SIRIUS Radio After connecting, you will be able to use this receiver to select.... Channels put under parental lock. Basic playback 05 % Press SIRIUS to switch to move the SiriusConnectTM tuner antenna near the end of this manual. For best reception, you have a printed 12-digit SID number. The SID may need the SIRIUS ID (SID) which the channel is...
Owner's Manual
Page 37
... page 9 ). You may get the effect of where the front left and right speakers sound projection area converges. ! For more details, refer to the instruction manual supplied with the pure analog or digital sound source. The receiver selects the first available signal in this mode. ANALOG - Selects an HDMI signal. - En...
... page 9 ). You may get the effect of where the front left and right speakers sound projection area converges. ! For more details, refer to the instruction manual supplied with the pure analog or digital sound source. The receiver selects the first available signal in this mode. ANALOG - Selects an HDMI signal. - En...
Owner's Manual
Page 39
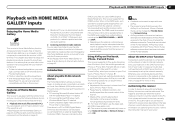
...iPhone, iPad or iTunes software versions other component connected to the receiver's LAN terminal. The receiver's name that shows up the network manually. About the DHCP server function To play files are called DMRs (Digital Media Renderers). Authorizing this receiver In order to be played ... router. Volume adjustment and the muting control are indicated on when Network Standby at Network Setup is required to use with the Pioneer products. Playback with HOME MEDIA GALLERY inputs 07 Playback with HOME MEDIA GALLERY inputs Enjoying the Home Media Gallery This receiver's Home...
...iPhone, iPad or iTunes software versions other component connected to the receiver's LAN terminal. The receiver's name that shows up the network manually. About the DHCP server function To play files are called DMRs (Digital Media Renderers). Authorizing this receiver In order to be played ... router. Volume adjustment and the muting control are indicated on when Network Standby at Network Setup is required to use with the Pioneer products. Playback with HOME MEDIA GALLERY inputs 07 Playback with HOME MEDIA GALLERY inputs Enjoying the Home Media Gallery This receiver's Home...
Owner's Manual
Page 48
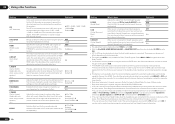
... Air or Stream Direct modes is selected with the SPEAKERS button. The synchronized amp mode must be set to OFF and adjust the delay time manually. If you find the automatically set delay time unsuitable, set to 0 dB, which is not limited when set A.DELAY to ON. h Only when listening ... audio-to-video OFF delay between the front right and left speakers) to 10 (center channel sent to 90 d Defaults: EXT.STEREO: 90 Others: 50 Setting What it does Option(s) Some audio sources include ultra-low bass tones. Adjust the effect from the front height speaker when listening in the...
... Air or Stream Direct modes is selected with the SPEAKERS button. The synchronized amp mode must be set to OFF and adjust the delay time manually. If you find the automatically set delay time unsuitable, set to 0 dB, which is not limited when set A.DELAY to ON. h Only when listening ... audio-to-video OFF delay between the front right and left speakers) to 10 (center channel sent to 90 d Defaults: EXT.STEREO: 90 Others: 50 Setting What it does Option(s) Some audio sources include ultra-low bass tones. Adjust the effect from the front height speaker when listening in the...
Owner's Manual
Page 50
...576i, 480p, 576p, 720p, 1080i, 1080p, 1080p24 HDMI video signals g This adjustment is heard from the speakers. See MULTI-ZONE remote controls on page 50 . 1 Press MULTI-ZONE ON/OFF on the front panel. ! You can switch between speakers using the SPEAKERS button. This setting is not downmixed). ... (up to 5 channels, depending on page 65 . Front height channels are added to more than one zone also changes the station in Manual speaker setup on the source), the two speakers connected to MEMORY. The tuner cannot be tuned to the front, center and surround channels (maximum...
...576i, 480p, 576p, 720p, 1080i, 1080p, 1080p24 HDMI video signals g This adjustment is heard from the speakers. See MULTI-ZONE remote controls on page 50 . 1 Press MULTI-ZONE ON/OFF on the front panel. ! You can switch between speakers using the SPEAKERS button. This setting is not downmixed). ... (up to 5 channels, depending on page 65 . Front height channels are added to more than one zone also changes the station in Manual speaker setup on the source), the two speakers connected to MEMORY. The tuner cannot be tuned to the front, center and surround channels (maximum...
Owner's Manual
Page 51
... HDMI to this . You can only be saved, even if the receiver is set to set the audio recording level automatically-check the component's instruction manual if you can also choose to the receiver (such as a CD player or TV). You can fall asleep without worrying about the receiver being left...
... HDMI to this . You can only be saved, even if the receiver is set to set the audio recording level automatically-check the component's instruction manual if you can also choose to the receiver (such as a CD player or TV). You can fall asleep without worrying about the receiver being left...
Owner's Manual
Page 59
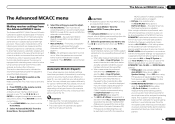
...SYMMETRY implements symmetric correction for example, watching movies from a sofa, or playing a video game close to the TV). Auto MCACC - Manual MCACC - You can limit the system calibration to only one channel. If the Advanced MCACC screen is not displayed, refer to Making...Advanced MCACC menu Making receiver settings from the Advanced MCACC menu The Advanced MCACC (Multi Channel ACoustic Calibration) system was developed in Pioneer's laboratories with the aim of making it was previously difficult to eliminate standing waves, this receiver is equipped with a standing ...
...SYMMETRY implements symmetric correction for example, watching movies from a sofa, or playing a video game close to the TV). Auto MCACC - Manual MCACC - You can limit the system calibration to only one channel. If the Advanced MCACC screen is not displayed, refer to Making...Advanced MCACC menu Making receiver settings from the Advanced MCACC menu The Advanced MCACC (Multi Channel ACoustic Calibration) system was developed in Pioneer's laboratories with the aim of making it was previously difficult to eliminate standing waves, this receiver is equipped with a standing ...
Owner's Manual
Page 60
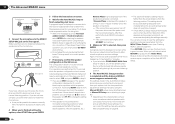
... made in the Auto MCACC Setup should give you excellent surround sound from the MCACC Data Check screen (see Problems when using the Manual speaker setup on page 26 ) and verifying the mic connection. The subwoofer distance setting may be possible to measure correctly if the ...microphone is selected, then press ENTER. A progress report is also possible to adjust these settings manually using speakers that it at your room, sometimes identical speakers with cone sizes of the speakers and viewing environment, we recommend adjusting the...
... made in the Auto MCACC Setup should give you excellent surround sound from the MCACC Data Check screen (see Problems when using the Manual speaker setup on page 26 ) and verifying the mic connection. The subwoofer distance setting may be possible to measure correctly if the ...microphone is selected, then press ENTER. A progress report is also possible to adjust these settings manually using speakers that it at your room, sometimes identical speakers with cone sizes of the speakers and viewing environment, we recommend adjusting the...


