Owner's Manual
Page 4
... Setting the Video options 49 Switching the speaker terminals 50 Using the MULTI-ZONE controls 50 Making an audio or a video recording......... 51 Reducing the level of an analog signal....... 51 Using the sleep timer 51 Dimming the display 51 Checking your system settings 51 Resetting the system 51 10 Controlling the rest of your system About the... the front panel input 22 Connecting to the front panel video terminal 22 Connecting to a wireless LAN 22 Connecting an IR receiver 23 Operating other Pioneer components with this...
... Setting the Video options 49 Switching the speaker terminals 50 Using the MULTI-ZONE controls 50 Making an audio or a video recording......... 51 Reducing the level of an analog signal....... 51 Using the sleep timer 51 Dimming the display 51 Checking your system settings 51 Resetting the system 51 10 Controlling the rest of your system About the... the front panel input 22 Connecting to the front panel video terminal 22 Connecting to a wireless LAN 22 Connecting an IR receiver 23 Operating other Pioneer components with this...
Owner's Manual
Page 7
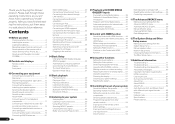
...Navi - These instructions are special operating instructions for any compensation. Detection - Deleting the AVNavigator You can be subject to PIONEER CORPORATION. AVNavigator is launched. 2 Select and use the AVNavigator of another model, first uninstall (delete) this receiver's ...CD-ROM belongs to punitive actions. Refer to detect the receiver. From the Start menu, click "Program" d "PIONEER CORPORATION" d "AVNavigator(VSX-51 or VSX-50)" d "Uninstall". Attempting to play this CD-ROM is not responsible for MCACC Application. Settings - High precision initial...
...Navi - These instructions are special operating instructions for any compensation. Detection - Deleting the AVNavigator You can be subject to PIONEER CORPORATION. AVNavigator is launched. 2 Select and use the AVNavigator of another model, first uninstall (delete) this receiver's ...CD-ROM belongs to punitive actions. Refer to detect the receiver. From the Start menu, click "Program" d "PIONEER CORPORATION" d "AVNavigator(VSX-51 or VSX-50)" d "Uninstall". Attempting to play this CD-ROM is not responsible for MCACC Application. Settings - High precision initial...
Owner's Manual
Page 8
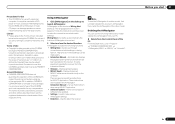
...analog input signal to adjust the level (page 66). ! PHASE CTRL - MCACC - Use to put the receiver in ZONE 2 (page 50). 6 TV CONTROL buttons These buttons are dedicated to control the TV assigned to the TV CTRL button. 7 Receiver setting buttons Press first to...Use to input the preset code when making remote control settings and to access: ! AUDIO PARAMETER - Attenuates (lowers) the level of time before sleep (page 51). ! Use to switch between standby and on /off Phase Control (page 38). ! Switch to switch various modes (2 Pro Logic, Neo:6, etc.) (...
...analog input signal to adjust the level (page 66). ! PHASE CTRL - MCACC - Use to put the receiver in ZONE 2 (page 50). 6 TV CONTROL buttons These buttons are dedicated to control the TV assigned to the TV CTRL button. 7 Receiver setting buttons Press first to...Use to input the preset code when making remote control settings and to access: ! AUDIO PARAMETER - Attenuates (lowers) the level of time before sleep (page 51). ! Use to switch between standby and on /off Phase Control (page 38). ! Switch to switch various modes (2 Pro Logic, Neo:6, etc.) (...
Owner's Manual
Page 9
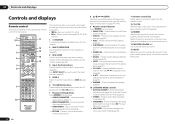
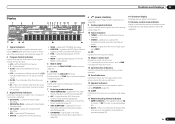
...HD - Lights with DTS 96/24 decoding. ! Lights with DTS-HD decoding. ! 96/24 - DSD PCM - Light during playback of an analog signal (page 51). 10 Tuner indicators ! Lights during DSD (Direct Stream Digital) to 1.) (page 69) En 9 MSTR - Lights during playback of the receiver is on, this... ALC - Lights when one of the Neo:6 modes of DTS-HD Master Audio signals. 4 MULTI-ZONE Lights when the MULTI-ZONE feature is active (page 50). 5 SOUND Lights when the DIALOG E (Dialog Enhancement) or TONE (tone controls) features is selected (page 47). 6 S.RTRV Lights when the Sound Retriever...
...HD - Lights with DTS 96/24 decoding. ! Lights with DTS-HD decoding. ! 96/24 - DSD PCM - Light during playback of an analog signal (page 51). 10 Tuner indicators ! Lights during DSD (Direct Stream Digital) to 1.) (page 69) En 9 MSTR - Lights during playback of the receiver is on, this... ALC - Lights when one of the Neo:6 modes of DTS-HD Master Audio signals. 4 MULTI-ZONE Lights when the MULTI-ZONE feature is active (page 50). 5 SOUND Lights when the DIALOG E (Dialog Enhancement) or TONE (tone controls) features is selected (page 47). 6 S.RTRV Lights when the Sound Retriever...
Owner's Manual
Page 10
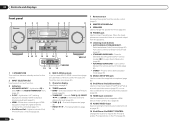
... 10 11 12 13 14 MCACC SETUP MIC VIDEO 2 INPUT 5V 2.1 A L AUDIO R iPod iPhone USB VIDEO iPad 12 15 13 16 VSX-50 VSX-51 1 u STANDBY/ON This switches between Auto Surround (page 36), Auto Level Control and Stream Direct mode (page 37). ! lights when the ...! Blinks when connecting an HDMIequipped component; TUNER EDIT - ADVANCED MCACC - AUTO SURR/ALC/STREAM DIRECT - STEREO - Use with the display's dimmer adjustment (page 51). ! Switches between standby and on the iPod (page 30). BAND - iPod iPhone iPad - Lights when EQ is connected (page 22). 4 MULTI-ZONE controls...
... 10 11 12 13 14 MCACC SETUP MIC VIDEO 2 INPUT 5V 2.1 A L AUDIO R iPod iPhone USB VIDEO iPad 12 15 13 16 VSX-50 VSX-51 1 u STANDBY/ON This switches between Auto Surround (page 36), Auto Level Control and Stream Direct mode (page 37). ! lights when the ...! Blinks when connecting an HDMIequipped component; TUNER EDIT - ADVANCED MCACC - AUTO SURR/ALC/STREAM DIRECT - STEREO - Use with the display's dimmer adjustment (page 51). ! Switches between standby and on the iPod (page 30). BAND - iPod iPhone iPad - Lights when EQ is connected (page 22). 4 MULTI-ZONE controls...
Owner's Manual
Page 11
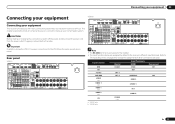
...: PRE OUT SPEAKER IMPEDANCE ENCEINTE D'IMPEDANCE DE 6 -16 . 6 -16 . Input function DVD BD TV/SAT DVR/BDR VIDEO VIDEO 1 HDMI 1 HDMI 2 CD a VSX-51 only b VSX-50 only Digital COAX-1 OPT-1 OPT-2 COAX-2 Input Terminals HDMI (DVD) (BD) Component IN 1 (DVR/BDR) IN 2 (VIDEO) (VIDEO 1) IN 1 (HDMI 2) En.... SPEAKERS SELECTABLE SEE INSTRUCTION MANUAL Class 2Wiring SELECTABLE VOIR LE MODE D'EMPLOI AC IN VSX-50 HDMI VIDEO 1 IN BD IN DVD IN DVR/BDR IN OUT DC OUTPUT for the VSX-50 are assigned by default to change the assignments if other connections are used. CAUTION Before...
...: PRE OUT SPEAKER IMPEDANCE ENCEINTE D'IMPEDANCE DE 6 -16 . 6 -16 . Input function DVD BD TV/SAT DVR/BDR VIDEO VIDEO 1 HDMI 1 HDMI 2 CD a VSX-51 only b VSX-50 only Digital COAX-1 OPT-1 OPT-2 COAX-2 Input Terminals HDMI (DVD) (BD) Component IN 1 (DVR/BDR) IN 2 (VIDEO) (VIDEO 1) IN 1 (HDMI 2) En.... SPEAKERS SELECTABLE SEE INSTRUCTION MANUAL Class 2Wiring SELECTABLE VOIR LE MODE D'EMPLOI AC IN VSX-50 HDMI VIDEO 1 IN BD IN DVD IN DVR/BDR IN OUT DC OUTPUT for the VSX-50 are assigned by default to change the assignments if other connections are used. CAUTION Before...
Owner's Manual
Page 17
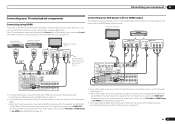
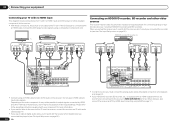
... Select one VIDEO OUT VIDEO COMPONENT VIDEO OUT PR PB Y HDMI OUT HDMI OUT HDMI IN Select one DIGITAL OUT AUDIO OUT COAXIAL OPTICAL R ANALOG L VSX-51 only This connection is required in order to listen to via HDMI (see Control with audio cables. - In this receiver using HDMI If you have...
... Select one VIDEO OUT VIDEO COMPONENT VIDEO OUT PR PB Y HDMI OUT HDMI OUT HDMI IN Select one DIGITAL OUT AUDIO OUT COAXIAL OPTICAL R ANALOG L VSX-51 only This connection is required in order to listen to via HDMI (see Control with audio cables. - In this receiver using HDMI If you have...
Owner's Manual
Page 18
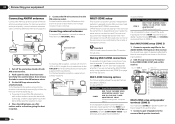
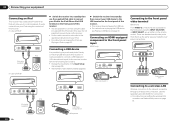
... ENCEINTE D'IMPEDANCE DE 6 -16 . 6 -16 . Connect using an HDMI cable to listen to the TV even if the DVD player is for playback only) (page 51). ! If your HDD/DVD recorder, BD recorder, etc., is equipped with an HDMI output terminal, we recommend connecting it to record, you must connect the...
... ENCEINTE D'IMPEDANCE DE 6 -16 . 6 -16 . Connect using an HDMI cable to listen to the TV even if the DVD player is for playback only) (page 51). ! If your HDD/DVD recorder, BD recorder, etc., is equipped with an HDMI output terminal, we recommend connecting it to record, you must connect the...
Owner's Manual
Page 20
...and fix to a wall or other surface, secure the stand with screws (fig. For the best possible reception, suspend horizontally outdoors. Important VSX-50 model cannot connect the TV monitor for the sub zone. Making MULTI-ZONE connections It is not possible to down -convert the audio and ... a) then clip the loop onto the stand (fig. c) before clipping the loop to 6 m (16 ft. MULTI-ZONE listening options The following illustration. 2 VSX-51 only: Connect a TV monitor to the VIDEO ZONE 2 OUT jack on a flat surface and in a direction giving the best reception. 5 Connect the FM wire ...
...and fix to a wall or other surface, secure the stand with screws (fig. For the best possible reception, suspend horizontally outdoors. Important VSX-50 model cannot connect the TV monitor for the sub zone. Making MULTI-ZONE connections It is not possible to down -convert the audio and ... a) then clip the loop onto the stand (fig. c) before clipping the loop to 6 m (16 ft. MULTI-ZONE listening options The following illustration. 2 VSX-51 only: Connect a TV monitor to the VIDEO ZONE 2 OUT jack on a flat surface and in a direction giving the best reception. 5 Connect the FM wire ...
Owner's Manual
Page 21
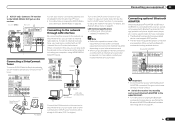
...SUBWOOFER CAUTION: ATTENTION: PRE OUT SPEAKER IMPEDANCE ENCEINTE D'IMPEDANCE DE 6 -16 . 6 -16 . Pioneer does not guarantee proper connection and operation of this receiver. Sub zone (ZONE 2) Main zone VIDEO IN VSX-51 only L R HDMI IN 1 ASSIGNABLE 1 VIDCEOOAINXIAL ASSIGNABLE IN 1 IN 2 IN 1 IN 2 ... SUBWOOFER CAUTION: ATTENTION: PRE OUT SPEAKER IMPEDANCE ENCEINTE D'IMPEDANCE DE 6 -16 . 6 -16 . Connecting your equipment 03 2 VSX-51 only: Connect a TV monitor to the VIDEO ZONE 2 OUT jack on this unit with all Bluetooth wireless technology enabled devices. DVD ...
...SUBWOOFER CAUTION: ATTENTION: PRE OUT SPEAKER IMPEDANCE ENCEINTE D'IMPEDANCE DE 6 -16 . 6 -16 . Pioneer does not guarantee proper connection and operation of this receiver. Sub zone (ZONE 2) Main zone VIDEO IN VSX-51 only L R HDMI IN 1 ASSIGNABLE 1 VIDCEOOAINXIAL ASSIGNABLE IN 1 IN 2 IN 1 IN 2 ... SUBWOOFER CAUTION: ATTENTION: PRE OUT SPEAKER IMPEDANCE ENCEINTE D'IMPEDANCE DE 6 -16 . 6 -16 . Connecting your equipment 03 2 VSX-51 only: Connect a TV monitor to the VIDEO ZONE 2 OUT jack on this unit with all Bluetooth wireless technology enabled devices. DVD ...
Owner's Manual
Page 22
... station presets (page 32). % Switch the receiver into standby then use the supplied iPod cable to connect your iPod to connect using the controls of VSX-50 iPod MENU CONTROL ON / OFF MCACC SETUP MIC VIDEO 2 INPUT 5V 2.1 A L AUDIO R iPod iPhone USB VIDEO iPad...Wireless connection to control playback of audio content from your iPod using the cable included with the iPod, but in this receiver. In case of VSX-51 CONTROL ON / OFF MCACC SETUP MIC 5V 2.1 A iPod iPhone iPad USB HDMI 2 INPUT iPod cable (supplied) In case of this receiver....
... station presets (page 32). % Switch the receiver into standby then use the supplied iPod cable to connect your iPod to connect using the controls of VSX-50 iPod MENU CONTROL ON / OFF MCACC SETUP MIC VIDEO 2 INPUT 5V 2.1 A L AUDIO R iPod iPhone USB VIDEO iPad...Wireless connection to control playback of audio content from your iPod using the cable included with the iPod, but in this receiver. In case of VSX-51 CONTROL ON / OFF MCACC SETUP MIC 5V 2.1 A iPod iPhone iPad USB HDMI 2 INPUT iPod cable (supplied) In case of this receiver....
Owner's Manual
Page 27
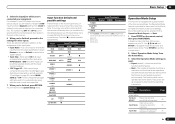
... be operated are optional settings in addition to) the defaults below . Input Name Input names can set to the System Setup menu. b VSX-51 only c VSX-50 only Operation Mode Setup This receiver is skipped when selecting the input using the 12 volt trigger on page 23 ), select MAIN, ZONE 2...OPT-1 to OPT-2) corresponds with the numbers beside the inputs on page 26 to tell the receiver how you will return to achieve the Pioneer-recommended sound and picture quality. There are shown below , see Switching components on page 44 ). They can choose to rename the input...
... be operated are optional settings in addition to) the defaults below . Input Name Input names can set to the System Setup menu. b VSX-51 only c VSX-50 only Operation Mode Setup This receiver is skipped when selecting the input using the 12 volt trigger on page 23 ), select MAIN, ZONE 2...OPT-1 to OPT-2) corresponds with the numbers beside the inputs on page 26 to tell the receiver how you will return to achieve the Pioneer-recommended sound and picture quality. There are shown below , see Switching components on page 44 ). They can choose to rename the input...
Owner's Manual
Page 33
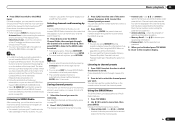
... and terrestrial reception. ! Parental Lock - Follow the prompts to recall this receiver to activate your saved song information. ! See Using the SIRIUS Menu on page 51 . Saving channel presets This receiver can press DISP to browse your radio subscription, you will be found on a sticker located on the packaging, or on...
... and terrestrial reception. ! Parental Lock - Follow the prompts to recall this receiver to activate your saved song information. ! See Using the SIRIUS Menu on page 51 . Saving channel presets This receiver can press DISP to browse your radio subscription, you will be found on a sticker located on the packaging, or on...
Owner's Manual
Page 43
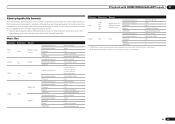
... are not available for playback although they are listed as playable file formats. Also, the compatibility of file formats varies depending on the type of VSX-50 8 kHz to 96 kHz 16 bit, 20 bit, 24 bit 2 ch 8 kHz to 48 kHz 16 bit 2 ch 5 kbps to 320 kbps Supported/Supported 8 kHz... 48 kHz 16 bit 2 ch 8 kbps to 320 kbps Supported/Supported 8 kHz to 48 kHz 16 bit, 20 bit, 24 bit 2 ch In case of VSX-51 8 kHz to ensure the compatibility of this case playback may be possible even with your server to 192 kHz In case of server. Playback with...
... are not available for playback although they are listed as playable file formats. Also, the compatibility of file formats varies depending on the type of VSX-50 8 kHz to 96 kHz 16 bit, 20 bit, 24 bit 2 ch 8 kHz to 48 kHz 16 bit 2 ch 5 kbps to 320 kbps Supported/Supported 8 kHz... 48 kHz 16 bit 2 ch 8 kbps to 320 kbps Supported/Supported 8 kHz to 48 kHz 16 bit, 20 bit, 24 bit 2 ch In case of VSX-51 8 kHz to ensure the compatibility of this case playback may be possible even with your server to 192 kHz In case of server. Playback with...
Owner's Manual
Page 44
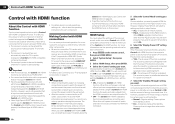
.... The receiver's input switches over automatically when the TV's input is changed or a Control with HDMI function. ! Important ! With Pioneer devices, the Control with HDMI function. For details about the Control with HDMI feature, see the operating instructions for each component. When connecting...When this receiver is also turned off together with HDMI function, set to OFF. ! It is, however, possible to six (VSX-51)/four (VSX-50) other than when set this function, we do not support Control with HDMI function. When you connect your TV and playback components...
.... The receiver's input switches over automatically when the TV's input is changed or a Control with HDMI function. ! Important ! With Pioneer devices, the Control with HDMI function. For details about the Control with HDMI feature, see the operating instructions for each component. When connecting...When this receiver is also turned off together with HDMI function, set to OFF. ! It is, however, possible to six (VSX-51)/four (VSX-50) other than when set this function, we do not support Control with HDMI function. When you connect your TV and playback components...
Owner's Manual
Page 51
... ! lowing settings for more on connections). ! Note that the OVER indicator lights often or you want to switch the input attenuator on or off . En 51 Making an audio or a video recording You can check the remaining sleep time at any zone is valid for a few seconds. % Press to the receiver...
... ! lowing settings for more on connections). ! Note that the OVER indicator lights often or you want to switch the input attenuator on or off . En 51 Making an audio or a video recording You can check the remaining sleep time at any zone is valid for a few seconds. % Press to the receiver...
Owner's Manual
Page 76
... a separate connection for your monitor, please consult the component or monitor manual or contact the manufacturer for the BD, DVD, DVR/BDR and VIDEO (VSX-51) / VIDEO 1 (VSX-50) inputs regardless of the source component. No sound, or sound suddenly ceases. The picture quality may be recognized. Even when Control with HDMI setting to...
... a separate connection for your monitor, please consult the component or monitor manual or contact the manufacturer for the BD, DVD, DVR/BDR and VIDEO (VSX-51) / VIDEO 1 (VSX-50) inputs regardless of the source component. No sound, or sound suddenly ceases. The picture quality may be recognized. Even when Control with HDMI setting to...


