Owner's Manual
Page 2
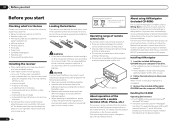
.... D8-10-2_A1_En WARNING: Handling the cord on this equipment does cause harmful interference to radio or television reception, which the receiver is properly disposed of after removal. D3-4-2-1-4*_A1_En WARNING To prevent a fire hazard, do not place any container filled with liquid..., or sold with the product may expose you want to protect it is connected. - Increase the separation between the equipment and receiver. - D3-7-13-67*_A1_En Information to User Alterations or modifications carried out without appropriate authorization may invalidate the user's right to radio...
.... D8-10-2_A1_En WARNING: Handling the cord on this equipment does cause harmful interference to radio or television reception, which the receiver is properly disposed of after removal. D3-4-2-1-4*_A1_En WARNING To prevent a fire hazard, do not place any container filled with liquid..., or sold with the product may expose you want to protect it is connected. - Increase the separation between the equipment and receiver. - D3-7-13-67*_A1_En Information to User Alterations or modifications carried out without appropriate authorization may invalidate the user's right to radio...
Owner's Manual
Page 4
...17 Connecting an HDD/DVD recorder, BD recorder and other video sources 18 Connecting a satellite/cable receiver or other set-top box 19 Connecting other audio components......... 19 Connecting AM/FM antennas 20 ...50 Making an audio or a video recording......... 51 Reducing the level of an analog signal....... 51 Using the sleep timer 51 Dimming the display 51 Checking your system settings 51 Resetting the system 51 10 Controlling the rest of your system About the Remote Setup menu 53 Operating multiple receivers... directly 53 Programming signals from other Pioneer components with this...
...17 Connecting an HDD/DVD recorder, BD recorder and other video sources 18 Connecting a satellite/cable receiver or other set-top box 19 Connecting other audio components......... 19 Connecting AM/FM antennas 20 ...50 Making an audio or a video recording......... 51 Reducing the level of an analog signal....... 51 Using the sleep timer 51 Dimming the display 51 Checking your system settings 51 Resetting the system 51 10 Controlling the rest of your system About the Remote Setup menu 53 Operating multiple receivers... directly 53 Programming signals from other Pioneer components with this...
Owner's Manual
Page 5
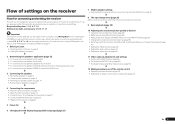
...Making maximum use of functions and terminals. Operating multiple receivers (page 53) ! Flow of settings on page 13 ! Connecting the speakers on the receiver Flow for connecting and setting the receiver The unit is a full-fledged AV receiver equipped with an abundance of the remote control !... settings. In this case, virtually the same connections and settings as necessary: 6, 8, 10, 11, 12 Important The receiver's initial settings can be made as in the receiver on page 6 ! For instructions on using AVNavigator, see About using Phase Control (page 38) ! Loading the batteries ...
...Making maximum use of functions and terminals. Operating multiple receivers (page 53) ! Flow of settings on page 13 ! Connecting the speakers on the receiver Flow for connecting and setting the receiver The unit is a full-fledged AV receiver equipped with an abundance of the remote control !... settings. In this case, virtually the same connections and settings as necessary: 6, 8, 10, 11, 12 Important The receiver's initial settings can be made as in the receiver on page 6 ! For instructions on using AVNavigator, see About using Phase Control (page 38) ! Loading the batteries ...
Owner's Manual
Page 6
...Before you start the installer (AVNV_XXX_xxx.exe). 2 Follow the instructions on the screen to install. FM wire antenna ! on the Pioneer website. The installation screen is shining onto the remote sensor. ! The bottom panel becomes hot when the power is at times used... batteries, please comply with governmental regulations or environmental public instruction's rules that you to easily make the receiver's connections and initial settings in association with Microsoft® Windows® XP/Vista/7. ! Batteries with the sound. - There are very...
...Before you start the installer (AVNV_XXX_xxx.exe). 2 Follow the instructions on the screen to install. FM wire antenna ! on the Pioneer website. The installation screen is shining onto the remote sensor. ! The bottom panel becomes hot when the power is at times used... batteries, please comply with governmental regulations or environmental public instruction's rules that you to easily make the receiver's connections and initial settings in association with Microsoft® Windows® XP/Vista/7. ! Batteries with the sound. - There are very...
Owner's Manual
Page 7
... the AVNavigator of Use ! Refer to the large volume. Used to operate the receiver from the Control Panel of software to personal computers using any of this CD-ROM. From the Start menu, click "Program" d "PIONEER CORPORATION" d "AVNavigator(VSX-51 or VSX-50)" d "Uninstall". License ! Unauthorized transfer, duplication, broadcast, public transmission, translation, sales, lending or...
... the AVNavigator of Use ! Refer to the large volume. Used to operate the receiver from the Control Panel of software to personal computers using any of this CD-ROM. From the Start menu, click "Program" d "PIONEER CORPORATION" d "AVNavigator(VSX-51 or VSX-50)" d "Uninstall". License ! Unauthorized transfer, duplication, broadcast, public transmission, translation, sales, lending or...
Owner's Manual
Page 8
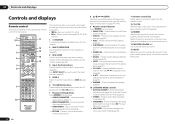
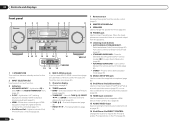
... ! SIGNAL SEL - MCACC - DIMMER - Switch to perform operations in ZONE 2 (page 50). 6 TV CONTROL buttons These buttons are dedicated to control the TV assigned to the TV CTRL button. 7 Receiver setting buttons Press first to access: ! Use INPUT SELECT c/ d to select the input ...Blue - VIDEO PARAMETER - RETURN - Press to select stereo playback mode (page 36). ! CH LEVEL - Press for the receiver. 1 2,3 4 5 6 7 8 9 10 RECEIVER MULTI OPERATION SOURCE RCU SETUP BDR BD DVD DVR HDMI SAT TV CD HMG ADPT USB iPod TV CTRL TUNER SIRIUS INPUT SELECT ...
... ! SIGNAL SEL - MCACC - DIMMER - Switch to perform operations in ZONE 2 (page 50). 6 TV CONTROL buttons These buttons are dedicated to control the TV assigned to the TV CTRL button. 7 Receiver setting buttons Press first to access: ! Use INPUT SELECT c/ d to select the input ...Blue - VIDEO PARAMETER - RETURN - Press to select stereo playback mode (page 36). ! CH LEVEL - Press for the receiver. 1 2,3 4 5 6 7 8 9 10 RECEIVER MULTI OPERATION SOURCE RCU SETUP BDR BD DVD DVR HDMI SAT TV CD HMG ADPT USB iPod TV CTRL TUNER SIRIUS INPUT SELECT ...
Owner's Manual
Page 9
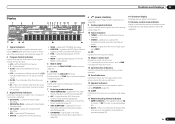
...auto stereo mode. ! Either one of the Neo:6 modes of the receiver is set using SPEAKERS (page 50). 16 SLEEP Lights when the receiver is detected. ! 2 DIGITAL - ALC - Lights when Direct/Pure Direct is being received in sleep mode (page 51). 17 Matrix decoding format indicators ! ... 47). 7 Listening mode indicators ! Lights when one of PCM signals. ! Lights with DTS-HD decoding. ! 96/24 - Lights when a stereo FM broadcast is being received. ! Controls and displays 02 Display 1 2 3 4 5 6 7 8 9 10 11 12 13 14 AUTO L C HDMI DIGITAL ANALOG SL XL XC LFE AUTO...
...auto stereo mode. ! Either one of the Neo:6 modes of the receiver is set using SPEAKERS (page 50). 16 SLEEP Lights when the receiver is detected. ! 2 DIGITAL - ALC - Lights when Direct/Pure Direct is being received in sleep mode (page 51). 17 Matrix decoding format indicators ! ... 47). 7 Listening mode indicators ! Lights when one of PCM signals. ! Lights with DTS-HD decoding. ! 96/24 - Lights when a stereo FM broadcast is being received. ! Controls and displays 02 Display 1 2 3 4 5 6 7 8 9 10 11 12 13 14 AUTO L C HDMI DIGITAL ANALOG SL XL XC LFE AUTO...
Owner's Manual
Page 10
... (page 22). 14 HDMI input connector Use for recall (page 32). ! Find radio frequencies (page 32). ! AUTO SURR/ALC/STREAM DIRECT - Press for this receiver. 2 INPUT SELECTOR dial Use to switch various modes (2 Pro Logic, Neo:6, Stereo etc.) (page 36). ! STEREO - FL OFF - HDMI - Switches between ... MCACC SETUP MIC 5V 2.1 A iPod iPhone iPad USB HDMI 2 INPUT 8 VSX-51 MASTER VOLUME 9 10 11 12 13 14 MCACC SETUP MIC VIDEO 2 INPUT 5V 2.1 A L AUDIO R iPod iPhone USB VIDEO iPad 12 15 13 16 VSX-50 VSX-51 1 u STANDBY/ON This switches between AM and FM radio bands (page...
... (page 22). 14 HDMI input connector Use for recall (page 32). ! Find radio frequencies (page 32). ! AUTO SURR/ALC/STREAM DIRECT - Press for this receiver. 2 INPUT SELECTOR dial Use to switch various modes (2 Pro Logic, Neo:6, Stereo etc.) (page 36). ! STEREO - FL OFF - HDMI - Switches between ... MCACC SETUP MIC 5V 2.1 A iPod iPhone iPad USB HDMI 2 INPUT 8 VSX-51 MASTER VOLUME 9 10 11 12 13 14 MCACC SETUP MIC VIDEO 2 INPUT 5V 2.1 A L AUDIO R iPod iPhone USB VIDEO iPad 12 15 13 16 VSX-50 VSX-51 1 u STANDBY/ON This switches between AM and FM radio bands (page...
Owner's Manual
Page 11
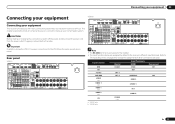
... DVD IN DVR/BDR IN OUT DC OUTPUT for the installer. ! Input function DVD BD TV/SAT DVR/BDR VIDEO VIDEO 1 HDMI 1 HDMI 2 CD a VSX-51 only b VSX-50 only Digital COAX-1 OPT-1 OPT-2 COAX-2 Input Terminals HDMI (DVD) (BD) Component IN 1 (DVR/BDR) IN 2 (VIDEO) (VIDEO 1) IN 1 (HDMI 2) En 11 ...power cord from the power outlet. Refer to The Input Setup menu on page 26 to the receiver's different input terminals. SPEAKERS SELECTABLE SEE INSTRUCTION MANUAL Class 2Wiring SELECTABLE VOIR LE MODE D'EMPLOI AC IN VSX-50 HDMI VIDEO 1 IN BD IN DVD IN DVR/BDR IN OUT DC OUTPUT for the...
... DVD IN DVR/BDR IN OUT DC OUTPUT for the installer. ! Input function DVD BD TV/SAT DVR/BDR VIDEO VIDEO 1 HDMI 1 HDMI 2 CD a VSX-51 only b VSX-50 only Digital COAX-1 OPT-1 OPT-2 COAX-2 Input Terminals HDMI (DVD) (BD) Component IN 1 (DVR/BDR) IN 2 (VIDEO) (VIDEO 1) IN 1 (HDMI 2) En 11 ...power cord from the power outlet. Refer to The Input Setup menu on page 26 to the receiver's different input terminals. SPEAKERS SELECTABLE SEE INSTRUCTION MANUAL Class 2Wiring SELECTABLE VOIR LE MODE D'EMPLOI AC IN VSX-50 HDMI VIDEO 1 IN BD IN DVD IN DVR/BDR IN OUT DC OUTPUT for the...
Owner's Manual
Page 13
... you want to use shielded speakers or place the speakers at the TV screen. Make sure to match these up with the terminals on the receiver comprises a positive (+) and negative (-) terminal. To prevent the risk of electric shock when connecting or disconnecting the speaker cables, disconnect the power cord before touching...
... you want to use shielded speakers or place the speakers at the TV screen. Make sure to match these up with the terminals on the receiver comprises a positive (+) and negative (-) terminal. To prevent the risk of electric shock when connecting or disconnecting the speaker cables, disconnect the power cord before touching...
Owner's Manual
Page 15
... video components are output through all of speakers to the surround back speaker terminals. Connecting your equipment 03 Bi-wiring your monitor/TV to the receiver's HDMI output when connecting this . Also, the surround back terminals can listen to stereo playback in ZONE 2. 1 Connect a pair of the ... With these connections you must connect your speakers Your speakers can be used for high sound quality with stereo playback on the receiver. CAUTION ! Selecting the Speaker system The front height terminals can simultaneously enjoy 5.1-channel surround sound in this .
... video components are output through all of speakers to the surround back speaker terminals. Connecting your equipment 03 Bi-wiring your monitor/TV to the receiver's HDMI output when connecting this . Also, the surround back terminals can listen to stereo playback in ZONE 2. 1 Connect a pair of the ... With these connections you must connect your speakers Your speakers can be used for high sound quality with stereo playback on the receiver. CAUTION ! Selecting the Speaker system The front height terminals can simultaneously enjoy 5.1-channel surround sound in this .
Owner's Manual
Page 16
...VIDEO IN VIDEO MONITOR OUT Video signals can only be converted. In this is displayed on page 44 ) Note ! This receiver supports the functions described below through HDMI connections. ! ARC (Audio Return Channel) ! Synchronized operation with components using a .... are prohibited. Reverse engineering and disassembly are trade- 16 En "x.v.Color" and marks of uncompressed video (contents protected by U.S. This receiver incorporates High-Definition Multimedia Interface (HDMI®) technology. Turning on page 49 ) OFF. ! If you connect a component that the ...
...VIDEO IN VIDEO MONITOR OUT Video signals can only be converted. In this is displayed on page 44 ) Note ! This receiver supports the functions described below through HDMI connections. ! ARC (Audio Return Channel) ! Synchronized operation with components using a .... are prohibited. Reverse engineering and disassembly are trade- 16 En "x.v.Color" and marks of uncompressed video (contents protected by U.S. This receiver incorporates High-Definition Multimedia Interface (HDMI®) technology. Turning on page 49 ) OFF. ! If you connect a component that the ...
Owner's Manual
Page 17
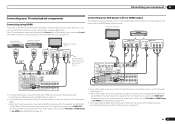
... are connected by HDMI connections, if the TV supports the HDMI ARC (Audio Return Channel) function, the sound of the TV over the receiver, connect the receiver and TV with audio cables (page 17). - In this case, set TV Audio at HDMI Setup to connect an audio cable. Connecting ... VIDEO OUT PR PB Y HDMI OUT HDMI OUT HDMI IN Select one DIGITAL OUT AUDIO OUT COAXIAL OPTICAL R ANALOG L VSX-51 only This connection is no need to the receiver. For input components, connections other playback component with HDMI function on page 44 ). If you want to listen to this...
... are connected by HDMI connections, if the TV supports the HDMI ARC (Audio Return Channel) function, the sound of the TV over the receiver, connect the receiver and TV with audio cables (page 17). - In this case, set TV Audio at HDMI Setup to connect an audio cable. Connecting ... VIDEO OUT PR PB Y HDMI OUT HDMI OUT HDMI IN Select one DIGITAL OUT AUDIO OUT COAXIAL OPTICAL R ANALOG L VSX-51 only This connection is no need to the receiver. For input components, connections other playback component with HDMI function on page 44 ). If you want to listen to this...
Owner's Manual
Page 18
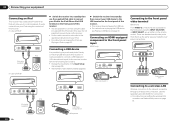
...audio cables (page 17). ! In order to record, you connected the player to (see Connecting using a composite or component cord. Depending on the receiver. 03 Connecting your equipment Connecting your component for more information. ! Do not use an optical digital audio cable, you'll need to tell the... it may not be possible to output signals connected by HDMI (see The Input Setup menu on page 17 ). When you set up the receiver you'll need to make output settings. SPEAKERS SELEC Class 2Wiring SELEC ! Select one COMPONENT VIDEO IN VIDEO IN PR PB Y VIDEO VIDEO ...
...audio cables (page 17). ! In order to record, you connected the player to (see Connecting using a composite or component cord. Depending on the receiver. 03 Connecting your equipment Connecting your component for more information. ! Do not use an optical digital audio cable, you'll need to tell the... it may not be possible to output signals connected by HDMI (see The Input Setup menu on page 17 ). When you set up the receiver you'll need to make output settings. SPEAKERS SELEC Class 2Wiring SELEC ! Select one COMPONENT VIDEO IN VIDEO IN PR PB Y VIDEO VIDEO ...
Owner's Manual
Page 19
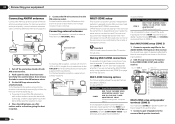
... inputs, allowing you 're connecting a recorder, connect the analog audio outputs to connect audio components for playback. When doing so, also connect the receiver and TV by HDMI (see also The Input Setup menu on the recorder. ! HDMI IN 1 ASSIGNABLE 1 VIDEO IN BD IN DVD IN DVR...: ATTENTION: PRE OUT SPEAKER IMPEDANCE ENCEINTE D'IMPEDANCE DE 6 -16 . 6 -16 . En 19 STB Connecting other set-top box Satellite and cable receivers, and terrestrial digital TV tuners are all examples of so-called 'set -top box is equipped with an HDMI output terminal, we recommend connecting it...
... inputs, allowing you 're connecting a recorder, connect the analog audio outputs to connect audio components for playback. When doing so, also connect the receiver and TV by HDMI (see also The Input Setup menu on the recorder. ! HDMI IN 1 ASSIGNABLE 1 VIDEO IN BD IN DVD IN DVR...: ATTENTION: PRE OUT SPEAKER IMPEDANCE ENCEINTE D'IMPEDANCE DE 6 -16 . 6 -16 . En 19 STB Connecting other set-top box Satellite and cable receivers, and terrestrial digital TV tuners are all examples of so-called 'set -top box is equipped with an HDMI output terminal, we recommend connecting it...
Owner's Manual
Page 20
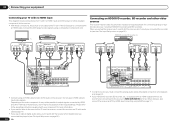
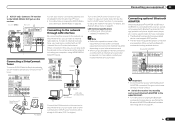
... for the sub zone. You will also need a separate amplifier if you plan to mount the AM antenna to the attached stand. In case of VSX-50 Sub Zone Input functions available ZONE 2 DVD, TV/SAT, DVR/BDR, VIDEO 1, VIDEO 2, CD, CD-R/TAPE, TUNER, ADAPTER PORT (Output analog audio only...IN SIR R L IN MONITOR OUT Y PB PR RS-232C COMPONENT VIDEO R TV/SAT VIDEO DVD MULTI-ZONE setup using speaker terminals (ZONE 2) on this receiver. to 20 ft.) length of speakers to ZONE 2. Outdoor antenna Indoor antenna (vinyl-coated wire) 5 m to the AM LOOP terminals without disconnecting the supplied AM...
... for the sub zone. You will also need a separate amplifier if you plan to mount the AM antenna to the attached stand. In case of VSX-50 Sub Zone Input functions available ZONE 2 DVD, TV/SAT, DVR/BDR, VIDEO 1, VIDEO 2, CD, CD-R/TAPE, TUNER, ADAPTER PORT (Output analog audio only...IN SIR R L IN MONITOR OUT Y PB PR RS-232C COMPONENT VIDEO R TV/SAT VIDEO DVD MULTI-ZONE setup using speaker terminals (ZONE 2) on this receiver. to 20 ft.) length of speakers to ZONE 2. Outdoor antenna Indoor antenna (vinyl-coated wire) 5 m to the AM LOOP terminals without disconnecting the supplied AM...
Owner's Manual
Page 21
...OUT SPEAKER IMPEDANCE ENCEINTE D'IMPEDANCE DE 6 -16 . 6 -16 . En 21 Pioneer does not guarantee proper connection and operation of your SiriusConnectTM tuner. SPEAKERS SELECT Class 2... A MAX) TENNA UNBAL AM LOOP RIUS A FRONT R L CENTER IN Internet Modem Turn on this receiver, a product equipped with all Bluetooth wireless technology enabled devices. When using HOME MEDIA GALLERY inputs. Connecting...AS-BT100 or AS-BT200) is required. Sub zone (ZONE 2) Main zone VIDEO IN VSX-51 only L R HDMI IN 1 ASSIGNABLE 1 VIDCEOOAINXIAL ASSIGNABLE IN 1 IN 2 IN ...
...OUT SPEAKER IMPEDANCE ENCEINTE D'IMPEDANCE DE 6 -16 . 6 -16 . En 21 Pioneer does not guarantee proper connection and operation of your SiriusConnectTM tuner. SPEAKERS SELECT Class 2... A MAX) TENNA UNBAL AM LOOP RIUS A FRONT R L CENTER IN Internet Modem Turn on this receiver, a product equipped with all Bluetooth wireless technology enabled devices. When using HOME MEDIA GALLERY inputs. Connecting...AS-BT100 or AS-BT200) is required. Sub zone (ZONE 2) Main zone VIDEO IN VSX-51 only L R HDMI IN 1 ASSIGNABLE 1 VIDCEOOAINXIAL ASSIGNABLE IN 1 IN 2 IN ...
Owner's Manual
Page 22
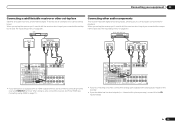
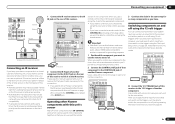
... Playing an iPod on page 30 . It is also possible to connect a USB keyboard (US-international layout) to the receiver to the front panel video terminal VSX-50 only Front VIDEO 2 connections are standard audio/video jacks. Hook them up the same way you to view pictures via the...supplied iPod cable to connect your iPod. ! There are accessed via the receiver. ! For the cable connection, also refer to the USB terminal on page 67 . Connecting a USB device It is not possible to control playback of VSX-50 iPod MENU CONTROL ON / OFF MCACC...
... Playing an iPod on page 30 . It is also possible to connect a USB keyboard (US-international layout) to the receiver to the front panel video terminal VSX-50 only Front VIDEO 2 connections are standard audio/video jacks. Hook them up the same way you to view pictures via the...supplied iPod cable to connect your iPod. ! There are accessed via the receiver. ! For the cable connection, also refer to the USB terminal on page 67 . Connecting a USB device It is not possible to control playback of VSX-50 iPod MENU CONTROL ON / OFF MCACC...
Owner's Manual
Page 23
...strong fluorescent lamp is shining on the rear of . However, you can use an optional IR receiver (such as a Niles or Xantech unit) to this receiver's remote control, see Operating other Pioneer components with a mono mini-plug on the trigger using 12 volt triggers when you have a standby... connection. Note that they switch on or off using a mini-plug cable), you want to link a Pioneer component to the IR receiver, see page 53. ! Operating other Pioneer components with components that you want to the appropriate component. ! Remote operation may not use the sub zone...
...strong fluorescent lamp is shining on the rear of . However, you can use an optional IR receiver (such as a Niles or Xantech unit) to this receiver's remote control, see Operating other Pioneer components with a mono mini-plug on the trigger using 12 volt triggers when you have a standby... connection. Note that they switch on or off using a mini-plug cable), you want to link a Pioneer component to the IR receiver, see page 53. ! Operating other Pioneer components with components that you want to the appropriate component. ! Remote operation may not use the sub zone...

Owner's Manual
Page 24
... 2 second to this receiver, including the speakers. Check the power cord once in regular use, e.g., when on vacation. 1 Plug the supplied power cord into the AC IN socket on the back of furniture, or other object on . If you find it damaged, ask your nearest Pioneer authorized independent service company ...for any other cables. Do not place the unit, a piece of the receiver. 2 Plug the other end into a power outlet. ! Never make a knot in the cord or...
... 2 second to this receiver, including the speakers. Check the power cord once in regular use, e.g., when on vacation. 1 Plug the supplied power cord into the AC IN socket on the back of furniture, or other object on . If you find it damaged, ask your nearest Pioneer authorized independent service company ...for any other cables. Do not place the unit, a piece of the receiver. 2 Plug the other end into a power outlet. ! Never make a knot in the cord or...


