
Owner's Manual
Page 4
...often undetectable until you to be loud and harmful to prevent hearing damage or loss in the cord or tie it damaged, ask your nearest PIONEER authorized service center or your volume control at a safe level. THE FOLLOWING NOISES CAN BE DANGEROUS UNDER CONSTANT EXPOSURE 90 Subway, motorcycle, truck ...other cords. To establish a safe level: • Start your dealer for a lifetime. Once you an electrical shock. We Want You Listening For A Lifetime Used wisely, your protection. This list of sound levels is too late, this now will provide a lifetime of your sensitive hearing.
...often undetectable until you to be loud and harmful to prevent hearing damage or loss in the cord or tie it damaged, ask your nearest PIONEER authorized service center or your volume control at a safe level. THE FOLLOWING NOISES CAN BE DANGEROUS UNDER CONSTANT EXPOSURE 90 Subway, motorcycle, truck ...other cords. To establish a safe level: • Start your dealer for a lifetime. Once you an electrical shock. We Want You Listening For A Lifetime Used wisely, your protection. This list of sound levels is too late, this now will provide a lifetime of your sensitive hearing.
Owner's Manual
Page 5
...components such as digital audio from SACD and DVD-A discs (if the player is fully compatible with Pioneer's PQLS* technology when playing audio CDs and SACDs. Naturally, you can use a wide range of cords interchangeably. On the video side, the component video output is compatible ...theater sound with 96kHz/24bit A/D converters. Next Generation THX Standards and New Digital Formats The VSX-49TXi is ASA (Advanced Speaker Array), which can setup this receiver. THX technologies are using i.LINK include 'smart' features such as possible for users we have created the MCACC system....
...components such as digital audio from SACD and DVD-A discs (if the player is fully compatible with Pioneer's PQLS* technology when playing audio CDs and SACDs. Naturally, you can use a wide range of cords interchangeably. On the video side, the component video output is compatible ...theater sound with 96kHz/24bit A/D converters. Next Generation THX Standards and New Digital Formats The VSX-49TXi is ASA (Advanced Speaker Array), which can setup this receiver. THX technologies are using i.LINK include 'smart' features such as possible for users we have created the MCACC system....

Owner's Manual
Page 6
... 24 Connecting Digital Audio Components 25 Digital Input Default Settings 26 Connecting the Radio Antennas 27 Using outdoor antennas 27 Connecting Speakers 28 Placing Your Speakers 29 Speaker placement 29 Using i.LINK Interface 30 What is i.LINK 30 Connecting i.LINK-equipped Components 30 Creating an i....Data Copy of Acoustic Calibration EQ 47 Check the Auto Settings 48 Basic Operation 49 Stereo and Multichannel Playback 49 Switching the channels used for playback (LISTENING CH SELECT 50 Switching i.LINK/ANALOG/DIGITAL Signal Input 51 Playback of up to 192kHz, 24-bit sound ...
... 24 Connecting Digital Audio Components 25 Digital Input Default Settings 26 Connecting the Radio Antennas 27 Using outdoor antennas 27 Connecting Speakers 28 Placing Your Speakers 29 Speaker placement 29 Using i.LINK Interface 30 What is i.LINK 30 Connecting i.LINK-equipped Components 30 Creating an i....Data Copy of Acoustic Calibration EQ 47 Check the Auto Settings 48 Basic Operation 49 Stereo and Multichannel Playback 49 Switching the channels used for playback (LISTENING CH SELECT 50 Switching i.LINK/ANALOG/DIGITAL Signal Input 51 Playback of up to 192kHz, 24-bit sound ...

Owner's Manual
Page 7
... pre-amplifier 79 Using a separate power amplifier for main room stereo sound 79 Multi-Room 80 MULTI-ROOM connections 80 MULTI-ROOM setup 81 Controlling the MULTI-ROOM system from the main room 82 Controlling the MULTI-ROOM system from the sub room 83 The PIONEER SR System: Operating... other PIONEER components 84 Multi Operations 85 Performing multi operations 86 System off 87 Using System off 88 Editing Remote Control Screen Names (ITEM MEMO 89 Editing Buttons Names (KEY...
... pre-amplifier 79 Using a separate power amplifier for main room stereo sound 79 Multi-Room 80 MULTI-ROOM connections 80 MULTI-ROOM setup 81 Controlling the MULTI-ROOM system from the main room 82 Controlling the MULTI-ROOM system from the sub room 83 The PIONEER SR System: Operating... other PIONEER components 84 Multi Operations 85 Performing multi operations 86 System off 87 Using System off 88 Editing Remote Control Screen Names (ITEM MEMO 89 Editing Buttons Names (KEY...

Owner's Manual
Page 8
...attached to the back of the remote control) Cushion for Remote x 4 U-shaped connectors x 2 (attached to the LCD display so please use of batteries may have received all of battery life. When you notice a decrease in the battery case. • Batteries with governmental regulations... public institu- Remote Control Battery Alarm When the batteries get an average of 1-3 months of the following precautions. • Never use different batteries together. • When disposing of the batteries properly according to operate the remote control properly an alarm will sound and...
...attached to the back of the remote control) Cushion for Remote x 4 U-shaped connectors x 2 (attached to the LCD display so please use of batteries may have received all of battery life. When you notice a decrease in the battery case. • Batteries with governmental regulations... public institu- Remote Control Battery Alarm When the batteries get an average of 1-3 months of the following precautions. • Never use different batteries together. • When disposing of the batteries properly according to operate the remote control properly an alarm will sound and...
Owner's Manual
Page 9
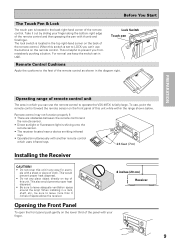
... along the bottom right edge of the remote control. For normal use the remote control to leave adequate ventilation space around the amp! This would prevent proper heat dispersal. • Be sure to operate the VSX-49TXi is located in the diagram right. This also would prevent proper ...heat dispersal. • Do not any way, for example with another remote control which you can 't use , point the remote control toward the remote sensor on ...
... along the bottom right edge of the remote control. For normal use the remote control to leave adequate ventilation space around the amp! This would prevent proper heat dispersal. • Be sure to operate the VSX-49TXi is located in the diagram right. This also would prevent proper ...heat dispersal. • Do not any way, for example with another remote control which you can 't use , point the remote control toward the remote sensor on ...
Owner's Manual
Page 10
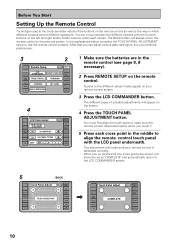
...first align the touch panel to make sure your remote control is calibrated correctly. The BACK button will always return the remote control to use the remote control properly. This adjustment will make sure the remote control responds properly when you 've touched all four cross points the ...remote control as well as the way in which different screens control different operations. Before You Start Setting Up the Remote Control Try and get used to the touch-sensitive nature of possible adjustments will appear on the screen. 4 Press the TOUCH PANEL ADJUSTMENT button. Access to suit your...
...first align the touch panel to make sure your remote control is calibrated correctly. The BACK button will always return the remote control to use the remote control properly. This adjustment will make sure the remote control responds properly when you 've touched all four cross points the ...remote control as well as the way in which different screens control different operations. Before You Start Setting Up the Remote Control Try and get used to the touch-sensitive nature of possible adjustments will appear on the screen. 4 Press the TOUCH PANEL ADJUSTMENT button. Access to suit your...

Owner's Manual
Page 11
... batteries down quicker. 11 This button turns the light on or off after 60 seconds.) BEEP: When you have the backlight on or not and use lock TV CONTROL FUNCTION CH + CH - If you 'd like to make and press those buttons. The different possibilities are entered. You can choose how long... once. VOL + VOL - LCD TIMER: In order to save the battery a timer will stay on before the timer turns it on the remote control screen. Use the - /+ buttons to adjust the number of 5-60 seconds. You can also turn off after a set this function in a range of seconds for the timer...
... batteries down quicker. 11 This button turns the light on or off after 60 seconds.) BEEP: When you have the backlight on or not and use lock TV CONTROL FUNCTION CH + CH - If you 'd like to make and press those buttons. The different possibilities are entered. You can choose how long... once. VOL + VOL - LCD TIMER: In order to save the battery a timer will stay on before the timer turns it on the remote control screen. Use the - /+ buttons to adjust the number of 5-60 seconds. You can also turn off after a set this function in a range of seconds for the timer...

Owner's Manual
Page 12
...Home Theater: The Basics Most consumers are used to home theater systems that give you many different listening modes and they offer excellent sound and picture quality, and allow users to enjoy home theater soundtracks with more details on the VSX-49TXi receiver. These factors are: 1) The ...equipment you can use seven speakers and a subwoofer. You can also hook up your equipment, like your home theater. 3) The ...
...Home Theater: The Basics Most consumers are used to home theater systems that give you many different listening modes and they offer excellent sound and picture quality, and allow users to enjoy home theater soundtracks with more details on the VSX-49TXi receiver. These factors are: 1) The ...equipment you can use seven speakers and a subwoofer. You can also hook up your equipment, like your home theater. 3) The ...

Owner's Manual
Page 13
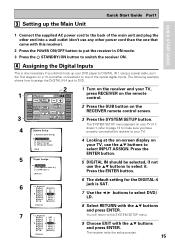
... composite RCA video cord, as the on the receiver. For more see a video image as well as shown below using this receiver. Also hook up using DIGITAL IN 1. Follow the diagram below . optical cord VIDEO INPUT 13 Instruction for this case, you will need to assign the digital input (... GUIDE Quick Start Guide Part1 Before making or changing the connections, switch off the power and disconnect the power cord from a DVD player, you used for the audio output you need to see page 19). If your DVD player with digital audio connections. In this . RCA video cord RCA ...
... composite RCA video cord, as the on the receiver. For more see a video image as well as shown below using this receiver. Also hook up using DIGITAL IN 1. Follow the diagram below . optical cord VIDEO INPUT 13 Instruction for this case, you will need to assign the digital input (... GUIDE Quick Start Guide Part1 Before making or changing the connections, switch off the power and disconnect the power cord from a DVD player, you used for the audio output you need to see page 19). If your DVD player with digital audio connections. In this . RCA video cord RCA ...

Owner's Manual
Page 14
...AC IN SPEAKERS ª ı· L R Surround speaker (Right) Surround back speaker (Left) Surround back speaker (Right) memo • Please use a mono (single plug) RCA cord and for advice on your subwoofer. • When you attached your speakers. surround left to speaker manual for ...terminals on new, eight channel home theater DVDs. and, optimally, surround back left & right; See page 109-110 for the other speakers use surround back speakers. L LR MULTI CH INPUT SUB W. A center speaker is very important for details.) 14 These speakers are important to...
...AC IN SPEAKERS ª ı· L R Surround speaker (Right) Surround back speaker (Left) Surround back speaker (Right) memo • Please use a mono (single plug) RCA cord and for advice on your subwoofer. • When you attached your speakers. surround left to speaker manual for ...terminals on new, eight channel home theater DVDs. and, optimally, surround back left & right; See page 109-110 for the other speakers use surround back speakers. L LR MULTI CH INPUT SUB W. A center speaker is very important for details.) 14 These speakers are important to...
Owner's Manual
Page 15
...-R ] RF IN [ DVD/LD ] [Return] 1 Turn on the receiver and your DVD player to DIGITAL IN 1 using a coaxial cable, as in ON mode. 3 Press the STANDBY/ON button to switch the receiver ON. 4 Assigning the Digital Inputs This is SAT.... 7 Use the 2 3 buttons to select DVD/ LD. 8 Select RETURN with the 5∞ buttons and press ENTER...to the back of the main unit and plug the other end into a wall outlet (don't use any other power cord than the one that came with this receiver). 2 Press the POWER ON/...
...-R ] RF IN [ DVD/LD ] [Return] 1 Turn on the receiver and your DVD player to DIGITAL IN 1 using a coaxial cable, as in ON mode. 3 Press the STANDBY/ON button to switch the receiver ON. 4 Assigning the Digital Inputs This is SAT.... 7 Use the 2 3 buttons to select DVD/ LD. 8 Select RETURN with the 5∞ buttons and press ENTER...to the back of the main unit and plug the other end into a wall outlet (don't use any other power cord than the one that came with this receiver). 2 Press the POWER ON/...
Owner's Manual
Page 16
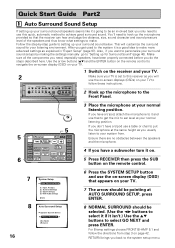
...page 40). Surround Setup] [3. RETURN brings you get the mic to ear level at your normal listening position. LOUDNESS TAPE 2 MONITOR INPUT ATT. Use the arrow buttons (5∞) and the ENTER button on the remote control to navigate the on-screen display (OSD) on your TV. 1 Switch ...7 8 System Setup [ Auto Surround Setup ] [1. Ensure there are no obstacles between the speakers and the microphone. 4 If you only need to use that the receiver can hear and judge the distance, size, sound character and sound pressure level of the speakers and thus know what settings to...
...page 40). Surround Setup] [3. RETURN brings you get the mic to ear level at your normal listening position. LOUDNESS TAPE 2 MONITOR INPUT ATT. Use the arrow buttons (5∞) and the ENTER button on the remote control to navigate the on-screen display (OSD) on your TV. 1 Switch ...7 8 System Setup [ Auto Surround Setup ] [1. Ensure there are no obstacles between the speakers and the microphone. 4 If you only need to use that the receiver can hear and judge the distance, size, sound character and sound pressure level of the speakers and thus know what settings to...

Owner's Manual
Page 17
...GO NEXT and press ENTER. 17 QUICK START GUIDE If you have a subwoofer make sure OK,GO NEXT is selected and press ENTER. Use the ∞5 buttons to view the settings select NEXT and press ENTER repeatedly. Test tone is turned on and has the volume turned ... speaker connection. Make sure you see the SPEAKER SYSTEMS CHECK screen. If you have a subwoofer turn off the power and check the speaker connections. 12 Use the ∞5 buttons to select a speaker then the 2 3 buttons to try again select RETRY with 5∞ buttons and press ENTER. FRONT [ YES ] CENTER...
...GO NEXT and press ENTER. 17 QUICK START GUIDE If you have a subwoofer make sure OK,GO NEXT is selected and press ENTER. Use the ∞5 buttons to view the settings select NEXT and press ENTER repeatedly. Test tone is turned on and has the volume turned ... speaker connection. Make sure you see the SPEAKER SYSTEMS CHECK screen. If you have a subwoofer turn off the power and check the speaker connections. 12 Use the ∞5 buttons to select a speaker then the 2 3 buttons to try again select RETRY with 5∞ buttons and press ENTER. FRONT [ YES ] CENTER...

Owner's Manual
Page 18
... button, press the RECEIVER button then press MAIN to access the main remote control screen. 5 Play a DVD then adjust the MASTER VOLUME. 3 Personalizing Your Sound 1 Use the Surround Listening Mode buttons to access the main remote control screen. 4 Press the STANDARD button on the remote control for household appliances (air conditioner... and switch them off after three minutes and the receiver will be prepared for the source material. The system will also light up to normal use.
... button, press the RECEIVER button then press MAIN to access the main remote control screen. 5 Play a DVD then adjust the MASTER VOLUME. 3 Personalizing Your Sound 1 Use the Surround Listening Mode buttons to access the main remote control screen. 4 Press the STANDARD button on the remote control for household appliances (air conditioner... and switch them off after three minutes and the receiver will be prepared for the source material. The system will also light up to normal use.
Owner's Manual
Page 19
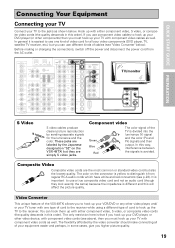
...descends in some cases, give you hook up your DVD player, or other video device, with component video cords as well. The color on the VSX-49TXi but they look exactly the same) because the impedance is yellow to hook up your VCR/DVD or any other components) then you must hook... the lowest quality. In general it from the AC outlet. In this will affect the picture quality. Video Converter This unique feature of the VSX-49TXi allows you use different kinds of your DVD player (or other video player, and/ or your TV tuner with either component video, S video, or composite video ...
...descends in some cases, give you hook up your DVD player, or other video device, with component video cords as well. The color on the VSX-49TXi but they look exactly the same) because the impedance is yellow to hook up your VCR/DVD or any other components) then you must hook... the lowest quality. In general it from the AC outlet. In this will affect the picture quality. Video Converter This unique feature of the VSX-49TXi allows you use different kinds of your DVD player (or other video player, and/ or your TV tuner with either component video, S video, or composite video ...

Owner's Manual
Page 20
...are necessary. We recommand you hook up your audio signal with either a coaxial or optical cord (see below ) to hook up your DVD/LD player using component video cable connections you want to setup your DVD player with component video cords to a terminal other than COMPONENT VIDEO IN 1 (like Dolby Digital..., in this . • If you hook up a digital input, with either component video, S video or composite video cords (the quality descends in order to use all possible soundtracks on pages 30-31. See your video signal with either a coaxial or optical digital cords (you can...
...are necessary. We recommand you hook up your audio signal with either a coaxial or optical cord (see below ) to hook up your DVD/LD player using component video cable connections you want to setup your DVD player with component video cords to a terminal other than COMPONENT VIDEO IN 1 (like Dolby Digital..., in this . • If you hook up a digital input, with either component video, S video or composite video cords (the quality descends in order to use all possible soundtracks on pages 30-31. See your video signal with either a coaxial or optical digital cords (you can...
Owner's Manual
Page 21
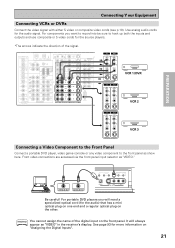
... Component to the Front Panel Connect a portable DVD player, video game console or any video component to hook up both the inputs and outputs and use composite or S video cords for the audio) that has a mini optical plug on one end and a regular optical plug on the other. It will need... OUT (OPTICAL) ON/OFF HOLD VIDEO-IN/OUT AUDIO-IN/OUT DIGITAL IN S-VIDEO VIDEO VIDEO INPUT L AUDIO R Be careful! L LR MULTI CH INPUT SUB W. Use analog audio cords for more information on the front panel. See page 93 for the audio signal. Front video connections are accessed via the front...
... Component to the Front Panel Connect a portable DVD player, video game console or any video component to hook up both the inputs and outputs and use composite or S video cords for the audio) that has a mini optical plug on one end and a regular optical plug on the other. It will need... OUT (OPTICAL) ON/OFF HOLD VIDEO-IN/OUT AUDIO-IN/OUT DIGITAL IN S-VIDEO VIDEO VIDEO INPUT L AUDIO R Be careful! L LR MULTI CH INPUT SUB W. Use analog audio cords for more information on the front panel. See page 93 for the audio signal. Front video connections are accessed via the front...

Owner's Manual
Page 22
... UNBAL FRONT R PB S-VIDEO PR CENTER LANALOG SUR- See page 93 to do this . 22 For the audio signal, in order to use component video cords to hook up the video signal with either a coaxial or optical cable, it doesn't matter which (see p.19). STEREO ROUND...ANALOG STEREO L DIGITAL DIGITAL R AC OUTLET Satellite tuner AC IN SPEAKERS ª ı· L R TV tuner memo • If you use digital soundtracks broadcast you must assign those inputs with the "Assigning the Component Video Inputs" procedure. Connecting Your Equipment Connecting Satellite TV (SAT) Components ...
... UNBAL FRONT R PB S-VIDEO PR CENTER LANALOG SUR- See page 93 to do this . 22 For the audio signal, in order to use component video cords to hook up the video signal with either a coaxial or optical cable, it doesn't matter which (see p.19). STEREO ROUND...ANALOG STEREO L DIGITAL DIGITAL R AC OUTLET Satellite tuner AC IN SPEAKERS ª ı· L R TV tuner memo • If you use digital soundtracks broadcast you must assign those inputs with the "Assigning the Component Video Inputs" procedure. Connecting Your Equipment Connecting Satellite TV (SAT) Components ...

Owner's Manual
Page 23
...plugs (a set of stereo ins and a set of stereo plugs (two plugs). If your analog audio components (turntable, cassette deck) use these analog connections. If you want to record with these jacks. L LR MULTI CH INPUT SUB W. PREPARATION PREPARATION Connecting Your Equipment ...L L R R Turntable If your turntable has a ground wire, connect it up any other component to the PHONO jacks other than PHONO. 7 Audio cords Use audio cords (not supplied) to an input other than a turntable. It could damage the equipment. R Be sure to L (left). DIGITAL PCM/2DIGITAL /...
...plugs (a set of stereo ins and a set of stereo plugs (two plugs). If your analog audio components (turntable, cassette deck) use these analog connections. If you want to record with these jacks. L LR MULTI CH INPUT SUB W. PREPARATION PREPARATION Connecting Your Equipment ...L L R R Turntable If your turntable has a ground wire, connect it up any other component to the PHONO jacks other than PHONO. 7 Audio cords Use audio cords (not supplied) to an input other than a turntable. It could damage the equipment. R Be sure to L (left). DIGITAL PCM/2DIGITAL /...


