
Owner's Manual
Page 4
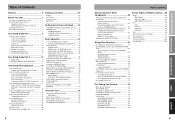
... 52 Using Headphones 52 Video Select 53 Adjusting the Brightness of the Display (DIMMER 53 Using the Tuner 54 Automatic and Manual Tuning 54 MPX Mode 54 Direct Access Tuning 55 Memorizing Frequently Used Stations 56 Naming Memorized Stations 57 Recalling Memorized Stations 58... 66 Connecting Additional Amplifiers 67 Multi Operations 68 Performing Multi Operations 69 SYSTEM OFF 70 Using SYSTEM OFF 71 The PIONEER SR System: Operating other PIONEER components 71 Resetting the Remote Control 72 Erasing Multi Operations 72 Erasing Learned Remote Control Commands ... 72 Erasing All...
... 52 Using Headphones 52 Video Select 53 Adjusting the Brightness of the Display (DIMMER 53 Using the Tuner 54 Automatic and Manual Tuning 54 MPX Mode 54 Direct Access Tuning 55 Memorizing Frequently Used Stations 56 Naming Memorized Stations 57 Recalling Memorized Stations 58... 66 Connecting Additional Amplifiers 67 Multi Operations 68 Performing Multi Operations 69 SYSTEM OFF 70 Using SYSTEM OFF 71 The PIONEER SR System: Operating other PIONEER components 71 Resetting the Remote Control 72 Erasing Multi Operations 72 Erasing Learned Remote Control Commands ... 72 Erasing All...

Owner's Manual
Page 5
... 52 Using Headphones 52 Video Select 53 Adjusting the Brightness of the Display (DIMMER 53 Using the Tuner 54 Automatic and Manual Tuning 54 MPX Mode 54 Direct Access Tuning 55 Memorizing Frequently Used Stations 56 Naming Memorized Stations 57 Recalling Memorized Stations 58... 66 Connecting Additional Amplifiers 67 Multi Operations 68 Performing Multi Operations 69 SYSTEM OFF 70 Using SYSTEM OFF 71 The PIONEER SR System: Operating other PIONEER components 71 Resetting the Remote Control 72 Erasing Multi Operations 72 Erasing Learned Remote Control Commands ... 72 Erasing All...
... 52 Using Headphones 52 Video Select 53 Adjusting the Brightness of the Display (DIMMER 53 Using the Tuner 54 Automatic and Manual Tuning 54 MPX Mode 54 Direct Access Tuning 55 Memorizing Frequently Used Stations 56 Naming Memorized Stations 57 Recalling Memorized Stations 58... 66 Connecting Additional Amplifiers 67 Multi Operations 68 Performing Multi Operations 69 SYSTEM OFF 70 Using SYSTEM OFF 71 The PIONEER SR System: Operating other PIONEER components 71 Resetting the Remote Control 72 Erasing Multi Operations 72 Erasing Learned Remote Control Commands ... 72 Erasing All...
Owner's Manual
Page 9
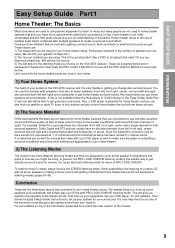
... the basics. For more than two channels of audio. Particularly important is not really complicated and this receiver with more details on the VSX-43TX receiver. EASY SETUP GUIDE PREPARATION Easy Setup Guide Part1 Home Theater: The Basics Most consumers are used to home theater systems that powers... the subwoofer) of sound. Home theater refers to the use this little guide should give you consult the manual that contribute to your speaker configuration. 2) The 'source' material you will still be able to music in your home. 1) Your Home ...
... the basics. For more than two channels of audio. Particularly important is not really complicated and this receiver with more details on the VSX-43TX receiver. EASY SETUP GUIDE PREPARATION Easy Setup Guide Part1 Home Theater: The Basics Most consumers are used to home theater systems that powers... the subwoofer) of sound. Home theater refers to the use this little guide should give you consult the manual that contribute to your speaker configuration. 2) The 'source' material you will still be able to music in your home. 1) Your Home ...
Owner's Manual
Page 11
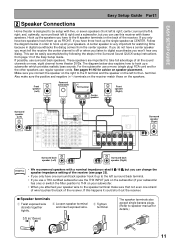
... strands together tightly. 2 Loosen speaker terminal and insert exposed wire. 3 Tighten terminal. 3/8 in(10mm) The speaker terminals also accept single banana plugs. (Refer to speaker manual for the other speakers use surround back speakers. Hook up to the left & right; Follow the diagram below also explains how to hook up all...
... strands together tightly. 2 Loosen speaker terminal and insert exposed wire. 3 Tighten terminal. 3/8 in(10mm) The speaker terminals also accept single banana plugs. (Refer to speaker manual for the other speakers use surround back speakers. Hook up to the left & right; Follow the diagram below also explains how to hook up all...
Owner's Manual
Page 14
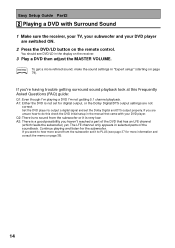
If you 're having trouble getting 5.1 channel playback. The LFE channel only appears in the manual that has an LFE channel (which feeds the subwoofer) yet. If you are unsure how to do this Frequently Asked Questions (FAQ) guide: Q1: Even ...
If you 're having trouble getting 5.1 channel playback. The LFE channel only appears in the manual that has an LFE channel (which feeds the subwoofer) yet. If you are unsure how to do this Frequently Asked Questions (FAQ) guide: Q1: Even ...
Owner's Manual
Page 16
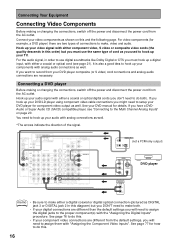
... to setup your DVD player for component video output as well. Hook up your audio with the "Assigning the Digital Inputs" procedure. See your DVD manual for how to hook up your TV. If you will need to assign the digital jacks to use the same type of the signal. ASSIGNABLE...
... to setup your DVD player for component video output as well. Hook up your audio with the "Assigning the Digital Inputs" procedure. See your DVD manual for how to hook up your TV. If you will need to assign the digital jacks to use the same type of the signal. ASSIGNABLE...
Owner's Manual
Page 24
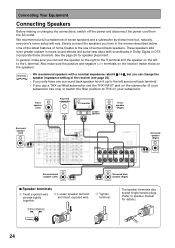
... the left surround back terminal. • If you connect the speaker on the right to the R terminal and the speaker on the left to speaker manual for speaker placement. Simply connect the speakers you have one ) or switch the filter position to THX on the speakers. TER DVD/ LD IN SURROUND...
... the left surround back terminal. • If you connect the speaker on the right to the R terminal and the speaker on the left to speaker manual for speaker placement. Simply connect the speakers you have one ) or switch the filter position to THX on the speakers. TER DVD/ LD IN SURROUND...
Owner's Manual
Page 26
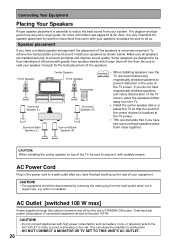
... come with your speakers so please be floor-standing but others benefit greatly from the wall socket when not in the color of your speaker manuals for more information see pages 91 & 92. AC Power Cord Plug in order to read your equipment. Also, it with high power consumption such as...
... come with your speakers so please be floor-standing but others benefit greatly from the wall socket when not in the color of your speaker manuals for more information see pages 91 & 92. AC Power Cord Plug in order to read your equipment. Also, it with high power consumption such as...

Owner's Manual
Page 34
... advanced setup for Surround Sound To ensure the best possible surround sound, complete the following setup operations. If you can use the 5∞ buttons to manually adjust all the surround sound functions. To do a more personalized.
... advanced setup for Surround Sound To ensure the best possible surround sound, complete the following setup operations. If you can use the 5∞ buttons to manually adjust all the surround sound functions. To do a more personalized.
Owner's Manual
Page 36
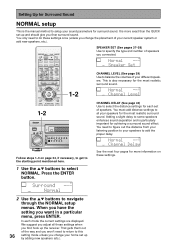
... mode the current settings are displayed. When you have the setting you finer surround sound. Setting Up for Surround Sound NORMAL setup This is the manual method to some speakers enhances sound separation and is particularly important for achieving a surround sound effect. It is more information on page 34, if necessary...
... mode the current settings are displayed. When you have the setting you finer surround sound. Setting Up for Surround Sound NORMAL setup This is the manual method to some speakers enhances sound separation and is particularly important for achieving a surround sound effect. It is more information on page 34, if necessary...
Owner's Manual
Page 39
...proceed to step 5. You may need to the next speaker. Select a setting mode with the below instructions for the method you want press ENTER. MANUAL: move to complete the procedure and start over from step 2. The default setting is output. In AUTO (automatic test tone) mode This mode switches ...two ways to set it to the middle position before doing these operations. • If you need to select and press ENTER. In MANUAL (manual test tone) mode To switch the test tone between each speaker use the 5∞ buttons to adjust the level after testing your system with...
...proceed to step 5. You may need to the next speaker. Select a setting mode with the below instructions for the method you want press ENTER. MANUAL: move to complete the procedure and start over from step 2. The default setting is output. In AUTO (automatic test tone) mode This mode switches ...two ways to set it to the middle position before doing these operations. • If you need to select and press ENTER. In MANUAL (manual test tone) mode To switch the test tone between each speaker use the 5∞ buttons to adjust the level after testing your system with...
Owner's Manual
Page 42
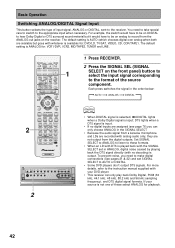
... the receiver. DTS lights when a DTS signal is ANALOG for : DVD/LD, TV/SAT, VIDEO, CD, CDR/TAPE1. For more details, refer to the instruction manual supplied with analog audio only, they are available but it would have to be on the receiver. Basic Operation Switching ANALOG/DIGITAL Signal Input This...
... the receiver. DTS lights when a DTS signal is ANALOG for : DVD/LD, TV/SAT, VIDEO, CD, CDR/TAPE1. For more details, refer to the instruction manual supplied with analog audio only, they are available but it would have to be on the receiver. Basic Operation Switching ANALOG/DIGITAL Signal Input This...

Owner's Manual
Page 54
...-ROOM L C R LFE LS S RS SP A B 3 Tune in FM and AM radio broadcasts using the automatic (search) and manual (step) tuning functions. For Manual Tuning • To change frequencies one step at the first station it locates. On the remote, this selects the tuner function on the...INPUT SELECT CHANNEL VOLUME REMOTE SETUP 1 3 MPX button RECEIVER 1 STANDBY/ON MOVIE MUSIC ENTER MULTI JOG AUDIO/VIDEO MULTI-CHANNEL RECEIVER VSX-43TX STANDBY MULTI JOG CONTROL SET UP RETURN SIGNAL HI-BIT SELECT HI-SAMPLING SB CH MODE MIDNIGHT LOUDNESS BAND CLASS STATION TUNING SELECT ...
...-ROOM L C R LFE LS S RS SP A B 3 Tune in FM and AM radio broadcasts using the automatic (search) and manual (step) tuning functions. For Manual Tuning • To change frequencies one step at the first station it locates. On the remote, this selects the tuner function on the...INPUT SELECT CHANNEL VOLUME REMOTE SETUP 1 3 MPX button RECEIVER 1 STANDBY/ON MOVIE MUSIC ENTER MULTI JOG AUDIO/VIDEO MULTI-CHANNEL RECEIVER VSX-43TX STANDBY MULTI JOG CONTROL SET UP RETURN SIGNAL HI-BIT SELECT HI-SAMPLING SB CH MODE MIDNIGHT LOUDNESS BAND CLASS STATION TUNING SELECT ...

Owner's Manual
Page 56
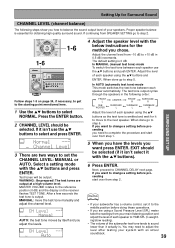
...TITLE INPUT SELECT CHANNEL VOLUME REMOTE SETUP 4 5 3 RECEIVER 45 STANDBY/ON MOVIE MUSIC ENTER MULTI JOG AUDIO/VIDEO MULTI-CHANNEL RECEIVER VSX-43TX STANDBY MULTI JOG CONTROL SET UP RETURN SIGNAL HI-BIT SELECT HI-SAMPLING SB CH MODE MIDNIGHT LOUDNESS BAND CLASS STATION TUNING SELECT PHONES... STEREO SP A B « SIGNAL ANALOG STEREO dB SP A B 3 Press the CLASS button repeatedly to activate the memory function. See "Automatic and Manual Tuning" or "Direct Access Tuning" on page 54 and 55. 2 Press the TUNER EDIT button to select a class number. SIGNAL PRO LOGIC Neo ...
...TITLE INPUT SELECT CHANNEL VOLUME REMOTE SETUP 4 5 3 RECEIVER 45 STANDBY/ON MOVIE MUSIC ENTER MULTI JOG AUDIO/VIDEO MULTI-CHANNEL RECEIVER VSX-43TX STANDBY MULTI JOG CONTROL SET UP RETURN SIGNAL HI-BIT SELECT HI-SAMPLING SB CH MODE MIDNIGHT LOUDNESS BAND CLASS STATION TUNING SELECT PHONES... STEREO SP A B « SIGNAL ANALOG STEREO dB SP A B 3 Press the CLASS button repeatedly to activate the memory function. See "Automatic and Manual Tuning" or "Direct Access Tuning" on page 54 and 55. 2 Press the TUNER EDIT button to select a class number. SIGNAL PRO LOGIC Neo ...

Owner's Manual
Page 61
... perform these operations, press the MULTI CONTROL button for fast reverse playback. 3 Start playback. 7 SUBTITLE Button Number Buttons Stop playback (on individual commands consult the manual that system. Directly access tracks on a reversible deck. Repeated presses skips to the start of the tape on a program source. Button(s) Function SOURCE Press to...
... perform these operations, press the MULTI CONTROL button for fast reverse playback. 3 Start playback. 7 SUBTITLE Button Number Buttons Stop playback (on individual commands consult the manual that system. Directly access tracks on a reversible deck. Repeated presses skips to the start of the tape on a program source. Button(s) Function SOURCE Press to...

Owner's Manual
Page 62
... receiver's remote control after you program it to the TV CONT button. Use to select or adjust and navigate items on individual commands consult the manual that system. Use to the TV CONT button. Press to move forward channels. Thus if you only have two TVs, assign the main TV to...
... receiver's remote control after you program it to the TV CONT button. Use to select or adjust and navigate items on individual commands consult the manual that system. Use to the TV CONT button. Press to move forward channels. Thus if you only have two TVs, assign the main TV to...
Owner's Manual
Page 65
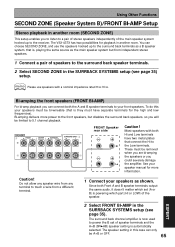
... BACK / ı R L ª · · FRONT Speaker rear side · ª Hi · ª Lo Caution! See your speaker manual for playback in another room (SECOND ZONE) This setup enables you to listen to a pair of stereo speakers independently of the speaker. 2 Select FRONT BI...the A and B speaker terminals to the Low terminals. Caution! Most speakers with a nominal impedance rated 8 Ω-16 Ω. The VSX-43TX has two possibilities for more power to the front speakers, but from a different terminal. 1 Connect your speakers must be A+B or OFF...
... BACK / ı R L ª · · FRONT Speaker rear side · ª Hi · ª Lo Caution! See your speaker manual for playback in another room (SECOND ZONE) This setup enables you to listen to a pair of stereo speakers independently of the speaker. 2 Select FRONT BI...the A and B speaker terminals to the Low terminals. Caution! Most speakers with a nominal impedance rated 8 Ω-16 Ω. The VSX-43TX has two possibilities for more power to the front speakers, but from a different terminal. 1 Connect your speakers must be A+B or OFF...
Owner's Manual
Page 95
... (temperature sensor) is connected correctly (see pages 15-22). • Press MUTING on again. • Disconnect the power plug from wall and call a Pioneer-accredited repair center to turn on the receiver. THDCT NG blinks in another set of the speakers (as opposed to the speakers' rated impedance) is... service center or your dealer to ACOUSTIC CALIBRATION EQ (page 84-85) and lower the 63 Hz and 125 Hz equalizer levels using MANUAL setting. During loud playback the power suddenly switches off and allow it 's convenient go to carry out repair work. EXPERT 95 If you...
... (temperature sensor) is connected correctly (see pages 15-22). • Press MUTING on again. • Disconnect the power plug from wall and call a Pioneer-accredited repair center to turn on the receiver. THDCT NG blinks in another set of the speakers (as opposed to the speakers' rated impedance) is... service center or your dealer to ACOUSTIC CALIBRATION EQ (page 84-85) and lower the 63 Hz and 125 Hz equalizer levels using MANUAL setting. During loud playback the power suddenly switches off and allow it 's convenient go to carry out repair work. EXPERT 95 If you...
Owner's Manual
Page 96
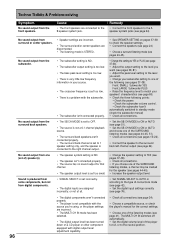
... not at all connections (see pages 15-22). • Connect the speaker to standby mode (check the subwoofer manual) • Check all connections (see page 24). • Choose a compatible source, or check the player's manual for the correct settings. • Choose one of connections made (see page 42). • Set the digital...
... not at all connections (see pages 15-22). • Connect the speaker to standby mode (check the subwoofer manual) • Check all connections (see page 24). • Choose a compatible source, or check the player's manual for the correct settings. • Choose one of connections made (see page 42). • Set the digital...
Owner's Manual
Page 98
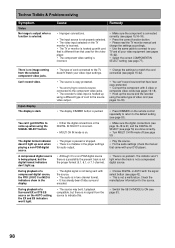
... are done correctly. • Turn MULTI CH IN mode off (see page 50) . • Play the source. • Fix the audio settings (check the manual that came with the source. • The audio is in two channel format. • It has already been Dolby surround encoded. • The source may...• Make sure the component is connected correctly (see pages 15,16-18). • Press the correct function button. • Please read the TV monitor manual and change the settings accordingly. • Use the same cable to connect to ON (see page 42). • This is different than that have been...
... are done correctly. • Turn MULTI CH IN mode off (see page 50) . • Play the source. • Fix the audio settings (check the manual that came with the source. • The audio is in two channel format. • It has already been Dolby surround encoded. • The source may...• Make sure the component is connected correctly (see pages 15,16-18). • Press the correct function button. • Please read the TV monitor manual and change the settings accordingly. • Use the same cable to connect to ON (see page 42). • This is different than that have been...


