Owner's Manual
Page 4
... and playback components 16 Connecting using HDMI 16 Connecting your TV with no HDMI input 17 Connecting your DVD player with no HDMI output . . ...stored on components on iPod touch, iPhone, iPad, and iTunes 38 About the DHCP server function 38 Authorizing this Pioneer product. ...Network Setup menu 41 Network Configuration 41 Language 42 Firmware Update 42 Factory Reset 42 System Information 42 About network playback 43 Content playable over ... menu 49 Analog Input 49 Component Input 49 The Speaker System setting 49 The Video Parameter setting 49 Video Converter 49 Resolution ...
... and playback components 16 Connecting using HDMI 16 Connecting your TV with no HDMI input 17 Connecting your DVD player with no HDMI output . . ...stored on components on iPod touch, iPhone, iPad, and iTunes 38 About the DHCP server function 38 Authorizing this Pioneer product. ...Network Setup menu 41 Network Configuration 41 Language 42 Firmware Update 42 Factory Reset 42 System Information 42 About network playback 43 Content playable over ... menu 49 Analog Input 49 Component Input 49 The Speaker System setting 49 The Video Parameter setting 49 Video Converter 49 Resolution ...
Owner's Manual
Page 7
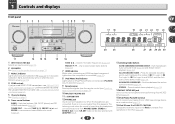
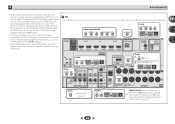
...radio stations (page 32). 7 HDMI indicator Blinks when connecting an HDMI-equipped component; The listening mode when the sound is no sound output from the speakers. Switches between Auto surround mode (page 33) and Stream... iPhone iPad DIRECT CONTROL ENTER PHONES MCACC SETUP MIC VIDEO USB iPod iPhone iPad 10 VSX-42 MASTER VOLUME 17 18 24 25 19 20 21 22 19 23 26 27 28... buttons BAND - lights when the component is connected (page 16). 8 iPod iPhone iPad indicator Lights when an iPod/iPhone/iPad is connected and iPod/USB input is automatically set to control the sub zone from...
...radio stations (page 32). 7 HDMI indicator Blinks when connecting an HDMI-equipped component; The listening mode when the sound is no sound output from the speakers. Switches between Auto surround mode (page 33) and Stream... iPhone iPad DIRECT CONTROL ENTER PHONES MCACC SETUP MIC VIDEO USB iPod iPhone iPad 10 VSX-42 MASTER VOLUME 17 18 24 25 19 20 21 22 19 23 26 27 28... buttons BAND - lights when the component is connected (page 16). 8 iPod iPhone iPad indicator Lights when an iPod/iPhone/iPad is connected and iPod/USB input is automatically set to control the sub zone from...
Owner's Manual
Page 11
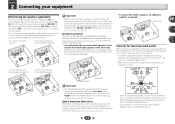
...enjoy the surround sound in the main zone with this case, sound will be output from your system. • It is output from the center. Main zone Sub zone R L Some tips for bigger rooms... sound quality Where you . 11 If you intend to connect only one was selected in another component in home theaters. In this setup. • You will be the maximum in the main ...the surround back speaker.) R L Speaker B Main zone Important • The Speaker System setting must be set if the above connections are performed. The 5.1 channel surround system is limited). To achieve the...
...enjoy the surround sound in the main zone with this case, sound will be output from your system. • It is output from the center. Main zone Sub zone R L Some tips for bigger rooms... sound quality Where you . 11 If you intend to connect only one was selected in another component in home theaters. In this setup. • You will be the maximum in the main ...the surround back speaker.) R L Speaker B Main zone Important • The Speaker System setting must be set if the above connections are performed. The 5.1 channel surround system is limited). To achieve the...
Owner's Manual
Page 12
... ASSIGNABLE IN 1 (CD) OPTICAL ASSIGNABLE IN 1 (TV) 2 V AX) SAT/CBL DVD IN IN AUDIO PRE OUT SUB WOOFER ADAPTER PORT (OUTPUT 5 V 0.1 A MAX) L ZONE 2 ANTENNA OUT A R FRONT L R AM LOOP L FRONT IN R L R SURROUND SURROUND BACK ... subwoofer), or mounting them . left Front right Center Front left Speaker B setting Speaker B - Make sure the speakers don't face each other speakers should be... low frequency reproduction capabilities to the front channel. (The subwoofer's low frequency component is not recommended. • When not connecting a subwoofer, connect speakers with...
... ASSIGNABLE IN 1 (CD) OPTICAL ASSIGNABLE IN 1 (TV) 2 V AX) SAT/CBL DVD IN IN AUDIO PRE OUT SUB WOOFER ADAPTER PORT (OUTPUT 5 V 0.1 A MAX) L ZONE 2 ANTENNA OUT A R FRONT L R AM LOOP L FRONT IN R L R SURROUND SURROUND BACK ... subwoofer), or mounting them . left Front right Center Front left Speaker B setting Speaker B - Make sure the speakers don't face each other speakers should be... low frequency reproduction capabilities to the front channel. (The subwoofer's low frequency component is not recommended. • When not connecting a subwoofer, connect speakers with...
Owner's Manual
Page 14
...white, and you want to hear HDMI audio output from your TV (no sound will be heard from the speakers. This receiver incorporates High-Definition Multimedia Interface (HDMI®) technology. These cables are only possible when connected to a compatible component. • HDMI format digital audio transmissions ...8226; If the video signal does not appear on your TV, try adjusting the resolution settings on /off the power and disconnect the power cord from the HDMI is used to connect digital components to this happens, the magnetic field produced by HDCP (1080p/24, 1080p/60, etc.))...
...white, and you want to hear HDMI audio output from your TV (no sound will be heard from the speakers. This receiver incorporates High-Definition Multimedia Interface (HDMI®) technology. These cables are only possible when connected to a compatible component. • HDMI format digital audio transmissions ...8226; If the video signal does not appear on your TV, try adjusting the resolution settings on /off the power and disconnect the power cord from the HDMI is used to connect digital components to this happens, the magnetic field produced by HDCP (1080p/24, 1080p/60, etc.))...
Owner's Manual
Page 15
...luminance (Y) signal and the color (PB and PR) signals and then output. Playback component Terminal for connection with source device IN IN IN HDMI Y PB PR COMPONENT VIDEO VIDEO Yellow VIDEO Component video cables Use component video cables to damage the shutter protecting the optical socket. •... component, then composite (in that can be damaged if bent around sharp corners. • You can be careful when inserting the plug not to get the best possible color reproduction of video connection and are prohibited. In this case, try adjusting the resolution settings ...
...luminance (Y) signal and the color (PB and PR) signals and then output. Playback component Terminal for connection with source device IN IN IN HDMI Y PB PR COMPONENT VIDEO VIDEO Yellow VIDEO Component video cables Use component video cables to damage the shutter protecting the optical socket. •... component, then composite (in that can be damaged if bent around sharp corners. • You can be careful when inserting the plug not to get the best possible color reproduction of video connection and are prohibited. In this case, try adjusting the resolution settings ...

Owner's Manual
Page 16
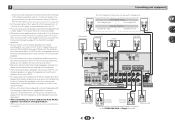
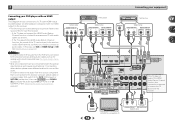
... player Connecting your equipment Blu-ray Disc player HDMI/DVI-compatible components HDMI OUT Set-top box HDMI OUT Game console DVD recorder, Blu-ray Disc recorder Video component HDMI OUT HDMI OUT IN LAN (10/100) DVD SAT/...OUTPUT 5 V 0.1 A MAX) L ZONE 2 ANTENNA OUT A R FRONT L R AM LOOP CENTER SURROUND R L SURROUND BACK R L(Single) IN 1 (DVD) ASSIGNABLE Y PB PR COMPONENT VIDEO HDMI IN L IN R DVD SAT/CBL ANALOG IN 1 (CD) ASSIGNABLE FM UNBAL 75 ANALOG IN1 (CD) CAUTION: ATTENTION: SPEAKER IMPEDANCE ENCEINTE D'IMPEDANCE DE 6 -16 . 6 -16 . In this case, set...
... player Connecting your equipment Blu-ray Disc player HDMI/DVI-compatible components HDMI OUT Set-top box HDMI OUT Game console DVD recorder, Blu-ray Disc recorder Video component HDMI OUT HDMI OUT IN LAN (10/100) DVD SAT/...OUTPUT 5 V 0.1 A MAX) L ZONE 2 ANTENNA OUT A R FRONT L R AM LOOP CENTER SURROUND R L SURROUND BACK R L(Single) IN 1 (DVD) ASSIGNABLE Y PB PR COMPONENT VIDEO HDMI IN L IN R DVD SAT/CBL ANALOG IN 1 (CD) ASSIGNABLE FM UNBAL 75 ANALOG IN1 (CD) CAUTION: ATTENTION: SPEAKER IMPEDANCE ENCEINTE D'IMPEDANCE DE 6 -16 . 6 -16 . In this case, set...
Owner's Manual
Page 17
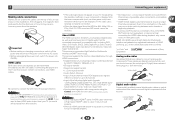
... for analog audio input is required (see Selecting the audio input signal on page 49). • Only one component can be necessary to make video output settings. 2 Connecting your equipment Connecting your TV with no HDMI input This diagram shows connections of a TV (with no HDMI input) and DVD player (or other ...
... for analog audio input is required (see Selecting the audio input signal on page 49). • Only one component can be necessary to make video output settings. 2 Connecting your equipment Connecting your TV with no HDMI input This diagram shows connections of a TV (with no HDMI input) and DVD player (or other ...
Owner's Manual
Page 18
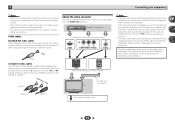
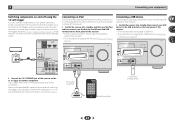
...(see The Input Assign menu on page 49). • Only one component can be connected to connect an audio cable. Connecting your DVD player with no HDMI output) to the receiver. • The following connection/setting is required to listen to choose the audio signal O1 (OPTICAL1) or ...C1 (COAXIAL1) (see Selecting the audio input signal on page 52). 2 Connecting your equipment DVD player Select one COMPONENT VIDEO OUT Y PB ...
...(see The Input Assign menu on page 49). • Only one component can be connected to connect an audio cable. Connecting your DVD player with no HDMI output) to the receiver. • The following connection/setting is required to listen to choose the audio signal O1 (OPTICAL1) or ...C1 (COAXIAL1) (see Selecting the audio input signal on page 52). 2 Connecting your equipment DVD player Select one COMPONENT VIDEO OUT Y PB ...
Owner's Manual
Page 19
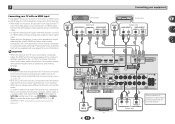
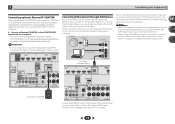
...equipment Connecting optional Bluetooth® ADAPTER When the Bluetooth ADAPTER (Pioneer Model No. 2 Connecting your nearest Internet service provider. To listen to Internet radio stations, you can play audio files stored on the components on your Internet environment. • When using a broadband ...is required. Note • Refer to set up the network manually. Bluetooth® ADAPTER LAN cable (sold separately) IN LAN (10/100) COAXIAL ASSIGNABLE IN 1 SAT/CBL BD GAME DVR/BDR VIDEO (CD) PRE OUT SUB WOOFER ADAPTER PORT AUDIO DVD IN (OUTPUT 5 V 0.1 A MAX) L ZONE...
...equipment Connecting optional Bluetooth® ADAPTER When the Bluetooth ADAPTER (Pioneer Model No. 2 Connecting your nearest Internet service provider. To listen to Internet radio stations, you can play audio files stored on the components on your Internet environment. • When using a broadband ...is required. Note • Refer to set up the network manually. Bluetooth® ADAPTER LAN cable (sold separately) IN LAN (10/100) COAXIAL ASSIGNABLE IN 1 SAT/CBL BD GAME DVR/BDR VIDEO (CD) PRE OUT SUB WOOFER ADAPTER PORT AUDIO DVD IN (OUTPUT 5 V 0.1 A MAX) L ZONE...
Owner's Manual
Page 21
..., see Playing an iPod on page 27. After you 've set on the trigger using 12 volt triggers when you 'll be able to the 12 V trigger of another component. However, you must specify which input functions switch on page 51. VSX-42 HDMI iPod iPhone iPad BAND TUNER EDIT CONTROL TUNE ON/OFF...storage device 21 HDMI OUT DVD SAT/CBL 12 V TRIGGER INPUT IR IN OUT 12 V TRIGGER (OUTPUT 12 V 50 mA MAX) VIDEO MONITOR SAT/CBL DVD OUT IN IN AUDIO IN 1 (DVD) ASSIGNABLE Y PB PR DVD COMPONENT VIDEO Connect the 12 V TRIGGER jack of this will switch on page 28. Note...
..., see Playing an iPod on page 27. After you 've set on the trigger using 12 volt triggers when you 'll be able to the 12 V trigger of another component. However, you must specify which input functions switch on page 51. VSX-42 HDMI iPod iPhone iPad BAND TUNER EDIT CONTROL TUNE ON/OFF...storage device 21 HDMI OUT DVD SAT/CBL 12 V TRIGGER INPUT IR IN OUT 12 V TRIGGER (OUTPUT 12 V 50 mA MAX) VIDEO MONITOR SAT/CBL DVD OUT IN IN AUDIO IN 1 (DVD) ASSIGNABLE Y PB PR DVD COMPONENT VIDEO Connect the 12 V TRIGGER jack of this will switch on page 28. Note...
Owner's Manual
Page 25
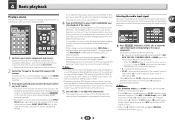
... Here are the basic instructions for BD, DVD, SAT/CBL, DVR/BDR, VIDEO or GAME input. It is fixed to check the digital audio output settings on the remote control, then press the appropriate button to this case, the remote control won't switch operational modes. For other inputs, H cannot...multichannel surround sound. 5 Use VOLUME +/- Note • You may only get digital 2 channel stereo and analog sound. to check on the playback component (for playback (see page 8). 25 If you selected the proper input source and there is still no sound, select the audio input signal for ...
... Here are the basic instructions for BD, DVD, SAT/CBL, DVR/BDR, VIDEO or GAME input. It is fixed to check the digital audio output settings on the remote control, then press the appropriate button to this case, the remote control won't switch operational modes. For other inputs, H cannot...multichannel surround sound. 5 Use VOLUME +/- Note • You may only get digital 2 channel stereo and analog sound. to check on the playback component (for playback (see page 8). 25 If you selected the proper input source and there is still no sound, select the audio input signal for ...
Owner's Manual
Page 26
... input CENTER O1 RECEIVER SURROUND SIGNAL SSELURROUND BACK R L 3R L(Single) IN 1 (DVD) ASSIGNABLE Y PB PR COMPONENT VIDEO L IN R DVD SAT/CBL ANALOG IN 1 (CD) ASSIGNABLE TUNER FM UNBAL 75 CAUTION: ATTENTION: SPEAKER IMPEDANCE...6 -16 . To prevent noise, make the proper digital connections (page 14) and set to A (analog). • You may get digital noise when a LD or CD player compatible with... 96 kHz) and DTS (including DTS 96 kHz/24 bit) digital signal formats. TV (TV input) (OUTPUT 5 V 0.1 A MAX) ANTENNA A R FRONT L AM LOOP 2. SPEAKERS SELECTABL Class 2 Wiring SELECTABL ...
... input CENTER O1 RECEIVER SURROUND SIGNAL SSELURROUND BACK R L 3R L(Single) IN 1 (DVD) ASSIGNABLE Y PB PR COMPONENT VIDEO L IN R DVD SAT/CBL ANALOG IN 1 (CD) ASSIGNABLE TUNER FM UNBAL 75 CAUTION: ATTENTION: SPEAKER IMPEDANCE...6 -16 . To prevent noise, make the proper digital connections (page 14) and set to A (analog). • You may get digital noise when a LD or CD player compatible with... 96 kHz) and DTS (including DTS 96 kHz/24 bit) digital signal formats. TV (TV input) (OUTPUT 5 V 0.1 A MAX) ANTENNA A R FRONT L AM LOOP 2. SPEAKERS SELECTABL Class 2 Wiring SELECTABL ...
Owner's Manual
Page 35
However, the effect you can actually feel when Phase Control is added are output from diagonally to the rear as it to the plus (+) sign (or 0°). Using surround back channel processing You can have the receiver automatically use 6.1 ... surround back speakers so that have a maximized Phase Control effect. • The Phase Control mode cannot be set to OFF even when set to ON, depending on for generating the surround back component from the surround component is effective when the speakers in the 7.1-channel surround system are 'in phase', they crest and trough...
However, the effect you can actually feel when Phase Control is added are output from diagonally to the rear as it to the plus (+) sign (or 0°). Using surround back channel processing You can have the receiver automatically use 6.1 ... surround back speakers so that have a maximized Phase Control effect. • The Phase Control mode cannot be set to OFF even when set to ON, depending on for generating the surround back component from the surround component is effective when the speakers in the 7.1-channel surround system are 'in phase', they crest and trough...
Owner's Manual
Page 36
... may be slightly out of sync with an HDMI cable. Setting/What it is unavailable due to the current source, settings and status of delay, you can make using a center speaker) Spreads the center channel between components connected with an HDMI cable. By adding a bit of... = 30 frames (NTSC) Default: 0.0 MIDNIGHT/LOUDNESSa The MIDNIGHT allows you to hear effective surround sound of non-PCM sources. Channel 1 is output from an uneven sound image. The LOUDNESS is a slight delay ON before OFF recognizes the PCM signal on the operational status of this is selected...
... may be slightly out of sync with an HDMI cable. Setting/What it is unavailable due to the current source, settings and status of delay, you can make using a center speaker) Spreads the center channel between components connected with an HDMI cable. By adding a bit of... = 30 frames (NTSC) Default: 0.0 MIDNIGHT/LOUDNESSa The MIDNIGHT allows you to hear effective surround sound of non-PCM sources. Channel 1 is output from an uneven sound image. The LOUDNESS is a slight delay ON before OFF recognizes the PCM signal on the operational status of this is selected...
Owner's Manual
Page 46
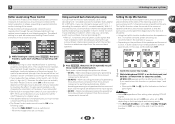
... the Home Menu when the NETRADIO, PANDORA, M.SERVER, FAVORITE, iPod/USB or ADAPTER input is in the speaker items that connects this setting to Standby Through output or not during standby (see The Network Standby menu on page 52). • Auto Power Down - Allows the AirPlay function to be... example of speakers you want to the component video inputs (page 49). • Speaker System - Analog Input - It is a good idea to make sure that enables the signal output from the HDMI OUT terminal for all of these operating instructions is set the HDMI input signal to specify your ...
... the Home Menu when the NETRADIO, PANDORA, M.SERVER, FAVORITE, iPod/USB or ADAPTER input is in the speaker items that connects this setting to Standby Through output or not during standby (see The Network Standby menu on page 52). • Auto Power Down - Allows the AirPlay function to be... example of speakers you want to the component video inputs (page 49). • Speaker System - Analog Input - It is a good idea to make sure that enables the signal output from the HDMI OUT terminal for all of these operating instructions is set the HDMI input signal to specify your ...
Owner's Manual
Page 49
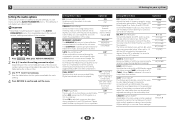
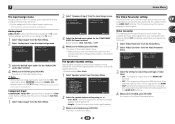
...8226; Make sure you have connected the audio from the component to the Video Parameter menu. 49 Auto MCACC 2 . ZONE2 Setup 10 . 12V Trigger 4 . The Video Parameter setting This receiver can be output from the HDMI OUT terminal. 4 When you 're finished... terminals. • Default setting: Surr. Sound is output from the composite or component video terminals; the output is assigned to CD under factory settings, but this function. Video Converter b . Resolution c . The signal input from the composite and component video terminals will be set. 1 Select 'Video Parameter...
...8226; Make sure you have connected the audio from the component to the Video Parameter menu. 49 Auto MCACC 2 . ZONE2 Setup 10 . 12V Trigger 4 . The Video Parameter setting This receiver can be output from the HDMI OUT terminal. 4 When you 're finished... terminals. • Default setting: Surr. Sound is output from the composite or component video terminals; the output is assigned to CD under factory settings, but this function. Video Converter b . Resolution c . The signal input from the composite and component video terminals will be set. 1 Select 'Video Parameter...
Owner's Manual
Page 50
The signal is not set to OFF, the Auto Power Down setting will appear either at top and bottom or on your display (if the image doesn't match your monitor type, adjust the aspect ratio on the source component or on with the resolution specified here (480p means the resolution of 480p/...Home Menu. Home Menu 1 . You return to the capacity of the TV (monitor) connected by HDMI. • PURE - Note • When set to OFF and cannot be output due to automatically turn off (when there has been no operation). • You can select 2, 4 or 6 hours, or OFF (if no picture...
The signal is not set to OFF, the Auto Power Down setting will appear either at top and bottom or on your display (if the image doesn't match your monitor type, adjust the aspect ratio on the source component or on with the resolution specified here (480p means the resolution of 480p/...Home Menu. Home Menu 1 . You return to the capacity of the TV (monitor) connected by HDMI. • PURE - Note • When set to OFF and cannot be output due to automatically turn off (when there has been no operation). • You can select 2, 4 or 6 hours, or OFF (if no picture...
Owner's Manual
Page 52
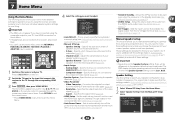
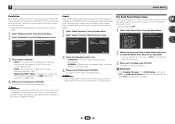
... initialization. HDMI Setup 1 . Speaker System 5 . Video Parameter 6 . When using a component that connects this receiver will need to set this unit. Synchronized operations cannot be output. The TV's sound is input from the wall socket. However, we recommend that support the... 5 Select the 'Control' setting you want . In this case, set to use the Control with HDMI function. Chapter 8 Control with HDMI function Synchronized operations below with a Control with HDMIcompatible Pioneer TV or Blu-ray Disc player are possible when the component is connected to ON (see...
... initialization. HDMI Setup 1 . Speaker System 5 . Video Parameter 6 . When using a component that connects this receiver will need to set this unit. Synchronized operations cannot be output. The TV's sound is input from the wall socket. However, we recommend that support the... 5 Select the 'Control' setting you want . In this case, set to use the Control with HDMI function. Chapter 8 Control with HDMI function Synchronized operations below with a Control with HDMIcompatible Pioneer TV or Blu-ray Disc player are possible when the component is connected to ON (see...
Owner's Manual
Page 53
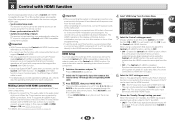
...'s menu screen, etc. - This receiver will switch to be played through the receiver from connected components displays properly on , set audio to be played through this receiver, and see if video output from the TV's menu screen, etc. The receiver's input switches automatically when the Control with HDMI... OFF. 8 When you must: 1 Put all components into standby mode. 2 Turn the power on last. 3 Choose the HDMI input to all HDMI inputs are connected. If the Standby Through setting is possible to output the audio and video signals from a player via HDMI to the TV without producing...
...'s menu screen, etc. - This receiver will switch to be played through the receiver from connected components displays properly on , set audio to be played through this receiver, and see if video output from the TV's menu screen, etc. The receiver's input switches automatically when the Control with HDMI... OFF. 8 When you must: 1 Put all components into standby mode. 2 Turn the power on last. 3 Choose the HDMI input to all HDMI inputs are connected. If the Standby Through setting is possible to output the audio and video signals from a player via HDMI to the TV without producing...


