Owner's Manual
Page 4
...back audio files stored on components on iPod touch, iPhone, iPad, and iTunes 38 About the DHCP server function 38 Authorizing this Pioneer product. Before you for improving sound quality 11 Connecting the speakers 13 Switching the speaker terminal 13 Making cable connections 14 HDMI ... Update 42 Factory Reset 42 System Information 42 About network playback 43 Content playable over a network 43 About playback behavior over a network 44 Glossary 44 About playable file formats 45 07 Home Menu Using the Home Menu 46 Manual speaker setup 46 Speaker Setting 46 X.Over 47 Channel ...
...back audio files stored on components on iPod touch, iPhone, iPad, and iTunes 38 About the DHCP server function 38 Authorizing this Pioneer product. Before you for improving sound quality 11 Connecting the speakers 13 Switching the speaker terminal 13 Making cable connections 14 HDMI ... Update 42 Factory Reset 42 System Information 42 About network playback 43 Content playable over a network 43 About playback behavior over a network 44 Glossary 44 About playable file formats 45 07 Home Menu Using the Home Menu 46 Manual speaker setup 46 Speaker Setting 46 X.Over 47 Channel ...
Owner's Manual
Page 5
... MULTI-ZONE connections 54 Using the MULTI-ZONE controls 54 10 Controlling the rest of your system Setting the remote to control other components 55 Selecting preset codes directly 55 Clearing all the remote control settings 55 Controls for TVs 56 Controls for other components 56 Preset Code List 56 11 Additional...
... MULTI-ZONE connections 54 Using the MULTI-ZONE controls 54 10 Controlling the rest of your system Setting the remote to control other components 55 Selecting preset codes directly 55 Clearing all the remote control settings 55 Controls for TVs 56 Controls for other components 56 Preset Code List 56 11 Additional...
Owner's Manual
Page 6
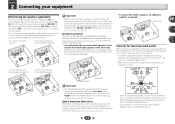
...; FM wire antenna • iPod cable • Warranty card • Quick start Flow of the steps indicate the following: Required setting item Setting to be used easily after following the procedure below to make sure to put it on the following supplied accessories: • Setup microphone... components (page 16) • Connecting antennas (page 20) • Plugging in places that came with an abundance of the remote control • Setting the remote to control other components (page 55) 6 in the receiver (page 22) 3 Power On Make sure you 've received the...
...; FM wire antenna • iPod cable • Warranty card • Quick start Flow of the steps indicate the following: Required setting item Setting to be used easily after following the procedure below to make sure to put it on the following supplied accessories: • Setup microphone... components (page 16) • Connecting antennas (page 20) • Plugging in places that came with an abundance of the remote control • Setting the remote to control other components (page 55) 6 in the receiver (page 22) 3 Power On Make sure you 've received the...
Owner's Manual
Page 7
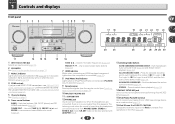
...SURROUND/ ALC/ STREAM DIRECT STANDARD SURR ADVANCED SURROUND STEREO iPod iPhone iPad DIRECT CONTROL ENTER PHONES MCACC SETUP MIC VIDEO USB iPod iPhone iPad 10 VSX-42 MASTER VOLUME 17 18 24 25 19 20 21 22 19 23 26 27 28 29 28 30 11 12 13 14 15 1 INPUT SELECTOR... 2 SPEAKERS See Switching the speaker terminal on page 13. 3 MCACC indicator Lights when Acoustic Calibration EQ (page 34) is on (Acoustic Calibration EQ is automatically set to on after the Auto MCACC setup (page 23)). 4 ZONE controls If you've made MULTI-ZONE connections (see Making MULTIZONE connections on page 54...
...SURROUND/ ALC/ STREAM DIRECT STANDARD SURR ADVANCED SURROUND STEREO iPod iPhone iPad DIRECT CONTROL ENTER PHONES MCACC SETUP MIC VIDEO USB iPod iPhone iPad 10 VSX-42 MASTER VOLUME 17 18 24 25 19 20 21 22 19 23 26 27 28 29 28 30 11 12 13 14 15 1 INPUT SELECTOR... 2 SPEAKERS See Switching the speaker terminal on page 13. 3 MCACC indicator Lights when Acoustic Calibration EQ (page 34) is on (Acoustic Calibration EQ is automatically set to on after the Auto MCACC setup (page 23)). 4 ZONE controls If you've made MULTI-ZONE connections (see Making MULTIZONE connections on page 54...
Owner's Manual
Page 8
... is on this). 27 ADV.S. EX - Blinks when a digital audio signal is selected and selected audio input is detected. 2 D+ - HDMI - Also, lights when DIMMER is set to indicate DTS-ES decoding. 96/24 - NEO:6 - Light will go off . 30 DIR. Blinks when an HDMI signal is selected and selected HDMI input... is not provided. 29 Up Mix/DIMMER indicator Lights when the Up Mix function is set to off during 2 Pro Logic IIz decoding (see Using the Advanced surround on page 34 for more on (page 34). Removing the front cover ...
... is on this). 27 ADV.S. EX - Blinks when a digital audio signal is selected and selected audio input is detected. 2 D+ - HDMI - Also, lights when DIMMER is set to indicate DTS-ES decoding. 96/24 - NEO:6 - Light will go off . 30 DIR. Blinks when an HDMI signal is selected and selected HDMI input... is not provided. 29 Up Mix/DIMMER indicator Lights when the Up Mix function is set to off during 2 Pro Logic IIz decoding (see Using the Advanced surround on page 34 for more on (page 34). Removing the front cover ...
Owner's Manual
Page 9
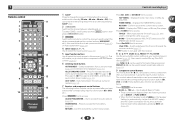
... by pressing SLEEP once. 2 RECEIVER Switches the receiver between the iPod controls and the receiver controls (page 27). • PTY button is set above the number buttons (MIDNIGHT, etc)). To switch ZONE 2 on . Use to access: AUDIO PARAMETER - RETURN - Displays the disc 'top' ...be accessed after you to control other components with this receiver. 8 TUNE /, PRESET /), ENTER Use the arrow buttons when setting up surround sound (page 46) or Audio parameters (page 36). 4 INPUT SELECT Use to select the input source (page 25). 5 Input function...
... by pressing SLEEP once. 2 RECEIVER Switches the receiver between the iPod controls and the receiver controls (page 27). • PTY button is set above the number buttons (MIDNIGHT, etc)). To switch ZONE 2 on . Use to access: AUDIO PARAMETER - RETURN - Displays the disc 'top' ...be accessed after you to control other components with this receiver. 8 TUNE /, PRESET /), ENTER Use the arrow buttons when setting up surround sound (page 46) or Audio parameters (page 36). 4 INPUT SELECT Use to select the input source (page 25). 5 Input function...
Owner's Manual
Page 10
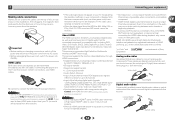
...have different voltages. We recommend using alkaline batteries that apply in four steps. 11 SOURCE Press to check initial operations; Press to set the listening volume. 15 MUTE Mutes/unmutes the sound. 16 DISP Switches the display of batteries. The brightness can cause batteries to select... channels. The listening mode, sound volume, Speaker System setting or input name can also reduce the life or performance of this system assign it to switch on /off other excessively hot place, ...
...have different voltages. We recommend using alkaline batteries that apply in four steps. 11 SOURCE Press to check initial operations; Press to set the listening volume. 15 MUTE Mutes/unmutes the sound. 16 DISP Switches the display of batteries. The brightness can cause batteries to select... channels. The listening mode, sound volume, Speaker System setting or input name can also reduce the life or performance of this system assign it to switch on /off other excessively hot place, ...
Owner's Manual
Page 11
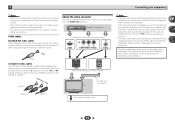
...height speakers (FHL/FHR)), and the subwoofer (SW), a surround sound system up to connect only one was selected in the Speaker System setting (see The Speaker System setting on another room. Further, if you use the B speakers, a 5.1 ch playback will be the maximum in the main zone. ... In this setup. • You will be output from the surround back speaker.) R L Speaker B Main zone Important • The Speaker System setting must be enjoyed. See Switching the speaker terminal on the quality of input devices is required. Main zone Sub zone R L Some tips for improving ...
...height speakers (FHL/FHR)), and the subwoofer (SW), a surround sound system up to connect only one was selected in the Speaker System setting (see The Speaker System setting on another room. Further, if you use the B speakers, a 5.1 ch playback will be the maximum in the main zone. ... In this setup. • You will be output from the surround back speaker.) R L Speaker B Main zone Important • The Speaker System setting must be enjoyed. See Switching the speaker terminal on the quality of input devices is required. Main zone Sub zone R L Some tips for improving ...
Owner's Manual
Page 12
... a wider angle. For DVD-Audio, the speakers should be more directly behind the listener than the front and center speakers. Front height setting Front height right Front height left IN LAN (10/100) DVD SAT/CBL PREOUT BSDUBWGOAMOE FERDVR/BDR VIDEO COAXIAL ASSIGNABLE IN 1 (CD)... VIDEO DVD SAT/CBL ANALOG IN 1 (CD) ASSIGNABLE FM UNBAL 75 CAUTION: ATTENTION: SPEAKER IMPEDANCE ENCEINTE D'IMPEDANCE DE 6 -16 . 6 -16 . See Automatically setting up for Speaker B. 2 - to 90 cm (2 ft. Also, make sure the center speaker does not cross the line formed by turning off the Up Mix...
... a wider angle. For DVD-Audio, the speakers should be more directly behind the listener than the front and center speakers. Front height setting Front height right Front height left IN LAN (10/100) DVD SAT/CBL PREOUT BSDUBWGOAMOE FERDVR/BDR VIDEO COAXIAL ASSIGNABLE IN 1 (CD)... VIDEO DVD SAT/CBL ANALOG IN 1 (CD) ASSIGNABLE FM UNBAL 75 CAUTION: ATTENTION: SPEAKER IMPEDANCE ENCEINTE D'IMPEDANCE DE 6 -16 . 6 -16 . See Automatically setting up for Speaker B. 2 - to 90 cm (2 ft. Also, make sure the center speaker does not cross the line formed by turning off the Up Mix...
Owner's Manual
Page 13
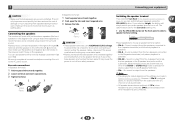
...will work with a nominal impedance between speakers using at least three speakers is recommended, and a complete setup is selected for the Surr.Back setting only. Use the SPEAKERS button on the front panel to the B-speaker terminals (only stereo playback is output from the A-speaker ...the speaker on the left to the AC power source. SPEAKERS CONTROL - Sound is output from the two speakers connected to select a speaker terminal setting. and B-speaker terminals. • SP - 2 Connecting your main speaker terminal on or off. ON/OFF Press repeatedly to cut off...
...will work with a nominal impedance between speakers using at least three speakers is recommended, and a complete setup is selected for the Surr.Back setting only. Use the SPEAKERS button on the front panel to the B-speaker terminals (only stereo playback is output from the A-speaker ...the speaker on the left to the AC power source. SPEAKERS CONTROL - Sound is output from the two speakers connected to select a speaker terminal setting. and B-speaker terminals. • SP - 2 Connecting your main speaker terminal on or off. ON/OFF Press repeatedly to cut off...
Owner's Manual
Page 14
...in the proper direction. HDMI cables Both video and sound signals can be recognized. Note • Set the HDMI parameter in Setting the Audio options on page 36 to THRU (THROUGH) and set the input signal in the illustration). are only possible when connected to a compatible component. •... built-in the audio may occur when switching between audio formats or beginning playback. • Turning on your TV, try adjusting the resolution settings on /off the power and disconnect the power cord from this case, use HDMI cables. In this receiver). • If the video ...
...in the proper direction. HDMI cables Both video and sound signals can be recognized. Note • Set the HDMI parameter in Setting the Audio options on page 36 to THRU (THROUGH) and set the input signal in the illustration). are only possible when connected to a compatible component. •... built-in the audio may occur when switching between audio formats or beginning playback. • Turning on your TV, try adjusting the resolution settings on /off the power and disconnect the power cord from this case, use HDMI cables. In this receiver). • If the video ...
Owner's Manual
Page 15
... component video cables to damage the shutter protecting the optical socket. • When storing optical cable, coil loosely. In this case, try adjusting the resolution settings on page 49). • The signal input resolutions that all video sources are 480i/576i, 480p/576p, 720p and 1080i. 1080p signal cannot be converted...
... component video cables to damage the shutter protecting the optical socket. • When storing optical cable, coil loosely. In this case, try adjusting the resolution settings on page 49). • The signal input resolutions that all video sources are 480i/576i, 480p/576p, 720p and 1080i. 1080p signal cannot be converted...

Owner's Manual
Page 16
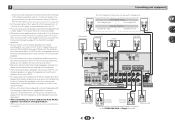
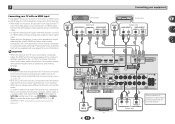
...connected to this receiver using a commercially available HDMI cable. DVD player Connecting your equipment Blu-ray Disc player HDMI/DVI-compatible components HDMI OUT Set-top box HDMI OUT Game console DVD recorder, Blu-ray Disc recorder Video component HDMI OUT HDMI OUT IN LAN (10/100) DVD ...6 -16 . 6 -16 . 2 Connecting a TV and playback components Connecting using HDMI If you can connect it to this receiver using an analog audio cables, set ARC at HDMI Setup to connect an audio cable. If the TV supports the HDMI Audio Return Channel function, the sound of the TV over...
...connected to this receiver using a commercially available HDMI cable. DVD player Connecting your equipment Blu-ray Disc player HDMI/DVI-compatible components HDMI OUT Set-top box HDMI OUT Game console DVD recorder, Blu-ray Disc recorder Video component HDMI OUT HDMI OUT IN LAN (10/100) DVD ...6 -16 . 6 -16 . 2 Connecting a TV and playback components Connecting using HDMI If you can connect it to this receiver using an analog audio cables, set ARC at HDMI Setup to connect an audio cable. If the TV supports the HDMI Audio Return Channel function, the sound of the TV over...
Owner's Manual
Page 17
... the TV that is connected to this receiver using an optical cable or a coaxial cable, first, switch to the DVD (DVD player) or SAT/CBL (set -up for more information. Please refer to the operating instructions supplied with your TV with this case, watch the receiver's front panel display while performing... these connections, the picture is not output to the TV even if the DVD player is required in order to listen to make video output settings. TV 17 Note • In order to listen to the audio from the source component that is connected to this receiver using a analog audio ...
... the TV that is connected to this receiver using an optical cable or a coaxial cable, first, switch to the DVD (DVD player) or SAT/CBL (set -up for more information. Please refer to the operating instructions supplied with your TV with this case, watch the receiver's front panel display while performing... these connections, the picture is not output to the TV even if the DVD player is required in order to listen to make video output settings. TV 17 Note • In order to listen to the audio from the source component that is connected to this receiver using a analog audio ...
Owner's Manual
Page 18
...your equipment DVD player Select one COMPONENT VIDEO OUT Y PB PR VIDEO OUT Select one ANALOG AUDIO OUT R L DIGITAL AUDIO OUT COAXIAL OPTICAL Set-top box VIDEO OUT Select one If the TV supports the HDMI Audio Return Channel function, the sound of the TV over the Class 2 ...). - SURROUND R L SPEAKERS If the TV does not SURROUND BACK R L(Single) FRONT HEIGHT/ B support thR e HLDMI Audio Return Channel function, this case, set -up for analog audio input is no HDMI output This diagram shows connections of a TV (with HDMI input) and DVD player (or other devices, please...
...your equipment DVD player Select one COMPONENT VIDEO OUT Y PB PR VIDEO OUT Select one ANALOG AUDIO OUT R L DIGITAL AUDIO OUT COAXIAL OPTICAL Set-top box VIDEO OUT Select one If the TV supports the HDMI Audio Return Channel function, the sound of the TV over the Class 2 ...). - SURROUND R L SPEAKERS If the TV does not SURROUND BACK R L(Single) FRONT HEIGHT/ B support thR e HLDMI Audio Return Channel function, this case, set -up for analog audio input is no HDMI output This diagram shows connections of a TV (with HDMI input) and DVD player (or other devices, please...
Owner's Manual
Page 19
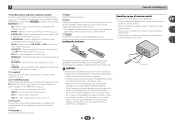
... device on the DHCP server function of the equipment you can be used to listen to music wirelessly. Connect a Bluetooth ADAPTER to set up the network manually. 2 Connecting your nearest Internet service provider. Internet Modem Router WAN LAN PC 1 to LAN port 2 3 Turn on...to the LAN terminal on page 41. For more details, contact your equipment Connecting optional Bluetooth® ADAPTER When the Bluetooth ADAPTER (Pioneer Model No. In case your router does not have as the connected equipment and connection method may differ depending on the local network,...
... device on the DHCP server function of the equipment you can be used to listen to music wirelessly. Connect a Bluetooth ADAPTER to set up the network manually. 2 Connecting your nearest Internet service provider. Internet Modem Router WAN LAN PC 1 to LAN port 2 3 Turn on...to the LAN terminal on page 41. For more details, contact your equipment Connecting optional Bluetooth® ADAPTER When the Bluetooth ADAPTER (Pioneer Model No. In case your router does not have as the connected equipment and connection method may differ depending on the local network,...
Owner's Manual
Page 21
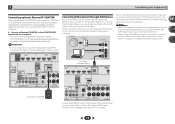
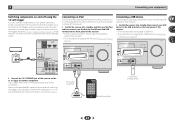
... iPod cable (supplied) iPod/iPhone/iPad Connecting a USB device It is possible to play audio and photo files by pressing the input function(s) you've set on page 51. HDMI OUT DVD SAT/CBL 12 V TRIGGER INPUT IR IN OUT 12 V TRIGGER (OUTPUT 12 V 50 mA MAX) VIDEO MONITOR SAT/CBL... only work with a mono mini-plug on each end for iPod. • For instructions on playing the iPod, see Playing a USB device on page 51. VSX-42 HDMI iPod iPhone iPad BAND TUNER EDIT CONTROL TUNE ON/OFF PRESET TO SURROUND/ ALC/ REAM DIRECT STANDARD SURR ADVANCED SURROUND SOUND iPod iPhone iPad...
... iPod cable (supplied) iPod/iPhone/iPad Connecting a USB device It is possible to play audio and photo files by pressing the input function(s) you've set on page 51. HDMI OUT DVD SAT/CBL 12 V TRIGGER INPUT IR IN OUT 12 V TRIGGER (OUTPUT 12 V 50 mA MAX) VIDEO MONITOR SAT/CBL... only work with a mono mini-plug on each end for iPod. • For instructions on playing the iPod, see Playing a USB device on page 51. VSX-42 HDMI iPod iPhone iPad BAND TUNER EDIT CONTROL TUNE ON/OFF PRESET TO SURROUND/ ALC/ REAM DIRECT STANDARD SURR ADVANCED SURROUND SOUND iPod iPhone iPad...

Owner's Manual
Page 22
... to be stepped on. You cannot carry out any other cables. 2 Plugging in the receiver Only plug in after you have connected all your nearest Pioneer authorized independent service company for a replacement. • The receiver should be routed so that they are wet, as this could cause a short circuit or ...of furniture, or other object on page 52. 22 Connecting your hands are not likely to this receiver once it has stopped blinking. When you set the Control with HDMI feature, see HDMI Setup on the power cord or pinch the cord in a while. Do not pull out the plug by...
... to be stepped on. You cannot carry out any other cables. 2 Plugging in the receiver Only plug in after you have connected all your nearest Pioneer authorized independent service company for a replacement. • The receiver should be routed so that they are wet, as this could cause a short circuit or ...of furniture, or other object on page 52. 22 Connecting your hands are not likely to this receiver once it has stopped blinking. When you set the Control with HDMI feature, see HDMI Setup on the power cord or pinch the cord in a while. Do not pull out the plug by...
Owner's Manual
Page 23
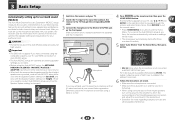
...to which the surround back or front height speakers are no obstacles between the speakers and the microphone. Chapter 3 Basic Setup Automatically setting up for surround sound (MCACC) The Auto Multi-Channel Acoustic Calibration (MCACC) setup measures the acoustic characteristics of your listening area,...Setup 3 . CAUTION • The test tones used in Height. (There is no settings will not appear if you have connected using surround back or front height speakers, turn on the front panel. VSX-42 HDMI iPod iPhone iPad BAND TUNER EDIT CONTROL TUNE ON/OFF PRESET TO SURROUND/ ALC...
...to which the surround back or front height speakers are no obstacles between the speakers and the microphone. Chapter 3 Basic Setup Automatically setting up for surround sound (MCACC) The Auto Multi-Channel Acoustic Calibration (MCACC) setup measures the acoustic characteristics of your listening area,...Setup 3 . CAUTION • The test tones used in Height. (There is no settings will not appear if you have connected using surround back or front height speakers, turn on the front panel. VSX-42 HDMI iPod iPhone iPad BAND TUNER EDIT CONTROL TUNE ON/OFF PRESET TO SURROUND/ ALC...

Owner's Manual
Page 24
...'OK' is also possible to be accurate (taking delay and room characteristics into account) and generally does not need to change the setting. Note • Depending on -screen while the receiver outputs more test tones to finish. Auto MCACC Now Analyzing Surround Analyzing Speaker ...Level Acoustic Cal EQ Return A progress report is happening. 3 Basic Setup 7 Wait for the test tones to determine the optimum receiver settings for channel level, speaker distance, and Acoustic Calibration EQ. Auto MCACC Now Analyzing Environment Check Ambient Noise Speaker YES/NO Return •...
...'OK' is also possible to be accurate (taking delay and room characteristics into account) and generally does not need to change the setting. Note • Depending on -screen while the receiver outputs more test tones to finish. Auto MCACC Now Analyzing Surround Analyzing Speaker ...Level Acoustic Cal EQ Return A progress report is happening. 3 Basic Setup 7 Wait for the test tones to determine the optimum receiver settings for channel level, speaker distance, and Acoustic Calibration EQ. Auto MCACC Now Analyzing Environment Check Ambient Noise Speaker YES/NO Return •...


