Owner's Manual
Page 1
AUDIO/VIDEO MULTI-CHANNEL RECEIVER VSX-41 Operating Instructions
AUDIO/VIDEO MULTI-CHANNEL RECEIVER VSX-41 Operating Instructions
Owner's Manual
Page 4
... terminals 20 A and B speaker systems 20 Hints on speaker placement 20 Connecting additional amplifiers 22 AC outlet 23 Operating other Pioneer components .......... 23 4 Controls and displays Front panel 24 Display 25 Remote control 27 5 Playing sources Introduction to Sound Modes ... controls 34 Playing other sources 34 Selecting the multichannel analog inputs .... 35 Using Re-Equalization 35 6 Setting up your receiver Choosing your receiver setup 36 Speaker setting 37 Surround back speaker setting 37 6.1 channel setting 38 Subwoofer setting 38 Crossover frequency setting 38...
... terminals 20 A and B speaker systems 20 Hints on speaker placement 20 Connecting additional amplifiers 22 AC outlet 23 Operating other Pioneer components .......... 23 4 Controls and displays Front panel 24 Display 25 Remote control 27 5 Playing sources Introduction to Sound Modes ... controls 34 Playing other sources 34 Selecting the multichannel analog inputs .... 35 Using Re-Equalization 35 6 Setting up your receiver Choosing your receiver setup 36 Speaker setting 37 Surround back speaker setting 37 6.1 channel setting 38 Subwoofer setting 38 Crossover frequency setting 38...

Owner's Manual
Page 6
...8226; AM loop antenna • FM wire antenna • Dry cell batteries x 2 (AA size IEC LR6) • Remote control • These operating instructions Installing the receiver Please note the following precautions: • Never use new and old batteries together. • Insert the plus and minus sides of the batteries properly according... to leave more than 8 inches (20 cm.) of space above the receiver. This prevents proper heat dispersal. • When installing on top of this unit (as leakage and bursting.
...8226; AM loop antenna • FM wire antenna • Dry cell batteries x 2 (AA size IEC LR6) • Remote control • These operating instructions Installing the receiver Please note the following precautions: • Never use new and old batteries together. • Insert the plus and minus sides of the batteries properly according... to leave more than 8 inches (20 cm.) of space above the receiver. This prevents proper heat dispersal. • When installing on top of this unit (as leakage and bursting.

Owner's Manual
Page 7
This receiver will automatically decode Dolby Digital, DTS, or Dolby Surround DVD-Video discs, according to your system. DVD-Video has become the basic source material for ... the DVD, you many more options (such as surround sound) when listening to soundtracks. The surround sound you get from one disc, all of the receiver. 5 minute guide 02 Introduction to home theater You are explained in Playing sources, starting on page 30. 7 En In most cases, you have up in...
This receiver will automatically decode Dolby Digital, DTS, or Dolby Surround DVD-Video discs, according to your system. DVD-Video has become the basic source material for ... the DVD, you many more options (such as surround sound) when listening to soundtracks. The surround sound you get from one disc, all of the receiver. 5 minute guide 02 Introduction to home theater You are explained in Playing sources, starting on page 30. 7 En In most cases, you have up in...
Owner's Manual
Page 8
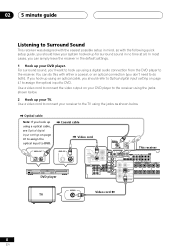
...surround sound, you should refer to Optical digital input setting on page 41 to assign the optical input to connect the video output on page 41 to assign the optical input to DVD. You can simply leave the receiver in the default settings. 1 Hook up your system hooked up for...shown below . 2 Hook up using the jacks shown below . DIGITAL OUT VIDEO OUT S STANDBY/ON 41 ¡¢ 0 7 8 Î 3 DVD PLAYER DVD player Video cord DIGITAL IN OPT ASSIGNABLE (DVD/ LD)¥ (TV/ SAT) ¥ This receiver DVD IN / LD FRONT IN D V D ANTENNA5.1CIN H REC INPUT CD-R AM IN / ...
...surround sound, you should refer to Optical digital input setting on page 41 to assign the optical input to connect the video output on page 41 to assign the optical input to DVD. You can simply leave the receiver in the default settings. 1 Hook up your system hooked up for...shown below . 2 Hook up using the jacks shown below . DIGITAL OUT VIDEO OUT S STANDBY/ON 41 ¡¢ 0 7 8 Î 3 DVD PLAYER DVD player Video cord DIGITAL IN OPT ASSIGNABLE (DVD/ LD)¥ (TV/ SAT) ¥ This receiver DVD IN / LD FRONT IN D V D ANTENNA5.1CIN H REC INPUT CD-R AM IN / ...
Owner's Manual
Page 9
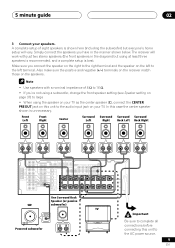
... is shown here (including the subwoofer) but using the speaker on your speakers. Also make sure the positive and negative (+/-) terminals on the receiver match those on the speakers. • Use speakers with just two stereo speakers (the front speakers in the manner shown below. 5 minute ...connect the CENTER PREOUT jack on this unit to complete all connections before connecting this case the center speaker shown is unnecessary. The receiver will vary. Front Left Front Right Center Surround Surround Surround Surround Left Right Back Left Back Right IN ANTENNA IN AM LOOP FM...
... is shown here (including the subwoofer) but using the speaker on your speakers. Also make sure the positive and negative (+/-) terminals on the receiver match those on the speakers. • Use speakers with just two stereo speakers (the front speakers in the manner shown below. 5 minute ...connect the CENTER PREOUT jack on this unit to complete all connections before connecting this case the center speaker shown is unnecessary. The receiver will vary. Front Left Front Right Center Surround Surround Surround Surround Left Right Back Left Back Right IN ANTENNA IN AM LOOP FM...

Owner's Manual
Page 11
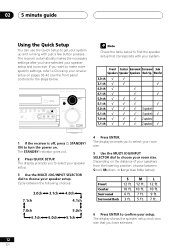
...know how to do this) if you need to do this . See also Choosing your receiver setup on your DVD player or source discs, you can select. 5 minute guide 02 4 Plug in the... receiver's display, indicating that the DVD input is showing in the receiver and switch it isn't, press DVD/LD on the remote control to set the receiver to the DVD input. 5 Press QUICK SETUP on ...your TV to confirm your selection. In this receiver. Make sure you 're unsure about the settings. 6 Play a DVD, and adjust the volume to...
...know how to do this) if you need to do this . See also Choosing your receiver setup on your DVD player or source discs, you can select. 5 minute guide 02 4 Plug in the... receiver's display, indicating that the DVD input is showing in the receiver and switch it isn't, press DVD/LD on the remote control to set the receiver to the DVD input. 5 Press QUICK SETUP on ...your TV to confirm your selection. In this receiver. Make sure you 're unsure about the settings. 6 Play a DVD, and adjust the volume to...
Owner's Manual
Page 12
... room size. Front Center Surround Surround Back S 12 ft. 10 ft. 6 ft. 3 ft. The receiver automatically makes the necessary settings after you have selected your system. 1 If the receiver is off, press STANDBY/ ON to choose your speaker setup. Depending on . M 12 ft. 10 ft... 6.1ch 6.0ch 5.0ch 5.1ch 6 Press ENTER to find the speaker setup that you have selected. 12 En AUDIO/VIDEO MULTI-CHANNEL RECEIVER N∫m-¯, ADVANCED STEREO/ SURROUND DIRECT SIGNAL MIDNIGHT/ SELECT LOUDNESS SPEAKERS MONITOR TONE QUICK SETUP LISTENING MODE FL DIMMER MULTI JOG VIDEO INPUT...
... room size. Front Center Surround Surround Back S 12 ft. 10 ft. 6 ft. 3 ft. The receiver automatically makes the necessary settings after you have selected your system. 1 If the receiver is off, press STANDBY/ ON to choose your speaker setup. Depending on . M 12 ft. 10 ft... 6.1ch 6.0ch 5.0ch 5.1ch 6 Press ENTER to find the speaker setup that you have selected. 12 En AUDIO/VIDEO MULTI-CHANNEL RECEIVER N∫m-¯, ADVANCED STEREO/ SURROUND DIRECT SIGNAL MIDNIGHT/ SELECT LOUDNESS SPEAKERS MONITOR TONE QUICK SETUP LISTENING MODE FL DIMMER MULTI JOG VIDEO INPUT...
Owner's Manual
Page 13
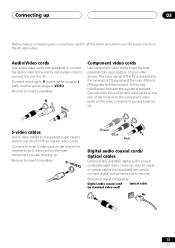
...on the video component you are hooking up. Be sure to connect the monitor TV. In this receiver. S-video cables Use S-video cables (not supplied) to get the best possible color reproduction of the receiver to get clearer picture reproduction than regular video cords. Y Green Blue P B P R Red ...audio/video cords (not supplied) to connect the audio/video components and a video cord to insert completely. The color signal of the receiver to the component video jacks on the video component you are used to connect digital components to insert completely. Connect from the AC ...
...on the video component you are hooking up. Be sure to connect the monitor TV. In this receiver. S-video cables Use S-video cables (not supplied) to get the best possible color reproduction of the receiver to get clearer picture reproduction than regular video cords. Y Green Blue P B P R Red ...audio/video cords (not supplied) to connect the audio/video components and a video cord to insert completely. The color signal of the receiver to the component video jacks on the video component you are used to connect digital components to insert completely. Connect from the AC ...
Owner's Manual
Page 14
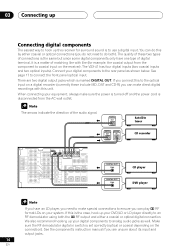
... your digital components to analog audio jacks as shown below. 03 Connecting up Connecting digital components The easiest way to hook up this receiver for example, the coaxial output from the AC wall outlet. The arrows indicate the direction of connections is the same but since some...digital components only have an LD player, you are two digital output jacks which is set correctly (optical or coaxial depending on the receiver). The VSX-41 has four digital inputs (two coaxial inputs and two optical inputs). We also recommend hooking up your equipment, always make direct digital...
... your digital components to analog audio jacks as shown below. 03 Connecting up Connecting digital components The easiest way to hook up this receiver for example, the coaxial output from the AC wall outlet. The arrows indicate the direction of connections is the same but since some...digital components only have an LD player, you are two digital output jacks which is set correctly (optical or coaxial depending on the receiver). The VSX-41 has four digital inputs (two coaxial inputs and two optical inputs). We also recommend hooking up your equipment, always make direct digital...
Owner's Manual
Page 15
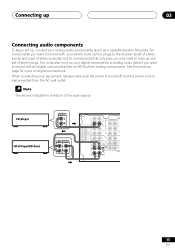
Connecting up 03 Connecting audio components To begin set up four plugs to the receiver (a set of stereo inputs and a set of the audio signal. The arrows indicate the direction of stereo plugs. When connecting your analog audio components (such ...
Connecting up 03 Connecting audio components To begin set up four plugs to the receiver (a set of stereo inputs and a set of the audio signal. The arrows indicate the direction of stereo plugs. When connecting your analog audio components (such ...
Owner's Manual
Page 16
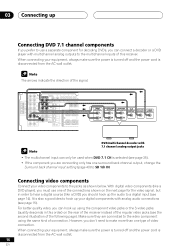
... video components (like a DVD) you don't need to make more than one type of the connections shown on the rear of the receiver instead of the regular video jacks (see page 14). When connecting your equipment, always make sure the power is turned off and the power... from the AC wall outlet. 16 En For better quality video, you must use a separate component for the video signal, but in this receiver. Connecting video components Connect your digital components with 7.1 channel analog output jacks • The multichannel input can hook up your video components to ...
... video components (like a DVD) you don't need to make more than one type of the connections shown on the rear of the receiver instead of the regular video jacks (see page 14). When connecting your equipment, always make sure the power is turned off and the power... from the AC wall outlet. 16 En For better quality video, you must use a separate component for the video signal, but in this receiver. Connecting video components Connect your digital components with 7.1 channel analog output jacks • The multichannel input can hook up your video components to ...

Owner's Manual
Page 18
...snap connectors Twist the exposed wire strands together and insert into the hole, then snap the connector shut. 3/8 in the direction that the receiver is switched off and unplugged from the wall outlet before making or changing any connections. AM loop antenna Assemble the antenna and connect to ... 75Ω 75 Ω coaxial cable FM ANTENNA To improve AM reception Connect a 15-18 feet length of vinyl-coated wire to the receiver. Outdoor antenna Indoor antenna (Vinylcoated wire) 15-18 ft. (5-6m) AM LOOP ANTENNA 18 En 03 Connecting up Connecting antennas Connect the AM...
...snap connectors Twist the exposed wire strands together and insert into the hole, then snap the connector shut. 3/8 in the direction that the receiver is switched off and unplugged from the wall outlet before making or changing any connections. AM loop antenna Assemble the antenna and connect to ... 75Ω 75 Ω coaxial cable FM ANTENNA To improve AM reception Connect a 15-18 feet length of vinyl-coated wire to the receiver. Outdoor antenna Indoor antenna (Vinylcoated wire) 15-18 ft. (5-6m) AM LOOP ANTENNA 18 En 03 Connecting up Connecting antennas Connect the AM...

Owner's Manual
Page 19
The receiver will vary. Use speakers with just two stereo speakers (the front speakers in the manner shown below , but using a subwoofer, change the front speaker setting (... right terminal and the speaker on page 37) to the AC power source. 19 En Also make sure the positive and negative (+/-) terminals on the receiver match those on the speakers. ASSIGNABLE (DVD/ LD) IN ¥ CD (DVD/ LD)¥ S - VIDEO (CD) ø (TV/ SAT) ¥ SURROUND MONITOR (CD-R/ ø / TAPE...
The receiver will vary. Use speakers with just two stereo speakers (the front speakers in the manner shown below , but using a subwoofer, change the front speaker setting (... right terminal and the speaker on page 37) to the AC power source. 19 En Also make sure the positive and negative (+/-) terminals on the receiver match those on the speakers. ASSIGNABLE (DVD/ LD) IN ¥ CD (DVD/ LD)¥ S - VIDEO (CD) ø (TV/ SAT) ¥ SURROUND MONITOR (CD-R/ ø / TAPE...
Owner's Manual
Page 20
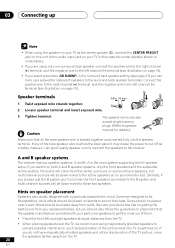
... up a subwoofer instead of the TV picture, move the speakers farther away from the TV. • When placing speakers near a wall; A and B speaker systems The receiver has two speaker systems: A and B. If you do not have provided a few tips on getting the best sound from your speakers (below), but multichannel sources... the right channel (+) terminal, and the negative wire to the audio input jack on . If you 'll only hear the front speakers connected to the receiver.
... up a subwoofer instead of the TV picture, move the speakers farther away from the TV. • When placing speakers near a wall; A and B speaker systems The receiver has two speaker systems: A and B. If you do not have provided a few tips on getting the best sound from your speakers (below), but multichannel sources... the right channel (+) terminal, and the negative wire to the audio input jack on . If you 'll only hear the front speakers connected to the receiver.
Owner's Manual
Page 22
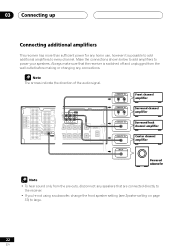
...back channel amplifier Center channel amplifier Powered subwoofer • To hear sound only from the pre-outs, disconnect any speakers that the receiver is switched off and unplugged from the wall outlet before making or changing any home use, however it is possible to add ...additional amplifiers to every channel. 03 Connecting up Connecting additional amplifiers This receiver has more than sufficient power for any connections. Always make sure that are connected directly to the receiver. • If you're not using a subwoofer, change the front speaker setting ...
...back channel amplifier Center channel amplifier Powered subwoofer • To hear sound only from the pre-outs, disconnect any speakers that the receiver is switched off and unplugged from the wall outlet before making or changing any home use, however it is possible to add ...additional amplifiers to every channel. 03 Connecting up Connecting additional amplifiers This receiver has more than sufficient power for any connections. Always make sure that are connected directly to the receiver. • If you're not using a subwoofer, change the front speaker setting ...
Owner's Manual
Page 23
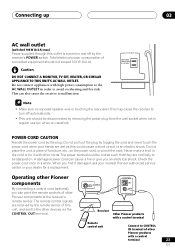
... fire or give you find it with high power consumption to the AC WALL OUTLET in regular use (ex. OUT CONTROL CONTROL IN OUT Receiver Other Pioneer products with a control terminal 23 En Do not connect appliances with other devices via the CONTROL OUT terminal. Check the power cord once in... the cord or tie it damaged, ask your nearest Pioneer authorized service center or your hands are received by the plug. Total electrical power consumption of this unit, and sent to the other cords. when on . Do not...
... fire or give you find it with high power consumption to the AC WALL OUTLET in regular use (ex. OUT CONTROL CONTROL IN OUT Receiver Other Pioneer products with a control terminal 23 En Do not connect appliances with other devices via the CONTROL OUT terminal. Check the power cord once in... the cord or tie it damaged, ask your nearest Pioneer authorized service center or your hands are received by the plug. Total electrical power consumption of this unit, and sent to the other cords. when on . Do not...
Owner's Manual
Page 24
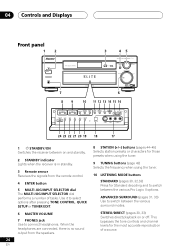
... dial performs a number of a source. 24 En 04 Controls and Displays Front panel 1 2 STANDBY STANDBY/ON PHONES 3 45 AUDIO/VIDEO MULTI-CHANNEL RECEIVER N∫m-¯, MULTI JOG TM ENTER INPUT SELECTOR MASTER VOLUME DOWN UP 7 89 6 10 11 12 13 14 15 16 STATION TUNER EDIT CLASS TUNING...VIDEO VIDEO L AUDIO R 24 23 22 21 20 19 18 17 1 STANDBY/ON Switches the receiver between on or off. When the headphones are connected, there is in standby. 3 Remote sensor Receives the signals from the speakers. Use it to select options after pressing TONE CONTROL, QUICK SETUP or ...
... dial performs a number of a source. 24 En 04 Controls and Displays Front panel 1 2 STANDBY STANDBY/ON PHONES 3 45 AUDIO/VIDEO MULTI-CHANNEL RECEIVER N∫m-¯, MULTI JOG TM ENTER INPUT SELECTOR MASTER VOLUME DOWN UP 7 89 6 10 11 12 13 14 15 16 STATION TUNER EDIT CLASS TUNING...VIDEO VIDEO L AUDIO R 24 23 22 21 20 19 18 17 1 STANDBY/ON Switches the receiver between on or off. When the headphones are connected, there is in standby. 3 Remote sensor Receives the signals from the speakers. Use it to select options after pressing TONE CONTROL, QUICK SETUP or ...
Owner's Manual
Page 25
...signal is on SB Depending on /off. 15 TONE Press this button to make the fluorescent display (FL) dimmer or brighter. 20 Re-EQ (page 41) This feature compensates for the effect of reproducing sounds that have been originally processed for a large movie theater in a smaller room. 21 MPX (page ...43) Press to receive a radio broadcast in mono. 22 BAND (page 43) Switches between AM and FM radio bands. 23 CLASS (pages 44-45) Switches between the three banks...
...signal is on SB Depending on /off. 15 TONE Press this button to make the fluorescent display (FL) dimmer or brighter. 20 Re-EQ (page 41) This feature compensates for the effect of reproducing sounds that have been originally processed for a large movie theater in a smaller room. 21 MPX (page ...43) Press to receive a radio broadcast in mono. 22 BAND (page 43) Switches between AM and FM radio bands. 23 CLASS (pages 44-45) Switches between the three banks...

Owner's Manual
Page 26
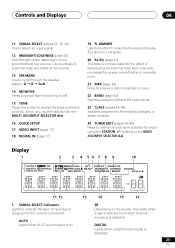
... on, this lights to indicate decoding of a Dolby Digital signal. 4 2 PRO LOGIC II When the Standard mode of the receiver is on, this lights to indicate Pro Logic II decoding. 5 ATT Lights when INPUT ATT is used to attenuate (reduce) the level of ... Advanced Surround modes has been selected. 14 LOUDNESS Lights when LOUDNESS has been selected. 15 TUNER indicators STEREO: Lights when a stereo FM broadcast is being received in use . This function bypasses all tone, balance, Advanced Surround, and Dolby Surround effects. 8 MIDNIGHT Lights during Midnight listening. 9 MONITOR Lights when MONITOR...
... on, this lights to indicate decoding of a Dolby Digital signal. 4 2 PRO LOGIC II When the Standard mode of the receiver is on, this lights to indicate Pro Logic II decoding. 5 ATT Lights when INPUT ATT is used to attenuate (reduce) the level of ... Advanced Surround modes has been selected. 14 LOUDNESS Lights when LOUDNESS has been selected. 15 TUNER indicators STEREO: Lights when a stereo FM broadcast is being received in use . This function bypasses all tone, balance, Advanced Surround, and Dolby Surround effects. 8 MIDNIGHT Lights during Midnight listening. 9 MONITOR Lights when MONITOR...


