Owner's Manual
Page 4
... Hints on speaker placement 20 Connecting additional amplifiers 22 AC outlet 23 Operating other Pioneer components .......... 23 4 Controls and displays Front panel 24 Display 25 Remote control ...setting 37 Surround back speaker setting 37 6.1 channel setting 38 Subwoofer setting 38 Crossover frequency setting 38 LFE attenuator setting 39 Front speaker distance setting 39 Center speaker distance setting 39 Surround speaker distance setting .......... 39 Surround back speaker distance setting 39 Dynamic range control setting 40 Dual mono setting 40 Component video input settings...
... Hints on speaker placement 20 Connecting additional amplifiers 22 AC outlet 23 Operating other Pioneer components .......... 23 4 Controls and displays Front panel 24 Display 25 Remote control ...setting 37 Surround back speaker setting 37 6.1 channel setting 38 Subwoofer setting 38 Crossover frequency setting 38 LFE attenuator setting 39 Front speaker distance setting 39 Center speaker distance setting 39 Surround speaker distance setting .......... 39 Surround back speaker distance setting 39 Dynamic range control setting 40 Dual mono setting 40 Component video input settings...
Owner's Manual
Page 5
Coaxial digital input settings 41 Optical digital input settings 41 Setting the relative volume level of each channel 42 10 Additional information Troubleshooting 67 Specifications 69 Cleaning the unit 70 7 Using the tuner Listening to the ... 48 Searching for preset codes using brand names 49 Programming signals from other remote controls 49 Erasing one of the remote control button settings 50 Clearing all the remote control settings ........ 50 Direct function 51 Confirming preset codes 51 Controls for TVs 52 Controls for other components 53 Preset Code List 55
Coaxial digital input settings 41 Optical digital input settings 41 Setting the relative volume level of each channel 42 10 Additional information Troubleshooting 67 Specifications 69 Cleaning the unit 70 7 Using the tuner Listening to the ... 48 Searching for preset codes using brand names 49 Programming signals from other remote controls 49 Erasing one of the remote control button settings 50 Clearing all the remote control settings ........ 50 Direct function 51 Confirming preset codes 51 Controls for TVs 52 Controls for other components 53 Preset Code List 55

Owner's Manual
Page 7
.... 5 minute guide 02 Introduction to home theater You are explained in Playing sources, starting on the source and the sound settings of the receiver. Depending on the speakers you won't have set up to its size, quality, and ease of them being there'. DVD-Video has become the basic source material for...
.... 5 minute guide 02 Introduction to home theater You are explained in Playing sources, starting on the source and the sound settings of the receiver. Depending on the speakers you won't have set up to its size, quality, and ease of them being there'. DVD-Video has become the basic source material for...
Owner's Manual
Page 8
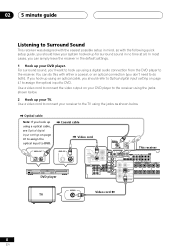
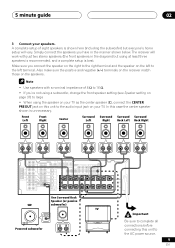
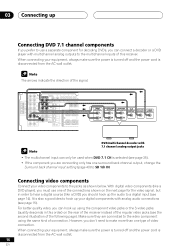
...; IN IN IN R AUDIO DIGITAL IN COAX OPT OPT ASSIGNABLE AUX DVD 7.1CH INPUT CENTER SUB W. You can simply leave the receiver in the default settings. 1 Hook up your receiver to connect your DVD player. Optical cable Note: If you hook up using an optical cable, you should have your TV... a coaxial, or an optical connection (you don't need to do this with the following quick setup guide, you should refer to Optical digital input setting on page 41 to assign the optical input to DVD. If you can do both). Use a video cord to the TV using the jacks shown below . ASSIGNABLE...
...; IN IN IN R AUDIO DIGITAL IN COAX OPT OPT ASSIGNABLE AUX DVD 7.1CH INPUT CENTER SUB W. You can simply leave the receiver in the default settings. 1 Hook up your receiver to connect your DVD player. Optical cable Note: If you hook up using an optical cable, you should have your TV... a coaxial, or an optical connection (you don't need to do this with the following quick setup guide, you should refer to Optical digital input setting on page 41 to assign the optical input to DVD. If you can do both). Use a video cord to the TV using the jacks shown below . ASSIGNABLE...
Owner's Manual
Page 9
... the audio input jack on this case the center speaker shown is best. Make sure you 're not using a subwoofer, change the front speaker setting (see Speaker setting on page 37) to large • When using at least three speakers is recommended, and a complete setup is unnecessary. Simply connect the speakers you...
... the audio input jack on this case the center speaker shown is best. Make sure you 're not using a subwoofer, change the front speaker setting (see Speaker setting on page 37) to large • When using at least three speakers is recommended, and a complete setup is unnecessary. Simply connect the speakers you...

Owner's Manual
Page 10
... terminal for a subwoofer when using only one surround back speaker connect as above ). • If you select subwoofer (SB SUBWF) in the Surround back speaker setting (see page 37) you only have one surround back speaker, connect the positive wire to the right channel (+) terminal, and the negative wire to the...
... terminal for a subwoofer when using only one surround back speaker connect as above ). • If you select subwoofer (SB SUBWF) in the Surround back speaker setting (see page 37) you only have one surround back speaker, connect the positive wire to the right channel (+) terminal, and the negative wire to the...

Owner's Manual
Page 11
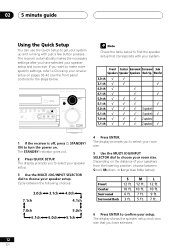
.... 11 En See pages 30-31 for more on your TV to this case, the listening mode must be set to Standard (it isn't, press DVD/LD on the remote control to set the receiver to do this. See Using the Quick Setup on your DVD player or source discs, you need... input. 5 Press QUICK SETUP on , followed by your DVD player, your receiver setup on page 36-42 for more setup options. Make sure you've set -see page 32-33 if you may only get digital 2 channel stereo and analog sound. Depending on this ) if you can select.
.... 11 En See pages 30-31 for more on your TV to this case, the listening mode must be set to Standard (it isn't, press DVD/LD on the remote control to set the receiver to do this. See Using the Quick Setup on your DVD player or source discs, you need... input. 5 Press QUICK SETUP on , followed by your DVD player, your receiver setup on page 36-42 for more setup options. Make sure you've set -see page 32-33 if you may only get digital 2 channel stereo and analog sound. Depending on this ) if you can select.
Owner's Manual
Page 12
The receiver automatically makes the necessary settings after you have selected. 12 En The display prompts you have selected your speaker setup and room size. Front Center Surround Surround Back S 12 ft. ... from the listening position, choose between the following choices: 3.0ch 7.1ch 3.1ch 4.0ch 4.1ch 4 Press ENTER. The display prompts you want to make more specific settings, refer to choose your room size. 02 5 minute guide Using the Quick Setup You can use the Quick Setup to get your system up and...
The receiver automatically makes the necessary settings after you have selected. 12 En The display prompts you have selected your speaker setup and room size. Front Center Surround Surround Back S 12 ft. ... from the listening position, choose between the following choices: 3.0ch 7.1ch 3.1ch 4.0ch 4.1ch 4 Press ENTER. The display prompts you want to make more specific settings, refer to choose your room size. 02 5 minute guide Using the Quick Setup You can use the Quick Setup to get your system up and...
Owner's Manual
Page 14
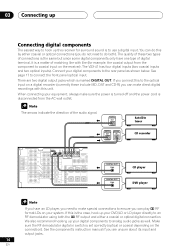
... player, you need to do both the 2 RF output and either coaxial or optical connections (you are two digital output jacks which is set correctly (optical or coaxial depending on your digital components to connect the front panel optical input. We also recommend hooking up your DVD/LD ... the receiver). See page 17 to the rear panel as well. Make sure the RF demodulator digital in switch is marked DIGITAL OUT. The VSX-41 has four digital inputs (two coaxial inputs and two optical inputs). Connect your system. You can make direct digital recordings with like with this...
... player, you need to do both the 2 RF output and either coaxial or optical connections (you are two digital output jacks which is set correctly (optical or coaxial depending on your digital components to connect the front panel optical input. We also recommend hooking up your DVD/LD ... the receiver). See page 17 to the rear panel as well. Make sure the RF demodulator digital in switch is marked DIGITAL OUT. The VSX-41 has four digital inputs (two coaxial inputs and two optical inputs). Connect your system. You can make direct digital recordings with like with this...
Owner's Manual
Page 15
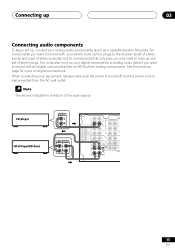
For components you want to record to/from digital components (like an MD) to the receiver (a set of stereo inputs and a set of the audio signal. You must also hook up your equipment, always make sure the power is turned off and the power cord is disconnected ... CD-R/Tape/MD Deck OUTPUT L R REC PLAY L R DIGITA ASSIG IN AUX DVD 7.1CH INPUT CENTER SUB W. Connecting up 03 Connecting audio components To begin set up one set of stereo outputs), but for more on digital connections. See the previous page for components that only play, you want to record with, you...
For components you want to record to/from digital components (like an MD) to the receiver (a set of stereo inputs and a set of the audio signal. You must also hook up your equipment, always make sure the power is turned off and the power cord is disconnected ... CD-R/Tape/MD Deck OUTPUT L R REC PLAY L R DIGITA ASSIG IN AUX DVD 7.1CH INPUT CENTER SUB W. Connecting up 03 Connecting audio components To begin set up one set of stereo outputs), but for more on digital connections. See the previous page for components that only play, you want to record with, you...
Owner's Manual
Page 16
... power cord is selected (see page 15). Make sure they are connecting only has one surround back channel output, change the Surround back channel input setting (page 40) to SB 1ch IN. The arrows indicate the direction of connection. Connecting video components Connect your equipment, always make more than one of...
... power cord is selected (see page 15). Make sure they are connecting only has one surround back channel output, change the Surround back channel input setting (page 40) to SB 1ch IN. The arrows indicate the direction of connection. Connecting video components Connect your equipment, always make more than one of...

Owner's Manual
Page 19
... left terminal. Use speakers with just two stereo speakers (the front speakers in the manner shown below , but using a subwoofer, change the front speaker setting (see Speaker setting on page 37) to large. Front Speakers Front Left Front Right Center Speaker Center Surround Speakers Surround Left Surround Right Surround Back Speakers Surround...
... left terminal. Use speakers with just two stereo speakers (the front speakers in the manner shown below , but using a subwoofer, change the front speaker setting (see Speaker setting on page 37) to large. Front Speakers Front Left Front Right Center Speaker Center Surround Speakers Surround Left Surround Right Surround Back Speakers Surround...
Owner's Manual
Page 20
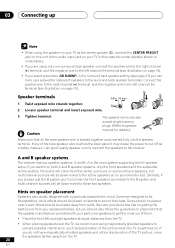
... negative wire to the left and right speakers at equal distances from walls. Speaker terminals 1 Twist exposed wire strands together. 3/8 in the Surround back speaker setting (see illustration on page 10). • If you can hook up • When using the speaker on this case the center speaker shown is twisted...
... negative wire to the left and right speakers at equal distances from walls. Speaker terminals 1 Twist exposed wire strands together. 3/8 in the Surround back speaker setting (see illustration on page 10). • If you can hook up • When using the speaker on this case the center speaker shown is twisted...

Owner's Manual
Page 21
... Position • If possible, place the surround speakers slightly above or below . Be sure all speakers are installed securely to reduce the risk of speaker set up Front Left Center Front Right If you choose to install the center speaker on top of the TV, be sure to secure it with... the surround speakers further away from the TV in the event of the center channel is localized at the TV screen. Overhead view of speaker set up 21 En
... Position • If possible, place the surround speakers slightly above or below . Be sure all speakers are installed securely to reduce the risk of speaker set up Front Left Center Front Right If you choose to install the center speaker on top of the TV, be sure to secure it with... the surround speakers further away from the TV in the event of the center channel is localized at the TV screen. Overhead view of speaker set up 21 En
Owner's Manual
Page 22
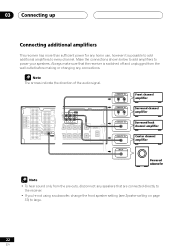
... more than sufficient power for any speakers that are connected directly to the receiver. • If you're not using a subwoofer, change the front speaker setting (see Speaker setting on page 37) to large. 22 En
... more than sufficient power for any speakers that are connected directly to the receiver. • If you're not using a subwoofer, change the front speaker setting (see Speaker setting on page 37) to large. 22 En
Owner's Manual
Page 23
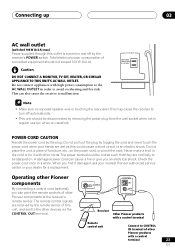
...overheating and fire risk. The remote control signals are received by the remote sensor of other Pioneer products with high power consumption to the AC WALL OUTLET in regular use (ex. DO NOT CONNECT A MONITOR, TV SET, HEATER, OR SIMILAR APPLIANCE TO THIS UNIT'S AC WALL OUTLET. Do not connect appliances... that they are wet as this could cause a short circuit or an electric shock. The power cords should not exceed 100 W (0.8 A). Operating other Pioneer components at the receiver's remote sensor. Check the power cord once in the cord or tie it damaged, ask your nearest...
...overheating and fire risk. The remote control signals are received by the remote sensor of other Pioneer products with high power consumption to the AC WALL OUTLET in regular use (ex. DO NOT CONNECT A MONITOR, TV SET, HEATER, OR SIMILAR APPLIANCE TO THIS UNIT'S AC WALL OUTLET. Do not connect appliances... that they are wet as this could cause a short circuit or an electric shock. The power cords should not exceed 100 W (0.8 A). Operating other Pioneer components at the receiver's remote sensor. Check the power cord once in the cord or tie it damaged, ask your nearest...

Owner's Manual
Page 26
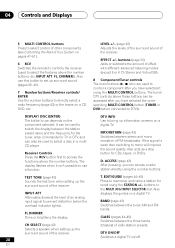
...use . 11 Character display 12 Neo:6 Lights during NEO:6 processing 13 ADV. 04 Controls and Displays 2 DIGITAL Lights when a Dolby Digital signal is set using the MPX button. This feature evens out the soudn for each channel, the maximum level can range between -10dB and -0dB. 26 En ...of the analog input signal. 6 RE-EQ: Lights when Re-Equalization is detected. ANALOG Lights when an analog signal is swiched on your level settings for smaller rooms. 7 DIRECT Lights when source direct playback is being received. 16 Master volume level Shows the overall volume level. ---dB indicates the...
...use . 11 Character display 12 Neo:6 Lights during NEO:6 processing 13 ADV. 04 Controls and Displays 2 DIGITAL Lights when a Dolby Digital signal is set using the MPX button. This feature evens out the soudn for each channel, the maximum level can range between -10dB and -0dB. 26 En ...of the analog input signal. 6 RE-EQ: Lights when Re-Equalization is detected. ANALOG Lights when an analog signal is swiched on your level settings for smaller rooms. 7 DIRECT Lights when source direct playback is being received. 16 Master volume level Shows the overall volume level. ---dB indicates the...

Owner's Manual
Page 27
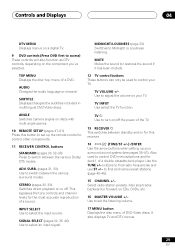
... Screen This screen displays the mode the receiver is in Direct Setup mode so you can put it to learn signals from other information. DIR SET Indicates that the remote is in Setup mode so that the remote is in , commands sent, etc. ERASE Indicates that new information (preset codes, ... pages 47-51). BRAND Indicates that the remote is in Read ID mode so that the remote is in Learning mode and ready to default settings (see page 51). 27 En READ ID Indicates that you can check the preset codes (see page 50). Controls and Displays 04 Remote control 1 2 5 6 7 8 9 ...
... Screen This screen displays the mode the receiver is in Direct Setup mode so you can put it to learn signals from other information. DIR SET Indicates that the remote is in Setup mode so that the remote is in , commands sent, etc. ERASE Indicates that new information (preset codes, ... pages 47-51). BRAND Indicates that the remote is in Read ID mode so that the remote is in Learning mode and ready to default settings (see page 51). 27 En READ ID Indicates that you can check the preset codes (see page 50). Controls and Displays 04 Remote control 1 2 5 6 7 8 9 ...
Owner's Manual
Page 28
...display between the three banks CH SELECT (page 42) (classes) of the receiver. TEST TONE (page 42) Sounds the test tone when setting up information screens on a digital TV. BAND (page 43) Switches between stereo and mono reception of the receiver. The tuner/ DTV ...51). 6 RCV Switches the remote to controls the receiver (used to prevent distortion (when the overload indicator lights). DIMMER)). Selects a speaker when setting up surround sound (pages 36, 42). 7 Number buttons/Receiver controls/ ENTER Use the number buttons to directly select a radio frequency (page 43)...
...display between the three banks CH SELECT (page 42) (classes) of the receiver. TEST TONE (page 42) Sounds the test tone when setting up information screens on a digital TV. BAND (page 43) Switches between stereo and mono reception of the receiver. The tuner/ DTV ...51). 6 RCV Switches the remote to controls the receiver (used to prevent distortion (when the overload indicator lights). DIMMER)). Selects a speaker when setting up surround sound (pages 36, 42). 7 Number buttons/Receiver controls/ ENTER Use the number buttons to directly select a radio frequency (page 43)...
Owner's Manual
Page 29
...radio station presets. It also displays TV and DTV menus. 29 En to adjust the volume on your surround sound system (see pages 36-41). Also used to Midnight or Loudness listening. Also skip tracks backward or forward on the component you've selected. This bypasses the tone controls... with multi-angle scenes. 10 REMOTE SETUP (pages 47-51) Press this receiver. 14 }]'' (TUNE/ST +/-) /ENTER Use the arrow buttons when setting up the remote control to control other components. 11 RECEIVER CONTROL buttons STANDARD (pages 30, 32-33) Press to turn on/off . Controls and ...
...radio station presets. It also displays TV and DTV menus. 29 En to adjust the volume on your surround sound system (see pages 36-41). Also used to Midnight or Loudness listening. Also skip tracks backward or forward on the component you've selected. This bypasses the tone controls... with multi-angle scenes. 10 REMOTE SETUP (pages 47-51) Press this receiver. 14 }]'' (TUNE/ST +/-) /ENTER Use the arrow buttons when setting up the remote control to control other components. 11 RECEIVER CONTROL buttons STANDARD (pages 30, 32-33) Press to turn on/off . Controls and ...


