
Owner's Manual
Page 11
... to this . Also make sure that came with the TV if you can select. See pages 30-31 for more on this receiver. Check the manual that DVD/LD is selected. There are several other sound options you don't know how to do this) if you 're unsure about the settings...
... to this . Also make sure that came with the TV if you can select. See pages 30-31 for more on this receiver. Check the manual that DVD/LD is selected. There are several other sound options you don't know how to do this) if you 're unsure about the settings...
Owner's Manual
Page 14
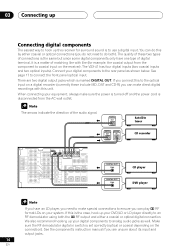
... sure the RF demodulator digital in switch is marked DIGITAL OUT. See the component's instruction manual if you can play 2 RF format LDs on your digital components to analog audio jacks as shown below. The VSX-41 has four digital inputs (two coaxial inputs and two optical inputs). DIGITAL OUT DIGITAL OUT DIGITAL...
... sure the RF demodulator digital in switch is marked DIGITAL OUT. See the component's instruction manual if you can play 2 RF format LDs on your digital components to analog audio jacks as shown below. The VSX-41 has four digital inputs (two coaxial inputs and two optical inputs). DIGITAL OUT DIGITAL OUT DIGITAL...
Owner's Manual
Page 20
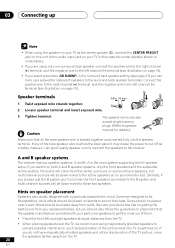
.... 3/8 in the Surround back speaker setting (see illustration on stands to sound their best. The speaker terminals also accept single banana plugs. (Refer to speaker manual for details.) Make sure that the speaker manufacturer provided with a particular placement in mind. Some should also follow the guidelines on placement that all the...
.... 3/8 in the Surround back speaker setting (see illustration on stands to sound their best. The speaker terminals also accept single banana plugs. (Refer to speaker manual for details.) Make sure that the speaker manufacturer provided with a particular placement in mind. Some should also follow the guidelines on placement that all the...
Owner's Manual
Page 32
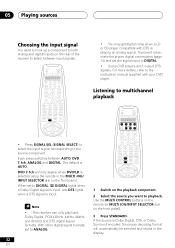
... ANGLE REMOTE SETUP STANDARD ADV.SURR. The default is AUTO. To prevent noise, make the proper digital connections (page 14) and set to the instruction manual supplied with DTS is input. • This receiver can only play back Dolby Digital, PCM (32kHz, 44kHz, 48kHz, and 96 kHz) and DTS digital signal...
... ANGLE REMOTE SETUP STANDARD ADV.SURR. The default is AUTO. To prevent noise, make the proper digital connections (page 14) and set to the instruction manual supplied with DTS is input. • This receiver can only play back Dolby Digital, PCM (32kHz, 44kHz, 48kHz, and 96 kHz) and DTS digital signal...
Owner's Manual
Page 43
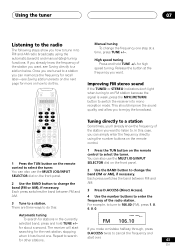
There are tuned to a station you can simply enter the frequency directly using the automatic (search) and manual (step) tuning functions. Release the button at a time, press TUNE +/-. Improving FM stereo sound If the TUNED or STEREO indicators don't light when tuning to .... 2 Use the BAND button to cancel the frequency and when it has found one step at the frequency you are three ways to do this : Manual tuning To change the band (FM or AM), if necessary. Each press switches the band between FM and AM. 3 Press D.ACCESS (Direct Access). 4 Use the...
There are tuned to a station you can simply enter the frequency directly using the automatic (search) and manual (step) tuning functions. Release the button at a time, press TUNE +/-. Improving FM stereo sound If the TUNED or STEREO indicators don't light when tuning to .... 2 Use the BAND button to cancel the frequency and when it has found one step at the frequency you are three ways to do this : Manual tuning To change the band (FM or AM), if necessary. Each press switches the band between FM and AM. 3 Press D.ACCESS (Direct Access). 4 Use the...
Owner's Manual
Page 44
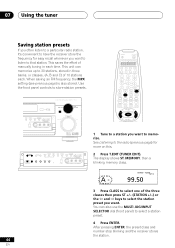
... and the receiver stores the station. 44 En This unit can also use the MULTI JOG/INPUT SELECTOR dial (front panel) to select one of manually tuning in three banks, or classes, (A, B and C) of 10 stations each time. The display shows ST. When saving an FM frequency, the MPX setting (see...
... and the receiver stores the station. 44 En This unit can also use the MULTI JOG/INPUT SELECTOR dial (front panel) to select one of manually tuning in three banks, or classes, (A, B and C) of 10 stations each time. The display shows ST. When saving an FM frequency, the MPX setting (see...
Owner's Manual
Page 46
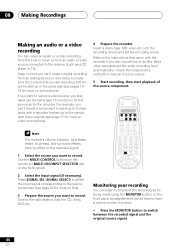
Insert a blank tape, MD, video etc. into the recording device and set the audio recording level automatically-check the component's instruction manual if you want to do this ). 3 Prepare the source you are recording to/from are unsure how to record. If you want to record a video ...
Insert a blank tape, MD, video etc. into the recording device and set the audio recording level automatically-check the component's instruction manual if you want to do this ). 3 Prepare the source you are recording to/from are unsure how to record. If you want to record a video ...
Owner's Manual
Page 68
... according to the type of each channel on page 42to check the speaker levels. • Connect the speakers properly (refer to the instruction manual supplied with DTS neutral position. If the unit does not operate normally due to the output when software with the DVD player. is output.... Refer to Setting the relative volume level of connections made. (refer to page 32). • Set the digital input settings correctly (refer to page 41). • Make digital connections (refer to page 14) and set for surround back sound. during playback of the remote sensor on the front panel ...
... according to the type of each channel on page 42to check the speaker levels. • Connect the speakers properly (refer to the instruction manual supplied with DTS neutral position. If the unit does not operate normally due to the output when software with the DVD player. is output.... Refer to Setting the relative volume level of connections made. (refer to page 32). • Set the digital input settings correctly (refer to page 41). • Make digital connections (refer to page 14) and set for surround back sound. during playback of the remote sensor on the front panel ...
Owner's Manual
Page 72
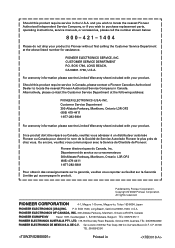
... if you wish to purchase replacement parts, operating instructions, service manuals, or accessories, please call the number shown below. 8 0 0 - 4 2 1 - 1 4 0 4 Please do not ship your product. Should this product require service in the U.S.A. PIONEER CORPORATION 4-1, Meguro 1-Chome, Meguro-ku, Tokyo 153-8654, Japan PIONEER ELECTRONICS [USA] INC. Customer Service Department 300 Allstate Parkway, Markham...
... if you wish to purchase replacement parts, operating instructions, service manuals, or accessories, please call the number shown below. 8 0 0 - 4 2 1 - 1 4 0 4 Please do not ship your product. Should this product require service in the U.S.A. PIONEER CORPORATION 4-1, Meguro 1-Chome, Meguro-ku, Tokyo 153-8654, Japan PIONEER ELECTRONICS [USA] INC. Customer Service Department 300 Allstate Parkway, Markham...


