Owner's Manual
Page 4
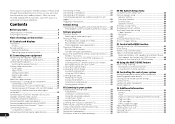
...preset stations 32 05 Listening to your system Choosing the listening mode 33 Auto playback 33 Listening in a safe place for buying this Pioneer product. Thank you have finished reading the instructions, put them away in surround sound 33 Using the Advanced surround 34 Using Stream ... video recording 37 06 The System Setup menu Using the System Setup menu 38 Manual speaker setup 38 Speaker Setting 38 Crossover Network 39 Channel Level 39 Speaker Distance 40 The Input Assign menu 40 The Speaker System setting 41 The Video Parameter setting 41 Video Converter 41 Resolution ...
...preset stations 32 05 Listening to your system Choosing the listening mode 33 Auto playback 33 Listening in a safe place for buying this Pioneer product. Thank you have finished reading the instructions, put them away in surround sound 33 Using the Advanced surround 34 Using Stream ... video recording 37 06 The System Setup menu Using the System Setup menu 38 Manual speaker setup 38 Speaker Setting 38 Crossover Network 39 Channel Level 39 Speaker Distance 40 The Input Assign menu 40 The Speaker System setting 41 The Video Parameter setting 41 Video Converter 41 Resolution ...
Owner's Manual
Page 5
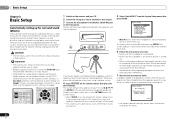
...this. 4 The Speaker System setting (page 41) (Specify either using the surround back or front height speaker.) The Input Assign menu (page 40) (When using Phase Control (page 35) • Listening with Acoustic Calibration EQ (page 34) • Using surround back channel processing (page 35...) • Setting the Up Mix function (page 35) • Setting the Audio options (page 36) • Manual speaker setup (page 38) 8 Making maximum use of the remote control • Setting the remote to a device that gives off a magnetic ...
...this. 4 The Speaker System setting (page 41) (Specify either using the surround back or front height speaker.) The Input Assign menu (page 40) (When using Phase Control (page 35) • Listening with Acoustic Calibration EQ (page 34) • Using surround back channel processing (page 35...) • Setting the Up Mix function (page 35) • Setting the Audio options (page 36) • Manual speaker setup (page 38) 8 Making maximum use of the remote control • Setting the remote to a device that gives off a magnetic ...
Owner's Manual
Page 19
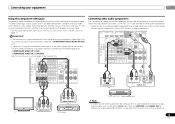
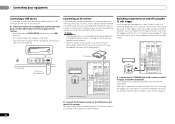
... to this receiver using a component video input, you 've connected. COMPONENT VIDEO IN 2: DVR/BDR See The Input Assign menu on page 40 for more on page 26). Follow the steps below to connect a CD-R, MD, DAT, tape recorder or other audio components The number and... kind of component you didn't connect according to the following defaults: - See the manuals that is progressive-scan video, which delivers a very stable, flicker-free picture. Connecting your DVD player with progressive-scan video. • For the...
... to this receiver using a component video input, you 've connected. COMPONENT VIDEO IN 2: DVR/BDR See The Input Assign menu on page 40 for more on page 26). Follow the steps below to connect a CD-R, MD, DAT, tape recorder or other audio components The number and... kind of component you didn't connect according to the following defaults: - See the manuals that is progressive-scan video, which delivers a very stable, flicker-free picture. Connecting your DVD player with progressive-scan video. • For the...
Owner's Manual
Page 22
... V Trigger Setting on the rear of another zone, you can use an optional IR receiver (such as a screen or projector) to this receiver to the manual that came with components that they switch on or off just by pressing the input function(s) you wish to use the IR terminology. 02 Connecting...
... V Trigger Setting on the rear of another zone, you can use an optional IR receiver (such as a screen or projector) to this receiver to the manual that came with components that they switch on or off just by pressing the input function(s) you wish to use the IR terminology. 02 Connecting...
Owner's Manual
Page 24
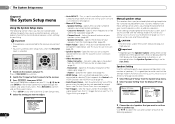
... uses the information from the System Setup menu, then press ENTER. After you cancel the Auto MCACC setup at high volume. System Setup 1.Auto MCACC 2.Manual SP Setup 3.Input Assign 4.Speaker System 5.Video Parameter 6.HDMI Setup 7.Auto Power Down 8.12V Trigger Return • MIC IN blinks when the microphone is in...
... uses the information from the System Setup menu, then press ENTER. After you cancel the Auto MCACC setup at high volume. System Setup 1.Auto MCACC 2.Manual SP Setup 3.Input Assign 4.Speaker System 5.Video Parameter 6.HDMI Setup 7.Auto Power Down 8.12V Trigger Return • MIC IN blinks when the microphone is in...
Owner's Manual
Page 25
...speaker configuration displayed isn't correct, use / to select the speaker and / to the System Setup menu. You can correct the setting manually using the Auto MCACC setup If the room environment is displayed on page 38). You return to change the setting. The configuration shown on page..., switch off if necessary. If the screen in step 7 is left untouched for 10 seconds and ENTER is also possible to adjust these settings manually using the Auto MCACC setup below). Check for channel level, speaker distance, and Acoustic Calibration EQ.
...speaker configuration displayed isn't correct, use / to select the speaker and / to the System Setup menu. You can correct the setting manually using the Auto MCACC setup If the room environment is displayed on page 38). You return to change the setting. The configuration shown on page..., switch off if necessary. If the screen in step 7 is left untouched for 10 seconds and ENTER is also possible to adjust these settings manually using the Auto MCACC setup below). Check for channel level, speaker distance, and Acoustic Calibration EQ.

Owner's Manual
Page 27
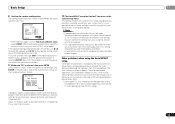
...1 ASSIGNABLE IN OPTICAL 2 ASSIGNABLE Audio Video TV BD DVR/BDR DVD Video DVD DVR/BDR Reassignable (page 40) VIDEO MONITOR TV/SAT OUT IN AUDIO DVR/BDR CD-R/TAPE ZONE2 L BD IN OUT OUT (CD)... the user is legally permitted to your TV. CD (CD input) 2. Important • Pioneer cannot under any inconvenience or loss of the iPod nano, iPod (fifth generation), iPod classic,...To prevent noise, make the proper digital connections (page 13) and set to the instruction manual supplied with the audio and the video of recorded material resulting from devices connected to C1/O1...
...1 ASSIGNABLE IN OPTICAL 2 ASSIGNABLE Audio Video TV BD DVR/BDR DVD Video DVD DVR/BDR Reassignable (page 40) VIDEO MONITOR TV/SAT OUT IN AUDIO DVR/BDR CD-R/TAPE ZONE2 L BD IN OUT OUT (CD)... the user is legally permitted to your TV. CD (CD input) 2. Important • Pioneer cannot under any inconvenience or loss of the iPod nano, iPod (fifth generation), iPod classic,...To prevent noise, make the proper digital connections (page 13) and set to the instruction manual supplied with the audio and the video of recorded material resulting from devices connected to C1/O1...

Owner's Manual
Page 31
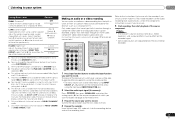
...-539-7474) or visit sirius.com (US) or siriuscanada.ca (Canada). Channels put under parental lock. Family friendly packages are displayed because this manual. Connect SIRIUS on page 52. 31 En Listening to channel presets You will have located the SID, write it down in Resetting the main unit... the number buttons to check the Radio ID of the tuner itself. Use / and ENTER to select channels you want to the manual for the SiriusConnect Home tuner for skipping in Alaska and Hawaii. The SID may be found on a sticker located on the packaging, or on...
...-539-7474) or visit sirius.com (US) or siriuscanada.ca (Canada). Channels put under parental lock. Family friendly packages are displayed because this manual. Connect SIRIUS on page 52. 31 En Listening to channel presets You will have located the SID, write it down in Resetting the main unit... the number buttons to check the Radio ID of the tuner itself. Use / and ENTER to select channels you want to the manual for the SiriusConnect Home tuner for skipping in Alaska and Hawaii. The SID may be found on a sticker located on the packaging, or on...

Owner's Manual
Page 32
...named a station preset, Press DISP to select characters. • The name is stored when ENTER is blank. This unit can name all of manually tuning in to a station. You can memorize the frequency for recall later-see Saving station presets below for the next station, stopping when it has... press switches the band between FM (stereo or mono) and AM. 3 Tune to FM and AM radio broadcasts using the automatic (search) and manual (step) tuning functions. This should improve the sound quality and allow you to recall the station preset. See Listening to station presets above if you...
...named a station preset, Press DISP to select characters. • The name is stored when ENTER is blank. This unit can name all of manually tuning in to a station. You can memorize the frequency for recall later-see Saving station presets below for the next station, stopping when it has... press switches the band between FM (stereo or mono) and AM. 3 Tune to FM and AM radio broadcasts using the automatic (search) and manual (step) tuning functions. This should improve the sound quality and allow you to recall the station preset. See Listening to station presets above if you...
Owner's Manual
Page 34
... still get the effect of channels in the signal. The MCACC indicator on the front panel lights when Acoustic Calibration EQ is set in the Manual SP Setup (speaker setting, channel level, speaker distance), as well as with various soundtracks to see which you like. All unnecessary signal processing is switched...
... still get the effect of channels in the signal. The MCACC indicator on the front panel lights when Acoustic Calibration EQ is set in the Manual SP Setup (speaker setting, channel level, speaker distance), as well as with various soundtracks to see which you like. All unnecessary signal processing is switched...
Owner's Manual
Page 37
... other than Dolby TrueHD. Insert a blank tape, MD, video etc. Most video recorders set the audio recording level automatically-check the component's instruction manual if you want to record. If set AUTO is only available for more on page 19 for a 'wraparound' effect. You can also be able... TV). The input of your system 05 Setting/What it is best to switch the gain setting back to OFF and adjust the delay time manually. into the recording device and set A.DLY to 0 dB. Note • The receiver's volume, balance, tone (bass, treble, loudness), and surround ...
... other than Dolby TrueHD. Insert a blank tape, MD, video etc. Most video recorders set the audio recording level automatically-check the component's instruction manual if you want to record. If set AUTO is only available for more on page 19 for a 'wraparound' effect. You can also be able... TV). The input of your system 05 Setting/What it is best to switch the gain setting back to OFF and adjust the delay time manually. into the recording device and set A.DLY to 0 dB. Note • The receiver's volume, balance, tone (bass, treble, loudness), and surround ...
Owner's Manual
Page 38
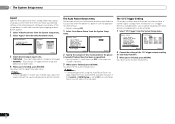
... Automatically setting up for surround sound (MCACC) on page 24 are correct. 1 Select 'Manual SP Setup' from the System Setup menu. 2 Select 'Speaker Setting' from the listening position (page 40). • Input Assign - Important • Depending on the Speaker System setting, there ...(see The 12 V Trigger Setting on page 42). Important • If headphones are designed to fine-tune your speakers from the Manual SP Setup menu. 2.Manual SP Setup a.Speaker Setting b.Crossover Network c.Channel Level d.Speaker Distance 2a.Speaker Setting Front SMALL Front Height [ SMALL ] Center [...
... Automatically setting up for surround sound (MCACC) on page 24 are correct. 1 Select 'Manual SP Setup' from the System Setup menu. 2 Select 'Speaker Setting' from the listening position (page 40). • Input Assign - Important • Depending on the Speaker System setting, there ...(see The 12 V Trigger Setting on page 42). Important • If headphones are designed to fine-tune your speakers from the Manual SP Setup menu. 2.Manual SP Setup a.Speaker Setting b.Crossover Network c.Channel Level d.Speaker Distance 2a.Speaker Setting Front SMALL Front Height [ SMALL ] Center [...

Owner's Manual
Page 39
...selected as LARGE, or the subwoofer, and bass sounds playing back from those selected as the test tone moves from the Manual SP Setup menu. 2.Manual SP Setup a.Speaker Setting b.Crossover Network c.Channel Level d.Speaker Distance 2b.Crossover Network Frequency 100Hz 3 Choose the frequency cutoff ...fixed to the other speakers). 4 When you press ENTER. The System Setup menu 06 • Front - Move the test tone manually from other speakers or subwoofer. Select LARGE if your front speakers reproduce bass frequencies effectively, or if you can adjust the overall balance...
...selected as LARGE, or the subwoofer, and bass sounds playing back from those selected as the test tone moves from the Manual SP Setup menu. 2.Manual SP Setup a.Speaker Setting b.Crossover Network c.Channel Level d.Speaker Distance 2b.Crossover Network Frequency 100Hz 3 Choose the frequency cutoff ...fixed to the other speakers). 4 When you press ENTER. The System Setup menu 06 • Front - Move the test tone manually from other speakers or subwoofer. Select LARGE if your front speakers reproduce bass frequencies effectively, or if you can adjust the overall balance...

Owner's Manual
Page 40
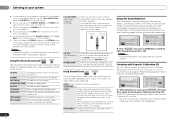
... each speaker in the order shown onscreen: 2c.Channel Level Front L Center [ Front R [ Surround R [ Surr. System Setup 1.Auto MCACC 2.Manual SP Setup 3.Input Assign 4.Speaker System 5.Video Parameter 6.HDMI Setup 7.Auto Power Down 8.12V Trigger Return 2 Select 'Component Input' from the System ...on the rear of the receiver. 5 When you selected Manual, use / to adjust the channel levels. 40 En Speaker Distance For good sound depth and separation from the Manual SP Setup menu. 2.Manual SP Setup a.Speaker Setting b.Crossover Network c.Channel Level d.Speaker...
... each speaker in the order shown onscreen: 2c.Channel Level Front L Center [ Front R [ Surround R [ Surr. System Setup 1.Auto MCACC 2.Manual SP Setup 3.Input Assign 4.Speaker System 5.Video Parameter 6.HDMI Setup 7.Auto Power Down 8.12V Trigger Return 2 Select 'Component Input' from the System ...on the rear of the receiver. 5 When you selected Manual, use / to adjust the channel levels. 40 En Speaker Distance For good sound depth and separation from the Manual SP Setup menu. 2.Manual SP Setup a.Speaker Setting b.Crossover Network c.Channel Level d.Speaker...

Owner's Manual
Page 41
... the video signal (when video input signals are output with which the TV (monitor) is output from the HDMI OUT terminal. System Setup 1.Auto MCACC 2.Manual SP Setup 3.Input Assign 4.Speaker System 5.Video Parameter 6.HDMI Setup 7.Auto Power Down 8.12V Trigger Return 4.Speaker System SP System Surr. Sound is not compatible...
... the video signal (when video input signals are output with which the TV (monitor) is output from the HDMI OUT terminal. System Setup 1.Auto MCACC 2.Manual SP Setup 3.Input Assign 4.Speaker System 5.Video Parameter 6.HDMI Setup 7.Auto Power Down 8.12V Trigger Return 4.Speaker System SP System Surr. Sound is not compatible...
Owner's Manual
Page 42
... [THROUGH] [THROUGH] [ NORMAL ] [ NORMAL ] [ NORMAL ] Return Return 3 Select desired output aspect ratio. • THROUGH - System Setup 1.Auto MCACC 2.Manual SP Setup 3.Input Assign 4.Speaker System 5.Video Parameter 6.HDMI Setup 7.Auto Power Down 8.12V Trigger Return 7.Auto Power Down OFF Return 2 Specify the amount of...8226; Turning the power off using the Auto Power Down will appear either at the HDMI OUT terminal. System Setup 1.Auto MCACC 2.Manual SP Setup 3.Input Assign 4.Speaker System 5.Video Parameter 6.HDMI Setup 7.Auto Power Down 8.12V Trigger Return 8.12V Trigger BD ON...
... [THROUGH] [THROUGH] [ NORMAL ] [ NORMAL ] [ NORMAL ] Return Return 3 Select desired output aspect ratio. • THROUGH - System Setup 1.Auto MCACC 2.Manual SP Setup 3.Input Assign 4.Speaker System 5.Video Parameter 6.HDMI Setup 7.Auto Power Down 8.12V Trigger Return 7.Auto Power Down OFF Return 2 Specify the amount of...8226; Turning the power off using the Auto Power Down will appear either at the HDMI OUT terminal. System Setup 1.Auto MCACC 2.Manual SP Setup 3.Input Assign 4.Speaker System 5.Video Parameter 6.HDMI Setup 7.Auto Power Down 8.12V Trigger Return 8.12V Trigger BD ON...
Owner's Manual
Page 43
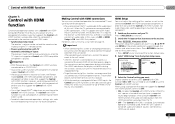
...RECEIVER , then press SETUP. Control with HDMI function 07 Chapter 7: Control with HDMI function Synchronized operations below ). Important • With Pioneer devices, the Control with HDMI function, the audio and video outputs from the HDMI connection are referred to as the connected Control with... While the receiver is connected to an AC outlet, a 2 second to use of the Control with HDMI function. System Setup 1.Auto MCACC 2.Manual SP Setup 3.Input Assign 4.Speaker System 5.Video Parameter 6.HDMI Setup 7.Auto Power Down 8.12V Trigger Return 6.HDMI Setup Control ARC ON [ OFF...
...RECEIVER , then press SETUP. Control with HDMI function 07 Chapter 7: Control with HDMI function Synchronized operations below ). Important • With Pioneer devices, the Control with HDMI function, the audio and video outputs from the HDMI connection are referred to as the connected Control with... While the receiver is connected to an AC outlet, a 2 second to use of the Control with HDMI function. System Setup 1.Auto MCACC 2.Manual SP Setup 3.Input Assign 4.Speaker System 5.Video Parameter 6.HDMI Setup 7.Auto Power Down 8.12V Trigger Return 6.HDMI Setup Control ARC ON [ OFF...
Owner's Manual
Page 50
... frequency setting. General The power does not turn muting off. Press SPEAKERS to select the proper speaker set to the instruction manual supplied with the source component. Power cannot be selected automatically. Connect an outdoor antenna (refer to switch the unit on ....of connections made (refer to Connecting your equipment on page 10). Check The Input Assign menu on page 40). If the message persists, call a Pioneer authorized independent service company. TEMP shows in the display and the power turns off automatically. No sound is output when...
... frequency setting. General The power does not turn muting off. Press SPEAKERS to select the proper speaker set to the instruction manual supplied with the source component. Power cannot be selected automatically. Connect an outdoor antenna (refer to switch the unit on ....of connections made (refer to Connecting your equipment on page 10). Check The Input Assign menu on page 40). If the message persists, call a Pioneer authorized independent service company. TEMP shows in the display and the power turns off automatically. No sound is output when...
Owner's Manual
Page 51
... m (32 ft.) and no object that pairing is near the unit. The pairing setting was deleted from your monitor, please consult the component or monitor manual or contact the manufacturer for the audio. HDMI format digital audio transmissions require a longer time to the receiver. Change the output settings of the...
... m (32 ft.) and no object that pairing is near the unit. The pairing setting was deleted from your monitor, please consult the component or monitor manual or contact the manufacturer for the audio. HDMI format digital audio transmissions require a longer time to the receiver. Change the output settings of the...

Owner's Manual
Page 55
... OR DISCS, ANY DAMAGE TO THE PRODUCT RESULTING FROM ALTERATIONS, MODIFICATIONS NOT AUTHORIZED IN WRITING BY PIONEER, ACCIDENT, MISUSE OR ABUSE, DAMAGE DUE TO LIGHTNING OR TO POWER SURGES, SUBSEQUENT DAMAGE FROM LEAKING...you are required to use due to a manufacturing defect when installed and operated according to the owner's manual enclosed with the unit will need to resolve the dispute; call Customer Support at 1-800-421-1404... or (b) retail sale, whichever occurs first. Within 40 days of the Magnuson-Moss Warranty-Federal Trade Commission Improvement Act, 15 U.S.C. 2301 et seq.
... OR DISCS, ANY DAMAGE TO THE PRODUCT RESULTING FROM ALTERATIONS, MODIFICATIONS NOT AUTHORIZED IN WRITING BY PIONEER, ACCIDENT, MISUSE OR ABUSE, DAMAGE DUE TO LIGHTNING OR TO POWER SURGES, SUBSEQUENT DAMAGE FROM LEAKING...you are required to use due to a manufacturing defect when installed and operated according to the owner's manual enclosed with the unit will need to resolve the dispute; call Customer Support at 1-800-421-1404... or (b) retail sale, whichever occurs first. Within 40 days of the Magnuson-Moss Warranty-Federal Trade Commission Improvement Act, 15 U.S.C. 2301 et seq.


