
Owner's Manual
Page 4
... the main section of digital terminal you can use a regular RCA stereo cord or the specially-made coaxial cords, they have one type of the manual. This is the best scenario, as shown below . For optical connections you will need the proper cable. Also hook up the video connection of plugs...
... the main section of digital terminal you can use a regular RCA stereo cord or the specially-made coaxial cords, they have one type of the manual. This is the best scenario, as shown below . For optical connections you will need the proper cable. Also hook up the video connection of plugs...

Owner's Manual
Page 7
... least, need to set up any more information see page 13) you won't have a center speaker. 5 Playing a DVD with digital audio or do this instruction manual. Use the instructions on pages 27- 38 of the receiver (see pages 39-42. 3 As mentioned above you should see "DVD/LD" in the display...
... least, need to set up any more information see page 13) you won't have a center speaker. 5 Playing a DVD with digital audio or do this instruction manual. Use the instructions on pages 27- 38 of the receiver (see pages 39-42. 3 As mentioned above you should see "DVD/LD" in the display...

Owner's Manual
Page 9
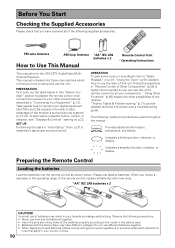
... You Start 10 Checking the Supplied Accessories 10 How to Use This Manual 10 Preparing the Remote Control 10 Installing the Receiver 11 Opening the Front Panel 11 The PIONEER SR System: Operating other PIONEER components 11 Connecting Your Equipment 12 Audio Components 12 Digital Connections 13 ... Performance 48 Direct Playback 49 Adjusting the Brightness of the Display 49 DUAL MONO Setting 50 Using the Tuner 51 Automatic and Manual Tuning 51 Direct Access Tuning 52 Memorizing Frequently Used Stations 53 Recalling Memorized Stations 54 Remote Control of Other Components .. 55...
... You Start 10 Checking the Supplied Accessories 10 How to Use This Manual 10 Preparing the Remote Control 10 Installing the Receiver 11 Opening the Front Panel 11 The PIONEER SR System: Operating other PIONEER components 11 Connecting Your Equipment 12 Audio Components 12 Digital Connections 13 ... Performance 48 Direct Playback 49 Adjusting the Brightness of the Display 49 DUAL MONO Setting 50 Using the Tuner 51 Automatic and Manual Tuning 51 Direct Access Tuning 52 Memorizing Frequently Used Stations 53 Recalling Memorized Stations 54 Remote Control of Other Components .. 55...
Owner's Manual
Page 10
...control as shown below in this unit's remote control for the VSX-33TX Audio/Video MultiChannel Receiver. This manual is highly recommended so you how to your other possibilities of... 6 3 CHTAVNVNOELLTTVVFUCNOEKNFFTERCTO+VTL1/C0HRESMELOMRTAEESCSTEEEIVRTEUINVRPOPULSUTYMASTTETELMOUSEDTNDUEIPGSESITNSATIGLENNRVARIDLESOEDLSIESEFCCLLTEDCCIMTDM-RMEMURLUTLITCIHCTINOUPNNUTTROL RECEIVER 1VCR 2VCR TVC ¢ ST Remote Control Unit • Operating Instructions This manual is essential to the marks in the battery case. • Batteries with new ones. "Techno Tidbits & Problem-solving...
...control as shown below in this unit's remote control for the VSX-33TX Audio/Video MultiChannel Receiver. This manual is highly recommended so you how to your other possibilities of... 6 3 CHTAVNVNOELLTTVVFUCNOEKNFFTERCTO+VTL1/C0HRESMELOMRTAEESCSTEEEIVRTEUINVRPOPULSUTYMASTTETELMOUSEDTNDUEIPGSESITNSATIGLENNRVARIDLESOEDLSIESEFCCLLTEDCCIMTDM-RMEMURLUTLITCIHCTINOUPNNUTTROL RECEIVER 1VCR 2VCR TVC ¢ ST Remote Control Unit • Operating Instructions This manual is essential to the marks in the battery case. • Batteries with new ones. "Techno Tidbits & Problem-solving...

Owner's Manual
Page 14
The RF demodulator changes the RF signal to the instruction manual supplied with the RFD-1. For more details, refer to a digital signal which is then processed by the VSX-33TX model through their digital input jacks. We also recommend hooking up your digital components to the proper component(s) with it's 2 (AC-3) RF output, a commercially...
The RF demodulator changes the RF signal to the instruction manual supplied with the RFD-1. For more details, refer to a digital signal which is then processed by the VSX-33TX model through their digital input jacks. We also recommend hooking up your digital components to the proper component(s) with it's 2 (AC-3) RF output, a commercially...
Owner's Manual
Page 19
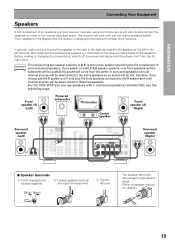
... speakers. If you 'll only hear the front speakers connected to the B system and multi channel sources will be down -mixed to speaker manual for details.) 19 For the VSX-33TX you have in . (10mm) The speaker terminals also accept single banana plugs. (Refer to the active speakers so no sound will vary...
... speakers. If you 'll only hear the front speakers connected to the B system and multi channel sources will be down -mixed to speaker manual for details.) 19 For the VSX-33TX you have in . (10mm) The speaker terminals also accept single banana plugs. (Refer to the active speakers so no sound will vary...
Owner's Manual
Page 20
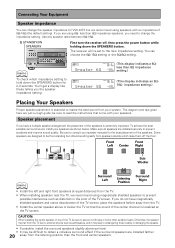
... the best sound from speakers stands which raise them off , then press the power button while holding down the SPEAKERS button for VSX-33TX but others benefit greatly from your speaker manuals for the best placement of the speakers is extremely important. Otherwise, the speaker may be floor-standing but we recommend using...
... the best sound from speakers stands which raise them off , then press the power button while holding down the SPEAKERS button for VSX-33TX but others benefit greatly from your speaker manuals for the best placement of the speakers is extremely important. Otherwise, the speaker may be floor-standing but we recommend using...
Owner's Manual
Page 34
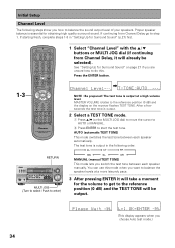
...speaker balance is output. 2 Select a TEST TONE mode. 1 Press 5/∞ (or the MULTI JOG dial) to move the cursor to AUTO or MANUAL. 2 Press ENTER to start the test tone. You can use this . If continuing from Channel Delay, it will take a moment for obtaining high ...button. \ NOTE : Be prepared! Initial Setup Channel Level The following order: FL CT FR SW SL SR MANUAL (manual TEST TONE) This mode lets you switch the test tone between each speaker manually. If starting fresh, complete steps 1-3 in the following steps show you how to balance the speaker levels at ...
...speaker balance is output. 2 Select a TEST TONE mode. 1 Press 5/∞ (or the MULTI JOG dial) to move the cursor to AUTO or MANUAL. 2 Press ENTER to start the test tone. You can use this . If continuing from Channel Delay, it will take a moment for obtaining high ...button. \ NOTE : Be prepared! Initial Setup Channel Level The following order: FL CT FR SW SL SR MANUAL (manual TEST TONE) This mode lets you switch the test tone between each speaker manually. If starting fresh, complete steps 1-3 in the following steps show you how to balance the speaker levels at ...
Owner's Manual
Page 35
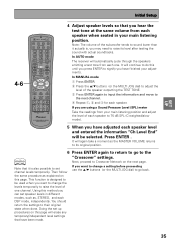
In MANUAL mode 1 Press ENTER 2 Press the 5/∞ buttons (or the MULTI JOG dial) to adjust the level of the speaker outputting the TEST TONE. 3 Press ENTER ...
In MANUAL mode 1 Press ENTER 2 Press the 5/∞ buttons (or the MULTI JOG dial) to adjust the level of the speaker outputting the TEST TONE. 3 Press ENTER ...
Owner's Manual
Page 44
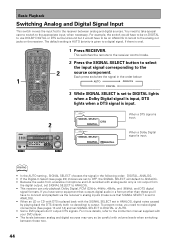
... signal in ANALOG, digital noise caused by playing back the DTS directly (with analog audio only is input. For more details, refer to the instruction manual supplied with the SIGNAL SELECT set in the following order: DIGITAL, ANALOG. • If the Digital-In Select (see page 29) choices are set SIGNAL...
... signal in ANALOG, digital noise caused by playing back the DTS directly (with analog audio only is input. For more details, refer to the instruction manual supplied with the SIGNAL SELECT set in the following order: DIGITAL, ANALOG. • If the Digital-In Select (see page 29) choices are set SIGNAL...

Owner's Manual
Page 48
... and up to 24 bit. Also, all speaker settings and other features (DIGITAL NR, etc.) cannot be louder than that of specialized discs. Check the manual of your DVD player to make sure. • During this unit's other setup settings have to set . INPUT ATT DIGITAL NR FL DIMMER 1 7 8 9 REMOTE SETUP...
... and up to 24 bit. Also, all speaker settings and other features (DIGITAL NR, etc.) cannot be louder than that of specialized discs. Check the manual of your DVD player to make sure. • During this unit's other setup settings have to set . INPUT ATT DIGITAL NR FL DIMMER 1 7 8 9 REMOTE SETUP...

Owner's Manual
Page 51
...tuning an FM station, because the station is too far away or the broadcast signal is weak, press MPX on the front panel. For Manual Tuning • To change frequencies quickly, hold TUNING -/+ buttons for you how to tune in the station. OPERATION 51 This should improve reception... of the station you desire, see "Direct Access Tuning" on the remote or the front panel to enjoy the broadcast. Using the Tuner Automatic and Manual Tuning The following page. MPX SOURCE RECEIVER DVD CD TV VCR 1 MULTI CONTROL CD-R TUN VCR 2 TVC 1 2 3 LOUDNESS VIDEO SELECT MULTI CH...
...tuning an FM station, because the station is too far away or the broadcast signal is weak, press MPX on the front panel. For Manual Tuning • To change frequencies quickly, hold TUNING -/+ buttons for you how to tune in the station. OPERATION 51 This should improve reception... of the station you desire, see "Direct Access Tuning" on the remote or the front panel to enjoy the broadcast. Using the Tuner Automatic and Manual Tuning The following page. MPX SOURCE RECEIVER DVD CD TV VCR 1 MULTI CONTROL CD-R TUN VCR 2 TVC 1 2 3 LOUDNESS VIDEO SELECT MULTI CH...

Owner's Manual
Page 53
... the STATION -/+ buttons repeatedly to select a class number. Repeat steps 1 through 4 to memorize up to 30 radio stations in the desired station. See "Automatic and Manual Tuning" or "Direct Access Tuning" on p.51 and 52. 2 Press the MEMORY button to activate the memory function. 3 Press the CLASS button repeatedly to select...
... the STATION -/+ buttons repeatedly to select a class number. Repeat steps 1 through 4 to memorize up to 30 radio stations in the desired station. See "Automatic and Manual Tuning" or "Direct Access Tuning" on p.51 and 52. 2 Press the MEMORY button to activate the memory function. 3 Press the CLASS button repeatedly to select...

Owner's Manual
Page 79
... has been turned down to prevent the output of loud noise from your speakers. • Replace the batteries (see p.44). • Refer to the instruction manual supplied with the reading of digital information. • The remote control batteries have worn out. • Too far away or bad angle of operation. •...
... has been turned down to prevent the output of loud noise from your speakers. • Replace the batteries (see p.44). • Refer to the instruction manual supplied with the reading of digital information. • The remote control batteries have worn out. • Too far away or bad angle of operation. •...

Owner's Manual
Page 80
... Digital / DTS source there is a possibility the present track is not Dolby Digital / DTS. • Play the source. • Fix the audio settings (check the manual that came with your preset stations. Station No. *1 *2 *3 *4 *5 Station Name CLASS A Frequency Station No. *6 *7 *8 *9 *0 Station Name Frequency Station No. *1 *2 *3 *4 *5 Station Name Frequency CLASS B Station No...
... Digital / DTS source there is a possibility the present track is not Dolby Digital / DTS. • Play the source. • Fix the audio settings (check the manual that came with your preset stations. Station No. *1 *2 *3 *4 *5 Station Name CLASS A Frequency Station No. *6 *7 *8 *9 *0 Station Name Frequency Station No. *1 *2 *3 *4 *5 Station Name Frequency CLASS B Station No...

Owner's Manual
Page 84
... sheet included with your product to purchase replacement parts, operating instructions, service manuals, or accessories, please call the number shown below. 8 0 0 - 4 2 1 - 1 4 0 4 Please do not ship your product. LTD. 178-184 Boundary Road, Braeside, Victoria 3195, Australia, TEL: [03] 9586-6300 PIONEER ELECTRONICS DE MEXICO S.A. Alternatively, please contact the Customer Service Department at...
... sheet included with your product to purchase replacement parts, operating instructions, service manuals, or accessories, please call the number shown below. 8 0 0 - 4 2 1 - 1 4 0 4 Please do not ship your product. LTD. 178-184 Boundary Road, Braeside, Victoria 3195, Australia, TEL: [03] 9586-6300 PIONEER ELECTRONICS DE MEXICO S.A. Alternatively, please contact the Customer Service Department at...


