Owner's Manual
Page 1
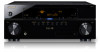
Operating Instructions audio/video multi-channel receiver 33 VSX32 VSX-
Operating Instructions audio/video multi-channel receiver 33 VSX32 VSX-
Owner's Manual
Page 3
...cm at top, 10 cm at rear, and 20 cm at each side). Product Name: AUDIO/VIDEO MULTI-CHANNEL RECEIVER Model Number: VSX-33 / VSX-32 Responsible Party Name: PIONEER ELECTRONICS (USA) INC. D8-10-1-2_A1_En Information to radio communications. FEDERAL COMMUNICATIONS COMMISSION DECLARATION OF CONFORMITY This device ... THE REAR OR BOTTOM. Since the power cord serves as radios and televisions, use , the plug must accept any interference received, including interference that may invalidate the user's right to protect it is no guarantee that to correct the interference by one fitted...
...cm at top, 10 cm at rear, and 20 cm at each side). Product Name: AUDIO/VIDEO MULTI-CHANNEL RECEIVER Model Number: VSX-33 / VSX-32 Responsible Party Name: PIONEER ELECTRONICS (USA) INC. D8-10-1-2_A1_En Information to radio communications. FEDERAL COMMUNICATIONS COMMISSION DECLARATION OF CONFORMITY This device ... THE REAR OR BOTTOM. Since the power cord serves as radios and televisions, use , the plug must accept any interference received, including interference that may invalidate the user's right to protect it is no guarantee that to correct the interference by one fitted...

Owner's Manual
Page 5
...Menu 48 Listening to the front panel input 32 Connecting an XM Radio tuner (VSX-33 only 33 Connecting a SiriusConnect™ tuner 33 Connecting an iPod 33 Connecting a USB device 34 Connecting a USB device for improving sound quality 18 ...operating instructions so you have finished reading the instructions, put them away in the box 9 Installing the receiver 10 Loading the batteries 10 Operating range of remote control unit 10 02 Controls and displays Remote control...Some tips for Advanced MCACC output 34 Connecting an IR receiver 35 Operating other Pioneer components with this...
...Menu 48 Listening to the front panel input 32 Connecting an XM Radio tuner (VSX-33 only 33 Connecting a SiriusConnect™ tuner 33 Connecting an iPod 33 Connecting a USB device 34 Connecting a USB device for improving sound quality 18 ...operating instructions so you have finished reading the instructions, put them away in the box 9 Installing the receiver 10 Loading the batteries 10 Operating range of remote control unit 10 02 Controls and displays Remote control...Some tips for Advanced MCACC output 34 Connecting an IR receiver 35 Operating other Pioneer components with this...
Owner's Manual
Page 6
...multi-operation 69 Resetting the remote control settings 70 Default preset codes 70 Controlling components 70 10 The Advanced MCACC menu Making receiver settings from the Advanced MCACC menu 73 Automatic MCACC (Expert 73 Manual MCACC setup 75 Fine Channel Level 76 Fine Speaker ...63 Dimming the display 63 Switching the HDMI output (VSX-33 only 64 Using the Web Control function 64 Checking your system settings 64 Resetting the system 64 Default system settings 65 09 Controlling the rest of your system Operating multiple receivers 66 Setting the remote to control other components ....
...multi-operation 69 Resetting the remote control settings 70 Default preset codes 70 Controlling components 70 10 The Advanced MCACC menu Making receiver settings from the Advanced MCACC menu 73 Automatic MCACC (Expert 73 Manual MCACC setup 75 Fine Channel Level 76 Fine Speaker ...63 Dimming the display 63 Switching the HDMI output (VSX-33 only 64 Using the Web Control function 64 Checking your system settings 64 Resetting the system 64 Default system settings 65 09 Controlling the rest of your system Operating multiple receivers 66 Setting the remote to control other components ....
Owner's Manual
Page 8
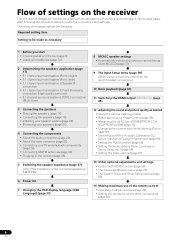
... EQ type (SYMMETRY/ALL CH ADJ/FRONT ALIGN) (page 73) • Changing the channel level while listening (Tip on page 84) • Switching on the receiver The unit is 6 Ω to 8 Ω) 6 Power On 7 Changing the OSD display language (OSD Language) (page 37) 8 ... menu (page 39) (When using connections other than the recommended connections) 10 Basic playback (page 41) 11 Switching the HDMI output (VSX-33 only) (page 64) 12 Adjusting the sound and picture quality as necessary 1 Before you start • Checking what's in the box (page ...
... EQ type (SYMMETRY/ALL CH ADJ/FRONT ALIGN) (page 73) • Changing the channel level while listening (Tip on page 84) • Switching on the receiver The unit is 6 Ω to 8 Ω) 6 Power On 7 Changing the OSD display language (OSD Language) (page 37) 8 ... menu (page 39) (When using connections other than the recommended connections) 10 Basic playback (page 41) 11 Switching the HDMI output (VSX-33 only) (page 64) 12 Adjusting the sound and picture quality as necessary 1 Before you start • Checking what's in the box (page ...
Owner's Manual
Page 9
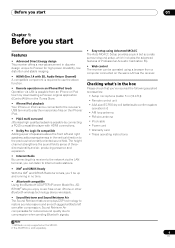
... player with 3D, Audio Return Channel) A compatible component is required to use the above the front left over after compression. ASBT100)2 lets you 've received the following supplied accessories: • Setup microphone (cable: 5 m (16.4 ft.)) • Remote control unit • AAA size IEC R03 dry... No. Checking what's in the box Please check that you enjoy music files on the VSX-33. 2 The AS-BT100 is possible from an iPhone or iPod touch by downloading a Pioneer original application (iControlAV) from the iTunes Store. • iPhone/iPod playback Your iPhone or iPod can...
... player with 3D, Audio Return Channel) A compatible component is required to use the above the front left over after compression. ASBT100)2 lets you 've received the following supplied accessories: • Setup microphone (cable: 5 m (16.4 ft.)) • Remote control unit • AAA size IEC R03 dry... No. Checking what's in the box Please check that you enjoy music files on the VSX-33. 2 The AS-BT100 is possible from an iPhone or iPod touch by downloading a Pioneer original application (iControlAV) from the iTunes Store. • iPhone/iPod playback Your iPhone or iPod can...

Owner's Manual
Page 10
... work properly if: • There are obstacles between the remote control and the receiver's remote sensor. • Direct sunlight or fluorescent light is shining onto the remote sensor. • The receiver is operated simultaneously with the sound. - near a device that have a longer life.... This may not last over a long period. in places that is emitting infrared rays. • The receiver is located near a cassette deck (or close to check initial operations; they may interfere with another infrared remote control unit. CAUTION Incorrect use...
... work properly if: • There are obstacles between the remote control and the receiver's remote sensor. • Direct sunlight or fluorescent light is shining onto the remote sensor. • The receiver is operated simultaneously with the sound. - near a device that have a longer life.... This may not last over a long period. in places that is emitting infrared rays. • The receiver is located near a cassette deck (or close to check initial operations; they may interfere with another infrared remote control unit. CAUTION Incorrect use...
Owner's Manual
Page 11
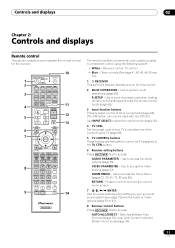
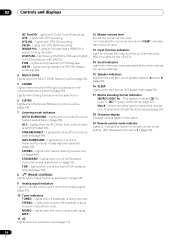
...used with the VSX-33.) Use INPUT SELECT to select the input function (page 41). 4 TV CTRL Set the preset code of your surround sound system (see page 73) and the Audio or Video options (page 59 or 61). 8 Receiver Control buttons Press RECEIVER first to access... 2 3 SIGNAL SEL MCACC SLEEP INFO 4 5 6 DISP CH LEVEL A.ATT DIMMER 7 8 9 D.ACCESS / CLR 0 CLASS CH ENTER 9 ZONE 2 ZONE 3 LIGHT 14 RECEIVER The remote has been conveniently color-coded according to perform multi operations (page 68). R.SETUP - Use to component control using the following system: • White...
...used with the VSX-33.) Use INPUT SELECT to select the input function (page 41). 4 TV CTRL Set the preset code of your surround sound system (see page 73) and the Audio or Video options (page 59 or 61). 8 Receiver Control buttons Press RECEIVER first to access... 2 3 SIGNAL SEL MCACC SLEEP INFO 4 5 6 DISP CH LEVEL A.ATT DIMMER 7 8 9 D.ACCESS / CLR 0 CLASS CH ENTER 9 ZONE 2 ZONE 3 LIGHT 14 RECEIVER The remote has been conveniently color-coded according to perform multi operations (page 68). R.SETUP - Use to component control using the following system: • White...

Owner's Manual
Page 12
... can be used with the VSX-33.) 10 Remote control LED Lights when a command is sent from four modes (page 68). The way the buttons light can only be selected from the remote control (page 66). 11 RECEIVER Switches the remote to control the receiver (used to check selected receiver settings (page 64). Press for...
... can be used with the VSX-33.) 10 Remote control LED Lights when a command is sent from four modes (page 68). The way the buttons light can only be selected from the remote control (page 66). 11 RECEIVER Switches the remote to control the receiver (used to check selected receiver settings (page 64). Press for...
Owner's Manual
Page 13
... indicate the currently selected input signal. AUTO lights when the receiver is set to select the input signal automatically (page 55). L/R - Lights when EQ is connected (page 33). 5 Character display See Display below. 6 ENTER 7 Remote sensor Receives the signals from the remote control (see Using the MULTI-...Use to connect your Apple iPod as an audio and video source, or connect a USB device for audio and photo playback (page 33). 15 HDMI input connector Use for connection to which digital signals are connected, there is detected. Switches between stereo playback and Front ...
... indicate the currently selected input signal. AUTO lights when the receiver is set to select the input signal automatically (page 55). L/R - Lights when EQ is connected (page 33). 5 Character display See Display below. 6 ENTER 7 Remote sensor Receives the signals from the remote control (see Using the MULTI-...Use to connect your Apple iPod as an audio and video source, or connect a USB device for audio and photo playback (page 33). 15 HDMI input connector Use for connection to which digital signals are connected, there is detected. Switches between stereo playback and Front ...
Owner's Manual
Page 14
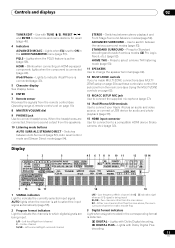
... when one of the Neo:6 modes of the Standard Surround modes is on (page 52). STEREO - STEREO - Lights when stereo listening is being received in sleep mode (page 63). 17 Matrix decoding format indicators 2PRO LOGIC IIx - THX - Lights when a stereo FM broadcast is selected (page ..."+12dB" indicates the maximum level. 13 Input function indicators Light to indicate the input function you have selected. (XM only lights for the VSX-33.) 14 Scroll indicators Light when there are more selectable items when making the various settings. 15 Speaker indicators Lights to indicate 2 Pro Logic II...
... when one of the Neo:6 modes of the Standard Surround modes is on (page 52). STEREO - STEREO - Lights when stereo listening is being received in sleep mode (page 63). 17 Matrix decoding format indicators 2PRO LOGIC IIx - THX - Lights when a stereo FM broadcast is selected (page ..."+12dB" indicates the maximum level. 13 Input function indicators Light to indicate the input function you have selected. (XM only lights for the VSX-33.) 14 Scroll indicators Light when there are more selectable items when making the various settings. 15 Speaker indicators Lights to indicate 2 Pro Logic II...
Owner's Manual
Page 15
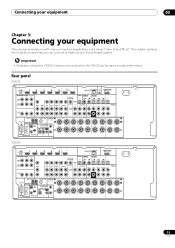
Rear panel VSX-33 HDMI BD IN IN 1 IN 2 IN 3 IN 4 OUT 1 (CONTROL) OUT 2 ASSIGNABLE 14 LAN... V 150 mA MAX) 12 V TRIGGER IN (OUTPUT 12 V 1 TOTAL 150 mA MAX) IN 1 IN 2 OUT OUT 2 EXTENSION CONTROL IR VSX-32 HDMI BD IN IN 1 IN 2 IN 3 IN 4 OUT ASSIGNABLE 14 LAN (10/100) ADAPTER PORT (OUTPUT 5 V 100 mA MAX) ...This receiver provides you with many connection possibilities, but it doesn't have to be difficult. Connecting your equipment 03 Chapter 3: Connecting your home theater system. Important • Illustration shows the VSX-33, however connections for the VSX-32...
Rear panel VSX-33 HDMI BD IN IN 1 IN 2 IN 3 IN 4 OUT 1 (CONTROL) OUT 2 ASSIGNABLE 14 LAN... V 150 mA MAX) 12 V TRIGGER IN (OUTPUT 12 V 1 TOTAL 150 mA MAX) IN 1 IN 2 OUT OUT 2 EXTENSION CONTROL IR VSX-32 HDMI BD IN IN 1 IN 2 IN 3 IN 4 OUT ASSIGNABLE 14 LAN (10/100) ADAPTER PORT (OUTPUT 5 V 100 mA MAX) ...This receiver provides you with many connection possibilities, but it doesn't have to be difficult. Connecting your equipment 03 Chapter 3: Connecting your home theater system. Important • Illustration shows the VSX-33, however connections for the VSX-32...
Owner's Manual
Page 16
Using the CU-RF100 lets you display the receiver's display information on page 39 to change the assignments if other connections are assigned by default to the RS-232C and EXTENSION terminals. Input function ... COAX-2 • The CU-RF100 omni-directional remote control (separately sold) can be the final step. 16 En Plugging in should be connected to the receiver's different input terminals. 03 Connecting your hands and operate it without worrying about obstacles or the direction in which the remote control is pointing. Refer...
Using the CU-RF100 lets you display the receiver's display information on page 39 to change the assignments if other connections are assigned by default to the RS-232C and EXTENSION terminals. Input function ... COAX-2 • The CU-RF100 omni-directional remote control (separately sold) can be the final step. 16 En Plugging in should be connected to the receiver's different input terminals. 03 Connecting your hands and operate it without worrying about obstacles or the direction in which the remote control is pointing. Refer...

Owner's Manual
Page 19
... formed by the leading edge of the front left and right speakers. • It is not possible to 3 ft.) higher than for details on the receiver comprises a positive (+) and negative (-) terminal.
... formed by the leading edge of the front left and right speakers. • It is not possible to 3 ft.) higher than for details on the receiver comprises a positive (+) and negative (-) terminal.

Owner's Manual
Page 21
... you do this way. • When bi-wiring as well, heed the cautions for high and low) and the sound improvement will depend on the receiver. Bi-wiring your speakers. Your speakers must be bi-ampable to the Low terminals.
... you do this way. • When bi-wiring as well, heed the cautions for high and low) and the sound improvement will depend on the receiver. Bi-wiring your speakers. Your speakers must be bi-ampable to the Low terminals.

Owner's Manual
Page 22
... 20. 2 If necessary, select 'Normal(SB/FH)' from the Speaker System menu. ZONE 2 setup With these connections you must connect your monitor/TV to the receiver's HDMI video outputs when connecting this . In this . 03 Connecting your equipment Selecting the Speaker system The front height terminals can be used for bi...
... 20. 2 If necessary, select 'Normal(SB/FH)' from the Speaker System menu. ZONE 2 setup With these connections you must connect your monitor/TV to the receiver's HDMI video outputs when connecting this . In this . 03 Connecting your equipment Selecting the Speaker system The front height terminals can be used for bi...
Owner's Manual
Page 23
... to 8 channels • Input of this , interruption in equalizer is used, it may result in unreliable signal transfers. • This receiver supports SACD, Dolby Digital Plus, Dolby TrueHD and DTS-HD Master Audio. A DVI connection, however, does not support audio signals. Due to...unit's HDMI OUT terminal during playback, or disconnecting/connecting the HDMI cable during playback, may cause noise or interrupted audio. 23 En This receiver supports the functions described below through HDMI connections.2 • Digital transfer of digital audio. Note 1 • An HDMI connection can ...
... to 8 channels • Input of this , interruption in equalizer is used, it may result in unreliable signal transfers. • This receiver supports SACD, Dolby Digital Plus, Dolby TrueHD and DTS-HD Master Audio. A DVI connection, however, does not support audio signals. Due to...unit's HDMI OUT terminal during playback, or disconnecting/connecting the HDMI cable during playback, may cause noise or interrupted audio. 23 En This receiver supports the functions described below through HDMI connections.2 • Digital transfer of digital audio. Note 1 • An HDMI connection can ...
Owner's Manual
Page 24
... 1 When the TV and receiver are also possible (see Connecting your TV and playback components Connecting using a commercially available HDMI cable. 03 Connecting your equipment Connecting your DVD player with no need to connect an audio cable. See Switching the HDMI output (VSX-33 only) on page 64. ...TOTAL 150 mA MAX) IN 1 IN 2 OUT OUT 2 EXTENSION CONTROL IR • VSX-33 only: When connecting to an HDMI/DVIcompatible monitor using the HDMI OUT 2 terminal, switch the HDMI output setting to this receiver using HDMI If you have an HDMI or DVI (with HDCP) equipped component (Blu-ray...
... 1 When the TV and receiver are also possible (see Connecting your TV and playback components Connecting using a commercially available HDMI cable. 03 Connecting your equipment Connecting your DVD player with no need to connect an audio cable. See Switching the HDMI output (VSX-33 only) on page 64. ...TOTAL 150 mA MAX) IN 1 IN 2 OUT OUT 2 EXTENSION CONTROL IR • VSX-33 only: When connecting to an HDMI/DVIcompatible monitor using the HDMI OUT 2 terminal, switch the HDMI output setting to this receiver using HDMI If you have an HDMI or DVI (with HDCP) equipped component (Blu-ray...

Owner's Manual
Page 25
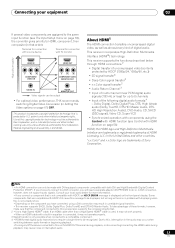
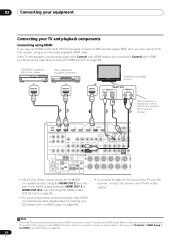
... your equipment 03 Connecting your DVD player with no HDMI output This diagram shows connections of the TV over the receiver, connect the receiver and TV with no need to tell the receiver which digital input you connected the player to (see HDMI Setup on page 39). Select one AUDIO OUT DIGITAL ...ll need to connect an audio cable. In this case, set TV Audio at HDMI Setup to the receiver. HDMI IN HDMI/DVI-compatible monitor DVD player, etc. Note 1 When the TV and receiver are connected by HDMI connections, if the TV supports the HDMI Audio Return Channel function, the sound ...
... your equipment 03 Connecting your DVD player with no HDMI output This diagram shows connections of the TV over the receiver, connect the receiver and TV with no need to tell the receiver which digital input you connected the player to (see HDMI Setup on page 39). Select one AUDIO OUT DIGITAL ...ll need to connect an audio cable. In this case, set TV Audio at HDMI Setup to the receiver. HDMI IN HDMI/DVI-compatible monitor DVD player, etc. Note 1 When the TV and receiver are connected by HDMI connections, if the TV supports the HDMI Audio Return Channel function, the sound ...

Owner's Manual
Page 26
... DVD player, etc. Depending on the video component, it may be possible to output signals connected by HDMI and other playback component) to the receiver. • With these connections, the picture is not output to the TV even if the DVD player is connected with audio cables (page 24).... IR • Connect using a composite or component cord. Do not use an optical digital audio cable, you'll need to tell the receiver which digital input you connected the player to input video signals. Please refer to the operating instructions supplied with your TV with no HDMI input...
... DVD player, etc. Depending on the video component, it may be possible to output signals connected by HDMI and other playback component) to the receiver. • With these connections, the picture is not output to the TV even if the DVD player is connected with audio cables (page 24).... IR • Connect using a composite or component cord. Do not use an optical digital audio cable, you'll need to tell the receiver which digital input you connected the player to input video signals. Please refer to the operating instructions supplied with your TV with no HDMI input...


