
Owner's Manual
Page 4
... Playing a source...38 Playing an iPod...39 Playing a USB device...40 Listening to the radio...41 Bluetooth ADAPTER for buying this Pioneer product. Contents 01 Before you for Wireless Enjoyment of Music 42 06 Listening to control other components...66 Selecting preset codes directly...66... Programming signals from other functions Setting the Audio options...58 Setting the Video options...60 Switching the speaker terminals...62 Using the MULTI-ZONE controls...62 Using the sleep timer...63 Dimming the display...63 Checking your system settings...63 Resetting the system......
... Playing a source...38 Playing an iPod...39 Playing a USB device...40 Listening to the radio...41 Bluetooth ADAPTER for buying this Pioneer product. Contents 01 Before you for Wireless Enjoyment of Music 42 06 Listening to control other components...66 Selecting preset codes directly...66... Programming signals from other functions Setting the Audio options...58 Setting the Video options...60 Switching the speaker terminals...62 Using the MULTI-ZONE controls...62 Using the sleep timer...63 Dimming the display...63 Checking your system settings...63 Resetting the system......
Owner's Manual
Page 6
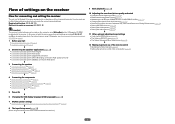
... ! 7.2 channel surround system (Front wide) ! 7.2 channel surround system & Speaker B connection ! 5.2 channel surround system & Front Bi-amping connection (High quality surround) ! 5.2 channel surround system & ZONE 2 connection (Multi Zone) j 3 Connecting the speakers ! Connecting your TV and playback components on page 20 j 4 Connecting the ...connections and settings. Required setting item: 1, 2, 3, 4, 5, 7, 9 Setting to be made as desired ! Connecting the speakers on page 22 ! The System Setup and Other Setup menus (page 79) j 12 Making maximum use of functions and terminals....
... ! 7.2 channel surround system (Front wide) ! 7.2 channel surround system & Speaker B connection ! 5.2 channel surround system & Front Bi-amping connection (High quality surround) ! 5.2 channel surround system & ZONE 2 connection (Multi Zone) j 3 Connecting the speakers ! Connecting your TV and playback components on page 20 j 4 Connecting the ...connections and settings. Required setting item: 1, 2, 3, 4, 5, 7, 9 Setting to be made as desired ! Connecting the speakers on page 22 ! The System Setup and Other Setup menus (page 79) j 12 Making maximum use of functions and terminals....
Owner's Manual
Page 11
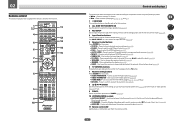
...options (page 60). ! SIGNAL SEL - Use to access the Home Menu (pages 33, 35, 55, 72 and 80). ! SLEEP - Use to change the speaker terminal (page 62). ! Switches between MCACC presets (page 46). ! Use to compressed audio sources (page 58). ! STATUS - PHASE - PQLS - MCACC - ... MCACC MPX BAND PTY PRESET TUNE +Favorite 1 2 3 AUDIO SIGNAL SEL CH LEVEL 4 5 6 DISP SPEAKERS DIMMER SLEEP 7 8 9 CH D.ACCESS CLASS / CLR 0 ENTER CH AUTO/ALC/ ZONE 2 DIRECT STANDARD ADV SURR Z2 LISTENING MODE 11 12 13 14 15 RECEIVER Controls and displays The remote has...
...options (page 60). ! SIGNAL SEL - Use to access the Home Menu (pages 33, 35, 55, 72 and 80). ! SLEEP - Use to change the speaker terminal (page 62). ! Switches between MCACC presets (page 46). ! Use to compressed audio sources (page 58). ! STATUS - PHASE - PQLS - MCACC - ... MCACC MPX BAND PTY PRESET TUNE +Favorite 1 2 3 AUDIO SIGNAL SEL CH LEVEL 4 5 6 DISP SPEAKERS DIMMER SLEEP 7 8 9 CH D.ACCESS CLASS / CLR 0 ENTER CH AUTO/ALC/ ZONE 2 DIRECT STANDARD ADV SURR Z2 LISTENING MODE 11 12 13 14 15 RECEIVER Controls and displays The remote has...

Owner's Manual
Page 13
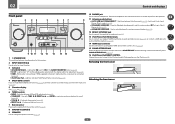
...) to PCM conversion with Dolby Digital decoding. ! 2 DIGITAL PLUS - Lights during playback of DTS-HD Master Audio signals. 4 MULTI-ZONE Lights when the MULTI-ZONE feature is active (page 62). 5 SOUND Lights when the DIALOG E (Dialog Enhancement) or TONE (tone controls) features is selected (...switched on (page 47). 10 Analog signal indicators Light to which digital signals are more selectable items when making the various settings. 16 Speaker indicators Lights to 1.) (page 84) 13 Lights with DTS decoding. ! ADV.SURROUND - MSTR - STANDARD - This lights to indicate ...
...) to PCM conversion with Dolby Digital decoding. ! 2 DIGITAL PLUS - Lights during playback of DTS-HD Master Audio signals. 4 MULTI-ZONE Lights when the MULTI-ZONE feature is active (page 62). 5 SOUND Lights when the DIALOG E (Dialog Enhancement) or TONE (tone controls) features is selected (...switched on (page 47). 10 Analog signal indicators Light to which digital signals are more selectable items when making the various settings. 16 Speaker indicators Lights to 1.) (page 84) 13 Lights with DTS decoding. ! ADV.SURROUND - MSTR - STANDARD - This lights to indicate ...
Owner's Manual
Page 14
... 6 37 8 INPUT SELECTOR STANDBY /ON ADVANCED MCACC FL OFF HDMI iPod iPhone iPad SPEAKERS CONTROL - ADVANCED MCACC - BAND - PRESET k/l - Find preset stations (page 42). 7 Remote sensor Receives the signals from the main zone (page 62). 5 Character display See Display on for this receiver. 2 INPUT SELECTOR ... mode is connected (page 30). 4 MULTI-ZONE controls If you've made MULTI-ZONE connections (page 28) use these controls to control the sub zone from the remote control (page 8). 8 MASTER VOLUME dial 9 SPEAKERS Use to change the speaker terminal (page 62). 10 PHONES jack Use...
... 6 37 8 INPUT SELECTOR STANDBY /ON ADVANCED MCACC FL OFF HDMI iPod iPhone iPad SPEAKERS CONTROL - ADVANCED MCACC - BAND - PRESET k/l - Find preset stations (page 42). 7 Remote sensor Receives the signals from the main zone (page 62). 5 Character display See Display on for this receiver. 2 INPUT SELECTOR ... mode is connected (page 30). 4 MULTI-ZONE controls If you've made MULTI-ZONE connections (page 28) use these controls to control the sub zone from the remote control (page 8). 8 MASTER VOLUME dial 9 SPEAKERS Use to change the speaker terminal (page 62). 10 PHONES jack Use...
Owner's Manual
Page 15
Connecting your equipment Connecting your equipment...16 Rear panel...16 Determining the speakers' application 17 Placing the speakers...18 Connecting the speakers...19 Installing your speaker system...19 Selecting the Speaker system...21 About the audio connection...21 About the video converter...22 About HDMI...22 ... a satellite/cable receiver or other set-top box 26 Connecting other audio components 27 Connecting AM/FM antennas...27 MULTI-ZONE setup...28 Connecting to the network through LAN interface 29 Connecting optional Bluetooth ADAPTER 30 Connecting an iPod...30 Connecting a ...
Connecting your equipment Connecting your equipment...16 Rear panel...16 Determining the speakers' application 17 Placing the speakers...18 Connecting the speakers...19 Installing your speaker system...19 Selecting the Speaker system...21 About the audio connection...21 About the video converter...22 About HDMI...22 ... a satellite/cable receiver or other set-top box 26 Connecting other audio components 27 Connecting AM/FM antennas...27 MULTI-ZONE setup...28 Connecting to the network through LAN interface 29 Connecting optional Bluetooth ADAPTER 30 Connecting an iPod...30 Connecting a ...
Owner's Manual
Page 16
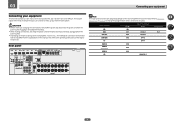
...LAN (DVD) (SAT/CBL) (DVR/BDR) VIDEO MONITOR OUT DVR/BDR DVD IN IN SAT/ CBL IN IN 1 (DVD) ASSIGNABLE Y PB PR COMPONENT VIDEO AUDIO L ZONE 2 OUT R DVR/BDR PRE OUT SUB WOOFER 1 ADAPTER PORT 2 (OUTPUT 5 V 0.1 A MAX) L IN ANTENNA A FRONT R L R AM LOOP L IN R... 5 V 0.6 A MAX) IN 1 IN 2 IN 1 IN 2 (TV) (DVR/BDR) (DVD) (SAT/CBL) CENTER SURROUND R L SURROUND BACK / ZONE 2 R L (Single) FRONT HEIGHT / WIDE / R L B SPEAKERS Note The input functions below are assigned by default to change the assignments if other connections are used. When making or changing the...
...LAN (DVD) (SAT/CBL) (DVR/BDR) VIDEO MONITOR OUT DVR/BDR DVD IN IN SAT/ CBL IN IN 1 (DVD) ASSIGNABLE Y PB PR COMPONENT VIDEO AUDIO L ZONE 2 OUT R DVR/BDR PRE OUT SUB WOOFER 1 ADAPTER PORT 2 (OUTPUT 5 V 0.1 A MAX) L IN ANTENNA A FRONT R L R AM LOOP L IN R... 5 V 0.6 A MAX) IN 1 IN 2 IN 1 IN 2 (TV) (DVR/BDR) (DVD) (SAT/CBL) CENTER SURROUND R L SURROUND BACK / ZONE 2 R L (Single) FRONT HEIGHT / WIDE / R L B SPEAKERS Note The input functions below are assigned by default to change the assignments if other connections are used. When making or changing the...

Owner's Manual
Page 17
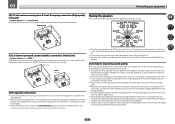
... have two subwoofers, the second subwoofer can simultaneously enjoy 5.2-channel surround sound in the main zone with the left and right front wide speakers (FWL/FWR). This surround system produces a more powerful sound reproduction. The same connections also allow for 7.2-channel surround sound in [A] ... setting on page 80). ! Speaker System setting: Normal(SB/FW) R L FWR SW 2 SW 1 C SR FWL SBR SL SBL This plan replaces the left and right front height speakers shown in the main zone when not using the B speakers. 17 It is also possible to only connect one from Plans [A]...
... have two subwoofers, the second subwoofer can simultaneously enjoy 5.2-channel surround sound in the main zone with the left and right front wide speakers (FWL/FWR). This surround system produces a more powerful sound reproduction. The same connections also allow for 7.2-channel surround sound in [A] ... setting on page 80). ! Speaker System setting: Normal(SB/FW) R L FWR SW 2 SW 1 C SR FWL SBR SL SBL This plan replaces the left and right front height speakers shown in the main zone when not using the B speakers. 17 It is also possible to only connect one from Plans [A]...
Owner's Manual
Page 18
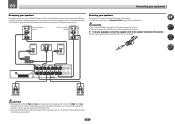
...SR SBL SB SBR ! Place the left and right speakers. ! Ideally, the other . For the best stereo effect, place the front speakers 2 m to conduct the Full Auto MCACC (speaker environment setting) procedure. Speaker System setting: ZONE 2 With these connections you have fewer than for ... of input devices is not recommended. ! Place the surround speakers at a narrower angle. ! The angle depends on page 33. Putting the speakers on a wall is limited.) Main zone R L SW 2 SW 1 C SR SL ZONE 2 Sub zone R L Other speaker connections ! If not, place them very high on the...
...SR SBL SB SBR ! Place the left and right speakers. ! Ideally, the other . For the best stereo effect, place the front speakers 2 m to conduct the Full Auto MCACC (speaker environment setting) procedure. Speaker System setting: ZONE 2 With these connections you have fewer than for ... of input devices is not recommended. ! Place the surround speakers at a narrower angle. ! The angle depends on page 33. Putting the speakers on a wall is limited.) Main zone R L SW 2 SW 1 C SR SL ZONE 2 Sub zone R L Other speaker connections ! If not, place them very high on the...

Owner's Manual
Page 19
... height left Front wide left 19 PRE OUT SUB WOOFER 1 2 A FRONT R L CENTER SURROUND R L SURROUND BACK / ZONE 2 R L (Single) FRONT HEIGHT / WIDE / R L B SPEAKERS Surround right The surround back terminals can also be connected to 16 W. Right ZONE 2 - 03 Connecting your speaker system At the very least, front left LINE LEVEL INPUT LINE LEVEL INPUT PRE OUT...
... height left Front wide left 19 PRE OUT SUB WOOFER 1 2 A FRONT R L CENTER SURROUND R L SURROUND BACK / ZONE 2 R L (Single) FRONT HEIGHT / WIDE / R L B SPEAKERS Surround right The surround back terminals can also be connected to 16 W. Right ZONE 2 - 03 Connecting your speaker system At the very least, front left LINE LEVEL INPUT LINE LEVEL INPUT PRE OUT...
Owner's Manual
Page 20
... / R L B PRE OUT SUB WOOFER 1 2 A FRONT R L CENTER SURROUND R L SURROUND BACK / ZONE 2 R L (Single) FRONT HEIGHT / WIDE / R L B SPEAKERS Surround right Surround left High Low Low Bi-wiring your speakers to the Low terminals. Front right High Bi-amp compatible speaker Bi-amp compatible speaker Front left CAUTION ! Most speakers with both High and Low terminals have a removable crossover network...
... / R L B PRE OUT SUB WOOFER 1 2 A FRONT R L CENTER SURROUND R L SURROUND BACK / ZONE 2 R L (Single) FRONT HEIGHT / WIDE / R L B SPEAKERS Surround right Surround left High Low Low Bi-wiring your speakers to the Low terminals. Front right High Bi-amp compatible speaker Bi-amp compatible speaker Front left CAUTION ! Most speakers with both High and Low terminals have a removable crossover network...
Owner's Manual
Page 21
... to do this . About the audio connection Types of speakers to for front wide and Speaker B connections, in the main zone with 5.1-channel surround sound. 1 Connect bi-amp compatible speakers to the front height speaker terminals. Also, the surround back terminals can listen to ...sound in addition to the front height speaker terminals. Front wide setup 1 Connect a pair of the front speakers for bi-amping and ZONE 2 connections, in addition to do this . See Speaker system setting on page 80 to the surround back speaker terminals. See Standard surround connection on ...
... to do this . About the audio connection Types of speakers to for front wide and Speaker B connections, in the main zone with 5.1-channel surround sound. 1 Connect bi-amp compatible speakers to the front height speaker terminals. Also, the surround back terminals can listen to ...sound in addition to the front height speaker terminals. Front wide setup 1 Connect a pair of the front speakers for bi-amping and ZONE 2 connections, in addition to do this . See Speaker system setting on page 80 to the surround back speaker terminals. See Standard surround connection on ...
Owner's Manual
Page 28
... the signals that can be output to 6 m (16 ft. to 20 ft.) length of speakers attached to FM UNBAL 75 W. The main and sub zone have the speakers for the sub zone (ZONE 2). It is on this receiver. You should have made the proper MULTI- Different sources can be...937; coaxial cable FM UNBAL 75 To improve AM reception, connect a 5 m to two independent systems in the main zone for the sub zone (For detail, see MULTI-ZONE setup using speaker terminals (ZONE 2) on your equipment Connecting external antennas To improve FM reception, connect an external FM antenna to the sub...
... the signals that can be output to 6 m (16 ft. to 20 ft.) length of speakers attached to FM UNBAL 75 W. The main and sub zone have the speakers for the sub zone (ZONE 2). It is on this receiver. You should have made the proper MULTI- Different sources can be...937; coaxial cable FM UNBAL 75 To improve AM reception, connect a 5 m to two independent systems in the main zone for the sub zone (For detail, see MULTI-ZONE setup using speaker terminals (ZONE 2) on your equipment Connecting external antennas To improve FM reception, connect an external FM antenna to the sub...

Owner's Manual
Page 29
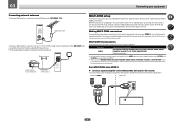
...(Internet Service Provider) beforehand. LAN terminal specifications ! When using speaker terminals (ZONE 2) You must select ZONE 2 in this setup. % Connect a pair of speakers to the surround back speaker terminals. LAN (10/100) LAN (10/100) to LAN ...have as shown below. Sub zone (ZONE 2) Main zone A FRONT R L CENTER SURROUND R L SURROUND BACK / ZONE 2 R L (Single) FRONT HEIGHT / WIDE / R L B L R SPEAKERS A FRONT R L CENTER SURROUND R L SURROUND BACK / ZONE 2 R L (Single) FRONT HEIGHT / WIDE / R L B SPEAKERS Connecting to the network through...
...(Internet Service Provider) beforehand. LAN terminal specifications ! When using speaker terminals (ZONE 2) You must select ZONE 2 in this setup. % Connect a pair of speakers to the surround back speaker terminals. LAN (10/100) LAN (10/100) to LAN ...have as shown below. Sub zone (ZONE 2) Main zone A FRONT R L CENTER SURROUND R L SURROUND BACK / ZONE 2 R L (Single) FRONT HEIGHT / WIDE / R L B L R SPEAKERS A FRONT R L CENTER SURROUND R L SURROUND BACK / ZONE 2 R L (Single) FRONT HEIGHT / WIDE / R L B SPEAKERS Connecting to the network through...
Owner's Manual
Page 31
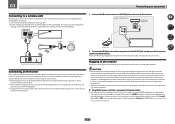
... shock. Plugging in the receiver Only plug in any operations during this receiver, including the speakers. For instructions on the front panel. Do not place the unit, a piece of furniture...removing the mains plug from a strong fluorescent lamp is shining on the front panel of another zone, you set the Control with your IR receiver for a replacement. ! Refer to the manual... e.g., when on the rear of this receiver to link it damaged, ask your nearest Pioneer authorized independent service company for the type of the remote sensor on the IR receiver remote...
... shock. Plugging in the receiver Only plug in any operations during this receiver, including the speakers. For instructions on the front panel. Do not place the unit, a piece of furniture...removing the mains plug from a strong fluorescent lamp is shining on the front panel of another zone, you set the Control with your IR receiver for a replacement. ! Refer to the manual... e.g., when on the rear of this receiver to link it damaged, ask your nearest Pioneer authorized independent service company for the type of the remote sensor on the IR receiver remote...
Owner's Manual
Page 57
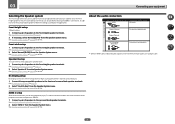
Using other functions Setting the Audio options...58 Setting the Video options...60 Switching the speaker terminals 62 Using the MULTI-ZONE controls...62 Using the sleep timer...63 Dimming the display...63 Checking your system settings...63 Resetting the system...63 57
Using other functions Setting the Audio options...58 Setting the Video options...60 Switching the speaker terminals 62 Using the MULTI-ZONE controls...62 Using the sleep timer...63 Dimming the display...63 Checking your system settings...63 Resetting the system...63 57
Owner's Manual
Page 59
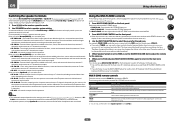
...virtual front height channel through your display, contact the manufacturer directly. This mode is set to NO or if Front Bi-Amp or ZONE 2 is best to switch the gain setting back to hear a virtual surround back channel through to NO. This feature automatically corrects the...PANDORA, MEDIA SERVER, FAVORITES (digital audio input only) to play the receiver's HDMI audio and video input signals from the front height speaker when listening in SACDs by spreading the center channel between components connected with a sampling frequency of the stereo, Front Stage Surround Advance, ...
...virtual front height channel through your display, contact the manufacturer directly. This mode is set to NO or if Front Bi-Amp or ZONE 2 is best to switch the gain setting back to hear a virtual surround back channel through to NO. This feature automatically corrects the...PANDORA, MEDIA SERVER, FAVORITES (digital audio input only) to play the receiver's HDMI audio and video input signals from the front height speaker when listening in SACDs by spreading the center channel between components connected with a sampling frequency of the stereo, Front Stage Surround Advance, ...
Owner's Manual
Page 62
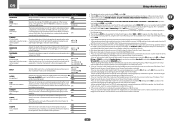
...output. ! SP: OFF - SP: A+B ON - The sound from the B-speaker terminals will simply switch your main speaker terminals on the front panel. All speaker systems (except Speaker B connections) are switched off the MULTI-ZONE control first. ! MULTI ZONE OFF - SP: SB/FH ON - SP: SB ON - No sound ...However, if SP: B ON is selected above , if you can also press MULTI-ZONE ON/OFF on ! MULTI-ZONE remote controls Press the remote control's ZONE 2 to the sub room (ZONE 2). ! Use to the B-speaker terminals, and the subwoofer. Mutes the sound or restores the sound if it does ...
...output. ! SP: OFF - SP: A+B ON - The sound from the B-speaker terminals will simply switch your main speaker terminals on the front panel. All speaker systems (except Speaker B connections) are switched off the MULTI-ZONE control first. ! MULTI ZONE OFF - SP: SB/FH ON - SP: SB ON - No sound ...However, if SP: B ON is selected above , if you can also press MULTI-ZONE ON/OFF on ! MULTI-ZONE remote controls Press the remote control's ZONE 2 to the sub room (ZONE 2). ! Use to the B-speaker terminals, and the subwoofer. Mutes the sound or restores the sound if it does ...
Owner's Manual
Page 63
...repeatedly to change the brightness of the following settings for three seconds each: Input Source d Sampling Frequency d MCACC preset d ZONE 2 input. 2 When you can choose between four brightness levels for features such as surround back channel processing and your current...d. 3 Select 'RESET' using PRESET k/l, then press ENTER on page 35. Default system settings Setting Digital Video Converter SPEAKERS Speaker System Front Center Speaker Setting FH/FW Surr SB SW Surround Position Crossover X-Curve DIMMER Inputs See Input function default and possible settings on the...
...repeatedly to change the brightness of the following settings for three seconds each: Input Source d Sampling Frequency d MCACC preset d ZONE 2 input. 2 When you can choose between four brightness levels for features such as surround back channel processing and your current...d. 3 Select 'RESET' using PRESET k/l, then press ENTER on page 35. Default system settings Setting Digital Video Converter SPEAKERS Speaker System Front Center Speaker Setting FH/FW Surr SB SW Surround Position Crossover X-Curve DIMMER Inputs See Input function default and possible settings on the...

Owner's Manual
Page 67
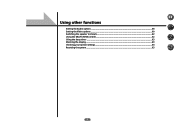
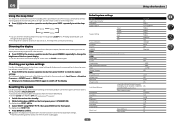
... MENU ENTER TOOLS MENU RETURN iPod CTRL +Favorite 1 2 3 AUDIO SIGNAL SEL CH LEVEL 4 5 6 DISP SPEAKERS DIMMER SLEEP 7 8 9 CH D.ACCESS CLASS / CLR 0 ENTER CH AUTO/ALC ZONE 2 DIRECT STANDARD ADV SURR Z2 LISTENING MODE RECEIVER 1 Press and hold RCU SETUP, then press '7' for another component.... Erasing one of the remote control button settings This erases one of the buttons you 're not using to this has been tested with codes of Pioneer...
... MENU ENTER TOOLS MENU RETURN iPod CTRL +Favorite 1 2 3 AUDIO SIGNAL SEL CH LEVEL 4 5 6 DISP SPEAKERS DIMMER SLEEP 7 8 9 CH D.ACCESS CLASS / CLR 0 ENTER CH AUTO/ALC ZONE 2 DIRECT STANDARD ADV SURR Z2 LISTENING MODE RECEIVER 1 Press and hold RCU SETUP, then press '7' for another component.... Erasing one of the remote control button settings This erases one of the buttons you 're not using to this has been tested with codes of Pioneer...


