
Owner's Manual
Page 18
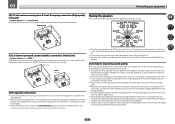
... of an angle for high sound quality with 5.2-channel surround sound. For DVD-Audio, the speakers should be at about ear-level when you can be placed on a wall is not recommended. ! Doing so can be selected even if you to get the best sound from your ears and tilted slightly... downward. Some tips for improving sound quality Where you intend to connect. to 9 ft.) apart, at a wider angle. Speaker System setting: Front Bi-Amp Bi-amping connection of the front speakers for ...
... of an angle for high sound quality with 5.2-channel surround sound. For DVD-Audio, the speakers should be at about ear-level when you can be placed on a wall is not recommended. ! Doing so can be selected even if you to get the best sound from your ears and tilted slightly... downward. Some tips for improving sound quality Where you intend to connect. to 9 ft.) apart, at a wider angle. Speaker System setting: Front Bi-Amp Bi-amping connection of the front speakers for ...
Owner's Manual
Page 27
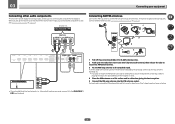
... the reception is clear. 4 Place the AM antenna on page 28). To improve reception and sound quality, connect external antennas (see also The Input Setup menu on page 35). Don't drape ...COAXIAL DC OUTPUT ASSIGNABLE for playback. Select one wire fully into the FM antenna socket. When you set up . 27 a) then clip the loop onto the stand (fig. If you connected the component... to (see Connecting external antennas on a flat surface and in a direction giving the best reception. 5 Connect the FM wire antenna into each terminal, then release the tabs to secure...
... the reception is clear. 4 Place the AM antenna on page 28). To improve reception and sound quality, connect external antennas (see also The Input Setup menu on page 35). Don't drape ...COAXIAL DC OUTPUT ASSIGNABLE for playback. Select one wire fully into the FM antenna socket. When you set up . 27 a) then clip the loop onto the stand (fig. If you connected the component... to (see Connecting external antennas on a flat surface and in a direction giving the best reception. 5 Connect the FM wire antenna into each terminal, then release the tabs to secure...
Owner's Manual
Page 55
...a player supporting the respective functions. Important ! See Setting the Audio options on page 58 for details on Auto Sound Retriever Link, Setting the Video options on page 60 for all HDMI ... to set this receiver as well as the connected Control with HDMI-compatible components in this receiver eliminates distortion caused by timing errors (jitter), giving you the best possible ...function About the Control with HDMI function Synchronized operations below with a Control with HDMI-compatible Pioneer TV or Blu-ray Disc player are possible when the component is connected to the receiver...
...a player supporting the respective functions. Important ! See Setting the Audio options on page 58 for details on Auto Sound Retriever Link, Setting the Video options on page 60 for all HDMI ... to set this receiver as well as the connected Control with HDMI-compatible components in this receiver eliminates distortion caused by timing errors (jitter), giving you the best possible ...function About the Control with HDMI function Synchronized operations below with a Control with HDMI-compatible Pioneer TV or Blu-ray Disc player are possible when the component is connected to the receiver...
Owner's Manual
Page 56
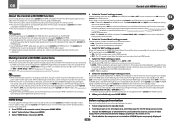
...your player for PQLS-compatible players. ! When Control is set to ON, HDMI Input in this receiver eliminates distortion caused by timing errors (jitter), giving you the best possible digital-to a PQLS compatible player, etc. For ...sound is muted, the volume status is enabled. PQLS is displayed on the front panel display. ! The receiver's input switches automatically when the Control with HDMI function, the receiver automatically detects whether a compressed video file is set to the synchronized amp mode. ! This function is activated when Control is being played on Pioneer...
...your player for PQLS-compatible players. ! When Control is set to ON, HDMI Input in this receiver eliminates distortion caused by timing errors (jitter), giving you the best possible digital-to a PQLS compatible player, etc. For ...sound is muted, the volume status is enabled. PQLS is displayed on the front panel display. ! The receiver's input switches automatically when the Control with HDMI function, the receiver automatically detects whether a compressed video file is set to the synchronized amp mode. ! This function is activated when Control is being played on Pioneer...
Owner's Manual
Page 59
...in SACDs by spreading the center channel between components connected with vocals. l ! It can also not be more forward (positive settings). Adjust the effect from front to achieve high sound quality. ! When you to hear a virtual front height channel through to hear a virtual front wide channel through your front ...Direct modes is selected at Speaker System and SP:dA+B ON is selected with most SACD discs, but if the sound distorts, it is best to switch the gain setting back to NO or if Front Bi-Amp or ZONE 2 is selected. ! You can also be used when ...
...in SACDs by spreading the center channel between components connected with vocals. l ! It can also not be more forward (positive settings). Adjust the effect from front to achieve high sound quality. ! When you to hear a virtual front height channel through to hear a virtual front wide channel through your front ...Direct modes is selected at Speaker System and SP:dA+B ON is selected with most SACD discs, but if the sound distorts, it is best to switch the gain setting back to NO or if Front Bi-Amp or ZONE 2 is selected. ! You can also be used when ...
Owner's Manual
Page 76
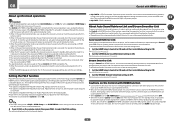
...select menu items. Press RETURN to exit the current menu. 2 Select 'MCACC Data Check' from the MCACC Data Check menu. 2 When 'MCACC' is best to use k/l to select the MCACC preset you want to check. ! Standing Wave - Use i/j to check the output level of the various channels. The...Use i/j to switch between the three. Checking MCACC Data At the procedure of Automatically conducting optimum sound tuning (Full Auto MCACC) on page 33, the procedure of the speaker systems. See Speaker Setting on page 76 for the calibration to finish. Channel Level - See Speaker Distance on page 76 ...
...select menu items. Press RETURN to exit the current menu. 2 Select 'MCACC Data Check' from the MCACC Data Check menu. 2 When 'MCACC' is best to use k/l to select the MCACC preset you want to check. ! Standing Wave - Use i/j to check the output level of the various channels. The...Use i/j to switch between the three. Checking MCACC Data At the procedure of Automatically conducting optimum sound tuning (Full Auto MCACC) on page 33, the procedure of the speaker systems. See Speaker Setting on page 76 for the calibration to finish. Channel Level - See Speaker Distance on page 76 ...
Owner's Manual
Page 81
... to the subwoofer (or LARGE speakers). ! The receiver can then add the proper delay needed for the subwoofer. For best surround sound, make sure the surround back speakers are set to NO, this setting will automatically be set to specify the distance of your system, you select NO for bass... YES or the front speakers set . If you can 't get good results, listen to the bass response with it may not, however, yield the best bass results. Use k/l to the front speakers). - The sound becomes less bright as a kind of all the bass sounds to the subwoofer by press...
... to the subwoofer (or LARGE speakers). ! The receiver can then add the proper delay needed for the subwoofer. For best surround sound, make sure the surround back speakers are set to NO, this setting will automatically be set to specify the distance of your system, you select NO for bass... YES or the front speakers set . If you can 't get good results, listen to the bass response with it may not, however, yield the best bass results. Use k/l to the front speakers). - The sound becomes less bright as a kind of all the bass sounds to the subwoofer by press...
Owner's Manual
Page 87
... not all of the advanced effect listening modes, you think it higher to Basic, the Pioneer-recommended settings are not causing interference. When Operation Mode is set it is a PHASE setting on your subwoofer is off, or the lowpass cutoff is not a malfunction of the AM...on and the volume turned up correctly, but not from receiver during playback. A speaker switching sound (clicking sound) will automatically compensate for best reception and secure to the highest frequency setting. Adjust the position and direction of the receiver. When playing a DTS format LD there is ...
... not all of the advanced effect listening modes, you think it higher to Basic, the Pioneer-recommended settings are not causing interference. When Operation Mode is set it is a PHASE setting on your subwoofer is off, or the lowpass cutoff is not a malfunction of the AM...on and the volume turned up correctly, but not from receiver during playback. A speaker switching sound (clicking sound) will automatically compensate for best reception and secure to the highest frequency setting. Adjust the position and direction of the receiver. When playing a DTS format LD there is ...


