
Owner's Manual
Page 4
...playback Playing a source...38 Playing an iPod...39 Playing a USB device...40 Listening to the radio...41 Bluetooth ADAPTER for buying this Pioneer product. Contents 01 Before you for Wireless Enjoyment of Music 42 06 Listening to your system Enjoying various types of playback using the ...the remote control button settings...67 Erasing all learnt settings that are in one input function 67 Direct function...68 About the ALL ZONE STBY (All Zone Standby) and DISCRETE ON (Discrete On) functions 68 Resetting the remote control settings...68 Controlling components...69 4 Thank you start ...
...playback Playing a source...38 Playing an iPod...39 Playing a USB device...40 Listening to the radio...41 Bluetooth ADAPTER for buying this Pioneer product. Contents 01 Before you for Wireless Enjoyment of Music 42 06 Listening to your system Enjoying various types of playback using the ...the remote control button settings...67 Erasing all learnt settings that are in one input function 67 Direct function...68 About the ALL ZONE STBY (All Zone Standby) and DISCRETE ON (Discrete On) functions 68 Resetting the remote control settings...68 Controlling components...69 4 Thank you start ...
Owner's Manual
Page 6
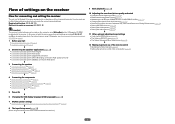
... height) ! 7.2 channel surround system (Front wide) ! 7.2 channel surround system & Speaker B connection ! 5.2 channel surround system & Front Bi-amping connection (High quality surround) ! 5.2 channel surround system & ZONE 2 connection (Multi Zone) j 3 Connecting the speakers ! Plugging in the box on page 8 ! Measuring the all EQ type (SYMMETRY/ALL CH ADJ/FRONT ALIGN) (page 72) ! Setting the...
... height) ! 7.2 channel surround system (Front wide) ! 7.2 channel surround system & Speaker B connection ! 5.2 channel surround system & Front Bi-amping connection (High quality surround) ! 5.2 channel surround system & ZONE 2 connection (Multi Zone) j 3 Connecting the speakers ! Plugging in the box on page 8 ! Measuring the all EQ type (SYMMETRY/ALL CH ADJ/FRONT ALIGN) (page 72) ! Setting the...
Owner's Manual
Page 11
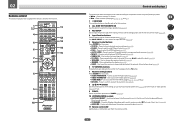
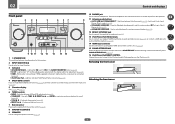
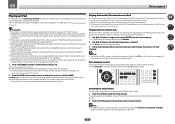
...switch between MCACC presets (page 46). ! 02 Remote control This section explains how to operate the remote control for this receiver. 2 ALL ZONE STBY DISCRETE ON Use this button to perform unique operations (page 68). 3 RCU SETUP Use to input the preset code when making remote ... TUNE +Favorite 1 2 3 AUDIO SIGNAL SEL CH LEVEL 4 5 6 DISP SPEAKERS DIMMER SLEEP 7 8 9 CH D.ACCESS CLASS / CLR 0 ENTER CH AUTO/ALC/ ZONE 2 DIRECT STANDARD ADV SURR Z2 LISTENING MODE 11 12 13 14 15 RECEIVER Controls and displays The remote has been conveniently color-coded according to...
...switch between MCACC presets (page 46). ! 02 Remote control This section explains how to operate the remote control for this receiver. 2 ALL ZONE STBY DISCRETE ON Use this button to perform unique operations (page 68). 3 RCU SETUP Use to input the preset code when making remote ... TUNE +Favorite 1 2 3 AUDIO SIGNAL SEL CH LEVEL 4 5 6 DISP SPEAKERS DIMMER SLEEP 7 8 9 CH D.ACCESS CLASS / CLR 0 ENTER CH AUTO/ALC/ ZONE 2 DIRECT STANDARD ADV SURR Z2 LISTENING MODE 11 12 13 14 15 RECEIVER Controls and displays The remote has been conveniently color-coded according to...
Owner's Manual
Page 12
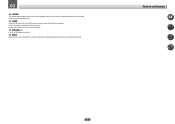
02 12 OPTION The preset codes of desired devices can be registered in the main zone. Use to select the white commands). Also use this button to perform operations in the remote control and button operations can be registered using the learning mode. 13 Switches the remote to control the receiver (used to set up surround sound. 14 VOLUME +/- Controls and displays 12 Switch to set the listening volume. 15 MUTE Mutes the sound or restores the sound if it has been muted (adjusting the volume also restores the sound).
02 12 OPTION The preset codes of desired devices can be registered in the main zone. Use to select the white commands). Also use this button to perform operations in the remote control and button operations can be registered using the learning mode. 13 Switches the remote to control the receiver (used to set up surround sound. 14 VOLUME +/- Controls and displays 12 Switch to set the listening volume. 15 MUTE Mutes the sound or restores the sound if it has been muted (adjusting the volume also restores the sound).

Owner's Manual
Page 13
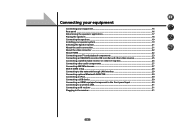
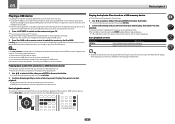
.../Pure Direct is being received in the corresponding format is set to indicate reducing the level of DTS-HD Master Audio signals. 4 MULTI-ZONE Lights when the MULTI-ZONE feature is active (page 62). 5 SOUND Lights when the DIALOG E (Dialog Enhancement) or TONE (tone controls) features is selected (page 58... AUTO SURROUND STREAM DIRECT 2PROLOGIC x Neo:6 ADV.SURROUND STANDARD SP AB SLEEP R 2DIGITAL PLUS DSD PCM TUNED SR 2TrueHD DTS HD ES 96/24 MULTI-ZONE PQLS ALC ATT STEREO S.RTRV SOUND UP MIX OVER MONO XR MSTR CD TUNER iPod DVD TV VIDEO BD DVR HDMI [ 2 ] USB [ 3 ] [ 4 ] ...
.../Pure Direct is being received in the corresponding format is set to indicate reducing the level of DTS-HD Master Audio signals. 4 MULTI-ZONE Lights when the MULTI-ZONE feature is active (page 62). 5 SOUND Lights when the DIALOG E (Dialog Enhancement) or TONE (tone controls) features is selected (page 58... AUTO SURROUND STREAM DIRECT 2PROLOGIC x Neo:6 ADV.SURROUND STANDARD SP AB SLEEP R 2DIGITAL PLUS DSD PCM TUNED SR 2TrueHD DTS HD ES 96/24 MULTI-ZONE PQLS ALC ATT STEREO S.RTRV SOUND UP MIX OVER MONO XR MSTR CD TUNER iPod DVD TV VIDEO BD DVR HDMI [ 2 ] USB [ 3 ] [ 4 ] ...
Owner's Manual
Page 14
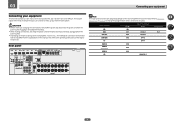
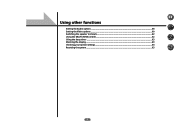
... See Display on for recall (page 41). ! When the headphones are connected, there is connected (page 30). 4 MULTI-ZONE controls If you've made MULTI-ZONE connections (page 28) use these controls to connect headphones. FL OFF - BAND - iPod iPhone iPad - Switches between AM ...remote control (page 8). 8 MASTER VOLUME dial 9 SPEAKERS Use to change the speaker terminal (page 62). 10 PHONES jack Use to control the sub zone from the speakers. 11 Listening mode buttons ! TUNER EDIT - Use with the display's dimmer adjustment (page 63). ! 02 Controls and displays Front ...
... See Display on for recall (page 41). ! When the headphones are connected, there is connected (page 30). 4 MULTI-ZONE controls If you've made MULTI-ZONE connections (page 28) use these controls to connect headphones. FL OFF - BAND - iPod iPhone iPad - Switches between AM ...remote control (page 8). 8 MASTER VOLUME dial 9 SPEAKERS Use to change the speaker terminal (page 62). 10 PHONES jack Use to control the sub zone from the speakers. 11 Listening mode buttons ! TUNER EDIT - Use with the display's dimmer adjustment (page 63). ! 02 Controls and displays Front ...
Owner's Manual
Page 15
... other video sources 25 Connecting a satellite/cable receiver or other set-top box 26 Connecting other audio components 27 Connecting AM/FM antennas...27 MULTI-ZONE setup...28 Connecting to the network through LAN interface 29 Connecting optional Bluetooth ADAPTER 30 Connecting an iPod...30 Connecting a USB device...30 Connecting an...
... other video sources 25 Connecting a satellite/cable receiver or other set-top box 26 Connecting other audio components 27 Connecting AM/FM antennas...27 MULTI-ZONE setup...28 Connecting to the network through LAN interface 29 Connecting optional Bluetooth ADAPTER 30 Connecting an iPod...30 Connecting a USB device...30 Connecting an...
Owner's Manual
Page 16
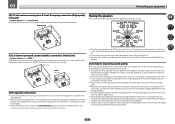
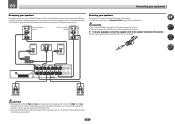
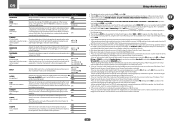
... LAN (DVD) (SAT/CBL) (DVR/BDR) VIDEO MONITOR OUT DVR/BDR DVD IN IN SAT/ CBL IN IN 1 (DVD) ASSIGNABLE Y PB PR COMPONENT VIDEO AUDIO L ZONE 2 OUT R DVR/BDR PRE OUT SUB WOOFER 1 ADAPTER PORT 2 (OUTPUT 5 V 0.1 A MAX) L IN ANTENNA A FRONT R L R AM LOOP L IN R DVD...FM UNBAL 75 (OUTPUT 5 V 0.6 A MAX) IN 1 IN 2 IN 1 IN 2 (TV) (DVR/BDR) (DVD) (SAT/CBL) CENTER SURROUND R L SURROUND BACK / ZONE 2 R L (Single) FRONT HEIGHT / WIDE / R L B SPEAKERS Note The input functions below are used. Before making connections, also keep the power cords of the devices being ...
... LAN (DVD) (SAT/CBL) (DVR/BDR) VIDEO MONITOR OUT DVR/BDR DVD IN IN SAT/ CBL IN IN 1 (DVD) ASSIGNABLE Y PB PR COMPONENT VIDEO AUDIO L ZONE 2 OUT R DVR/BDR PRE OUT SUB WOOFER 1 ADAPTER PORT 2 (OUTPUT 5 V 0.1 A MAX) L IN ANTENNA A FRONT R L R AM LOOP L IN R DVD...FM UNBAL 75 (OUTPUT 5 V 0.6 A MAX) IN 1 IN 2 IN 1 IN 2 (TV) (DVR/BDR) (DVD) (SAT/CBL) CENTER SURROUND R L SURROUND BACK / ZONE 2 R L (Single) FRONT HEIGHT / WIDE / R L B SPEAKERS Note The input functions below are used. Before making connections, also keep the power cords of the devices being ...

Owner's Manual
Page 17
... FWR SW 2 SW 1 C SR FWL SBR SL SBL This plan replaces the left and right front height speakers shown in the main zone when not using the B speakers. 17 Be sure to connect speakers to only connect one from the two subwoofers. If you have two ...subwoofers, the second subwoofer can simultaneously enjoy 5.2-channel surround sound in the main zone with stereo playback of the different channels. [C] 7.2 channel surround system & Speaker B connection ! The same connections also allow for 7.2-channel surround...
... FWR SW 2 SW 1 C SR FWL SBR SL SBL This plan replaces the left and right front height speakers shown in the main zone when not using the B speakers. 17 Be sure to connect speakers to only connect one from the two subwoofers. If you have two ...subwoofers, the second subwoofer can simultaneously enjoy 5.2-channel surround sound in the main zone with stereo playback of the different channels. [C] 7.2 channel surround system & Speaker B connection ! The same connections also allow for 7.2-channel surround...
Owner's Manual
Page 18
...can be sure to 90 cm (2 ft. 03 Connecting your speakers in the room has a big effect on another component in the main zone with 5.2-channel surround sound. After connecting, be selected even if you . ! The following guidelines should be damaged.) ! If you're going...should help you . ! Speaker System setting: Front Bi-Amp Bi-amping connection of the front speakers for home theater playback. ! Speaker System setting: ZONE 2 With these connections you , (1) use the surround back speaker, and, (2) don't use shielded speakers or place the speakers at a sufficient ...
...can be sure to 90 cm (2 ft. 03 Connecting your speakers in the room has a big effect on another component in the main zone with 5.2-channel surround sound. After connecting, be selected even if you . ! The following guidelines should be damaged.) ! If you're going...should help you . ! Speaker System setting: Front Bi-Amp Bi-amping connection of the front speakers for home theater playback. ! Speaker System setting: ZONE 2 With these connections you , (1) use the surround back speaker, and, (2) don't use shielded speakers or place the speakers at a sufficient ...

Owner's Manual
Page 19
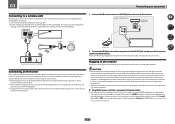
... (-) terminal. CAUTION ! To prevent the risk of the bare speaker wire touches the back panel it must be used for ZONE 2. 5.2 ch surround setting Not connected Not connected 6.2 ch surround setting Not connected Surround back 7.2 ch surround setting Surround back... right Surround back left LINE LEVEL INPUT LINE LEVEL INPUT PRE OUT SUB WOOFER 1 2 A FRONT R L CENTER SURROUND R L SURROUND BACK / ZONE 2 R L (Single) FRONT HEIGHT / WIDE / R L B Note ! Make sure that your equipment Connecting the speakers Each speaker connection on the speakers...
... (-) terminal. CAUTION ! To prevent the risk of the bare speaker wire touches the back panel it must be used for ZONE 2. 5.2 ch surround setting Not connected Not connected 6.2 ch surround setting Not connected Surround back 7.2 ch surround setting Surround back... right Surround back left LINE LEVEL INPUT LINE LEVEL INPUT PRE OUT SUB WOOFER 1 2 A FRONT R L CENTER SURROUND R L SURROUND BACK / ZONE 2 R L (Single) FRONT HEIGHT / WIDE / R L B Note ! Make sure that your equipment Connecting the speakers Each speaker connection on the speakers...
Owner's Manual
Page 20
.... Subwoofer 1 LINE LEVEL INPUT Center Subwoofer 2 LINE LEVEL INPUT PRE OUT SUB WOOFER 1 2 A FRONT R L CENTER SURROUND R L SURROUND BACK / ZONE 2 R L (Single) FRONT HEIGHT / WIDE / R L B PRE OUT SUB WOOFER 1 2 A FRONT R L CENTER SURROUND R L SURROUND BACK / ZONE 2 R L (Single) FRONT HEIGHT / WIDE / R L B SPEAKERS Surround right Surround left High Low Low Bi-wiring your speakers have two metal...
.... Subwoofer 1 LINE LEVEL INPUT Center Subwoofer 2 LINE LEVEL INPUT PRE OUT SUB WOOFER 1 2 A FRONT R L CENTER SURROUND R L SURROUND BACK / ZONE 2 R L (Single) FRONT HEIGHT / WIDE / R L B PRE OUT SUB WOOFER 1 2 A FRONT R L CENTER SURROUND R L SURROUND BACK / ZONE 2 R L (Single) FRONT HEIGHT / WIDE / R L B SPEAKERS Surround right Surround left High Low Low Bi-wiring your speakers have two metal...
Owner's Manual
Page 21
...System menu. Also, the surround back terminals can simultaneously enjoy 5.1-channel surround sound in addition to for bi-amping and ZONE 2 connections, in the main zone with 5.1-channel surround sound. 1 Connect bi-amp compatible speakers to stereo playback in high quality over a single cable....and audio signals can listen to the front and surround back speaker terminals. Speaker B setup You can be transferred in another component in ZONE 2. 1 Connect a pair of speakers to the front height speaker terminals. Front height setup *Default setting 1 Connect a pair of speakers...
...System menu. Also, the surround back terminals can simultaneously enjoy 5.1-channel surround sound in addition to for bi-amping and ZONE 2 connections, in the main zone with 5.1-channel surround sound. 1 Connect bi-amp compatible speakers to stereo playback in high quality over a single cable....and audio signals can listen to the front and surround back speaker terminals. Speaker B setup You can be transferred in another component in ZONE 2. 1 Connect a pair of speakers to the front height speaker terminals. Front height setup *Default setting 1 Connect a pair of speakers...
Owner's Manual
Page 28
... in separate rooms after you are not using the speaker terminals for the sub zone (ZONE 2). to 20 ft.) FM UNBAL 75 MULTI-ZONE setup This receiver can be selected.) Basic MULTI-ZONE setup (ZONE 2) % Connect a separate amplifier to 6 m (16 ft. You will ... have the speakers for the sub zone (For detail, see MULTI-ZONE setup using speaker terminals (ZONE 2) on ) and the sub zone can be used. MULTI-ZONE listening options The following illustration. ZONE connections. Sub zone (ZONE 2) Main zone AUDIO IN RL AUDIO L ZONE 2 OUT R AUDIO L ZONE 2 OUT R 28 ANTENNA AM...
... in separate rooms after you are not using the speaker terminals for the sub zone (ZONE 2). to 20 ft.) FM UNBAL 75 MULTI-ZONE setup This receiver can be selected.) Basic MULTI-ZONE setup (ZONE 2) % Connect a separate amplifier to 6 m (16 ft. You will ... have the speakers for the sub zone (For detail, see MULTI-ZONE setup using speaker terminals (ZONE 2) on ) and the sub zone can be used. MULTI-ZONE listening options The following illustration. ZONE connections. Sub zone (ZONE 2) Main zone AUDIO IN RL AUDIO L ZONE 2 OUT R AUDIO L ZONE 2 OUT R 28 ANTENNA AM...

Owner's Manual
Page 29
... Connecting to the network through LAN interface By connecting this setup. % Connect a pair of your router. LAN terminal specifications ! When using speaker terminals (ZONE 2) You must sign a contract with a straight LAN cable (CAT 5 or higher). You should have the built-in DHCP server function, it is ...Note ! In case your router does not have a pair of the equipment you have as shown below. 03 Connecting your equipment MULTI-ZONE setup using a broadband Internet connection, a contract with an Internet service provider is necessary to set up the network manually. LAN (...
... Connecting to the network through LAN interface By connecting this setup. % Connect a pair of your router. LAN terminal specifications ! When using speaker terminals (ZONE 2) You must sign a contract with a straight LAN cable (CAT 5 or higher). You should have the built-in DHCP server function, it is ...Note ! In case your router does not have a pair of the equipment you have as shown below. 03 Connecting your equipment MULTI-ZONE setup using a broadband Internet connection, a contract with an Internet service provider is necessary to set up the network manually. LAN (...
Owner's Manual
Page 31
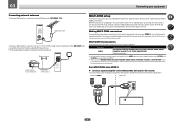
... they are not likely to be disconnected by removing the mains plug from a strong fluorescent lamp is shining on the rear of another zone, you find it with other manufacturers may not be possible if direct light from the wall socket when not in regular use, e.g., ... network is connected to an AC outlet, a 2 second to 10 second HDMI initialization process begins. After this process. Note that came with your nearest Pioneer authorized independent service company for WIRELESS LAN (OUTPUT 5 V 0.6 A MAX) Router Modem Internet WAN 1 Connect the IR receiver sensor to the IR IN...
... they are not likely to be disconnected by removing the mains plug from a strong fluorescent lamp is shining on the rear of another zone, you find it with other manufacturers may not be possible if direct light from the wall socket when not in regular use, e.g., ... network is connected to an AC outlet, a 2 second to 10 second HDMI initialization process begins. After this process. Note that came with your nearest Pioneer authorized independent service company for WIRELESS LAN (OUTPUT 5 V 0.6 A MAX) Router Modem Internet WAN 1 Connect the IR receiver sensor to the IR IN...
Owner's Manual
Page 39
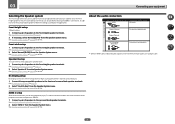
..., album name, song name, genre or composer, similar to using the controls of your iPod, you can be used for basic playback of Pioneer (http://pioneer.jp/homeav/support/ios/na/). ! Change the receiver's input to the iPod in a particular category by pressing the iPod iPhone iPad DIRECT CONTROL... Switching the iPod controls You can take advantage of the GUI screen of recorded material resulting from the iPod. ! Loading appears in the main zone. 1 Press u RECEIVER to browse that will be controlled using the TV screen. Finding what you 're ready to the iPod/USB operation ...
..., album name, song name, genre or composer, similar to using the controls of your iPod, you can be used for basic playback of Pioneer (http://pioneer.jp/homeav/support/ios/na/). ! Change the receiver's input to the iPod in a particular category by pressing the iPod iPhone iPad DIRECT CONTROL... Switching the iPod controls You can take advantage of the GUI screen of recorded material resulting from the iPod. ! Loading appears in the main zone. 1 Press u RECEIVER to browse that will be controlled using the TV screen. Finding what you 're ready to the iPod/USB operation ...
Owner's Manual
Page 40
.... Press iPod USB to switch the remote control to the previous menu. It includes the case of data that you want to browse that folder. ! Pioneer cannot guarantee compatibility (operation and/or bus power) with the device) for USB power. Make sure the receiver is 9. ! Loading appears in Step 2 (below : ! Try... and completion of format FAT16/32. If the slideshow is likely your TV. Basic playback controls Button(s) ENTER, d g What it is left in the sub zone. 1 Use i/j to select a folder, then press ENTER to start playback. !
.... Press iPod USB to switch the remote control to the previous menu. It includes the case of data that you want to browse that folder. ! Pioneer cannot guarantee compatibility (operation and/or bus power) with the device) for USB power. Make sure the receiver is 9. ! Loading appears in Step 2 (below : ! Try... and completion of format FAT16/32. If the slideshow is likely your TV. Basic playback controls Button(s) ENTER, d g What it is left in the sub zone. 1 Use i/j to select a folder, then press ENTER to start playback. !
Owner's Manual
Page 57
Using other functions Setting the Audio options...58 Setting the Video options...60 Switching the speaker terminals 62 Using the MULTI-ZONE controls...62 Using the sleep timer...63 Dimming the display...63 Checking your system settings...63 Resetting the system...63 57
Using other functions Setting the Audio options...58 Setting the Video options...60 Switching the speaker terminals 62 Using the MULTI-ZONE controls...62 Using the sleep timer...63 Dimming the display...63 Checking your system settings...63 Resetting the system...63 57
Owner's Manual
Page 59
... use the Virtual Height mode if the surround speakers are on and the FH setting is set to NO or if Front Bi-Amp or ZONE 2 is selected at Speaker System and SP:dA+B ON is effective for the currently selected Advanced Surround or ALC mode (each mode can only use...
... use the Virtual Height mode if the surround speakers are on and the FH setting is set to NO or if Front Bi-Amp or ZONE 2 is selected at Speaker System and SP:dA+B ON is effective for the currently selected Advanced Surround or ALC mode (each mode can only use...


