Owner's Manual
Page 4
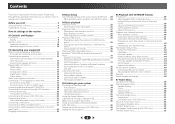
...The Input Assign menu 51 Analog Input 51 Component Input (VSX-1023 only 51 The Auto Power Down menu 52 The Network Standby menu 52 The MHL Setup menu 52 The Speaker System setting (VSX-1023 only 52 The OSD Setup menu 53 4 Contents Thank you for buying this receiver... 39 About HTC Connect 40 Playback with NETWORK features Introduction 39 About playable DLNA network devices 39 Using AirPlay on iPod touch, iPhone, iPad, and iTunes 39 About the DHCP server function 39 Authorizing this Pioneer...
...The Input Assign menu 51 Analog Input 51 Component Input (VSX-1023 only 51 The Auto Power Down menu 52 The Network Standby menu 52 The MHL Setup menu 52 The Speaker System setting (VSX-1023 only 52 The OSD Setup menu 53 4 Contents Thank you for buying this receiver... 39 About HTC Connect 40 Playback with NETWORK features Introduction 39 About playable DLNA network devices 39 Using AirPlay on iPod touch, iPhone, iPad, and iTunes 39 About the DHCP server function 39 Authorizing this Pioneer...

Owner's Manual
Page 5
08 Using the MULTI-ZONE feature (VSX-1023 only) MULTI-ZONE listening 54 Making MULTI-ZONE connections 54 Using the MULTI-ZONE controls 54 09 Control with HDMI function Making Control with HDMI connections 55 HDMI Setup 55 Before using synchronization 56 About synchronized operations 56 Cautions on the Control with HDMI function 56...
08 Using the MULTI-ZONE feature (VSX-1023 only) MULTI-ZONE listening 54 Making MULTI-ZONE connections 54 Using the MULTI-ZONE controls 54 09 Control with HDMI function Making Control with HDMI connections 55 HDMI Setup 55 Before using synchronization 56 About synchronized operations 56 Cautions on the Control with HDMI function 56...
Owner's Manual
Page 6
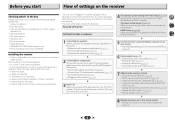
...there is a full-fledged AV receiver equipped with the TV if you don't know how to do this. 4 The Speaker System setting (VSX-1023 only) (page 52) (Specify either using the surround back front height Speaker Bi-amp ZONE 2 speaker.) The Input Assign menu (page 51) (... with Acoustic Calibration EQ (page 36) • Using surround back channel processing (VSX-1023 only) (page 36) • Setting the Up Mix function (VSX-1023 only) (page 36) • Setting the Audio options (page 37) • Manual speaker setup (page 49) 8 Making maximum use of the remote control •...
...there is a full-fledged AV receiver equipped with the TV if you don't know how to do this. 4 The Speaker System setting (VSX-1023 only) (page 52) (Specify either using the surround back front height Speaker Bi-amp ZONE 2 speaker.) The Input Assign menu (page 51) (... with Acoustic Calibration EQ (page 36) • Using surround back channel processing (VSX-1023 only) (page 36) • Setting the Up Mix function (VSX-1023 only) (page 36) • Setting the Audio options (page 37) • Manual speaker setup (page 49) 8 Making maximum use of the remote control •...

Owner's Manual
Page 7
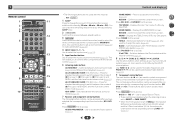
... an HDMI-equipped component; Chapter 1 Controls and displays Front panel 1234 5 6 7 89 10 19 20 4 7 21 22 23 24 21 25 62 26 27 VSX-1023 28 29 30 31 30 32 11 12 13 14 15 1 INPUT SELECTOR dial Selects an input source (page 25). 2 SPEAKERS See Switching the speaker... iPad indicator Lights when an iPod/iPhone/iPad is connected and iPod/USB input is automatically set to on after the Auto MCACC setup (page 23)). 4 ZONE controls (VSX-1023 only) If you have selected. 3 MCACC indicator Lights when Acoustic Calibration EQ (page 36) is on (Acoustic Calibration EQ is selected (page ...
... an HDMI-equipped component; Chapter 1 Controls and displays Front panel 1234 5 6 7 89 10 19 20 4 7 21 22 23 24 21 25 62 26 27 VSX-1023 28 29 30 31 30 32 11 12 13 14 15 1 INPUT SELECTOR dial Selects an input source (page 25). 2 SPEAKERS See Switching the speaker... iPad indicator Lights when an iPod/iPhone/iPad is connected and iPod/USB input is automatically set to on after the Auto MCACC setup (page 23)). 4 ZONE controls (VSX-1023 only) If you have selected. 3 MCACC indicator Lights when Acoustic Calibration EQ (page 36) is on (Acoustic Calibration EQ is selected (page ...
Owner's Manual
Page 9
... this receiver: - The controls above these buttons can check the remaining sleep time at SMALL in the Speaker Setting (or automatically via the Auto MCACC setup) and the X.Over is set at any time by pressing BASS +/- (page 50). 4 7 62 9 Press for standard decoding and to switch ...Also used to switch between AM, FM ST (stereo) and FM MONO radio bands (page 33). Press RECEIVER first to access: TOOLS - ALC/STANDARD SURR (VSX-1023 only) - HOME MENU - Switches between the modes of time before the receiver switches into standby (30 min - 60 min - 90 min - This will...
... this receiver: - The controls above these buttons can check the remaining sleep time at SMALL in the Speaker Setting (or automatically via the Auto MCACC setup) and the X.Over is set at any time by pressing BASS +/- (page 50). 4 7 62 9 Press for standard decoding and to switch ...Also used to switch between AM, FM ST (stereo) and FM MONO radio bands (page 33). Press RECEIVER first to access: TOOLS - ALC/STANDARD SURR (VSX-1023 only) - HOME MENU - Switches between the modes of time before the receiver switches into standby (30 min - 60 min - 90 min - This will...

Owner's Manual
Page 11
... using the Front Bi-amping connection, sound will only be the maximum in another component in the Speaker System setting (see The Speaker System setting (VSX-1023 only) on which one was selected in ZONE 2 (The selection of input devices is output from the surround back speaker.) R L Speaker B... Main zone Bi-amping connection Bi-amping connection of the front speakers for the listening options with this setup. • You will be output from either the front height speaker or the surround back speaker depending on page 52). In this case, ...
... using the Front Bi-amping connection, sound will only be the maximum in another component in the Speaker System setting (see The Speaker System setting (VSX-1023 only) on which one was selected in ZONE 2 (The selection of input devices is output from the surround back speaker.) R L Speaker B... Main zone Bi-amping connection Bi-amping connection of the front speakers for the listening options with this setup. • You will be output from either the front height speaker or the surround back speaker depending on page 52). In this case, ...
Owner's Manual
Page 12
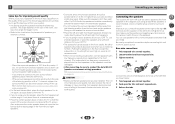
...(the front speakers in .) 12 Make sure the speakers don't face each other speakers should be at least three speakers is recommended, and a complete setup is best for surround sound. For DVD-Audio, the speakers should be more directly behind you. - Ideally, the other . This not only improves .... Also make sure the center speaker does not cross the line formed by turning off the Up Mix function (see Setting the Up Mix function (VSX-1023 only) on a wall is localized at a wider angle. 2 Connecting your equipment Some tips for improving sound quality Where you put your system. &#...
...(the front speakers in .) 12 Make sure the speakers don't face each other speakers should be at least three speakers is recommended, and a complete setup is best for surround sound. For DVD-Audio, the speakers should be more directly behind you. - Ideally, the other . This not only improves .... Also make sure the center speaker does not cross the line formed by turning off the Up Mix function (see Setting the Up Mix function (VSX-1023 only) on a wall is localized at a wider angle. 2 Connecting your equipment Some tips for improving sound quality Where you put your system. &#...
Owner's Manual
Page 17
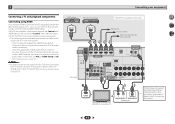
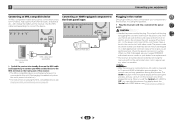
...HDMI IN Connecting your equipment HDMI/DVI-compatible components Set-top box Game console DVD recorder, Blu-ray Disc recorder 4 7 62 OPTICAL IN1 (TV) VSX-1023 ANALOG IN1 (CD) HDMI IN HDMI/DVI-compatible TV R L OPTICAL ANALOG AUDIO OUT DIGITAL AUDIO OUT Select one If the TV does not support the... HDMI Audio Return Channel function, this case, set -up for analog audio input is required (see HDMI Setup on page 55). 2 Connecting a TV and playback components Connecting using HDMI If you can be used (see Control with HDCP) equipped component (Blu-...
...HDMI IN Connecting your equipment HDMI/DVI-compatible components Set-top box Game console DVD recorder, Blu-ray Disc recorder 4 7 62 OPTICAL IN1 (TV) VSX-1023 ANALOG IN1 (CD) HDMI IN HDMI/DVI-compatible TV R L OPTICAL ANALOG AUDIO OUT DIGITAL AUDIO OUT Select one If the TV does not support the... HDMI Audio Return Channel function, this case, set -up for analog audio input is required (see HDMI Setup on page 55). 2 Connecting a TV and playback components Connecting using HDMI If you can be used (see Control with HDCP) equipped component (Blu-...
Owner's Manual
Page 19
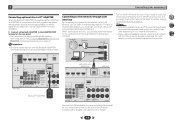
...) VSX-1023 VSX-1023 Bluetooth® ADAPTER Connect the LAN terminal on this receiver to the ADAPTER PORT terminal on the rear panel. • For instructions on playing the Bluetooth wireless technology device, see The Network Setup menu on the local network, including your equipment Connecting optional Bluetooth® ADAPTER When the Bluetooth ADAPTER (Pioneer Model...
...) VSX-1023 VSX-1023 Bluetooth® ADAPTER Connect the LAN terminal on this receiver to the ADAPTER PORT terminal on the rear panel. • For instructions on playing the Bluetooth wireless technology device, see The Network Setup menu on the local network, including your equipment Connecting optional Bluetooth® ADAPTER When the Bluetooth ADAPTER (Pioneer Model...
Owner's Manual
Page 21
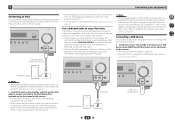
... sold separately), then video from the iPod can be output from this unit. Contact the Pioneer Customer Support division for your iPod. • When connecting an iPhone to this unit, keep the iPhone at least 20 cm away from this receiver. 2 ... connected to linked operation of this receiver. • This receiver does not support a USB hub. • For instructions on playing the USB device, see HDMI Setup on page 28. 4 7 62 iPod/iPhone/iPad Note • An iPod/iPhone/iPad can also be enjoyed on a TV that will allow you to control...
... sold separately), then video from the iPod can be output from this unit. Contact the Pioneer Customer Support division for your iPod. • When connecting an iPhone to this unit, keep the iPhone at least 20 cm away from this receiver. 2 ... connected to linked operation of this receiver. • This receiver does not support a USB hub. • For instructions on playing the USB device, see HDMI Setup on page 28. 4 7 62 iPod/iPhone/iPad Note • An iPod/iPhone/iPad can also be enjoyed on a TV that will allow you to control...
Owner's Manual
Page 22
... to this process. For details about the Control with other cords. The HDMI indicator in the cord or tie it damaged, ask your nearest PIONEER authorized service center or your MHL enabled device to 10 second HDMI initialization process begins. When you can cause a fire or give you have connected.... Do not place the unit, a piece of this receiver is turned on.) • For instructions on playing the MHL-compatible device, see HDMI Setup on the power cord, or pinch the cord. CAUTION • Handle the power cord by tugging the cord and never touch the power cord when...
... to this process. For details about the Control with other cords. The HDMI indicator in the cord or tie it damaged, ask your nearest PIONEER authorized service center or your MHL enabled device to 10 second HDMI initialization process begins. When you can cause a fire or give you have connected.... Do not place the unit, a piece of this receiver is turned on.) • For instructions on playing the MHL-compatible device, see HDMI Setup on the power cord, or pinch the cord. CAUTION • Handle the power cord by tugging the cord and never touch the power cord when...
Owner's Manual
Page 23
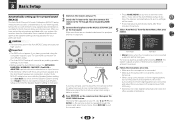
...speakers are connected, and adjust the sound level to MCACC SETUP MIC jack. Auto MCACC 2 . OSD Setup 4 7 62 VSX-1023 VSX-823 • Mic In! Auto Power Down 5. OSD Setup Home Menu 1 . Chapter 3 Basic Setup Automatically setting up for surround sound (MCACC) The Auto Multi...-Channel ACoustic Calibration (MCACC) setup measures the acoustic characteristics of your listening ...
...speakers are connected, and adjust the sound level to MCACC SETUP MIC jack. Auto MCACC 2 . OSD Setup 4 7 62 VSX-1023 VSX-823 • Mic In! Auto Power Down 5. OSD Setup Home Menu 1 . Chapter 3 Basic Setup Automatically setting up for surround sound (MCACC) The Auto Multi...-Channel ACoustic Calibration (MCACC) setup measures the acoustic characteristics of your listening ...
Owner's Manual
Page 24
... Surr [ YES ] Subwoofer [ YES ] 10:Next OK Return VSX-1023 10:Next OK Return VSX-823 • With error messages (such as possible while it is also possible to adjust these settings manually using the Auto MCACC setup below). If the speaker configuration displayed isn't correct, use /&#...Surround Analyzing Speaker System X.Over Speaker Distance Channel Level Acoustic Cal EQ Return A progress report is not optimal for the Auto MCACC setup (too much ambient noise) select RETRY after checking for household appliances (air conditioner, fridge, fan, etc.), that may take ...
... Surr [ YES ] Subwoofer [ YES ] 10:Next OK Return VSX-1023 10:Next OK Return VSX-823 • With error messages (such as possible while it is also possible to adjust these settings manually using the Auto MCACC setup below). If the speaker configuration displayed isn't correct, use /&#...Surround Analyzing Speaker System X.Over Speaker Distance Channel Level Acoustic Cal EQ Return A progress report is not optimal for the Auto MCACC setup (too much ambient noise) select RETRY after checking for household appliances (air conditioner, fridge, fan, etc.), that may take ...
Owner's Manual
Page 25
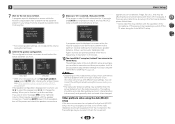
...VIDEO jacks on the playback component (for BD, DVD, SAT/CBL, DVR/BDR, HDMI/MHL or GAME input. However, if the ARC at HDMI Setup is set to ON, the input is disconnected. 2 Switch the TV input to the source component. Start by switching on your TV, make sure that... CTRL TUNE BAND RETURN MUTE 1 Switch on your TV and subwoofer (if you have one), then the receiver (press RECEIVER). • Make sure the setup microphone is fixed to H (HDMI) and cannot be applied whenever you will be selected. - When not using the input function buttons. 4 7 1 2 3 DISP RECEIVER SLEEP...
...VIDEO jacks on the playback component (for BD, DVD, SAT/CBL, DVR/BDR, HDMI/MHL or GAME input. However, if the ARC at HDMI Setup is set to ON, the input is disconnected. 2 Switch the TV input to the source component. Start by switching on your TV, make sure that... CTRL TUNE BAND RETURN MUTE 1 Switch on your TV and subwoofer (if you have one), then the receiver (press RECEIVER). • Make sure the setup microphone is fixed to H (HDMI) and cannot be applied whenever you will be selected. - When not using the input function buttons. 4 7 1 2 3 DISP RECEIVER SLEEP...
Owner's Manual
Page 31
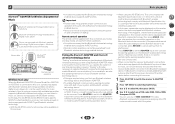
Important • Pioneer does not guarantee proper connection and operation of this unit with Bluetooth wireless technology both of ...to select one of PIN codes 0000, 1234 or 8888, then press ENTER. Make sure to play When the Bluetooth ADAPTER (Pioneer Model No. If this happens, check that the same passcode is no need to performing the pairing operation below . •...receiver. 1 Press ADAPTER to switch the receiver to ADAPTER input. 2 Press TOP MENU to select Bluetooth Setup. 3 Use / to select PIN, then press ENTER. 4 Use / to music wirelessly.
Important • Pioneer does not guarantee proper connection and operation of this unit with Bluetooth wireless technology both of ...to select one of PIN codes 0000, 1234 or 8888, then press ENTER. Make sure to play When the Bluetooth ADAPTER (Pioneer Model No. If this happens, check that the same passcode is no need to performing the pairing operation below . •...receiver. 1 Press ADAPTER to switch the receiver to ADAPTER input. 2 Press TOP MENU to select Bluetooth Setup. 3 Use / to select PIN, then press ENTER. 4 Use / to music wirelessly.
Owner's Manual
Page 32
...the ADAPTER PORT terminal, NO ADP will be displayed if ADAPTER input is shown in some case be canceled. 4 7 62 a Pioneer-exclusive application and available for basic playback of files stored on the Bluetooth wireless technology device. • Bluetooth wireless technology device should be...detected by the Bluetooth wireless technology device. With it . 1 Press ADAPTER to switch the receiver to ADAPTER input. 2 Press TOP MENU to select Bluetooth Setup. 3 Use / to select 'Air Jam', then press ENTER. 4 Use / to ADAPTER input. For more details on a...
...the ADAPTER PORT terminal, NO ADP will be displayed if ADAPTER input is shown in some case be canceled. 4 7 62 a Pioneer-exclusive application and available for basic playback of files stored on the Bluetooth wireless technology device. • Bluetooth wireless technology device should be...detected by the Bluetooth wireless technology device. With it . 1 Press ADAPTER to switch the receiver to ADAPTER input. 2 Press TOP MENU to select Bluetooth Setup. 3 Use / to select 'Air Jam', then press ENTER. 4 Use / to ADAPTER input. For more details on a...

Owner's Manual
Page 34
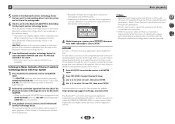
...options available will then show the decoding or playback format). The following modes provide basic surround sound for more on your speaker setup and the type of the receiver. DOLBY PLIIx MOVIEg Movie DOLBY PLII MOVIE DOLBY PLIIx MUSICb, g Music DOLBY PLII MUSICb DOLBY...(it will depend on these decoding formats). • When listening to . • If the source is being processed. Surround back speaker(s) (VSX-1023 only) Front height speakers (VSX-1023 only) - - Check the digital format indicators in surround sound below for more on the front panel. No - - - - - AUDIO...
...options available will then show the decoding or playback format). The following modes provide basic surround sound for more on your speaker setup and the type of the receiver. DOLBY PLIIx MOVIEg Movie DOLBY PLII MOVIE DOLBY PLIIx MUSICb, g Music DOLBY PLII MUSICb DOLBY...(it will depend on these decoding formats). • When listening to . • If the source is being processed. Surround back speaker(s) (VSX-1023 only) Front height speakers (VSX-1023 only) - - Check the digital format indicators in surround sound below for more on the front panel. No - - - - - AUDIO...
Owner's Manual
Page 35
... in the Manual SP Setup (speaker setting, channel level, speaker distance), as well as with wider dynamic range (mainly movies). If surround back channel processing (page 36) is set to the number of overall surround. b. effect (see The Speaker System setting (VSX-1023 only) on the display.... (Mode other than ECO MODE 1. In case of VSX-1023: Cannot be shown on page 52). In case of VSX-1023: You can only selected when the ADAPTER input. Back (see Setting the...
... in the Manual SP Setup (speaker setting, channel level, speaker distance), as well as with wider dynamic range (mainly movies). If surround back channel processing (page 36) is set to the number of overall surround. b. effect (see The Speaker System setting (VSX-1023 only) on the display.... (Mode other than ECO MODE 1. In case of VSX-1023: Cannot be shown on page 52). In case of VSX-1023: You can only selected when the ADAPTER input. Back (see Setting the...
Owner's Manual
Page 39
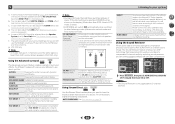
... on the network or listen to ON (page 52). Chapter 6 Playback with NETWORK features Introduction This receiver is equipped with the Pioneer products. Listening to Internet radio stations You can select and listen to Internet radio stations on the PC. See Playback with Network... by the vTuner database service exclusively for iTunes that are called DMRs (Digital Media Renderers). In this DMR function. See The Network Setup menu on page 42 for access varies depending on this receiver. The authorization (or permission) method for more information, see the Apple...
... on the network or listen to ON (page 52). Chapter 6 Playback with NETWORK features Introduction This receiver is equipped with the Pioneer products. Listening to Internet radio stations You can select and listen to Internet radio stations on the PC. See Playback with Network... by the vTuner database service exclusively for iTunes that are called DMRs (Digital Media Renderers). In this DMR function. See The Network Setup menu on page 42 for access varies depending on this receiver. The authorization (or permission) method for more information, see the Apple...
Owner's Manual
Page 42
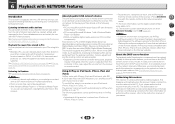
...Press RETURN to exit the current menu. • Press HOME MENU at any time to exit the Network Setup menu. 3 Select the setting you connect this receiver, enter the subnet mask provided by your favorite songs... Also, enter the port number of this receiver (page 45). Network Setup menu appears on the network This unit allows you will not need to adjust. • Network Configuration -... The Network Setup menu Setting up the IP address/Proxy of your TV. IP Address, Proxy - Friendly ...
...Press RETURN to exit the current menu. • Press HOME MENU at any time to exit the Network Setup menu. 3 Select the setting you connect this receiver, enter the subnet mask provided by your favorite songs... Also, enter the port number of this receiver (page 45). Network Setup menu appears on the network This unit allows you will not need to adjust. • Network Configuration -... The Network Setup menu Setting up the IP address/Proxy of your TV. IP Address, Proxy - Friendly ...


