
Owner's Manual
Page 4
...AVNavigator (included CD-ROM 6 02 Controls and displays Remote control 8 Display 9 Front panel 10 03 Connecting your equipment Connecting your equipment 11 Rear panel 11 Determining the speakers' application....... 11 Placing the speakers 12 Connecting the speakers 13...Connecting optional Bluetooth ADAPTER 21 Connecting an iPod 21 Connecting a USB device 21 Connecting to the front panel video terminal 21 Connecting to a wireless LAN 22 Connecting an IR receiver 22 Operating other functions Setting... on the Control with HDMI function 45 09 Using other Pioneer components with this...
...AVNavigator (included CD-ROM 6 02 Controls and displays Remote control 8 Display 9 Front panel 10 03 Connecting your equipment Connecting your equipment 11 Rear panel 11 Determining the speakers' application....... 11 Placing the speakers 12 Connecting the speakers 13...Connecting optional Bluetooth ADAPTER 21 Connecting an iPod 21 Connecting a USB device 21 Connecting to the front panel video terminal 21 Connecting to a wireless LAN 22 Connecting an IR receiver 22 Operating other functions Setting... on the Control with HDMI function 45 09 Using other Pioneer components with this...
Owner's Manual
Page 11
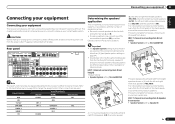
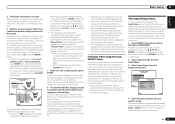
... to build various surround systems, in [A] with the left and right front height speakers shown in accordance with many connection possibilities, but it doesn't have . ! Rear panel HDMI IN 1 ASSIGNABLE 1 VIDEO 1 IN BD IN DVD IN DVR/BDR IN OUT DC OUTPUT for WIRELESS LAN LAN (10/100) COAXIAL ASSIGNABLE IN 1 IN...
... to build various surround systems, in [A] with the left and right front height speakers shown in accordance with many connection possibilities, but it doesn't have . ! Rear panel HDMI IN 1 ASSIGNABLE 1 VIDEO 1 IN BD IN DVD IN DVR/BDR IN OUT DC OUTPUT for WIRELESS LAN LAN (10/100) COAXIAL ASSIGNABLE IN 1 IN...
Owner's Manual
Page 21
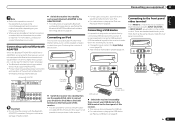
...as the connectedequipment and connection method may differ depending on the front panel of this receiver. Hook them up the same way you made the rear panel connections. When using the controls of this receiver. For more details..., contact your equipment 03 Note ! Doing so could cause damage or faulty contact. % Switch the receiver into standby and connect Bluetooth ADAPTER to radio station presets (page 31). The Bluetooth wireless technology enabled device must support A2DP profiles. ! Pioneer...
...as the connectedequipment and connection method may differ depending on the front panel of this receiver. Hook them up the same way you made the rear panel connections. When using the controls of this receiver. For more details..., contact your equipment 03 Note ! Doing so could cause damage or faulty contact. % Switch the receiver into standby and connect Bluetooth ADAPTER to radio station presets (page 31). The Bluetooth wireless technology enabled device must support A2DP profiles. ! Pioneer...
Owner's Manual
Page 22
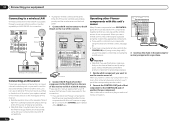
...IMPEDANCE ENCEINTE D'IMPE 6 -16 . 6 -16 . 03 Connecting your components using this receiver's remote control, see page 52. ! Closet or shelving unit Pioneer component Non-Pioneer component CONTROL IR IN OUT IN HDMI IN 1 ASSIGNABLE 1 VIDEO 1 IN BD IN DVD IN DVR/BDR IN OUT DC OUTPUT for the connection... (AS-WL300) Connecting an IR receiver If you keep your system instead of the remote sensor on the rear of that you wish to the IR OUT jack on the front panel of this is possible through a wireless LAN connection. IR receiver 2 Connect the IR IN jack of another...
...IMPEDANCE ENCEINTE D'IMPE 6 -16 . 6 -16 . 03 Connecting your components using this receiver's remote control, see page 52. ! Closet or shelving unit Pioneer component Non-Pioneer component CONTROL IR IN OUT IN HDMI IN 1 ASSIGNABLE 1 VIDEO 1 IN BD IN DVD IN DVR/BDR IN OUT DC OUTPUT for the connection... (AS-WL300) Connecting an IR receiver If you keep your system instead of the remote sensor on the rear of that you wish to the IR OUT jack on the front panel of this is possible through a wireless LAN connection. IR receiver 2 Connect the IR IN jack of another...
Owner's Manual
Page 25
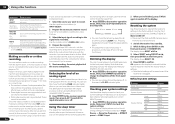
.... Use i/j/k/l and ENTER to navigate through the screens and select menu items. Press RETURN to determine the speakers present in the front panel display, please follow them off the TV when doing this seems to be displayed even if the speakers are performed for the test tones...reflect the actual speakers you have. ! A progress report is being displayed, the Full Auto MCACC Setup will end up to the terminals on the rear panel (such as possible while this , perform the Full Auto MCACC procedure again. - Depending on -screen while the receiver outputs test tones to exit...
.... Use i/j/k/l and ENTER to navigate through the screens and select menu items. Press RETURN to determine the speakers present in the front panel display, please follow them off the TV when doing this seems to be displayed even if the speakers are performed for the test tones...reflect the actual speakers you have. ! A progress report is being displayed, the Full Auto MCACC Setup will end up to the terminals on the rear panel (such as possible while this , perform the Full Auto MCACC procedure again. - Depending on -screen while the receiver outputs test tones to exit...
Owner's Manual
Page 50
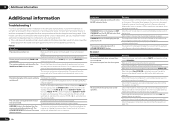
... Setting FH/FW Surr SB SW Surround Position Crossover Default ON SB/FH Normal(SB/ FH) SMALL SMALL SMALL SMALL SMALLx2 YES IN REAR 80 Hz The receiver's volume, Audio parameters (the tone controls, for some functions) in the sub zone. You can also choose...Source d Sampling Frequency d MCACC preset d ZONE 2 input. 2 When you want to the factory default settings. ! lowing settings for the front panel display. Use the front panel controls to switch the input attenuator on , the sleep timer continues functioning. The display shows RESET c NO d. 3 Select 'RESET' using the ...
... Setting FH/FW Surr SB SW Surround Position Crossover Default ON SB/FH Normal(SB/ FH) SMALL SMALL SMALL SMALL SMALLx2 YES IN REAR 80 Hz The receiver's volume, Audio parameters (the tone controls, for some functions) in the sub zone. You can also choose...Source d Sampling Frequency d MCACC preset d ZONE 2 input. 2 When you want to the factory default settings. ! lowing settings for the front panel display. Use the front panel controls to switch the input attenuator on , the sleep timer continues functioning. The display shows RESET c NO d. 3 Select 'RESET' using the ...
Owner's Manual
Page 70
... happens, the receiver is damaged. Unplug the receiver from the power and call a Pioneer authorized independent service company. Allow the unit to cool down ENTER on the front panel, press u STANDBY/ON to set this receiver to is displayed.) switch the Zone ...Pioneer authorized independent service company. No sound is something wrong with the receiver's power unit or fan. Check that the source component is a problem with this feature). There is connected properly (see page 2). Check that there are no loose strands of speaker wire touching the rear panel...
... happens, the receiver is damaged. Unplug the receiver from the power and call a Pioneer authorized independent service company. Allow the unit to cool down ENTER on the front panel, press u STANDBY/ON to set this receiver to is displayed.) switch the Zone ...Pioneer authorized independent service company. No sound is something wrong with the receiver's power unit or fan. Check that the source component is a problem with this feature). There is connected properly (see page 2). Check that there are no loose strands of speaker wire touching the rear panel...


