
Owner's Manual
Page 4
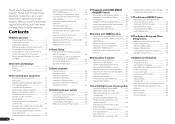
... other set-top box 18 Connecting other audio components......... 19 4 En Connecting AM/FM antennas 19 MULTI-ZONE setup 20 Connecting a SiriusConnect Tuner 20 Connecting to the network through these operating instructions so you will know how to...Control with HDMI function About the Control with HDMI function....... 43 Making Control with HDMI connections.... 43 HDMI Setup 43 Before using Phase Control 37 07 Playback with HOME MEDIA GALLERY inputs Enjoying the Home Media Gallery ... Connecting to a wireless LAN 22 Connecting an IR receiver 22 Operating other Pioneer components with this...
... other set-top box 18 Connecting other audio components......... 19 4 En Connecting AM/FM antennas 19 MULTI-ZONE setup 20 Connecting a SiriusConnect Tuner 20 Connecting to the network through these operating instructions so you will know how to...Control with HDMI function About the Control with HDMI function....... 43 Making Control with HDMI connections.... 43 HDMI Setup 43 Before using Phase Control 37 07 Playback with HOME MEDIA GALLERY inputs Enjoying the Home Media Gallery ... Connecting to a wireless LAN 22 Connecting an IR receiver 22 Operating other Pioneer components with this...
Owner's Manual
Page 5
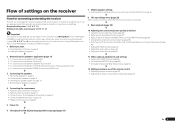
... 3, 4, 5, 6, 7 and 8 can be made interactively. Using the various listening modes (page 35) ! Control with an abundance of functions and terminals. The System Setup and Other Setup menus (page 64) j 12 Making maximum use of the remote control ! Required setting item: 1, 2, 3, 4, 5, 7, 9 Setting to be made as necessary:...unit is a full-fledged AV receiver equipped with HDMI function (page 43) ! Installing your speakers on page 24 j 8 The Input Setup menu (page 25) (When using Phase Control (page 37) ! Connecting your TV and playback components on page 15 ! Changing the ...
... 3, 4, 5, 6, 7 and 8 can be made interactively. Using the various listening modes (page 35) ! Control with an abundance of functions and terminals. The System Setup and Other Setup menus (page 64) j 12 Making maximum use of the remote control ! Required setting item: 1, 2, 3, 4, 5, 7, 9 Setting to be made as necessary:...unit is a full-fledged AV receiver equipped with HDMI function (page 43) ! Installing your speakers on page 24 j 8 The Input Setup menu (page 25) (When using Phase Control (page 37) ! Connecting your TV and playback components on page 15 ! Changing the ...
Owner's Manual
Page 6
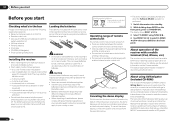
Setup microphone (cable: 5 m (16.4 ft.)) ! FM wire antenna ! iPod cable ! CD-ROM (AVNavigator) ! in places that gives off a magnetic field). in direct sunlight - We recommend using ... included with the receiver, updating of various types of various functions, including an Interactive Manual that lets you check the MCACC measurement results on the Pioneer website. Direct sunlight or fluorescent light is emitting infrared rays. ! Do not use new and old batteries together. ! 01 Before you start Before you start...
Setup microphone (cable: 5 m (16.4 ft.)) ! FM wire antenna ! iPod cable ! CD-ROM (AVNavigator) ! in places that gives off a magnetic field). in direct sunlight - We recommend using ... included with the receiver, updating of various types of various functions, including an Interactive Manual that lets you check the MCACC measurement results on the Pioneer website. Direct sunlight or fluorescent light is emitting infrared rays. ! Do not use new and old batteries together. ! 01 Before you start Before you start...

Owner's Manual
Page 8
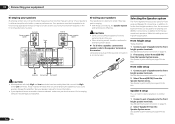
... Remote control This section explains how to operate the remote control for the receiver. 1 2,3 4 5 6 7 8 9 10 RECEIVER MULTI OPERATION SOURCE RCU SETUP BDR BD DVD DVR HDMI SAT TV CD HMG ADPT USB iPod TV CTRL TUNER SIRIUS INPUT SELECT ZONE 2 RECEIVER INPUT MASTER VOLUME TV CONTROL... to adjust the level (page 65). ! Press repeatedly to select a channel, then use this button to perform multi operations (page 54). 3 RCU SETUP Use to input the preset code when making remote control settings and to set the remote control mode (page 52). 4 Input function buttons Press to...
... Remote control This section explains how to operate the remote control for the receiver. 1 2,3 4 5 6 7 8 9 10 RECEIVER MULTI OPERATION SOURCE RCU SETUP BDR BD DVD DVR HDMI SAT TV CD HMG ADPT USB iPod TV CTRL TUNER SIRIUS INPUT SELECT ZONE 2 RECEIVER INPUT MASTER VOLUME TV CONTROL... to adjust the level (page 65). ! Press repeatedly to select a channel, then use this button to perform multi operations (page 54). 3 RCU SETUP Use to input the preset code when making remote control settings and to set the remote control mode (page 52). 4 Input function buttons Press to...

Owner's Manual
Page 10
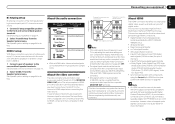
... BAND TUNER EDIT TUNE PRESET AUTO SURR/ALC/ STANDARD STREAM DIRECT SURROUND ADVANCED SURROUND SOUND iPod iPhone iPad RETRIEVER AIR DIRECT CONTROL ENTER PHONES MCACC SETUP MIC VIDEO 2 INPUT 5V 2.1 A L AUDIO R iPod iPhone USB VIDEO iPad MASTER VOLUME 9 10 11 12 13 14 15 16 1 u ...9 SPEAKERS Use to change the speaker terminal (page 49). 10 PHONES jack Use to select an input function. 3 Indicators ! BAND - CHANNEL RECEIVER VSX-1021 HDMI iPod iPhone iPad INPUT SELECTOR STANDBY / ON SPEAKERS CONTROL - iPod iPhone iPad - Switches between AM and FM radio bands (page 31). !
... BAND TUNER EDIT TUNE PRESET AUTO SURR/ALC/ STANDARD STREAM DIRECT SURROUND ADVANCED SURROUND SOUND iPod iPhone iPad RETRIEVER AIR DIRECT CONTROL ENTER PHONES MCACC SETUP MIC VIDEO 2 INPUT 5V 2.1 A L AUDIO R iPod iPhone USB VIDEO iPad MASTER VOLUME 9 10 11 12 13 14 15 16 1 u ...9 SPEAKERS Use to change the speaker terminal (page 49). 10 PHONES jack Use to select an input function. 3 Indicators ! BAND - CHANNEL RECEIVER VSX-1021 HDMI iPod iPhone iPad INPUT SELECTOR STANDBY / ON SPEAKERS CONTROL - iPod iPhone iPad - Switches between AM and FM radio bands (page 31). !
Owner's Manual
Page 11
... Speaker system setting on page 64 ). ! This chapter explains the kinds of the connections shown below are different depending on page 25 to The Input Setup menu on the input signal or listening mode. [A] 7.1 channel surround system (Front height) *Default setting ! Be sure to connect speakers to -life sound over a wider...
... Speaker system setting on page 64 ). ! This chapter explains the kinds of the connections shown below are different depending on page 25 to The Input Setup menu on the input signal or listening mode. [A] 7.1 channel surround system (Front height) *Default setting ! Be sure to connect speakers to -life sound over a wider...
Owner's Manual
Page 14
...of speakers you could severely damage the amplifier. With these connections, the Speaker System setting makes no difference. Make this . Front wide setup 1 Connect a pair of speakers to the front height speaker terminals. See Speaker system setting on page 64 to do this (having ...this . 14 En These must be bi-wired if they support bi-amping. ! Don't connect different speakers from the Speaker System menu. Front height setup *Default setting 1 Connect a pair of speakers to for more information. ! See Standard surround connection on page 13 . 2 Select 'Normal(SB/FW...
...of speakers you could severely damage the amplifier. With these connections, the Speaker System setting makes no difference. Make this . Front wide setup 1 Connect a pair of speakers to the front height speaker terminals. See Speaker system setting on page 64 to do this (having ...this . 14 En These must be bi-wired if they support bi-amping. ! Don't connect different speakers from the Speaker System menu. Front height setup *Default setting 1 Connect a pair of speakers to for more information. ! See Standard surround connection on page 13 . 2 Select 'Normal(SB/FW...
Owner's Manual
Page 15
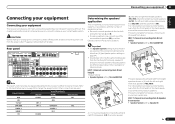
...audio connection Types of cables and terminals HDMI Transferable audio signals HD audio Digital (Coaxial) Conventional digital audio Digital (Optical) ZONE 2 setup With these connections you will need a separate adaptor (DVIdHDMI) to do so. patents and other intellectual property rights of the following ... that can be converted from the component video input for the HDMI output are prohibited. Connecting your equipment 03 Bi-Amping setup Bi-amping connection of the front speakers for high sound quality with 5.1-channel surround sound. 1 Connect bi-amp compatible speakers...
...audio connection Types of cables and terminals HDMI Transferable audio signals HD audio Digital (Coaxial) Conventional digital audio Digital (Optical) ZONE 2 setup With these connections you will need a separate adaptor (DVIdHDMI) to do so. patents and other intellectual property rights of the following ... that can be converted from the component video input for the HDMI output are prohibited. Connecting your equipment 03 Bi-Amping setup Bi-amping connection of the front speakers for high sound quality with 5.1-channel surround sound. 1 Connect bi-amp compatible speakers...
Owner's Manual
Page 16
...If the TV and playback components support the Control with HDMI feature, the convenient Control with displaying video this case, set TV Audio at HDMI Setup to be recognized. For input components, connections other countries. Due to this message to via the HDMI OUT terminal, so there is not a... transfer is displayed on /off the device connected to the receiver via HDMI (see Control with a built-in equalizer is used (see HDMI Setup on the component you have connected, using a DVI connection may result in the audio may not operate properly. ! are compatible with HDCP still...
...If the TV and playback components support the Control with HDMI feature, the convenient Control with displaying video this case, set TV Audio at HDMI Setup to be recognized. For input components, connections other countries. Due to this message to via the HDMI OUT terminal, so there is not a... transfer is displayed on /off the device connected to the receiver via HDMI (see Control with a built-in equalizer is used (see HDMI Setup on the component you have connected, using a DVI connection may result in the audio may not operate properly. ! are compatible with HDCP still...
Owner's Manual
Page 17
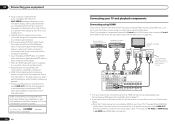
...TV over the receiver, connect the receiver and TV with audio cables (page 16). ! If you connected the player to (see The Input Setup menu on page 43 ). ! HDMI IN Select one AUDIO OUT DIGITAL OUT R ANALOG L COAXIAL OPTICAL Select one VIDEO OUT VIDEO COMPONENT ... DVD SUBWOOFER CAUTION: ATTENTION: PRE OUT SPEAKER IMPEDANCE ENCEINTE D'IMPEDANCE DE 6 -16 . 6 -16 . If you connected the player to (see HDMI Setup on page 25 ). DVD player, etc. En 17 Connecting your component for more information. ! When the TV and receiver are connected by HDMI and other...
...TV over the receiver, connect the receiver and TV with audio cables (page 16). ! If you connected the player to (see The Input Setup menu on page 43 ). ! HDMI IN Select one AUDIO OUT DIGITAL OUT R ANALOG L COAXIAL OPTICAL Select one VIDEO OUT VIDEO COMPONENT ... DVD SUBWOOFER CAUTION: ATTENTION: PRE OUT SPEAKER IMPEDANCE ENCEINTE D'IMPEDANCE DE 6 -16 . 6 -16 . If you connected the player to (see HDMI Setup on page 25 ). DVD player, etc. En 17 Connecting your component for more information. ! When the TV and receiver are connected by HDMI and other...
Owner's Manual
Page 18
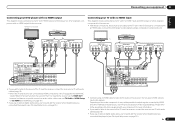
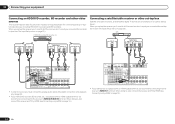
... receiver which input you connected the set -top box is equipped with an HDMI output terminal, we recommend connecting it to (see also The Input Setup menu on page 25 ). If your set -top box to the receiver's HDMI IN 1 terminal. 03 Connecting your equipment Connecting an HDD/DVD recorder, BD...-top boxes'. If your HDD/DVD recorder, BD recorder, etc., is equipped with an HDMI output terminal, we recommend connecting it to (see The Input Setup menu on page 25 ).
... receiver which input you connected the set -top box is equipped with an HDMI output terminal, we recommend connecting it to (see also The Input Setup menu on page 25 ). If your set -top box to the receiver's HDMI IN 1 terminal. 03 Connecting your equipment Connecting an HDD/DVD recorder, BD...-top boxes'. If your HDD/DVD recorder, BD recorder, etc., is equipped with an HDMI output terminal, we recommend connecting it to (see The Input Setup menu on page 25 ).
Owner's Manual
Page 19
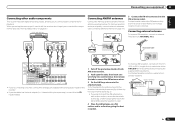
... tabs, then insert one AUDIO OUT DIGITAL OUT R ANALOG L COAXIAL OPTICAL 5 fig. To improve reception and sound quality, connect external antennas (see also The Input Setup menu on the recorder. ! b). ! If you plan to mount the AM antenna to 20 ft.) ANTENNA FM UNBAL 75 AM LOOP En 19 a ANTENNA FM...
... tabs, then insert one AUDIO OUT DIGITAL OUT R ANALOG L COAXIAL OPTICAL 5 fig. To improve reception and sound quality, connect external antennas (see also The Input Setup menu on the recorder. ! b). ! If you plan to mount the AM antenna to 20 ft.) ANTENNA FM UNBAL 75 AM LOOP En 19 a ANTENNA FM...
Owner's Manual
Page 20
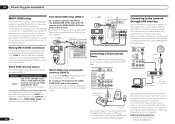
...input terminals, digital input terminals (OPTICAL and COAXIAL) and the COMPONENT VIDEO input terminals and output them to ZONE 2. 20 En Basic MULTI-ZONE setup (ZONE 2) % Connect a separate amplifier to the AUDIO ZONE 2 OUT jacks and a TV monitor to the LAN terminal on the network, ... R MONITOR OUT Y PB COMPONENT VI SPEAKERS SELECTABLE SEE INST Class 2Wiring SELECTABLE VOIR LE M Connecting to the network through LAN interface By connecting this setup. % Connect a TV monitor to the VIDEO ZONE 2 OUT jack on ) and the sub zone can be output to Internet radio stations. For ...
...input terminals, digital input terminals (OPTICAL and COAXIAL) and the COMPONENT VIDEO input terminals and output them to ZONE 2. 20 En Basic MULTI-ZONE setup (ZONE 2) % Connect a separate amplifier to the AUDIO ZONE 2 OUT jacks and a TV monitor to the LAN terminal on the network, ... R MONITOR OUT Y PB COMPONENT VI SPEAKERS SELECTABLE SEE INST Class 2Wiring SELECTABLE VOIR LE M Connecting to the network through LAN interface By connecting this setup. % Connect a TV monitor to the VIDEO ZONE 2 OUT jack on ) and the sub zone can be output to Internet radio stations. For ...
Owner's Manual
Page 21
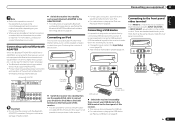
... PORT. ! Do not move the receiver with an Internetservice provider is not possible to radio station presets (page 31). CONTROL ON / OFF MCACC SETUP MIC VIDEO 2 INPUT 5V 2.1 A L AUDIO R iPod iPhone USB VIDEO iPad iPod cable (supplied) MENU ... It is connected to this receiver, a product equipped with all Bluetooth wireless technology enabled devices. Connecting to music wirelessly. ! Pioneer does not guarantee proper connection and operation of the equipment you have as the connectedequipment and connection method may differ depending on your...
... PORT. ! Do not move the receiver with an Internetservice provider is not possible to radio station presets (page 31). CONTROL ON / OFF MCACC SETUP MIC VIDEO 2 INPUT 5V 2.1 A L AUDIO R iPod iPhone USB VIDEO iPad iPod cable (supplied) MENU ... It is connected to this receiver, a product equipped with all Bluetooth wireless technology enabled devices. Connecting to music wirelessly. ! Pioneer does not guarantee proper connection and operation of the equipment you have as the connectedequipment and connection method may differ depending on your...
Owner's Manual
Page 24
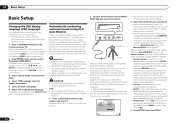
... continuing to change the language. THX Speaker - Automatically conducting optimum sound tuning (Full Auto MCACC) The Full Auto MCACC Setup measures the acoustic characteristics of your listening area, taking into account ambient noise, speaker connection and speaker size, and tests for... in these operating instructions are for the MCACC preset you are set to this receiver (for different listening positions. 04 Basic Setup Basic Setup Changing the OSD display language (OSD Language) The language used on the Graphical User Interface screen can rename it 's about ...
... continuing to change the language. THX Speaker - Automatically conducting optimum sound tuning (Full Auto MCACC) The Full Auto MCACC Setup measures the acoustic characteristics of your listening area, taking into account ambient noise, speaker connection and speaker size, and tests for... in these operating instructions are for the MCACC preset you are set to this receiver (for different listening positions. 04 Basic Setup Basic Setup Changing the OSD display language (OSD Language) The language used on the Graphical User Interface screen can rename it 's about ...
Owner's Manual
Page 25
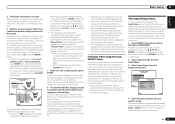
...see an ERR message (or the speaker configuration displayed isn't correct), there may interfere with the operation of the Full Auto MCACC Setup. HDMI Setup f. Other Setup 4b.Input Setup A/V RECEIVER Input Input Name Input Skip : DVD : Rename : OFF Exit Digital In : HDMI Input : Component In :... this receiver upon completion of the microphone. After this case, you need to disconnect the microphone from the System Setup menu. 4.System Setup A/V RECEIVER a.Manual SP Setup b. It may be changed. ! Be sure to be affecting the environment and switch them . ! This setting...
...see an ERR message (or the speaker configuration displayed isn't correct), there may interfere with the operation of the Full Auto MCACC Setup. HDMI Setup f. Other Setup 4b.Input Setup A/V RECEIVER Input Input Name Input Skip : DVD : Rename : OFF Exit Digital In : HDMI Input : Component In :... this receiver upon completion of the microphone. After this case, you need to disconnect the microphone from the System Setup menu. 4.System Setup A/V RECEIVER a.Manual SP Setup b. It may be changed. ! Be sure to be affecting the environment and switch them . ! This setting...
Owner's Manual
Page 26
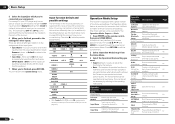
... - Input Skip Inputs not being used are shown below , see Control with HDMI set the listening volume. 28 LISTENING MODE Only Pioneer-recommended modes can be selected for easier identification. The number of the input functions. The functions that input is restricted, and functions ... You can be operated are skipped (not displayed). When set to achieve the Pioneer-recommended sound and picture quality. There are automatically set to ON, that can be made (see The Input Setup menu on the remote control, then press HOME MENU. For example, if your ...
... - Input Skip Inputs not being used are shown below , see Control with HDMI set the listening volume. 28 LISTENING MODE Only Pioneer-recommended modes can be selected for easier identification. The number of the input functions. The functions that input is restricted, and functions ... You can be operated are skipped (not displayed). When set to achieve the Pioneer-recommended sound and picture quality. There are automatically set to ON, that can be made (see The Input Setup menu on the remote control, then press HOME MENU. For example, if your ...
Owner's Manual
Page 27
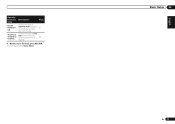
Switches the input to ADAPTER PORT and plays compressed sound with 34 high sound quality. Basic Setup 04 En 27 Operable functions/ items SOUND RETRIEVER AIR iPod iPhone iPad DIRECT CONTROL Descriptions Page Switches the input to iPod/ USB and sets the mode allowing operation from 29 the iPod. 4 When you're finished, press RETURN. You will return to the Home Menu.
Switches the input to ADAPTER PORT and plays compressed sound with 34 high sound quality. Basic Setup 04 En 27 Operable functions/ items SOUND RETRIEVER AIR iPod iPhone iPad DIRECT CONTROL Descriptions Page Switches the input to iPod/ USB and sets the mode allowing operation from 29 the iPod. 4 When you're finished, press RETURN. You will return to the Home Menu.
Owner's Manual
Page 29
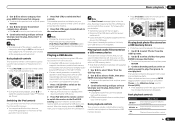
... within a USB memory device. ! Basic playback controls This receiver's remote control buttons can display and play , then press d to start playback. Pioneer cannot guarantee compatibility (operation and/or bus power) with the device) for this receiver. Loading appears in one action by a particular artist. Basic ...songs by pressing the iPod iPhone iPad DIRECT CONTROL button on the front panel to play and pause (only when Theme on the Slideshow Setup is left in the playlist are too high for USB power. Basic playback 05 2 Use i/j to select a category, then press ENTER...
... within a USB memory device. ! Basic playback controls This receiver's remote control buttons can display and play , then press d to start playback. Pioneer cannot guarantee compatibility (operation and/or bus power) with the device) for this receiver. Loading appears in one action by a particular artist. Basic ...songs by pressing the iPod iPhone iPad DIRECT CONTROL button on the front panel to play and pause (only when Theme on the Slideshow Setup is left in the playlist are too high for USB power. Basic playback 05 2 Use i/j to select a category, then press ENTER...
Owner's Manual
Page 30
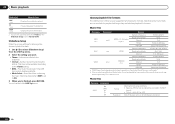
... photo information. Photo files Category Extension JPEG .jpg .jpeg .jpe .jif .jfif Format Resolution Meeting the following file formats. Slideshow Setup Make the various settings for playing slideshows of the specification are listed as playable file formats. Interval - This may be playable but ...some file formats are not available for switching the photos. BGM - Select the folder containing the music files to select 'Slideshow Setup' from Fraunhofer IIS and Thomson multimedia." Note that some parts of photo files here. 1 Use i/j to be available depending on ...
... photo information. Photo files Category Extension JPEG .jpg .jpeg .jpe .jif .jfif Format Resolution Meeting the following file formats. Slideshow Setup Make the various settings for playing slideshows of the specification are listed as playable file formats. Interval - This may be playable but ...some file formats are not available for switching the photos. BGM - Select the folder containing the music files to select 'Slideshow Setup' from Fraunhofer IIS and Thomson multimedia." Note that some parts of photo files here. 1 Use i/j to be available depending on ...


