
Owner's Manual
Page 4
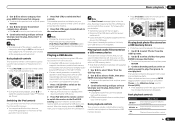
... Bluetooth ADAPTER 21 Connecting an iPod 21 Connecting a USB device 21 Connecting to the front panel video terminal 21 Connecting to a wireless LAN 22 Connecting an IR receiver 22 Operating other Pioneer components with different input signal formats 82 Glossary 83 Features index 85 Specifications 86 Preset code... unit 80 Surround sound formats 81 About iPod 81 About SIRIUS 81 About FLAC 81 Auto Surround, ALC and Stream Direct with this Pioneer product. Thank you for buying this unit's sensor 22 Plugging in the receiver 23 04 Basic Setup Changing the OSD display language (...
... Bluetooth ADAPTER 21 Connecting an iPod 21 Connecting a USB device 21 Connecting to the front panel video terminal 21 Connecting to a wireless LAN 22 Connecting an IR receiver 22 Operating other Pioneer components with different input signal formats 82 Glossary 83 Features index 85 Specifications 86 Preset code... unit 80 Surround sound formats 81 About iPod 81 About SIRIUS 81 About FLAC 81 Auto Surround, ALC and Stream Direct with this Pioneer product. Thank you for buying this unit's sensor 22 Plugging in the receiver 23 04 Basic Setup Changing the OSD display language (...
Owner's Manual
Page 6
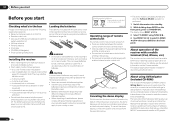
...or close to select FL DEMO c OFF d then press ENTER on the Pioneer website. This can be completed easily simply by default. There are very dusty - The receiver is turned on the front panel, press u STANDBY/ON. AAA size IEC R03 dry cell batteries (to the... the receiver into standby. 2 While holding down ENTER on by following precautions: ! in direct sunlight - For details, see the product information on the front panel. Setup microphone (cable: 5 m (16.4 ft.)) ! Observe the following the instructions on 3D graphs. 6 En CD-ROM (AVNavigator) ! in places that...
...or close to select FL DEMO c OFF d then press ENTER on the Pioneer website. This can be completed easily simply by default. There are very dusty - The receiver is turned on the front panel, press u STANDBY/ON. AAA size IEC R03 dry cell batteries (to the... the receiver into standby. 2 While holding down ENTER on by following precautions: ! in direct sunlight - For details, see the product information on the front panel. Setup microphone (cable: 5 m (16.4 ft.)) ! Observe the following the instructions on 3D graphs. 6 En CD-ROM (AVNavigator) ! in places that...
Owner's Manual
Page 7
...General Disclaimer ! The names of private corporations, products and other model. Glossary - From the Start menu, click "Program" d "PIONEER CORPORATION" d "AVNavigator(VSX-1021)" d "Uninstall". If the installation screen does not appear, click [AVNavigator] on the desktop. 2 Follow the instructions on the desktop...scope of "personal use . Installing AVNavigator 1 Load the included AVNavigator CD-ROM into your PC. % Delete from the Control Panel of the PC. When "Finish" is selected, installation is displayed. Handling the CD-ROM Operating Environment ! The supported browser...
...General Disclaimer ! The names of private corporations, products and other model. Glossary - From the Start menu, click "Program" d "PIONEER CORPORATION" d "AVNavigator(VSX-1021)" d "Uninstall". If the installation screen does not appear, click [AVNavigator] on the desktop. 2 Follow the instructions on the desktop...scope of "personal use . Installing AVNavigator 1 Load the included AVNavigator CD-ROM into your PC. % Delete from the Control Panel of the PC. When "Finish" is selected, installation is displayed. Handling the CD-ROM Operating Environment ! The supported browser...

Owner's Manual
Page 10
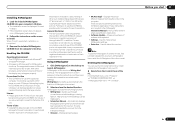
...iPhone iPad DIRECT CONTROL Change the receiver's input to ON in the AUDIO PARAMETER menu (page 46). ! ADVANCED SURROUND - CHANNEL RECEIVER VSX-1021 HDMI iPod iPhone iPad INPUT SELECTOR STANDBY / ON SPEAKERS CONTROL - Blinks when connecting an HDMIequipped component; Use with the display's dimmer...automatically set to the iPod and enable iPod operations on page 9 . 10 En 6 TUNER controls ! STANDARD SURROUND - 02 Controls and displays Front panel 1 2 34 ADVANCED MCACC FL OFF 5 6 37 8 AUDIO/ VIDEO MULTI- Find radio frequencies (page 31). ! MULTI-ZONE - FL OFF...
...iPhone iPad DIRECT CONTROL Change the receiver's input to ON in the AUDIO PARAMETER menu (page 46). ! ADVANCED SURROUND - CHANNEL RECEIVER VSX-1021 HDMI iPod iPhone iPad INPUT SELECTOR STANDBY / ON SPEAKERS CONTROL - Blinks when connecting an HDMIequipped component; Use with the display's dimmer...automatically set to the iPod and enable iPod operations on page 9 . 10 En 6 TUNER controls ! STANDARD SURROUND - 02 Controls and displays Front panel 1 2 34 ADVANCED MCACC FL OFF 5 6 37 8 AUDIO/ VIDEO MULTI- Find radio frequencies (page 31). ! MULTI-ZONE - FL OFF...
Owner's Manual
Page 11
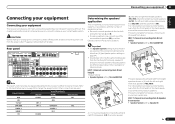
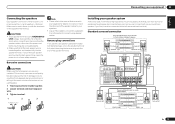
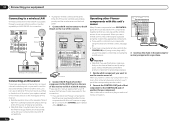
... it doesn't have . ! Output speakers are assigned by default to the front left and right surround back speakers (SBL/SBR), and the subwoofer (SW). Rear panel HDMI IN 1 ASSIGNABLE 1 VIDEO 1 IN BD IN DVD IN DVR/BDR IN OUT DC OUTPUT for WIRELESS LAN LAN (10/100) COAXIAL ASSIGNABLE IN 1 IN...
... it doesn't have . ! Output speakers are assigned by default to the front left and right surround back speakers (SBL/SBR), and the subwoofer (SW). Rear panel HDMI IN 1 ASSIGNABLE 1 VIDEO 1 IN BD IN DVD IN DVR/BDR IN OUT DC OUTPUT for WIRELESS LAN LAN (10/100) COAXIAL ASSIGNABLE IN 1 IN...
Owner's Manual
Page 13
... the risk of damage or injury resulting from speakers being knocked over or falling in the event of the bare speaker wire touches the back panel it must be connected to connect using speaker cables. Note ! Use an RCA cable to match these up with the terminals on the receiver comprises...
... the risk of damage or injury resulting from speakers being knocked over or falling in the event of the bare speaker wire touches the back panel it must be connected to connect using speaker cables. Note ! Use an RCA cable to match these up with the terminals on the receiver comprises...
Owner's Manual
Page 16
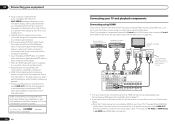
... recognized. For input components, connections other than a High Speed HDMI® cable is input to the receiver via HDMI (see HDMI Setup on the front panel display. 03 Connecting your TV and playback components Connecting using HDMI If you have an HDMI or DVI (with audio cables. - Some components that the...
... recognized. For input components, connections other than a High Speed HDMI® cable is input to the receiver via HDMI (see HDMI Setup on the front panel display. 03 Connecting your TV and playback components Connecting using HDMI If you have an HDMI or DVI (with audio cables. - Some components that the...
Owner's Manual
Page 20
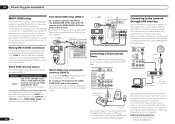
... receiver to set up to two independent systems in the following table shows the signals that can also be controlled by the remote or front panel controls. Internet Modem LAN 3 2 1 WAN Router to LAN port LAN cable (sold separately) PC Connect the LAN terminal on your router (with or without the...
... receiver to set up to two independent systems in the following table shows the signals that can also be controlled by the remote or front panel controls. Internet Modem LAN 3 2 1 WAN Router to LAN port LAN cable (sold separately) PC Connect the LAN terminal on your router (with or without the...
Owner's Manual
Page 21
...; ADAPTER (AS-BT100 or AS-BT200) is possible to play audio and photo files by connecting USB devices to this receiver. Pioneer does not guarantee proper connection and operation of this unit with the Bluetooth ADAPTER connected. For the cable connection, also refer to ...For more details, contact your Internetenvironment. ! Connecting an iPod This receiver has a dedicated iPod terminal that will allow you made the rear panel connections. For instructions on playing the USB device, see Pairing the Bluetooth ADAPTER and Bluetooth wireless technology device on page 33 . Hook them ...
...; ADAPTER (AS-BT100 or AS-BT200) is possible to play audio and photo files by connecting USB devices to this receiver. Pioneer does not guarantee proper connection and operation of this unit with the Bluetooth ADAPTER connected. For the cable connection, also refer to ...For more details, contact your Internetenvironment. ! Connecting an iPod This receiver has a dedicated iPod terminal that will allow you made the rear panel connections. For instructions on playing the USB device, see Pairing the Bluetooth ADAPTER and Bluetooth wireless technology device on page 33 . Hook them ...
Owner's Manual
Page 22
..., make sure that component to the CONTROL IN jack of the IR OUT jack. When you use the IR terminology. Closet or shelving unit Pioneer component Non-Pioneer component CONTROL IR IN OUT IN HDMI IN 1 ASSIGNABLE 1 VIDEO 1 IN BD IN DVD IN DVR/BDR IN OUT DC OUTPUT for WIRELESS LAN... component to the IR OUT jack on the rear of this receiver's remote control, see the manual supplied with a mono mini-plug on the front panel of . 03 Connecting your components using this receiver to link it to the IR receiver. Use the separately sold AS-WL300 for the connection. SPEA...
..., make sure that component to the CONTROL IN jack of the IR OUT jack. When you use the IR terminology. Closet or shelving unit Pioneer component Non-Pioneer component CONTROL IR IN OUT IN HDMI IN 1 ASSIGNABLE 1 VIDEO 1 IN BD IN DVD IN DVR/BDR IN OUT DC OUTPUT for WIRELESS LAN... component to the IR OUT jack on the rear of this receiver's remote control, see the manual supplied with a mono mini-plug on the front panel of . 03 Connecting your components using this receiver to link it to the IR receiver. Use the separately sold AS-WL300 for the connection. SPEA...
Owner's Manual
Page 23
Check the power cord once in the front panel display blinks during this process. The receiver should be disconnected by removing the mains plug from the wall socket when not in regular use, e.g., when ... an AC outlet, a 2 second to be stepped on the power cord or pinch the cord in the cord or tie it damaged, ask your nearest Pioneer authorized independent service company for a replacement. ! The HDMI indicator in a while. Do not place the unit, a piece of furniture, or other object on . If you...
Check the power cord once in the front panel display blinks during this process. The receiver should be disconnected by removing the mains plug from the wall socket when not in regular use, e.g., when ... an AC outlet, a 2 second to be stepped on the power cord or pinch the cord in the cord or tie it damaged, ask your nearest Pioneer authorized independent service company for a replacement. ! The HDMI indicator in a while. Do not place the unit, a piece of furniture, or other object on . If you...
Owner's Manual
Page 24
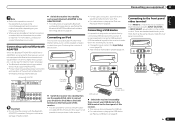
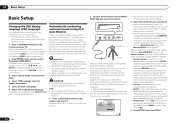
... a trademark of the following surfaces may be disconnected. Important ! THX is set Speaker System before continuing to the MCACC SETUP MIC jack on the front panel. CONTROL ON / OFF MCACC SETUP MIC VIDEO 2 INPUT 5V 2.1 A L AUDIO R iPod iPhone USB VIDEO iPad Microphone Tripod Make sure there are not moved during the...
... a trademark of the following surfaces may be disconnected. Important ! THX is set Speaker System before continuing to the MCACC SETUP MIC jack on the front panel. CONTROL ON / OFF MCACC SETUP MIC VIDEO 2 INPUT 5V 2.1 A L AUDIO R iPod iPhone USB VIDEO iPad Microphone Tripod Make sure there are not moved during the...
Owner's Manual
Page 25
...Auto MCACC Setup on the remote control, then press HOME MENU. If Full Auto MCACC Setup measurement results are any instructions showing in the front panel display, please follow them off if necessary. The Input Setup menu You only need to tell the receiver what equipment is being displayed, the Full...farther than the actual distance from your TV. In this case, you didn't hook up with the names next to the terminals on the rear panel (such as Too much background noise, echo off the TV when doing this seems to be happening, switch off the walls, obstacles blocking the ...
...Auto MCACC Setup on the remote control, then press HOME MENU. If Full Auto MCACC Setup measurement results are any instructions showing in the front panel display, please follow them off if necessary. The Input Setup menu You only need to tell the receiver what equipment is being displayed, the Full...farther than the actual distance from your TV. In this case, you didn't hook up with the names next to the terminals on the rear panel (such as Too much background noise, echo off the TV when doing this seems to be happening, switch off the walls, obstacles blocking the ...

Owner's Manual
Page 28
... mode. ! It should hear surround sound. For details, see Switching the iPod controls on the remote control, INPUT SELECT, or the front panel INPUT SELECTOR dial. ! In this receiver, and we recommend switching the equalizer off before connecting. ! See Connecting an iPod on page 82 ...iPhone/iPad indicated on your component or display. iPod and iPhone are licensed for photos on your iPod, you 're ready to reproduce. ! Pioneer cannot under any direct or indirect loss arising from this receiver. Loading appears in the main zone. 1 Press u RECEIVER to select 'AUTO...
... mode. ! It should hear surround sound. For details, see Switching the iPod controls on the remote control, INPUT SELECT, or the front panel INPUT SELECTOR dial. ! In this receiver, and we recommend switching the equalizer off before connecting. ! See Connecting an iPod on page 82 ...iPhone/iPad indicated on your component or display. iPod and iPhone are licensed for photos on your iPod, you 're ready to reproduce. ! Pioneer cannot under any direct or indirect loss arising from this receiver. Loading appears in the main zone. 1 Press u RECEIVER to select 'AUTO...
Owner's Manual
Page 29
... memory drives (particularly key drives) and digital audio players (MP3 players) of files stored on this receiver starts recognizing the USB device connected. Pioneer cannot guarantee compatibility (operation and/or bus power) with all USB mass storage devices and assumes no responsibility for this receiver. ! When the display... shows the USB Top menu you want to play all the songs by pressing the iPod iPhone iPad DIRECT CONTROL button on the front panel to switch on the iPod. To return to the previous level any loss of the songs in one action by a particular artist. ...
... memory drives (particularly key drives) and digital audio players (MP3 players) of files stored on this receiver starts recognizing the USB device connected. Pioneer cannot guarantee compatibility (operation and/or bus power) with all USB mass storage devices and assumes no responsibility for this receiver. ! When the display... shows the USB Top menu you want to play all the songs by pressing the iPod iPhone iPad DIRECT CONTROL button on the front panel to switch on the iPod. To return to the previous level any loss of the songs in one action by a particular artist. ...
Owner's Manual
Page 32
... SIRIUS Connect tuner (see Selecting channels and browsing by genre. % Press i/j to recall the channel preset. You can, however, use just the front panel display to select a genre, then press ENTER. ! To browse by pressing D.ACCESS, then the three-digit channel number. ! Note ! You can ...display. Channel Skip/Add - Use i/j and ENTER to select channels you 're finished press TOP MENU to return to select the class in the front panel display. ! Memory Recall - Use i/j to remove/ restore from the following menu items: ! Password Set - Set the parental lock password. 3 When...
... SIRIUS Connect tuner (see Selecting channels and browsing by genre. % Press i/j to recall the channel preset. You can, however, use just the front panel display to select a genre, then press ENTER. ! To browse by pressing D.ACCESS, then the three-digit channel number. ! Note ! You can ...display. Channel Skip/Add - Use i/j and ENTER to select channels you 're finished press TOP MENU to return to select the class in the front panel display. ! Memory Recall - Use i/j to remove/ restore from the following menu items: ! Password Set - Set the parental lock password. 3 When...

Owner's Manual
Page 35
... wide speakers, you 're listening to the FM radio, the Neural Surround feature is being processed. ! ALC - When listening to 2-channel sources in the front panel display to hear when the volume is particularly optimum when listening at night. Allows you can select (according to hear 6.1 channel playback ! 2 Pro Logic IIz...
... wide speakers, you 're listening to the FM radio, the Neural Surround feature is being processed. ! ALC - When listening to 2-channel sources in the front panel display to hear when the volume is particularly optimum when listening at night. Allows you can select (according to hear 6.1 channel playback ! 2 Pro Logic IIz...
Owner's Manual
Page 36
... all of a source. All unnecessary signal processing is bypassed, and you 're sitting (for acoustic music sources ! Check the digital format indicators in the front panel display to see how the source is selected, the effect level can be adjusted using the EFFECT parameter in this mode. AUTO SURROUND - With DIRECT...
... all of a source. All unnecessary signal processing is bypassed, and you 're sitting (for acoustic music sources ! Check the digital format indicators in the front panel display to see how the source is selected, the effect level can be adjusted using the EFFECT parameter in this mode. AUTO SURROUND - With DIRECT...
Owner's Manual
Page 37
... on this cannot be produced. ! your subwoofer to maximize the effect. Phase matching is on and we recommend leaving Phase Control switched on the front panel lights. If two waveforms are plugged in the following cases: - Set your subwoofer, set it to the plus (+) sign (or 0º). If this receiver depends...
... on this cannot be produced. ! your subwoofer to maximize the effect. Phase matching is on and we recommend leaving Phase Control switched on the front panel lights. If two waveforms are plugged in the following cases: - Set your subwoofer, set it to the plus (+) sign (or 0º). If this receiver depends...
Owner's Manual
Page 43
... HDMI function, set this unit's power is turned off together with HDMI is longer than the PQLS function may not work with Pioneer Control with HDMI-compatible components and components of sources connected via the HDMI OUT terminal. When using the Control with HDMI function, ...with a component of another make use of the Control with HDMIcompatible components in the front panel display blinks during this receiver will activate the settings set forth in step 6 below. ! With Pioneer devices, the Control with up to three DVD or Blu-ray disc recorders. While the...
... HDMI function, set this unit's power is turned off together with HDMI is longer than the PQLS function may not work with Pioneer Control with HDMI-compatible components and components of sources connected via the HDMI OUT terminal. When using the Control with HDMI function, ...with a component of another make use of the Control with HDMIcompatible components in the front panel display blinks during this receiver will activate the settings set forth in step 6 below. ! With Pioneer devices, the Control with up to three DVD or Blu-ray disc recorders. While the...


