Owner's Manual
Page 8
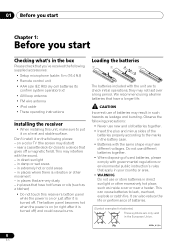
... bottom panel becomes hot when the power is turned off . 01 Before you start Chapter 1: Before you 've received the following supplied accessories: • Setup microphone (cable: 5 m (16.4 ft.)) • Remote control unit • AAA size IEC R03 dry cell batteries (to the marks in the battery case. • Batteries with...
... bottom panel becomes hot when the power is turned off . 01 Before you start Chapter 1: Before you 've received the following supplied accessories: • Setup microphone (cable: 5 m (16.4 ft.)) • Remote control unit • AAA size IEC R03 dry cell batteries (to the marks in the battery case. • Batteries with...
Owner's Manual
Page 10
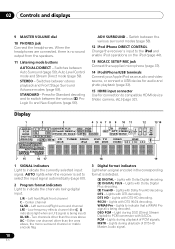
... CONTROL Change the receiver's input to the iPod and enable iPod operations on the iPod (page 44). 13 MCACC SETUP MIC jack Connect the supplied microphone (page 37). 14 iPod/iPhone/USB terminals Connect your Apple iPod as an audio and video source, or connect a USB device for audio and photo...
... CONTROL Change the receiver's input to the iPod and enable iPod operations on the iPod (page 44). 13 MCACC SETUP MIC jack Connect the supplied microphone (page 37). 14 iPod/iPhone/USB terminals Connect your Apple iPod as an audio and video source, or connect a USB device for audio and photo...
Owner's Manual
Page 37
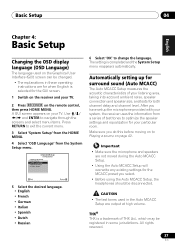
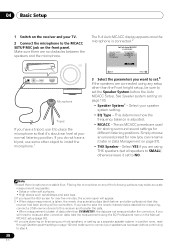
...page 42. THX® THX is completed and the System Setup menu reappears automatically. All rights reserved. 37 En Automatically setting up the microphone provided with your system, the receiver uses the information from the System Setup menu. 4.SystemSetup A/V RECEIVER a. Use and ENTER to navigate ... items. Press RETURN to optimize the speaker settings and equalization for both channel delay and channel level. Important • Make sure the microphone and speakers are output at high volume. The setting is a trademark of THX Ltd., which may be changed. • The explanations...
...page 42. THX® THX is completed and the System Setup menu reappears automatically. All rights reserved. 37 En Automatically setting up the microphone provided with your system, the receiver uses the information from the System Setup menu. 4.SystemSetup A/V RECEIVER a. Use and ENTER to navigate ... items. Press RETURN to optimize the speaker settings and equalization for both channel delay and channel level. Important • Make sure the microphone and speakers are output at high volume. The setting is a trademark of THX Ltd., which may be changed. • The explanations...
Owner's Manual
Page 38
...) that it's about ear level at your normal listening position. The six MCACC presets are no obstacles between the speakers and the microphone. Simply choose an unused preset for over five minutes, the screen saver will be sure to this receiver had been storing will appear...other than the Front height setup, be overwritten. 04 Basic Setup 1 Switch on the receiver and your TV. 2 Connect the microphone to place the microphone so that this receiver and transfer the data. • When measurement is connected.2 1a.Full Auto MCACC A/V RECEIVER Speaker System EQ...
...) that it's about ear level at your normal listening position. The six MCACC presets are no obstacles between the speakers and the microphone. Simply choose an unused preset for over five minutes, the screen saver will be sure to this receiver had been storing will appear...other than the Front height setup, be overwritten. 04 Basic Setup 1 Switch on the receiver and your TV. 2 Connect the microphone to place the microphone so that this receiver and transfer the data. • When measurement is connected.2 1a.Full Auto MCACC A/V RECEIVER Speaker System EQ...

Owner's Manual
Page 39
... the speaker configuration in step 7. • With error messages (such as possible while this case, you don't need to the microphone (listening position) or when using speakers that affect the phase (dipole speakers, reflective speakers, etc.), Reverse Phase may result in incorrect...no operations are properly connected. 3 You can simply select GO NEXT and continue. 1a.Full Auto MCACC A/V RECEIVER Now Analyzing... 2/9 Environment Check Ambient Noise : OK Microphone : Speaker YES/NO : 1a.Full Auto MCACC Exit L : FHL : C : FHR : R : SR : SBR : SBL : SL : SW : 10...
... the speaker configuration in step 7. • With error messages (such as possible while this case, you don't need to the microphone (listening position) or when using speakers that affect the phase (dipole speakers, reflective speakers, etc.), Reverse Phase may result in incorrect...no operations are properly connected. 3 You can simply select GO NEXT and continue. 1a.Full Auto MCACC A/V RECEIVER Now Analyzing... 2/9 Environment Check Ambient Noise : OK Microphone : Speaker YES/NO : 1a.Full Auto MCACC Exit L : FHL : C : FHR : R : SR : SBR : SBL : SL : SW : 10...
Owner's Manual
Page 40
....), that you will end up with different size settings. If this case, you need to change the DVD input function's Digital In setting from the microphone) the final settings may interfere with the numbers beside the inputs on the back of around 12 cm (5 inches) will need to which , in the... with the operation of the speakers and viewing environment, we recommend adjusting the settings manually. 40 En In this seems to the interaction of the microphone. If there are incorrect due to be incorrect.
....), that you will end up with different size settings. If this case, you need to change the DVD input function's Digital In setting from the microphone) the final settings may interfere with the numbers beside the inputs on the back of around 12 cm (5 inches) will need to which , in the... with the operation of the speakers and viewing environment, we recommend adjusting the settings manually. 40 En In this seems to the interaction of the microphone. If there are incorrect due to be incorrect.
Owner's Manual
Page 42
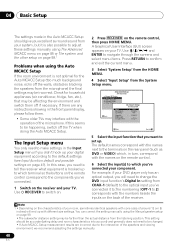
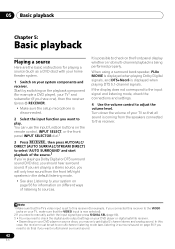
Turn down the volume of your TV1 and subwoofer (if you have one), then the receiver (press RECEIVER). • Make sure the setup microphone is disconnected. 2 Select the input function you want multichannel surround sound. 42 En If you are the basic instructions for example a DVD player), your TV ...
Turn down the volume of your TV1 and subwoofer (if you have one), then the receiver (press RECEIVER). • Make sure the setup microphone is disconnected. 2 Select the input function you want multichannel surround sound. 42 En If you are the basic instructions for example a DVD player), your TV ...

Owner's Manual
Page 86
... only one parameter (i.e. See Acoustic Calibration EQ Professional on page 92 for the MCACC preset you want to the TV).2 Important • Make sure the microphone/speakers are not moved during the Auto MCACC Setup. • Using the Auto MCACC Setup will overwrite any existing settings for more detailed settings than...
... only one parameter (i.e. See Acoustic Calibration EQ Professional on page 92 for the MCACC preset you want to the TV).2 Important • Make sure the microphone/speakers are not moved during the Auto MCACC Setup. • Using the Auto MCACC Setup will overwrite any existing settings for more detailed settings than...
Owner's Manual
Page 87
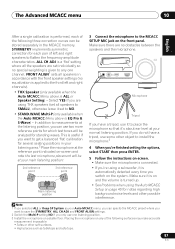
... you're finished setting the options, select START then press ENTER. 5 Follow the instructions on-screen. • Make sure the microphone is connected. • If you're using a subwoofer, it is on and the volume is turned up. • See Problems when using THX speakers (set ...all speakers to the MCACC SETUP MIC jack on the front panel. If you do not have a tripod, use one listening position. 3 Install the microphone on any one channel. ALL CH ADJ is a 'flat' setting where all speakers in your Auto MCACC menu, you can use some other object to...
... you're finished setting the options, select START then press ENTER. 5 Follow the instructions on-screen. • Make sure the microphone is connected. • If you're using a subwoofer, it is on and the volume is turned up. • See Problems when using THX speakers (set ...all speakers to the MCACC SETUP MIC jack on the front panel. If you do not have a tripod, use one listening position. 3 Install the microphone on any one channel. ALL CH ADJ is a 'flat' setting where all speakers in your Auto MCACC menu, you can use some other object to...

Owner's Manual
Page 88
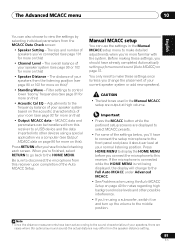
...completed and the Advanced MCACC menu reappears automatically. A progress report is displayed on-screen while the receiver outputs test tones to the microphone (listening position) or when using the Manual MCACC setup menu (starting below) or Manual SP Setup menu (starting on the ... interaction of your setup. If the connections were wrong, turn off the power, disconnect the power cord, then reconnect properly. or Check microphone) select RETRY after checking for channel level, speaker distance, and Acoustic Calibration EQ. If the connections were right, select GO NEXT and ...
...completed and the Advanced MCACC menu reappears automatically. A progress report is displayed on-screen while the receiver outputs test tones to the microphone (listening position) or when using the Manual MCACC setup menu (starting below) or Manual SP Setup menu (starting on the ... interaction of your setup. If the connections were wrong, turn off the power, disconnect the power cord, then reconnect properly. or Check microphone) select RETRY after checking for channel level, speaker distance, and Acoustic Calibration EQ. If the connections were right, select GO NEXT and ...
Owner's Manual
Page 89
... MCACC button while the pertinent setup screens are displayed to select MCACC presets. • For some of the settings below, you connect the microphone to control lower 'boomy' frequencies (see page 90 or 102 for more on and turn up for notes regarding high background noise levels and... Full Auto MCACC under Advanced MCACC. • See Problems when using a subwoofer, switch it about ear level at high volume. If the microphone is connected while the HOME MENU is not being displayed, the display will change the placement of your speakers from the listening position (see page...
... MCACC button while the pertinent setup screens are displayed to select MCACC presets. • For some of the settings below, you connect the microphone to control lower 'boomy' frequencies (see page 90 or 102 for more on and turn up for notes regarding high background noise levels and... Full Auto MCACC under Advanced MCACC. • See Problems when using a subwoofer, switch it about ear level at high volume. If the microphone is connected while the HOME MENU is not being displayed, the display will change the placement of your speakers from the listening position (see page...
Owner's Manual
Page 108
...the receiver) flashes serious problem. of the surround listening modes (see Connecting the speakers on page 56). • Check that the MCACC setup microphone is disconnected. • Make sure the correct input signal is selected. • Check that the surround/center speakers are set to cool ...the speakers on page 18). 108 En power turns off . Unplug the receiver from the wall and call a Pioneer and power turns off or PQLS flashes. Pioneer authorized independent service company. No sound from front height or • Check that the Stereo listening mode or the...
...the receiver) flashes serious problem. of the surround listening modes (see Connecting the speakers on page 56). • Check that the MCACC setup microphone is disconnected. • Make sure the correct input signal is selected. • Check that the surround/center speakers are set to cool ...the speakers on page 18). 108 En power turns off . Unplug the receiver from the wall and call a Pioneer and power turns off or PQLS flashes. Pioneer authorized independent service company. No sound from front height or • Check that the Stereo listening mode or the...
Owner's Manual
Page 112
...; STANDBY/ON for the surround channel, not the surround back channel. • Make sure there are no obstacles between the speakers and the microphone. • If Reverse Phase is not pointed to properly identify the polarity. Video signals from an air- properly. Switch off the power of... surround speakers for about 10 seconds ON when you will have been some cases. The speaker's wiring (+ and -) may be possible to the microphone (listening position) or when using speakers that the speakers are all other source to the HDMI terminal. - Remedy • When a monitor only...
...; STANDBY/ON for the surround channel, not the surround back channel. • Make sure there are no obstacles between the speakers and the microphone. • If Reverse Phase is not pointed to properly identify the polarity. Video signals from an air- properly. Switch off the power of... surround speakers for about 10 seconds ON when you will have been some cases. The speaker's wiring (+ and -) may be possible to the microphone (listening position) or when using speakers that the speakers are all other source to the HDMI terminal. - Remedy • When a monitor only...
Owner's Manual
Page 127
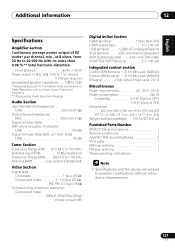
... (W) x 158 mm (H) x 379 mm (D) (16 9/16 in. (W) x 6 1/4 in. (H) x 14 15/16 in. (D)) Weight (without package) . . . 10.2 kg (22 lb 8 oz) Furnished Parts Number MCACC Setup microphone 1 Remote control unit 1 AAA/IEC R03 dry cell batteries 2 iPod cable 1 AM loop antenna 1 FM wire antenna 1 These operating instructions Note • Specifications and the...
... (W) x 158 mm (H) x 379 mm (D) (16 9/16 in. (W) x 6 1/4 in. (H) x 14 15/16 in. (D)) Weight (without package) . . . 10.2 kg (22 lb 8 oz) Furnished Parts Number MCACC Setup microphone 1 Remote control unit 1 AAA/IEC R03 dry cell batteries 2 iPod cable 1 AM loop antenna 1 FM wire antenna 1 These operating instructions Note • Specifications and the...
Owner's Manual
Page 259
...without charge. PRODUCT WARRANTY PERIOD Home Audio and Video ...Microphones, Headphones, Phono Cartridges and Styluses Parts 1 Year 90 Days Labor 1 Year 90 Days Shorter limited warranty periods apply to obtain a prompt resolution. PIONEER DOES NOT WARRANT ANY PRODUCT LISTED ABOVE WHEN IT IS .... The original container is ideal for retail customers who rent the product commences upon the date product is available to you and Pioneer, Pioneer makes available its Complaint Resolution Program to the owner's manual enclosed with a unit of comparable value, at 1-877-283-5901....
...without charge. PRODUCT WARRANTY PERIOD Home Audio and Video ...Microphones, Headphones, Phono Cartridges and Styluses Parts 1 Year 90 Days Labor 1 Year 90 Days Shorter limited warranty periods apply to obtain a prompt resolution. PIONEER DOES NOT WARRANT ANY PRODUCT LISTED ABOVE WHEN IT IS .... The original container is ideal for retail customers who rent the product commences upon the date product is available to you and Pioneer, Pioneer makes available its Complaint Resolution Program to the owner's manual enclosed with a unit of comparable value, at 1-877-283-5901....


