Owner's Manual
Page 4
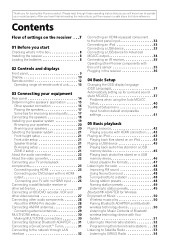
...an iPod 33 Connecting a USB device 33 Connecting a USB device for Advanced MCACC output 34 Connecting an IR receiver 35 Operating other Pioneer components with this Pioneer product. Thank you have finished reading the instructions, put them away in a safe place for future reference. After you for buying... instructions so you start Checking what's in the receiver 36 04 Basic Setup Changing the OSD display language (OSD Language 37 Automatically setting up for surround sound (Auto MCACC 37 Problems when using the Auto MCACC Setup 40 The Input Setup menu 40 Input function default...
...an iPod 33 Connecting a USB device 33 Connecting a USB device for Advanced MCACC output 34 Connecting an IR receiver 35 Operating other Pioneer components with this Pioneer product. Thank you have finished reading the instructions, put them away in a safe place for future reference. After you for buying... instructions so you start Checking what's in the receiver 36 04 Basic Setup Changing the OSD display language (OSD Language 37 Automatically setting up for surround sound (Auto MCACC 37 Problems when using the Auto MCACC Setup 40 The Input Setup menu 40 Input function default...
Owner's Manual
Page 5
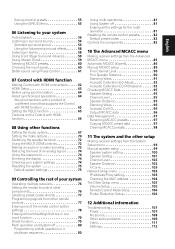
... components 76 Selecting preset codes directly 77 Programming signals from other remote controls 77 Erasing one of the remote control button settings 78 Erasing all learnt settings that are in one input function 79 Direct function 79 Multi operation and System off 80 Programming a Multi operation or... a shutdown sequence 80 Using multi operations 81 Using System off 81 Erasing all the settings for the multioperation 81 Resetting the remote control presets 82 Default preset codes 82 Controls the components 82 10 The Advanced MCACC menu...
... components 76 Selecting preset codes directly 77 Programming signals from other remote controls 77 Erasing one of the remote control button settings 78 Erasing all learnt settings that are in one input function 79 Direct function 79 Multi operation and System off 80 Programming a Multi operation or... a shutdown sequence 80 Using multi operations 81 Using System off 81 Erasing all the settings for the multioperation 81 Resetting the remote control presets 82 Default preset codes 82 Controls the components 82 10 The Advanced MCACC menu...
Owner's Manual
Page 7
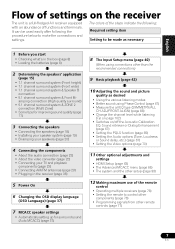
...receiver (page 36) 5 Power On 6 Changing the OSD display language (OSD Language) (page 37) 7 MCACC speaker settings • Automatically setting up for surround sound (Auto MCACC) (page 37) 8 The Input Setup menu (page 40) (When using connections other than the recommended...or Dialog Enhancement (page 67) • Setting the PQLS function (page 65) • Setting the Audio options (Tone, Loudness or Sound delay, etc.) (page 67) • Setting the Video options (page 70) 11 Other optional adjustments and settings • HDMI Setup (page 63) •...
...receiver (page 36) 5 Power On 6 Changing the OSD display language (OSD Language) (page 37) 7 MCACC speaker settings • Automatically setting up for surround sound (Auto MCACC) (page 37) 8 The Input Setup menu (page 40) (When using connections other than the recommended...or Dialog Enhancement (page 67) • Setting the PQLS function (page 65) • Setting the Audio options (Tone, Loudness or Sound delay, etc.) (page 67) • Setting the Video options (page 70) 11 Other optional adjustments and settings • HDMI Setup (page 63) •...
Owner's Manual
Page 9
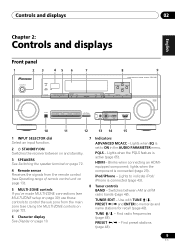
...and name stations for recall (page 48). Use with TUNE /, PRESET / and ENTER to indicate iPod/ iPhone is set to control the sub zone from the remote control (see Operating range of remote control unit on page 13). 5 MULTI-ZONE controls If you... menu. Lights when EQ is connected (page 43). 8 Tuner controls BAND - Find radio frequencies (page 48). PQLS - CHANNEL RECEIVER VSX-1020 TUNE PRESET PRESET TUNE TUNER EDIT ENTER MASTER VOLUME PHONES AUTO/ALC/DIRECT LISTENING MODE STEREO STANDARD ADV SURROUND iPod iPhone DIRECT CONTROL MCACC SETUP...
...and name stations for recall (page 48). Use with TUNE /, PRESET / and ENTER to indicate iPod/ iPhone is set to control the sub zone from the remote control (see Operating range of remote control unit on page 13). 5 MULTI-ZONE controls If you... menu. Lights when EQ is connected (page 43). 8 Tuner controls BAND - Find radio frequencies (page 48). PQLS - CHANNEL RECEIVER VSX-1020 TUNE PRESET PRESET TUNE TUNER EDIT ENTER MASTER VOLUME PHONES AUTO/ALC/DIRECT LISTENING MODE STEREO STANDARD ADV SURROUND iPod iPhone DIRECT CONTROL MCACC SETUP...
Owner's Manual
Page 10
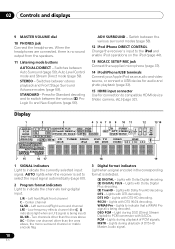
... - Lights with DTS-HD decoding. 96/24 - Lights during playback of DTS-HD Master Audio signal. 10 En When the headphones are connected, there is set to select the input signal automatically (page 60). 2 Program format indicators Light to switch between the various 2 Pro Logic IIx and Neo:6 options (page 56...
... - Lights with DTS-HD decoding. 96/24 - Lights during playback of DTS-HD Master Audio signal. 10 En When the headphones are connected, there is set to select the input signal automatically (page 60). 2 Program format indicators Light to switch between the various 2 Pro Logic IIx and Neo:6 options (page 56...
Owner's Manual
Page 11
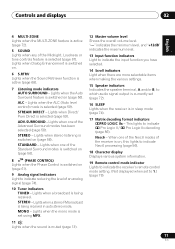
... function indicators Light to indicate the input function you have selected. 14 Scroll indicators Light when there are more selectable items when making the various settings. 15 Speaker indicators Indicates the speaker terminal, A and/or B, to 1.) (page 76) 11 En Neo:6 - STREAM DIRECT - Lights when one of ...Pure Direct is selected (page 59). Lights when the ALC (Auto level control) mode is selected (page 59). Lights when the mono mode is set (page 72). 16 SLEEP Lights when the receiver is switched on (page 56). Lights when Dialog Enhancement is switched on. 6 S.RTRV Lights when...
... function indicators Light to indicate the input function you have selected. 14 Scroll indicators Light when there are more selectable items when making the various settings. 15 Speaker indicators Indicates the speaker terminal, A and/or B, to 1.) (page 76) 11 En Neo:6 - STREAM DIRECT - Lights when one of ...Pure Direct is selected (page 59). Lights when the ALC (Auto level control) mode is selected (page 59). Lights when the mono mode is set (page 72). 16 SLEEP Lights when the receiver is switched on (page 56). Lights when Dialog Enhancement is switched on. 6 S.RTRV Lights when...
Owner's Manual
Page 12
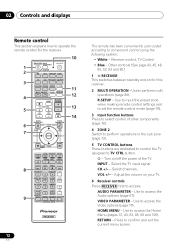
... remote has been conveniently color-coded according to access the Audio options (page 67). Use to input the preset code when making remote control settings and to set the remote control mode (page 76). 3 Input function buttons Press to select control of the TV. 02 Controls and displays Remote control This section...
... remote has been conveniently color-coded according to access the Audio options (page 67). Use to input the preset code when making remote control settings and to set the remote control mode (page 76). 3 Input function buttons Press to select control of the TV. 02 Controls and displays Remote control This section...
Owner's Manual
Page 13
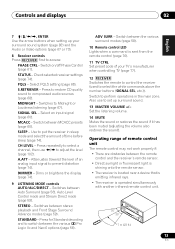
... restore CD quality sound to Midnight or Loudness listening (page 67). MCACC - ADV SURR - Switch to prevent distortion (page 74). Select PQLS setting (page 65). Switch between the remote control and the receiver's remote sensor. • Direct sunlight or fluorescent light is shining onto the remote ...ft.) 13 En STANDARD - Controls and displays 02 English Deutsch Français Italiano Nederlands Español 7 ENTER Use the arrow buttons when setting up surround sound. 13 MASTER VOLUME +/- Attenuates (lowers) the level of time before sleep (page 74). Use to put the receiver in ...
... restore CD quality sound to Midnight or Loudness listening (page 67). MCACC - ADV SURR - Switch to prevent distortion (page 74). Select PQLS setting (page 65). Switch between the remote control and the receiver's remote sensor. • Direct sunlight or fluorescent light is shining onto the remote ...ft.) 13 En STANDARD - Controls and displays 02 English Deutsch Français Italiano Nederlands Español 7 ENTER Use the arrow buttons when setting up surround sound. 13 MASTER VOLUME +/- Attenuates (lowers) the level of time before sleep (page 74). Use to put the receiver in ...

Owner's Manual
Page 15
... Plans [A] to [E] below. [A] 7.1 channel surround system (Front height) *Default setting • Speaker System setting: Normal(SB/FH) FHL FHR R L C SR SW [B] 7.1 channel surround system (Front wide) • Speaker System setting: Normal(SB/FW) L SW FWL SL R FWR C SR SBL SBR This ...).1 This surround system produces a true-to-life sound over a wider area. [C] 7.1 channel surround system & Speaker B connection • Speaker System setting: Speaker B SL SBR SBL R A 7.1 ch surround system connects the left and right front speakers (L/R), the center speaker (C), the left and right...
... Plans [A] to [E] below. [A] 7.1 channel surround system (Front height) *Default setting • Speaker System setting: Normal(SB/FH) FHL FHR R L C SR SW [B] 7.1 channel surround system (Front wide) • Speaker System setting: Normal(SB/FW) L SW FWL SL R FWR C SR SBL SBR This ...).1 This surround system produces a true-to-life sound over a wider area. [C] 7.1 channel surround system & Speaker B connection • Speaker System setting: Speaker B SL SBR SBL R A 7.1 ch surround system connects the left and right front speakers (L/R), the center speaker (C), the left and right...

Owner's Manual
Page 16
... 2 16 En Plan D Front Bi-Amp L SW R C SR SL [E] 5.1 channel surround system & ZONE 2 connection (Multi Zone) • Speaker System setting: ZONE 2 With these connections you have fewer than 5.1 speakers (except front left/right speakers). • When not connecting a subwoofer, connect speakers with stereo playback on...another component in ZONE 2 (The selection of input devices is limited.) Main zone R L C SW Important • The Speaker System setting must be made if you use any of the front speakers for surround sound (Auto MCACC) on page 37. Other speaker connection •...
... 2 16 En Plan D Front Bi-Amp L SW R C SR SL [E] 5.1 channel surround system & ZONE 2 connection (Multi Zone) • Speaker System setting: ZONE 2 With these connections you have fewer than 5.1 speakers (except front left/right speakers). • When not connecting a subwoofer, connect speakers with stereo playback on...another component in ZONE 2 (The selection of input devices is limited.) Main zone R L C SW Important • The Speaker System setting must be made if you use any of the front speakers for surround sound (Auto MCACC) on page 37. Other speaker connection •...

Owner's Manual
Page 19
... wide right Front wide left 19 En left Surround left Speaker B setting Speaker B - The front height terminals can also be used for the front wide and Speaker B. left Front right Center Subwoofer LINE LEVEL INPUT... PR SPEAKERS A Surround right The surround back terminals can also be used for Zone 2. 5.1 ch surround setting No connect No connect 6.1 ch surround setting No connect Surround back 7.1 ch surround setting Surround back right Surround back left ZONE 2 setting ZONE 2 - right Speaker B - right ZONE 2 - Note that your speaker system At the very ...
... wide right Front wide left 19 En left Surround left Speaker B setting Speaker B - The front height terminals can also be used for the front wide and Speaker B. left Front right Center Subwoofer LINE LEVEL INPUT... PR SPEAKERS A Surround right The surround back terminals can also be used for Zone 2. 5.1 ch surround setting No connect No connect 6.1 ch surround setting No connect Surround back 7.1 ch surround setting Surround back right Surround back left ZONE 2 setting ZONE 2 - right Speaker B - right ZONE 2 - Note that your speaker system At the very ...
Owner's Manual
Page 20
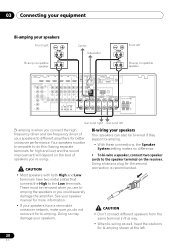
... be bi-ampable to the Low terminals. Your speakers must be bi-wired if they support bi-amping. • With these connections, the Speaker System setting makes no difference. • To bi-wire a speaker, connect two speaker cords to different amplifiers for bi-amping. See your speaker manual for more information...
... be bi-ampable to the Low terminals. Your speakers must be bi-wired if they support bi-amping. • With these connections, the Speaker System setting makes no difference. • To bi-wire a speaker, connect two speaker cords to different amplifiers for bi-amping. See your speaker manual for more information...
Owner's Manual
Page 21
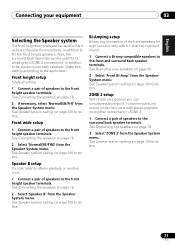
...terminals. See Connecting the speakers on page 18. 2 If necessary, select 'Normal(SB/FH)' from the Speaker System menu. See Speaker system setting on page 100 to do this . Also, the surround back terminals can be used for biamping and ZONE 2 connections, in the main zone ... . ZONE 2 setup With these connections you can simultaneously enjoy 5.1-channel surround sound in addition to for the surround back speakers. See Speaker system setting on another room. 1 Connect a pair of speakers to the surround back speaker terminals. Speaker B setup You can listen to stereo playback in...
...terminals. See Connecting the speakers on page 18. 2 If necessary, select 'Normal(SB/FH)' from the Speaker System menu. See Speaker system setting on page 100 to do this . Also, the surround back terminals can be used for biamping and ZONE 2 connections, in the main zone ... . ZONE 2 setup With these connections you can simultaneously enjoy 5.1-channel surround sound in addition to for the surround back speakers. See Speaker system setting on another room. 1 Connect a pair of speakers to the surround back speaker terminals. Speaker B setup You can listen to stereo playback in...
Owner's Manual
Page 22
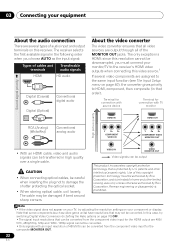
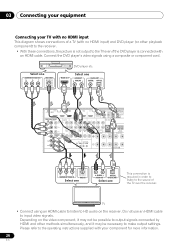
... terminals on this copyright protection technology must connect your monitor/TV to the receiver's HDMI video outputs when connecting this case, try adjusting the resolution settings on your component or display. CAUTION • When connecting optical cables, be damaged if bent around sharp corners. In this video source.1 If several types... are assigned to the same input function (see The Input Setup menu on page 40), the converter gives priority to HDMI, component, then composite (in Setting the Video options on page 70) OFF. • The signal input resolutions that order).
... terminals on this copyright protection technology must connect your monitor/TV to the receiver's HDMI video outputs when connecting this case, try adjusting the resolution settings on your component or display. CAUTION • When connecting optical cables, be damaged if bent around sharp corners. In this video source.1 If several types... are assigned to the same input function (see The Input Setup menu on page 40), the converter gives priority to HDMI, component, then composite (in Setting the Video options on page 70) OFF. • The signal input resolutions that order).
Owner's Manual
Page 26
... OUT PR PB Y VIDEO OUT DVD player etc. Depending on the receiver. TV • Connect using a composite or component cord. Please refer to make output settings.
... OUT PR PB Y VIDEO OUT DVD player etc. Depending on the receiver. TV • Connect using a composite or component cord. Please refer to make output settings.
Owner's Manual
Page 27
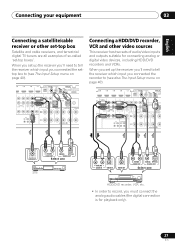
... L R AM LOOP FM UNBAL 75 SURROUND SURROU LR IR CONTROL IN OUT IN OUT SPEAKERS A Connecting a HDD/DVD recorder, VCR and other set-top box Satellite and cable receivers, and terrestrial digital TV tuners are all examples of audio/video inputs and outputs suitable for playback only). 27...ais Italiano Nederlands Español Connecting your equipment 03 Connecting a satellite/cable receiver or other video sources This receiver has two sets of so-called 'set up the receiver you'll need to tell the receiver which input you connected the settop box to record, you must connect ...
... L R AM LOOP FM UNBAL 75 SURROUND SURROU LR IR CONTROL IN OUT IN OUT SPEAKERS A Connecting a HDD/DVD recorder, VCR and other set-top box Satellite and cable receivers, and terrestrial digital TV tuners are all examples of audio/video inputs and outputs suitable for playback only). 27...ais Italiano Nederlands Español Connecting your equipment 03 Connecting a satellite/cable receiver or other video sources This receiver has two sets of so-called 'set up the receiver you'll need to tell the receiver which input you connected the settop box to record, you must connect ...
Owner's Manual
Page 28
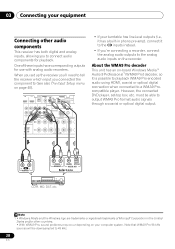
...you're connecting a recorder, connect the analog audio outputs to (see also The Input Setup menu on the recorder. However, the connected DVD player, set up the receiver you'll need to tell the receiver which input you to a WMA9 Procompatible player. One of Microsoft Corporation in phono pre-amp... WMA9 Pro-encoded audio using HDMI, coaxial or optical digital connection when connected to connect audio components for use with analog audio recorders. When you set -top box, etc. Note that WMA9 Pro 96 kHz sources will be able to 48 kHz. 28 En CONTROL IN OUT SPEAKERS A R REC L...
...you're connecting a recorder, connect the analog audio outputs to (see also The Input Setup menu on the recorder. However, the connected DVD player, set up the receiver you'll need to tell the receiver which input you to a WMA9 Procompatible player. One of Microsoft Corporation in phono pre-amp... WMA9 Pro-encoded audio using HDMI, coaxial or optical digital connection when connected to connect audio components for use with analog audio recorders. When you set -top box, etc. Note that WMA9 Pro 96 kHz sources will be able to 48 kHz. 28 En CONTROL IN OUT SPEAKERS A R REC L...
Owner's Manual
Page 30
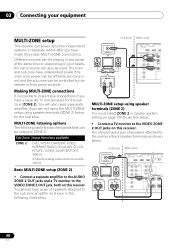
... will also need a separate amplifier if you are not using the MULTI-ZONE setup using speaker terminals (ZONE 2) You must select ZONE 2 in Speaker system setting on page 100 to use this setup. • Connect a TV monitor to the VIDEO ZONE 2 OUT jacks on your equipment MULTI-ZONE setup This receiver...
... will also need a separate amplifier if you are not using the MULTI-ZONE setup using speaker terminals (ZONE 2) You must select ZONE 2 in Speaker system setting on page 100 to use this setup. • Connect a TV monitor to the VIDEO ZONE 2 OUT jacks on your equipment MULTI-ZONE setup This receiver...
Owner's Manual
Page 32
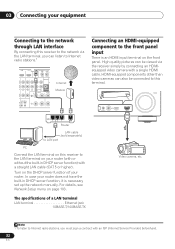
... IN CD IN R CD-R/TAPE OUT IN FRONT SUBWOOFER CENTE L Internet Modem Connecting an HDMI-equipped component to the front panel input There is necessary set up the network manually. Turn on page 103. Video camera, etc. For details, see Network Setup menu on the DHCP server function of a LAN terminal...
... IN CD IN R CD-R/TAPE OUT IN FRONT SUBWOOFER CENTE L Internet Modem Connecting an HDMI-equipped component to the front panel input There is necessary set up the network manually. Turn on page 103. Video camera, etc. For details, see Network Setup menu on the DHCP server function of a LAN terminal...

Owner's Manual
Page 35
...with your IR receiver for the type of cable necessary for grounding purposes. 1 Decide which component you want to link a Pioneer component to the IR receiver, see Setting the remote to control other components on page 76. • If you have at which you'll point the corresponding ...jack of another component to the IR OUT jack on the IR receiver remote sensor window. • Note that other Pioneer components with this unit's sensor Many Pioneer components have SR CONTROL jacks which can be able to control this receiver's remote control, see Operating other manufacturers may ...
...with your IR receiver for the type of cable necessary for grounding purposes. 1 Decide which component you want to link a Pioneer component to the IR receiver, see Setting the remote to control other components on page 76. • If you have at which you'll point the corresponding ...jack of another component to the IR OUT jack on the IR receiver remote sensor window. • Note that other Pioneer components with this unit's sensor Many Pioneer components have SR CONTROL jacks which can be able to control this receiver's remote control, see Operating other manufacturers may ...


